1. Introduction
Along with Windows and Linux clients, the QVD aims to provide desktop access to as many devices as possible. This document covers the QVD client for Android.
The app is available on Google Play https://play.google.com/store/apps/details?id=com.theqvd.android.client
Development has been sponsored by Qindel for use with QVD, a leading open source VDI solution. To find out more about QVD, please visit the website: http://theqvd.com
QVD is a highly scalable, cost effective, VDI solution built on top of Linux using NX technology and perl. Clients exist for both Windows and Linux, this document covers the Android client.
The main focus is to provide desktop access for large number of users with a very small footprint for each user session by:
-
Using the same OS image for all the users (using overlays)
-
Sharing memory between user processes (using LXC)
-
Using small bandwidth (using NX)
2. Installation
Installation is a two step process.
-
Install the app from Google Play and open it.
-
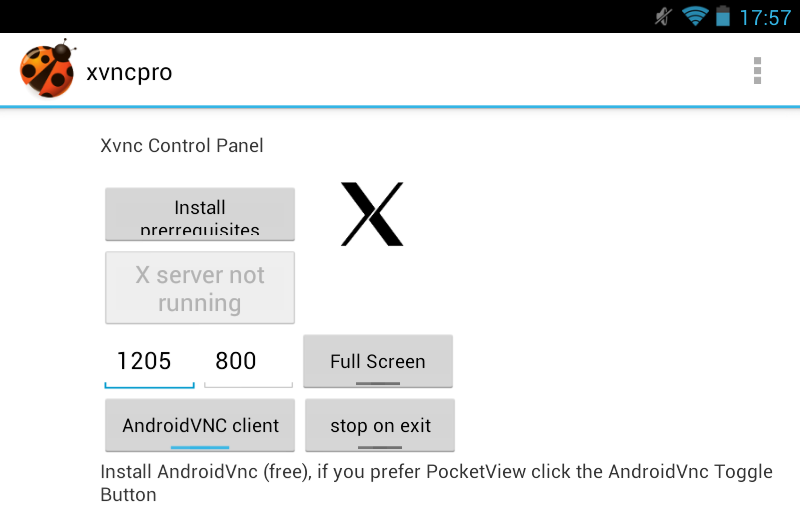
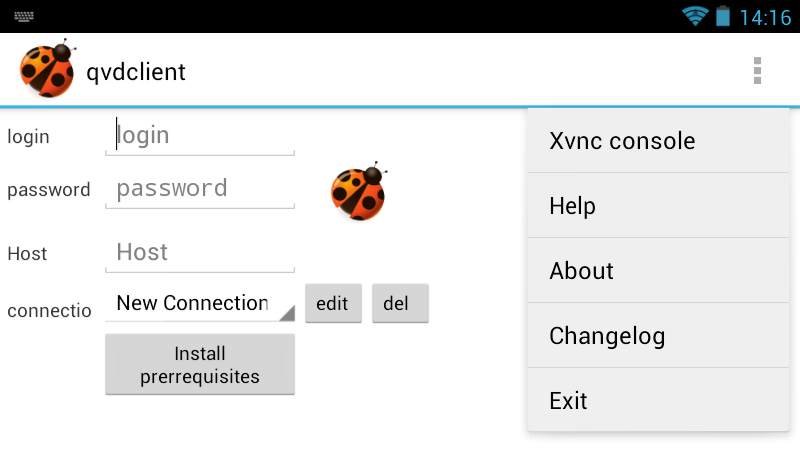
The QVD Android Client works in conjunction with a VNC server, the free AndroidVNC or the paid for PocketCloud Remote Desktop Pro. By default it will use the former which is included in the application. If you wish to use the (slightly better in our opinion but at a price) PocketCloud Remote Desktop Pro instead, select the back button on your device. You will now be presented with a toggle switch to select the desired VNC viewer. Do that, and again select Install Prerrequisites and you will be taken to the Google Play page of the selected viewer from where you can do the install. Once installed, go back the QVD Client. Additionally, Install Prerrequisites will install the Xvnc binary to the local storage. Note that this will also make available Xvnc Pro, free of charge. You should be able to find this in your application drawer after install.
3. Usage
3.1. Client Settings
-
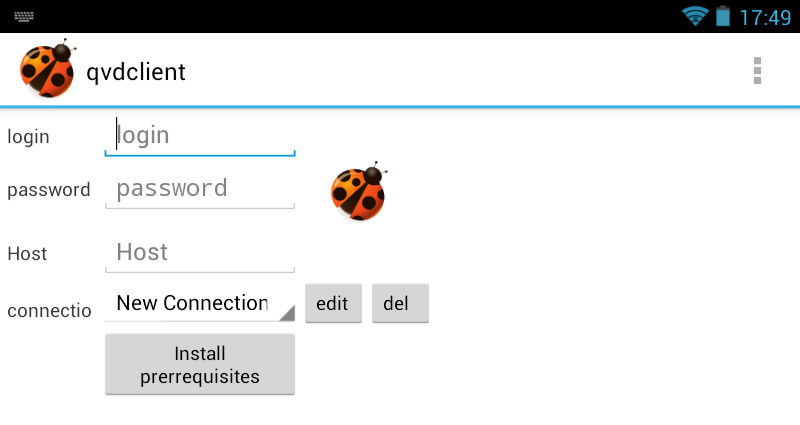
Open the QVD client by selecting the icon in Android.
-
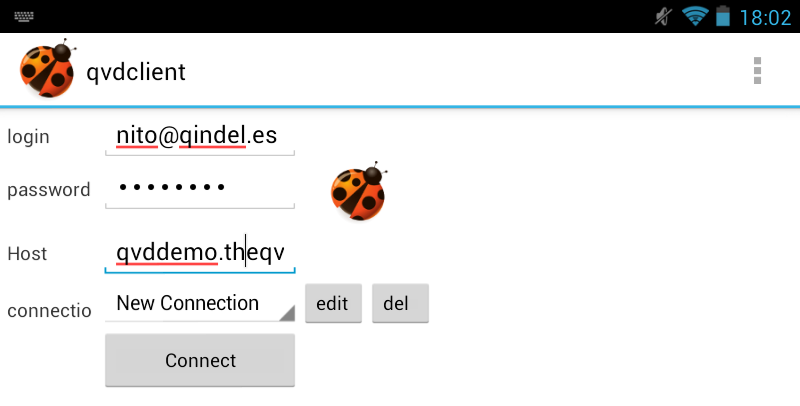
Enter the relevant username and password, along with the host name / ip address of your QVD instance. If this is your first time using the QVD client, you may wish to save your session details for later, or edit the settings. In this instance, select the Edit button. Note that here, too, is an option to delete any unwanted sessions.
-
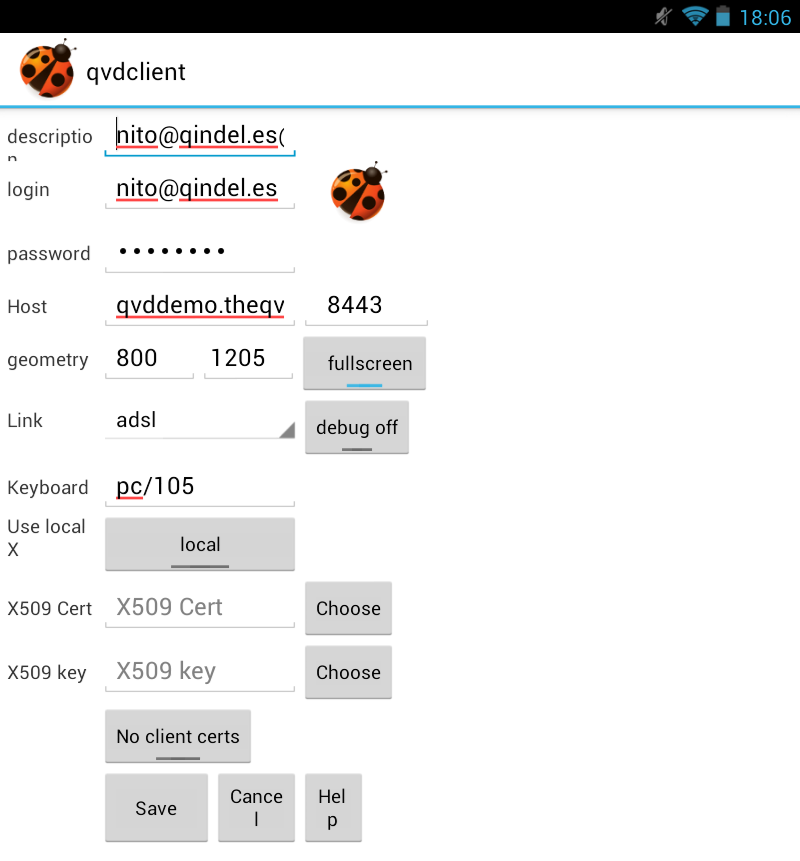
Give the session a description and optionally edit any of the settings. Most are self explanatory:
-
Login and password: your user credentials that have been set up in the QVD WAT or using the qvd-admin tool
-
Hostname: the host name or IP address of your QVD server
-
Port: this defaults to 8443 and unless you have changed it in your QVD setup, leave it as it is
-
Geometry: here you can enter the screen resolution. Optionally, select the fullscreen toggle which will ignore the geometry settings and try and maximise the session
-
Link: select the link that best describes your connection to the QVD server. ADSL is recommended if you are not on the same local network as the server
-
Debug: This option increases verbosity to the adb log which may provide assistance in the event of problems
-
Keyboard: This defaults to pc/105 (European layout) and can be changed as necessary
-
Use local X: this defaults to the bundled Xvnc Pro server. If you select generic it will use the x11://localhost:6000 intent, allowing you to select an alternative X server
-
X509 Cert and Key: If you have set up QVD to authenticate by public key, you may choose them here. QVD client will offer to install the Open Intents file manager if it is not available
-
No client certs: this toggle gives you the option to enable and disable the use of client certificates. By default it is off
-
Free XVnc Pro - w00t!
-
Once you are happy with the settings, press Save. If you have already modified the settings for this host, it will ask you to confirm an overwrite, do so if this is your intention. Finally, back in the main screen, click Connect which should now present you with your desktop in your Android device.

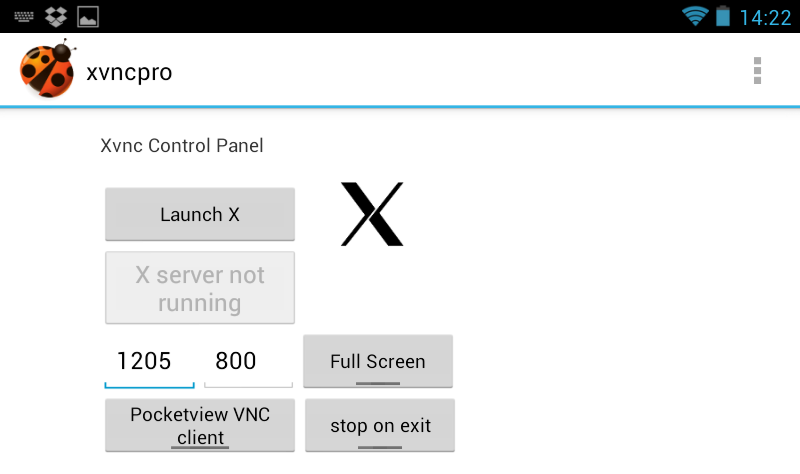
3.2. Additional Settings
In addtion to the connection screen, and the connection editing screen, QVD client for Android provides an additional menu for Xvnc settings, as well as Help, About, Changelog, and Exit options. Since the latter four options are pretty self explanatory, we will only cover the Xvnc console in this guide.
-
Launch X: This does exactly what it says and launches an instance of the X server and provides an option to stop the same
-
Full Screen: The X server will use the full screen of the device. If it’s toggled to Force X Params, it will use the parameters in the adjoining boxes (width and height)
-
There is an option to toggle the desired VNC viewer, so if you wish to change from the one you chose initially, you may do so here
-
Finally, there is a stop on exit toggle button, which will optionally close the X server when you exit the QVD client. Generally this is desirable behaviour.
3.3. Notifications
QVD Client uses the Android notifications system to keep you informed of the status of the connection. As show below, the connection is currently waiting for the server to bring up the host desktop, and the X server is currently up and running. If you click on the X11 notification you get to the Display, if you click on the qvd icon you get to the console. If a session is active it allows you to connect to the Xvnc session.
4. Uninstall
To uninstall, you will need to go to the Applications > Manage applications in Settings (on devices running Android 4.0 and greater, Settings > Apps), and remove the device through the provided interface.
Currently the binary is packaged inside the application and installed into the following location:
/data/data/com.theqvd.android.client
The binaries stored in this location might not get deleted on uninstall, so you may wish to delete this folder after uninstalling the app.
If for some reason you want to reinstall the application just delete the following file and restart the application:
/data/data/com.theqvd.android.xpro/shared_prefs/PREFS_PRIVATE.xml
5. Components
The list of components is as follows:
-
Xvnc Pro application. This consists of the following components:
-
Configuration Activity (Screen). Here you can configure and start and stop the X server.
-
Dummy Activity (Screen). This is where the fake display is sent.
-
Xserver service. This is a background process which has the X server running.
-
PocketCloud VNC viewer or AndroidVNC viewer (this last one is included in the application).
-
The QVD client application.
-
The Configuration Activity (Screen). Here you can define your connections and start and save new sessions.
-
The libqvdclient library which handles all the QVD connectivity.
6. FAQ
6.1. How do I test it
Register in http://theqvd.com for the demo and use the following info
Login: your email address password: will be emailed to you host: qvddemo.theqvd.com
6.2. X server
Currently the X server used is Xvnc, although you should be able to use any X server that supports OpenIntents. See http://www.openintents.org/action/android-intent-action-view/x11-server
Currently working X11 servers are:
-
XSDL X server https://play.google.com/store/apps/details?id=x.org.server
-
Darkside X server https://play.google.com/store/apps/details?id=au.com.darkside.XServer
-
Xvncpro X server https://play.google.com/store/apps/details?id=com.theqvd.android.xpro
-
Embedded X11 server, which is usually the latest version of xvncpro
Ensure that you specify in the connection settings "Use local X" as "generic" instead of "local", and then it will use any application that supports openintents URI x11.
6.3. How Do I Get Support
To allow us to provide any meaningful support, please submit a log capture. See, for example, the following web page for an example on how you might achieve this.
7. Credits & License
GPLv3
The Xvnc server itself is licensed as GPLv3
8. Change log
06/11/2014 - 2.0 - AndroidVNC is now included in the app 18/04/2012 - 0.1alpha - Updated error display in connection. 09/04/2012 - 0.1alpha - First Alpha version.