Introduction
This guide is intended to help you install a QVD solution by yourself. This document is going to be as simple as possible to follow and so you can simply copy and paste the commands appearing in the document in the console.
To this end, we have omitted any reference to the architecture of the product and we assume you have previously read the Architecture Manual.
|
|
Take into account that while versions of QVD from version 3.1 are able to support LXC virtualization, this guide only explains how to configure the environment for the default virtualization KVM, making it is as simple as possible. If you are interested in configuring your QVD installation to take advantage of LXC, read the chapter entitled Use of LXC Virtualization in QVD in the Administration Manual of QVD |
QVD is continuously being developed. Although we try to maintain all our documentation updated with the current version, it is possible we may provide some new functionality before updating the documentation. If there are sections in this document that have become outdated, or if you find that some of the instructions provided do not work as expected, please contact us.
The fast and easy method
QVD provides a demonstration VirtualBox device in form of an OVF image that you can download and execute with a minimum of effort inside the VirtualBox software, available free of charge. If you do not have VirtualBox installed, you can download it from the web site https://www.virtualbox.org/wiki/Downloads or follow the instructions there to obtain it for your particular operating system. Since you are executing the demonstration in a virtualized environment, this means that you will be able to try the software on a wide range of different environments without having to make significant changes to your own configuration.
The VM image can be found here (Appliances section):
Once downloaded, start the VirtualBox software and select "Import virtualized service" in the menu File. Choose the QVD demonstration that you have downloaded and click on Next. This will take you to the of Device Import Configuration screen.
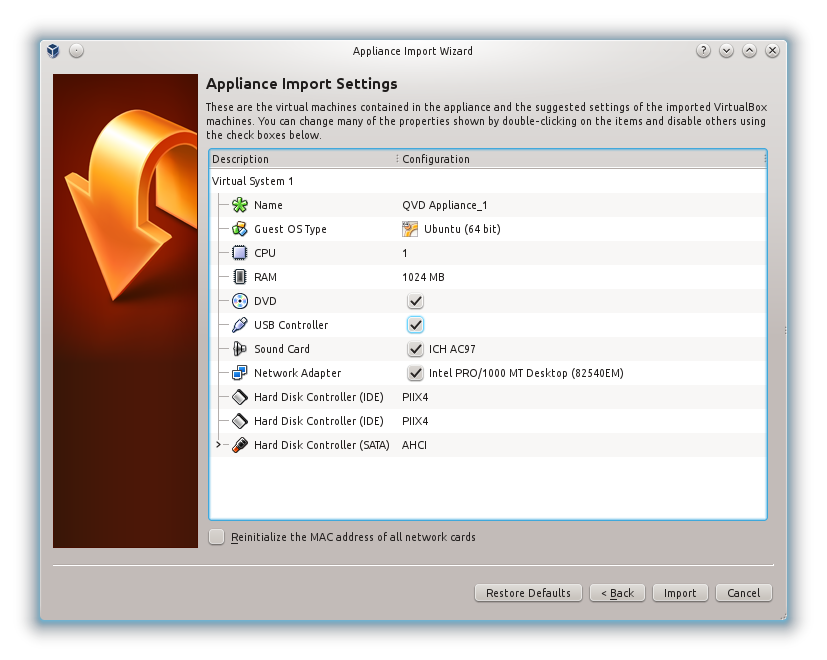
We do not recommend you change anything in this screen, so click on the Import button and give VirtualBox a couple of minutes to complete the importing process. Back to the main VirtualBox screen, the new machine "QVD Appliance" should now appear.
|
|
By default, the version of QVD of the appliance uses the ports 8443 for the layer 7 router and the port 7443 for the Web administration tool. Moreover, the port 2222 is used for the access ssh. Providing access to these ports in a guest operative system in VirtualBox can be done with NAT and establish the networking motor VirtualBox to assign these ports to the guest. This is already configured in the QVD Appliance. It is important to take into account that these ports must not be used yet in the local machine or this will not work correctly. |
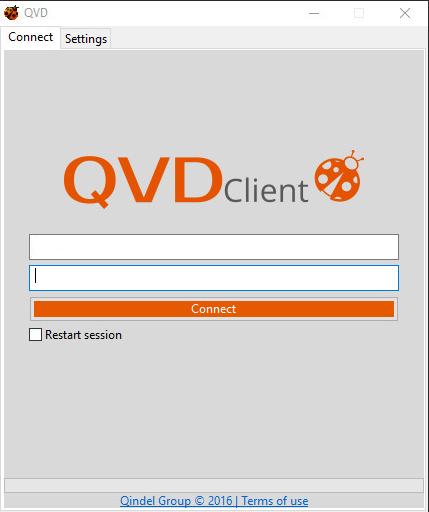
To start the QVD device, simply choose it from the virtual machine list in VirtualBox and click on the button Start. This will start the machine and will take you to a screen of log in of the console. The user’s name and the password by default are qvd, although you should not need to log in yet to try the software. You can connect to port 8443 of your localhost with the QVD Client to check the software from the user’s point of view. You can also connect to port 7443 of your localhost with a standard web browser to see the web administration interface WAT.
Here is the appliance data for you to experiment with freedom:
SYSTEM |
USER |
PASSWORD |
Console |
qvd |
qvd |
Console |
root |
root |
Web Administration Tool (https://localhost:7443) |
superadmin@* |
superadmin |
If you wish, you can use the QVD client to connect to the pre-configured virtual machine with the following data:
HOST |
USER |
PASSWORD |
localhost |
qvd-demo |
|
|
By default there is no root access to virtual desktops. If you need to do this, you can change the password from the vm filesystem that is mounted on the QVD appliance filesystem: |
Login as root to the QVD Appliance's console and run the following commands:
$ chroot /var/lib/qvd/storage/rootfs/10000-fs
$ passwd
Enter new UNIX password: root
Retype new UNIX password: root
passwd: password updated successfully
$ exit
$ cd /
Now you can make use of the user root with password root inside the demostration VM.
|
|
If you decide to use the demonstration device QVD, you can omit a big part of this document. Please note, however, that this demo is not supported and in no way provides a production ready solution. To completely understand how the components of QVD work, we highly recommend you to continue reading this document, but if you simply wish to see the software working, you should be able to get through the demo in the Installing and Configuring QVD Client. |
Installation Guide of QVD
1. Requirements for this guide
In this guide, we suppose that you want to configure your first demonstration environment of QVD. For this reason, we will assume that the components on the server’s side inside the solution will be hosted in the same physical server. We call this a mononode installation. In order to keep things as simple as possible, we will also assume that you will try the solution using the QVD Client installed in an independent workstation. Although it is possible to have all the components, including the client that is running, in the same machine, it is easier to show the capacities of the VDI if you are connected to a different workstation.
Since all the components will be executed in the same system, we will not be very worried about shared storage. However, it is important to understand that QVD uses some common storage between the different components of the solution and that to maximize the potential of your solution, it is probable that some of these storage directories are located in a shared network resource in a NAS or SAN.
With all this in mind, we will continue to build this solution in a single host to keep things as simple as possible. In reality, it is more than likely that a production environment maintains each of the different components in different systems and the storage is managed through each one of them. If you are comfortable configuring the shared NFS and building and installing each component in a different machine, do not hesitate to do so.
Currently, QVD has packets available for the server components for the distributions of SUSE Linux and Ubuntu Linux. This guide will assume that you are installing the packets in Ubuntu 16.04. The instructions are mostly similar for SUSE Linux, but where they are different, we will try to provide SUSE commands directly.
To sum up:
-
A single node with all the components (Ubuntu or Suse)
-
A client machine to try
-
Without shared storage
-
Very simple
-
Ready for production
1.1. Operating systems
1.1.1. Ubuntu Linux
The QVD components require the GNU / Linux Ubuntu 16.04 operating system.
Firstly, add the public key of the QVD parcels to your trusted keys (like root):
# wget -qO - https://www.theqvd.com/packages/key/public.key | sudo apt-key add -
Now, add the repository:
# echo "deb http://theqvd.com/packages/ubuntu-xenial QVD-4.0-current main" > \
/etc/apt/sources.list.d/qvd.list
# apt-get update
|
|
here, QVD-4.0-current always points at the latest version of release 4.0 of QVD. In future updates of the product, you should update this version to install the most recent as possible. You can of course install any version you wish, always looking first at all the versions available in our repositories. Examples of these versions may be QVD-4.0.0 or QVD-4.0.4. |
Execute apt-get update after adding the Ubuntu QVD repository.
The QVD repository provides the following packets:
-
perl-qvd-client: client software of QVD GUI
-
perl-qvd-hkd: maintenance daemon
-
perl-qvd-admin: command line tools to administrate users, virtual machines, operating system
-
perl-qvd-db: central database for the platform
Each of these packets will have a variety of dependencies that can be satisfied by other packets provided by the usual Ubuntu repositories. Below is a summary of other open source components required by QVD:
-
The RDBMS of PostgreSQL.
-
KVM: Hypervisor.
-
LXC: Linux containers based on user space tools of recent Kernels
-
libvirt0: a library for the interface with different virtualization systems
-
NX: protocol that manages remote desktop connections.
-
Ebtables: a firewall utility based on IP for ethernet bridges
|
|
QVD version 4 only works in PostgreSQL 9.2 or superior. |
1.1.2. SUSE Linux
The environment of the HKD node can also be installed in SUSE Linux Enterprise Server 11 (SP2 x86_64).
The packages for the HKD node environment are available in
http://theqvd.com/packages/sles/11SP2/stable
Firstly, add the public key of the QVD packages to your trusted keys (as root):
# rpm --import https://www.theqvd.com/packages/key/public.key
Now, add the repository:
# zypper ar http://theqvd.com/packages/sles/12SP1/stable QVD
# zypper ref
It is possible that you will need your installation disk to complete the operation.
The OpenBuild repository used by QVD provides the following main packages (together with the dependencies that are not covered in the default SLES repositories):
-
perl-qvd-client: client software of QVD GUI
-
perl-qvd-hkd: maintenance daemon
-
perl-qvd-admin: command line tools to administrate users, virtual machines, operating system
-
perl-qvd-db: central database for the platform
As before, the open source components required by QVD are as follows:
-
The RDBMS of PostgreSQL.
-
KVM: Hypervisor.
-
NX: protocol that manages remote desktop connections.
-
Ebtables: a firewall utility based on IP for ethernet bridges
1.2. System Hardware
The components of the HKD node must normally be executed in independent systems to guarantee that they have at their disposal sufficient resources to be executed and the hardware requirements will vary depending on the number of users that require the service, the number of disk images of the operating system that you want and several more factors.
In terms of this guide, which supposes you are evaluating QVD that you will only install an image and will configure one or two users maximum, we recommend the following system hardware requirements as a guide:
-
System Processor: Processor of 64 bits, preferably multi-core. It can support around 8 users per core. The 32-bit packets of are available for testing, but the limitation of 4 GB of RAM for the non-PAE modes of x86 processors means that only a limited number of clients will be possible and certainly not viable for a production environment.
-
System memory: At least 2 GB of RAM. This should be enough for a maximum of 4 users.
-
Disk space: At least 4 GB of space in disk must be available to contain the operating system image, etc. In all likelihood, you should try to double this amount to work comfortably with the tools implied when importing an image.
-
Network interface: you will need at least one available network interface. An Ethernet NIC 10/100 should be perfectly sufficient. We have also had success in serving the desktops via wireless connections.
You can use any supported client system to execute the QVD Client software. We currently support Linux, Microsoft Windows and OSX. Also, beta clients for Android and iOS.
1.3. Network
The HKD nodes use network bridge and virtual network interfaces to facilitate network interconnection in each of the virtual machines that are executed in the node. In order to automatically provide IP addresses to the virtual machines, QVD also executes a DHCP server which will assign IP addresses inside the range of the virtual network to the virtual hosts as they are started. Therefore, it is very important to choose a network range that is unlikely to enter into conflict with any of its existing infrastructure.
|
|
The services that are executed in systems with the same IP network can be affected by QVD or any of the virtual machines that are executed in QVD. |
The steps relating to network connection are dealt with in more detail later in this document, however the most important thing to bear in mind now is that you make sure you have a dedicated IP range that can be used for the virtual machines that will be executed inside QVD.
Furthermore, in a mononode installation, like the one we are describing here, you will need to configure a type of NAT so that the virtual machines will have access to the network. This is generally achieved by configuring iptables rules in the host. We will provide you with an example in this document, but you may find that an alternative approach is more appropriate for your particular environment.
2. Installation and configuration of QVD DB
Since one of the most fundamental components of the QVD solution is the database, we suggest you install this first. The database will be used to link all the other components and let them interact. The QVD software has a PostgreSQL database in its core. All the configuration information and execution times are stored in the database and if it fails, the wholeplatform will stop working.
In the production systems, it is strongly recommended that the database is installed with a high availability configuration, so it does not become a possible failure point for its VDI solution. In general, the real hardware requirements are very modest, any modern server with only two CPU cores 2 GB of RAM will be able to support the load of the database.
In this demonstration configuration, it is unlikely to generate very much load and we will assume that your test platform is able to meet these requirements.
2.1. Installation
The recommended installion method of the central database is with the packet perl-qvd-db. To install it, execute as root:
root@myserver:~# apt-get install perl-qvd-db
After installing perl-qvd-db, you have to perform several manual steps. They are
-
create a useraccount,
-
create a database,
-
change the database configuration and
-
deploy the scheme of the QVD database.
Since QVD is designed to be executed from one or more server nodes, the packet perl-qvd-db does not require the postgreSQL server as a dependency. However, for the purposes of this installation guide, we will need the server installed in the local machine. Of course, you could use a server in another machine and adapt its configuration accordingly. Install the following for Ubuntu:
# apt-get install postgresql
And for SLES:
# zypper install postgresql-server
Now, start the postgresql server:
# service postgresql start
|
|
We want to remind you again that the minimum version of PostgreSQL for QVD 4 is 9.2. |
You will need to create a user account and a database in postgres, so do su to the postgres account (use sudo if you are not root):
# su - postgres
2.2. Create a user account
If you want to use an existing user’s account, you can skip this step.
Once you have access to the database, you can create user accounts with the command createuser. You will be asked for a password for the new user and a few details about the user’s account. You can answer n to everything.
For example, to create a user called qvd, use the following command.
postgres@myserver:~$ createuser -SDRP qvd
Enter password for new role: passw0rd
Enter it again: passw0rd
The new user now can be assigned as the owner of a database. First, we have to create the QVD database.
2.3. Creation of the QVD database
Use the command createdb to create a database for QVD. Use the modifier -O to establish the owner of the database to the account that you want to use. In this case, we will establish the owner as the new user that we created in the previous step.
postgres@myserver:~$ createdb -O qvd qvddb
postgres@myserver:~$ exit
2.4. Change the configuration of PostgreSQL
In a production environment in which multiple systems interact with the QVD database, QVD uses transactions extensively and requires a level of transaction isolation greater than that configurated by default. Moreover, generally, you need PostgreSQL to be accessible for other hosts on its network. Although this step is optional in the independent solution that we are creating in this guide, you may want to carry out this configuration to make sure that your system is ready to manage additional HKD nodes. For this you, must edit the PostgreSQL configuration file postgresql.conf. We will assume that you are using PostgreSQL 9.2, although you may need to adjust some paths where necessary.
In Ubuntu the configuration files are found in /etc/postgresql/9.2/main.
In SLES the configuration files are found in /var/lib/pgsql/data
The level of transaction isolation is controlled with the setting default_transaction_isolation. To enable network access for PostgreSQL in general, change the setting listen_addresses de localhost to *.
For Ubuntu:
root@myserver:~# cd /etc/postgresql/9.2/main
root@myserver:/etc/postgresql/9.2/main# vi postgresql.conf
listen_addresses = '*'
default_transaction_isolation = 'serializable'
And for SLES:
root@myserver:~# cd /var/lib/pgsql/data
root@myserver:/var/lib/pgsql/data # vi postgresql.conf
listen_addresses = '*'
default_transaction_isolation = 'serializable'
|
|
Although the previous step was optional for an independent configuration, the following step is not. You must configure network access for the QVD user that you have created. |
To enable network access for the qvd user, look for the file pg_hba.conf. For Ubuntu this will be in /etc/postgresql/9.2/main and for SLES, /var/lib/pgsql/data. Edit this file and add the following line:
host qvddb qvd 192.168.0.0/24 md5
|
|
Make sure that you replace the default network 192.168.0.0/24 with the network that your platform uses. The format is the following: [host] [database] [user] [CIDR-address] [auth-method] [auth-options] |
Restart PostgreSQL for the changes to take effect.
root@myserver:~# service postgresql restart
2.5. Basic configuration
Each QVD node uses a configuration file /etc/qvd/node.conf from where we obtain, among other settings which we will cover later, the credentials of the database and the host name. Once you have finished configuring postgresql, you will need to create this node configuration file. You must have perl-qvd-config-core installed at this point as a dependency. It contains a sample file node.conf. Create the folder qvd in /etc, and copy this template configuration there:
root@myserver:~# cp -v /usr/lib/qvd/config/sample-node.conf /etc/qvd/node.conf
Obviously, the permissions in the file must be as restrictive as possible.
root@myserver:~# chown root:root /etc/qvd/node.conf
Now, make the file illegible by any person outside the owner and the group:
root@myserver:~# chmod 0640 /etc/qvd/node.conf
You will now need to edit the file /etc/qvd/node.conf to include the necessary details to access the database. The configuration file should look like this:
#
# QVD Node Configuration
#

# Name of this node in QVD. Usually the machine's hostname.
nodename = mycomputer

# Database connection information.
# database.host: where the QVD database is found
database.host=mycomputer
# database.name: the name of the QVD database
database.name=qvddb
# database.user: the user account needed to connect
database.user=qvd
# database.password: the password needed to connect
database.password=passw0rd

# Log level. One of ALL, DEBUG, INFO, WARN, ERROR, FATAL, OFF
log.level = ALL
log.filename = /var/log/qvd/qvd.log
Firstly, the entry nodename and the entry database.host must coincide with the name of your machine, so the previous example will need some editing.
The host of the database must also coincide with the hostname or the IP address of the system in which yourdatabase is found. By default, the name of the database is usually established in qvddb, but for customized installations, this may be different. You will also have to set the username and the password of the database that you configured when creating the database.
Finally, you could also add a level of logging for debugging purposes.
2.6. Installation of the QVD tables
Now it is the moment to populate the database with the tables that will be used to store the data for QVD. Before being able to use any of the tools for QVD, we will have to configure the database, the username and the password in the QVD configuration files.
Once this is done, execute qvd-deploy-db.pl. This will create the table structure that QVD needs.
# qvd-deploy-db.pl
|
|
At this point you will receive an authentication error if you have not used the combination of username and password as in the previous example. To change the details to make them coincide with the ones you have used, edit the file /etc/qvd/node.conf. We will discuss this file in more detail shortly. If you receive an error "Can’t deploy without a ddl_dir or SQL::Translator" you will need to execute "apt-get install qvd-node-libs" at this moment. |
2.7. Access test
Log in to postgresql and type the following command to list the tables used by QVD:
# psql -U qvd -W -h localhost -d qvddb
Password for user qvd:
psql (9.2.0)

qvd=> \d<return>
3. Installation and configuration of the node
3.1. Installation of the HKD
Now it is the moment to install the HKD, For this, make sure you have root privileges:
root@myserver:~# apt-get install perl-qvd-hkd
For Ubuntu, and for SLES:
root@myserver:~# zypper install perl-QVD-HKD
This will install the HKD, and all the necessary dependencies to execute an HKD node.
3.2. Installation of the administration tools
3.2.1. API
The API is a pre-requirement for the two following components, so it must be the first thing that you install. You can do this with the following command:
root@myserver:~# apt-get install perl-qvd-api
For SLES:
root@myserver:~# zypper install perl-QVD-API
When installing the API, you will need to configure it. For this, you must create the file /etc/qvd/api.conf and add the following lines:
# Database connection information.
# database.host: where the QVD database is found
database.host=mycomputer
# database.name: the name of the QVD database
database.name=qvddb
# database.user: the user account needed to connect
database.user=qvd
# database.password: the password needed to connect
database.password=passw0rd

api.user = root
api.group = root

path.api.ssl=/etc/qvd/certs
See that we have repeated here the configuration data, since the API requires this access. Moreover, we have added the two lines that mark the user with which the API will be executed (root in this case following the previous example), and one line more with the path where are the certificates that the QPI needs to start. If no certificate is available, you can see how to create one in the section Creation of an auto signed certificate of the current guide.
To start either the CLI or the WAT we need to start the API:
service qvd-api start
3.2.2. CLI
The QVD command line administration utility is included in the packet perl-qvd-admin.
root@myserver:~# apt-get install perl-qvd-admin
For SLES:
root@myserver:~# zypper install perl-QVD-Admin
This useful tool lets you, via the command line, perform all the operations that can be done using the web administration tool of the packet qvd-wat. You can install it in any host that you want to use to administrate your QVD installation. For example, you may wish to integrate QVD with an external supervision tool such as Nagios, so the installation of the QVD CLI Administration utility in this host would make this possible.
The QVD administration utility requires a configuration file that tells it where the QVD API is installed. We are going to configure this in the following step, but it is worth noting that if you wish to install this utility in another host, access to the API continues to be necessary for it to work.
Create the file /etc/qvd/qa.conf:
qa.url = https://localhost:443/
qa.tenant = *
qa.login = superadmin
qa.password = superadmin
qa.format = TABLE
qa.insecure = 1
In this example we have assumed that the API has been configured to listen in localhost to port 443. We have also assumed the password of the superadmin user and even that the SSL configuration has been performed. Moreover, we have configured qa.tenant = *, so we would see all the tenants of the platform if it were configured as multitenant. We will see how some of these things are configured later in this guide. For more information about the concept of multitenanting refer to the configuration manual of the CLI and the WAT. The parameter qa.insecure must be replaced by the parameter qa.ca with your Authority certification path.
3.2.3. WAT
The QVD Web Administration Tool (QVD-WAT) has a simpleinterface that facilitates the administration of the HKD nodes and the monitoring of active client sessions inside its infrastructure. It also offers the possibility to perform administration tasks on HKD nodes from remote locations.
Although it is not strictly necessary to execute QVD, it will undoubtedly help you to start with the product, so we will install it and configure it in our server node.
Install the packet with apt-get:
# apt-get install qvd-wat
Or using zypper in SLES:
# zypper install QVD-WAT
The WAT is installed in /usr/lib/qvd/lib/wat/. Inside this location its configuration file is found:config.json, which we show below:
{
   "apiUrl": "https://localhost:443"
}
For the mononode example we are preparing, it is not necessary to change this file. You only have to make sure that it is there.
The WAT is independent from the API in terms of installation. They can be installed in different machines and work without problems, as long as the WAT has in its configuration the address of the API. However, and given that they can be installed together, as is our case in mononode, the API serves the WAT by default, making it unnecessary to configure any apache server or nginx that serves it.
To start the WAT we need to have the API started. Try the connection in your browser, visiting http://localhost:443
To log in, you can use the default username and password:
-
user: superadmin@*
-
password: superadmin
You can change this password from the WAT itself.
4. Basic and indispensable configuration
Now that you have the administrative tools installed, we are going to use them to configure your node,
4.1. Internal QVD configuration parameters
While it is possible to add other configuration parameters to the configuration file of the QVD node that we have previously edited, this file is simply used to start the server and later the server will refer to the database to find any other configuration parameter, so it is good practice to establish the QVD configuration parameters inside the database.
There are some parameters that must be defined to inform QVD about its environment (for example, the range of available IP addresses for the virtual machines or its default gateway portal). These parameters are compulsory and the QVD daemons will refuse to start unless they are defined. They are the following:
-
vm.network.ip.start: First IP of the reserved range for virtual machines
-
vm.network.netmask: Network mask of the range
-
vm.network.gateway: IP of the router that allows exterior access. It will be transmitted to the virtual machines by DHCP
-
vm.network.bridge: Name of the interface bridge reserved for QVD
These entries can be established in the database using the command qa available in the packet perl-qvd-admin in the following way:
# qa4 config set tenant_id=-1,key=vm.network.ip.start,value=10.3.15.50
# qa4 config set tenant_id=-1,key=vm.network.netmask,value=24
# qa4 config set tenant_id=-1,key=vm.network.gateway,value=10.3.15.1
# qa4 config set tenant_id=-1,key=vm.network.bridge,value=qvdnet0
4.2. Network requirements
The QVD server nodes make use of a network bridge and of virtual network interfaces to provide network interfaces to each of the virtual machines that are executed in the node. In order to provide IP addresses to virtual machines, QVD also executes a DHCP server that will assign the IP addresses within the the virtual network range to the virtual hosts as they are started. So, it is very important to choose a network range that is unlikely to conflict with any of their other existing infrastructures for this purpose.
|
|
Services that are executed in systems of the same IP network can be affected by QVD or any of the virtual machines that are executed in QVD. |
There is a series of configuration steps that it may be necessary to perform manually to correctly configure the network of a QVD server node. There are often other ways to obtain a suitable network configuration, so we only provide them as guidelines.
4.2.1. Establish dnsmasq to be controlled by QVD
QVD uses dnsmasq as a DHCP and DNS server for the virtual machines that are executed in a node. To work correctly, dnsmasq needs to be executed by the HKD process.
Firstly, check that dnsmasq is installed. In Ubuntu, execute the following commands and check the status:
# dpkg -s dnsmasq
In SUSE:
# rpm -q dnsmasq
If it is not installed, do it now using your package manager, whether apt-get install dnsmasq, or zypper install dnsmasq.
By default, the Ubuntu package starts the process that is executed as a daemon in the background, so you should avoid it starting automatically. This is done with the following commands in Ubuntu:
# service dnsmasq stop
# sed -i s/ENABLED=1/ENABLED=0/ /etc/default/dnsmasq
In SLES, dnsmasq is managed under the command chkconfig and it is disabled by default, so you should not need to do anything. However, should dnsmasq have been enabled or simply to make sure, you can check that it is disabled executing the following command as root:
# chkconfig dnsmasq off
|
|
This step is essential for QVD to work using KVMvirtualization. For LXC it is possible to specify if it must use DHCP or not to configure the network in its virtual machines. |
4.2.2. Configure the IP resend
IP Forwarding is necessary to route the clients to the correct location. You can habilitate it quickly by executing the following command.
# echo 1 > /proc/sys/net/ipv4/ip_forward
Unfortunately, on restarting the host system, this change will be lost. To make it permanent, you can edit /etc/sysctl.conf and uncomment the line:
net.ipv4.ip_forward=1
You can force sysctl to reload its configuration after having edited this file executing:
# sysctl -p
4.2.3. Configuring a network bridge
There are several ways to configure the network bridge and the appropriate routing to make sure that a QVD client is routed to the correct virtual machine.
The easiest method is to configure the static network interface and a set of iptables routing rules to perform the necessary NAT to translate the IP addresses between its real and virtual network.
To configure its network in Ubuntu, edit the file /etc/network/interfaces and add the following lines:
auto qvdnet0
iface qvdnet0 inet static
  pre-up brctl addbr qvdnet0
  pre-up iptables -t nat -A POSTROUTING -o eth0 -j SNAT --to-source 192.168.0.2
  pre-up iptables -t nat -A PREROUTING -d 192.168.0.2 -p tcp --dport 8443 -j DNAT --to-destination 10.3.15.1
  post-down brctl delbr qvdnet0
  address 10.3.15.1
  netmask 255.255.255.0
It is important to point out that in the previous example you will need to change the IP address 192.168.0.2 to the network interface IP address to which you wish its clients to connect. In the example above we use the range 10.3.15.0/24 for the virtual network used by QVD. This range must be unique inside its infrastructure and must only be used by QVD, so the services that start in QVD do not interfere with other systems in the network.
While there are other cleaner approaches to configure its network, these sometimes have problems with specific types of network interfaces,such as WIFI. The approach mentioned above should work for the majority of systems.
Once the network configuration has been written to file, the network bridge interface should become active.
# ifup qvdnet0
4.2.4. Configure QVD for its network
For QVD to correctly manage the configuration of the virtual machine and the subsequent routing, you will need to change some of the configuration settings inside QVD-DB. It is recommended you use the QVD CLI Administration Utility to do this. You can also use the WAT if you have already configured it.
These settings are used to provide a dedicated network environment for the Virtual Machines. You must use IP addresses and network ranges that do not conflict with its existing network infrastructure. In the following example the range 10.3.15.0/24 is used for the virtual network used by QVD.
# qa4 config set tenant_id=-1,key=vm.network.ip.start,value=10.3.15.50
# qa4 config set tenant_id=-1,key=vm.network.netmask,value=24
# qa4 config set tenant_id=-1,key=vm.network.gateway,value=10.3.15.1
# qa4 config set tenant_id=-1,key=vm.network.dns_server,value=10.3.15.254
# qa4 config set tenant_id=-1,key=vm.network.bridge,value=qvdnet0
|
|
If AppArmor is being executed in your host machine, you can check to it does not allow the host machines to access the Internet. We have a profile of AppArmor for QVD available in the packages. In any case, it is also possible to disable AppArmor with /etc/init.d/apparmor teardown. This will stop AppArmor and will let QVD run normally. If this is unacceptable in the production environment, use the profile mentioned and ask the QVD support team for help if necessary. |
These settings are described in more detail in the section of the QVD Administration manual titled Virtual Machine Options in the chapter Basic configuration of QVD.
4.3. SSL configuration
The HKD node needs an x509 certificate and a private key to securte the network connections. For a production installation, you must use a certificate issued by a trusted certification authority, like Verisign or Thawte. For testing purposes you can use a self-signed certificate. In this demonstration, we go through the steps to create a self-signed certificate and we will use it inside our configuration. If you already have a certificate signed by a third party, you can omit this step and use it.
4.3.1. Creation of a self-signed certificate
The openssl tool is necessary to create a self-signed certificate. If you have not installed it yet, you can do it using the repositories of Ubuntu:
# apt-get install openssl
Or if you are using SLES:
root@myserver:~# zypper install openssl
We recommend that to work with the certificates, you create a subdirectory in /etc/qvd.
# mkdir /etc/qvd/certs
# cd /etc/qvd/certs
To create your certificate, you must first generate a private key.
# openssl genrsa 2048 > key.pem
Given the private key, a self-signed certificated is created with the following command.
# openssl req -new -x509 -nodes -sha256 -days 60 -key key.pem > cert.pem
OpenSSL will ask you to introduce the fields that are required for the certificate. You must introduce relevant information in these fields. The most important field is the Common Name which must coincide with the complete domain name of the host that will execute your QVD node.
You are about to be asked to enter information that will be
incorporated into your certificate request.
What you are about to enter is what is called a Distinguished Name or
a DN.
There are quite a few fields but you can leave some blank
For some fields there will be a default value,
If you enter '.', the field will be left blank.
+++-----+++
Country Name (2 letter code) [AU]:ES
State or Province Name (full name) [Some-State]:Madrid
Locality Name (eg, city) []:Madrid
Organization Name (eg, company) [Internet Widgits Pty Ltd]:Qindel Group
Organizational Unit Name (eg, section) []:QVD Team
Common Name (eg, YOUR name) []:qvd.qindel.com
Email Address []:documentation@theqvd.com
Now you will have a self-signed certificate and its corresponding private key.
4.3.2. Configure QVD to use SSL certificates
In the previous step we created a directory /etc/qvd/certs to store our self-signed certificate. If you are using a certificate signed by a recognized issuing entity, you may want to put the certificates in the same place so that the following instructions make sense.
In this step, we will configure QVD to use the server certificate and the private key. For this, we will use the qvd-admin tool.
# qa config ssl key=/etc/qvd/certs/key.pem cert=/etc/qvd/certs/cert.pem
If the certificate is not signed by a trusted authority, it must beadded to the trusted certificates directory of the system to be validated by the SSL layer. To determine which directory this is, execute the following command:
# openssl version -d
The directory of trusted certificates is always a subdirectory called certs inside the directory returned by the previous command.
For example, the command can return the following answer:
OPENSSLDIR: "/usr/lib/ssl"
The default SSL directory in SLES:
OPENSSLDIR: "/etc/ssl"
This would indicate that the trusted certificates are stored in /usr/lib/ssl/certs in Ubuntu or in /etc/ssl/certs in SLES. In most cases this is really a symbolic link to another location, but this path should be enough to work with the certificates.
For SSL to recognize the certificate, it must be correctly named. The following commands will help you make sure that the certificate is named correctly.
# trusted_ssl_path=/usr/lib/ssl/certs
# cert_path=/etc/qvd/certs/cert.pem
# cert_name=`openssl x509 -noout -hash -in $cert_path`.0
# cp $cert_path $trusted_ssl_path/QVD-L7R-cert.pem
# ln -s $trusted_ssl_path/QVD-L7R-cert.pem $trusted_ssl_path/$cert_name
If you are using SLES, you must change the trusted_ssl_path in the previous code to make it coincide with your environment:
# trusted_ssl_path=/etc/ssl
Of course, regardless of your distribution, it is important to check the trusted_ssl_path and the cert_path in the commands listed above. If necessary, change them to make them coincide with your environment.
The commands listed above will make sure that we obtain the correct name for your certificate and , then, we will copy the certificate to the path where the trusted certificates will be stored, renaming it to QVD-L7R-cert.pem so it has a name that will make sense to you later. Finally, we will create a symbolic link from the certificate to the name that OpenSSL expects in order to use the certificate file.
5. And now, what?
If you have already completed all the steps of this guide, congratulations, you now have a QVD solution installed. Now you should:
-
Add your HKD node to the solution
-
Install your first image
-
Add your first user
-
Connect and try the solution
From the version 4.0 of QVD, the WAT has become the standard administration tool of the product. We recommend you to continue with the WAT guide to perform these steps and thus continue learning about QVD.
You will also need to install the QVD client. In the Administration guide you will find a section about its installation and use.
Installation and configuration of the QVD client
The client QVD is available for the following platforms: Linux, Microsoft Windows, and Mac OSX.
Whichever platform you choose to execute the client application, the best thing to do is execute it in a system different from the one that you are using to execute server components. This will give you a much clearer idea of how the whole environment works.
1. Windows Client
If you use Microsoft Windows as your base platform to execute the QVD client application , you will have to manually download the QVD client installer. You can download it from:
Once you have finished downloading the installer, run it as a normal executable file and follow the installation wizard.
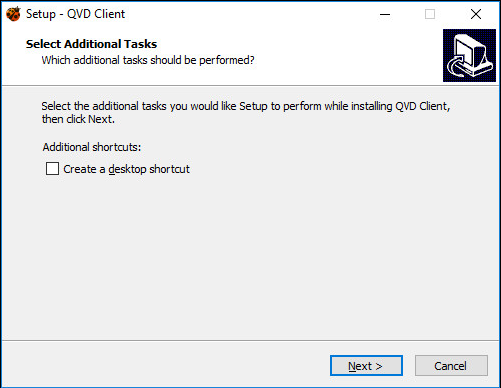
Once you have finished the installation, you can run the client from the shortcut on the Windows desktop (if you have selected to add the shortcut) or from the QVD menu in the Applications menu. This will open the client so that it is ready to connect.
2. Client OSX
If you use Mac OSX as your base platform to execute the QVD client application , you will have to manually download the QVD client installer. You can download it from:
Once you have finished downloading the installer, run it as a normal executable file and follow the installation wizard.
Once the installation has finished, you can execute the client from the Launcher.
3. Linux Client
Installing the QVD client on an Ubuntu Linux platform is easy. You must add the QVD repositoryto the fonts of the repository of apt if you have not done so yet.
You can now install the client with the following command:
# apt-get install perl-qvd-client
The installation of the QVD client under SLES is very similar (If you haven’t already done so, do not forget to configure the repository zypper ).
Now install the QVD Client:
# zypper install perl-QVD-Client
Depending on the desktop environment, you should be able to access the client inside the menu "Applications", usually in the submenu "Internet". Alternatively, you can execute the client GUI from the console using the command /usr/lib/qvd/bin/qvd-gui-client.pl.
4. Android and IOS Client
Both clients have been uploaded to the Google Play store and App Store respectively. Follow the normal procedure to install these applications on your devices.
Conclusion
In this guide we have gone through a basic installation and the configuration of all the components inside a QVD solution. We hope that, by following this guide you have managed to configure your own virtual desktop solution and that you had been able to connect to it with a QVD client.
QVD can be used for a wide range of purposes and on very different scales, so it is the first choice as a desktop virtualization platform for Business. Its remote administration capabilities, its capacity for integration with other technologies and its possibilities of secure connection for remote users will help you improve the administration of your Linux and Solaris users and reduce the costs associated with desktop virtualization.
If you have any questions or need additional support, visit our site at http://theqvd.com/
or contact us at info@theqvd.com.