Preface
This document will provide you with all of the information that you need to install, manage and administer any of the QVD components within a QVD solution. As an open-source product, QVD is constantly growing and being improved. We endeavour to keep our documentation as complete as possible and encourage readers to notify us of ways that the documentation can be improved. If you have any queries or suggestions, please email us at info@theqvd.com.
The document is broken into three main parts. The first part discusses the core components that make up a solution, how they interact and how they are installed and configured. The second part deals with integration issues and how to tweak behaviors within QVD to achieve better performance or to be more scalable. The third part is dedicated to providing you with all of the information that you may need to create and manage the Operating System Disk Images and Virtual Machines that get loaded into each virtual desktop.
Additionally, we provide a Bibliography to reference external material that may help you to gain a better understanding of the different technologies involved in a QVD solution. We also provide a Glossary of commonly used terms, that may help you to understand some of our own terminologies and some less frequently encountered terms when you come across them.
1. What is QVD?
QVD (Quality Virtual Desktop) is a Linux focused VDI (Virtual Desktop Infrastructure). The software is designed to entirely virtualize the Linux desktop, so that client systems are able to connect to a central server to load their desktop environment and applications. This means that when users work from their local machine, all of the programs, applications, processes, and data used are kept on the server and run centrally. Virtualization offers a number of benefits:
-
Users can switch between computers on a network and continue to work as if still located at the same desktop, with full access to all of their applications and data
-
Administrators have greater control over the applications that are installed on user’s systems, and are able to manage user data more easily to perform backups and virus scans etc
-
It is easier for Administrators to provision new desktops and to deploy applications for new users
-
There is reduced downtime in the case of hardware failures
-
Users can make use of a variety of different devices to access their desktop and applications, including laptops, PCs and smartphones
-
Users can work securely with the same desktop and applications from a remote location without the requirement for a VPN
-
Improved overall system and data security
-
Reduced costs of hardware, maintenance and administration
The QVD Server virtualizes each Linux Desktop. This can be achieved by using one of two virtualization technologies. Most commonly the Linux Kernel Virtual Machine (KVM) is used as a complete bare-metal hypervisor, however as of QVD 3.1, it is also possibly to take advantage of Linux Containers (LXC) to achieve operating-system level virtualization. This virtualization helps to keep each user’s environment as its own discrete entity, to improve security and stability. Virtualization allows you to serve multiple Operating Systems or environments to your users, depending on their requirements. These are loaded as independent Images on the QVD Server. In general, you will only load one or two images for all of your users. These images provide the base operating system and workstation environment, which are replicated for each virtual machine. When a user connects to the server, making use of the client application, a Virtual Machine is started solely for that user. This provides a jail that prevents any inappropriate system behaviour from affecting other users. When the user disconnects, the Virtual Machine is stopped. This means that if the user’s environment has somehow become problematic, a disconnect can revert the environment to its original state. This provides a much better level of security than if a user was working on an independent workstation.
In order to maintain user data, such as desktop settings, documents and other user specific information, there are two options. The first, and more common approach, is to store this information on an NFS share. In this way, data can be stored on a NAS device or within a SAN, where it can be easily managed. A second option is to load a second image into the virtual machine. This image is persistent, in that it can be updated by the user, and the changes are stored for each time the image is reloaded. Either approach is equally valid. By keeping user data separate from the core image, QVD helps to ensure that in the event that a core image is corrupted or in the event of system failure, you are able to minimize the time needed for disaster recovery.
The desktop is accessed from each workstation, making use of a client that uses the NX protocol to communicate with the server and to deliver the desktop and applications to the client. The NX protocol is used to handle remote X Windows connections and provides superior compression to allow for high performance even when accessing the desktop over a low-bandwidth connection. Furthermore, the QVD is able to encapsulate the NX protocol with SSL to secure connectivity so that users can work in a safe and secure manner, even if accessing their desktops from remote locations. QVD provides client software to run on a variety of base operating systems and devices, from Linux to Windows. This means that wherever you are, regardless of the system that you have access to, you can run the client application to access your Desktop.
1.1. Some Notes About This Manual
In general, it is assumed that most users of the QVD will take advantage of the KVM virtualization offered within the product. As a result, the majority of this guide assumes that you will configure the product in this way. Where users select to use LXC to achieve virtualization, there may be some differences in configuration. Where these are significantly important, we have included information for both virtualization platforms. However, we have also included a separate chapter on LXC virtualization which attempts to provide some additional guidance to users who choose to explore this option.
In the same line, although we provide packages for other Linux distributions such as SUSE Linux Enterprise Server (SLES), we assume that the majority of our users will use Ubuntu Linux. As a result, many of the commands in this guide, along with the locations of configuration files etc, are generally provided with the assumption that you are using Ubuntu Linux. Where it is important the users of SLES are aware of differences, we have attempted to also provide this information as clearly as possible.
Core Components
In this part of the manual, we discuss the core components that make up a QVD Solution. We will explain the architecture of a solution, and we will cover the installation and configuration settings specific to each component in detail.
1. Components and Architecture
1.1. Introduction to QVD Components
QVD 3.5.0 is comprised of a number of core components that work together to create a complete QVD solution. While not every single component is necessarily required in order to create a functioning environment, it is advisable that all components are actually installed to ensure ease of management and to protect the stability of the platform.
There are three major server side components:
-
QVD server,
-
Administration Server, and
-
PostgreSQL DBMS.
Ideally, each of these should be stored on a dedicated host for stability reasons, although it will become clear later that these components will have access to some shared resources in order to function properly.
While it is likely that you will only have one Administration Server and one PostgreSQL Database system in your environment, it is possible to have any number of QVD Server Nodes. Therefore, most deployments of the QVD will also include the following components:
-
Load Balancer
-
Shared Storage Facility (e.g. NFS etc)
By using a Load Balancer in front of your QVD Server Nodes, clients connections can be balanced across healthy Server Nodes in order to access a virtual desktop. This reduces the amount of configuration within the client software and also ensures a much healthier environment to serve virtual desktops.
Since each server node will require access to particular shared resources, such as the disk images that will be loaded into a virtual machine, and user home data, a shared storage facility is generally set up in order to allow all of the server nodes to have access to this shared data.
Within each Disk Image, that is loaded into a Virtual Machine out of which the Virtual Desktop is served to an end user, there is an additional component which becomes active for each Virtual Machine that is started:
-
QVD Virtual Machine Agent
The QVD Virtual Machine Agent (VMA) is responsible for accepting connections from the client via a QVD Server Node. It facilitates access to the desktop environment running within the virtual machine, including the ability to configure printer access and to configure the virtual machine to stream audio to the client.
Finally there is the client side component:
-
QVD GUI Client
The client is packaged for a variety of Linux base operating systems, and for Microsoft Windows. A client for Android platforms has also been released.
The client software can be installed on as many host systems as required.
1.2. QVD Architecture
In most production environments, the architecture of a QVD environment is such that several QVD Server Nodes will be running in parallel to each other. The QVD environment is designed to handle a fully load-balanced environment, so that you can have a High Availability solution.
1.2.1. Internal Elements
A QVD Server Node is composed of a single binary, the HKD or House Keeping Daemon. This brokers all connections with a layer-7 router which ensures that all clients are routed to the correct virtual IP address that is configured for the Virtual Machine that has been created for the connecting user. It is also responsible for authenticating the user prior to connection, and for establishing the client session. The HKD starts a listener on each QVD node and forks each incoming connection once it is established.
The HKD tracks the status of virtual machines. It is responsible for starting and stopping virtual machines as well as monitoring the health of each virtual machine and updating status information within the QVD Database, so that other Nodes and the administration tools are able to function accordingly. In general, the HKD is responsible for managing virtual machine status.
1.2.2. HKD Behaviour
The House Keeping Daemon is responsible for managing virtual machine states based on information that it detects within the QVD Database. The HKD regularly polls the QVD database to determine the status of each Virtual Machine. If the status has been changed by another element such as the web administration tool, the HKD is responsible for enacting the appropriate commands to effect the status change.
When QVD is configured for KVM virtualization, the HKD runs a KVM instance for each virtual machine that needs to be started, and provides startup options based on information obtained from the database.
When QVD is configured for LXC virtualization, the HKD will first check to
determine whether the image file has been uncompressed into the basefs folder
in the shared storage area, and uncompresses the image file if this has not
already been done. The HKD then uses the fuse-unionfs module
[<It is
possible to use alternative methods to create a union style mount, including
using the aufs module which can offer significant performance improvements.
Users have also succeeded in using bind mounts to achieve the same purpose.>]
to perform a union mount of the image in the basefs folder with an
automatically generated overlay file system and home file system. This mount is
performed inside the rootfs folder in the shared storage. Finally, the HKD will
load the newly mounted image into an LXC instance.
As the Virtual Machine instance starts, the HKD will check that the image boots correctly, that it has network connectivity and that the QVD-VMA is running within the virtual machine. If any of these checks fails, the HKD will change the state of the virtual machine to blocked within the QVD Database. After a short period, the HKD will kill the running virtual machine.
During each loop run that the HKD performs it will check the health of all running virtual machines, it checks the database to determine if there are any VM state changes, implements any changes to VM state, and updates information in the database pertaining to VM state.
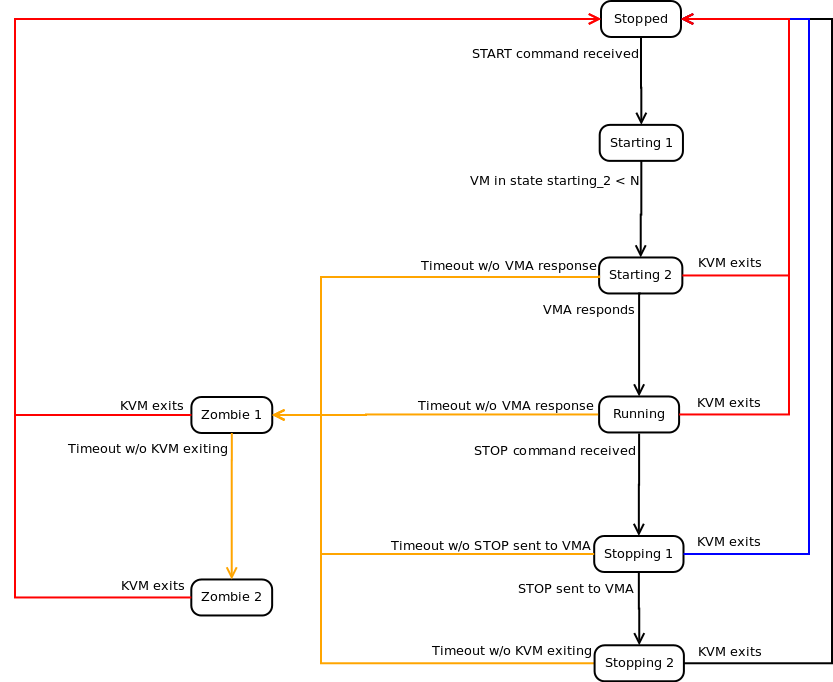
As per the diagram above, these are typical examples of the different Machine States that the HKD will return for a Virtual Machine starting up using KVM.
-
Stopped: the VM is not running on any host
-
Starting 1: the HKD has received the start command but is waiting until it has the resources available to move to the next machine state
-
Starting 2: the VM has been started but the boot process has not yet completed
-
Running: the VM is running on a host
-
Stopping 1: the HKD received the stop command but is waiting for the VMA within the VM to respond to the request
-
Stopping 2: the VMA has responded to the stop request and the VM is in the process of shutting down
-
Zombie 1: The VM is running but is not responding, a TERM signal has been sent to the process
-
Zombie 2: The VM is running but is not responding, a KILL signal has been sent to the process
DI Tags
QVD supports the ability to "tag" Disk Images. This feature is important, because it allows you to easily change Disk Image versions for Virtual Machines. If you are making a change to the Disk Image that a large number of users are already making use of, you can assign it a new DI Tag. You are then able to roll the change out to as many virtual desktops as you require by changing the DI Tag that the Virtual Machine is set to load. If something goes wrong, rollback is as simple as updating the DI Tag being used by a Virtual Machine.
When the HKD loads a Virtual Machine, it checks the DI Tag for that Virtual Machine within the QVD-DB, and ensures that the correct Disk Image is used during the startup phase. Therefore, if a DI Tag is changed while a Virtual Machine is running, the change will not be implemented until the Virtual Machine has been restarted.
1.2.3. QVD Client and L7R Server Node Interactions
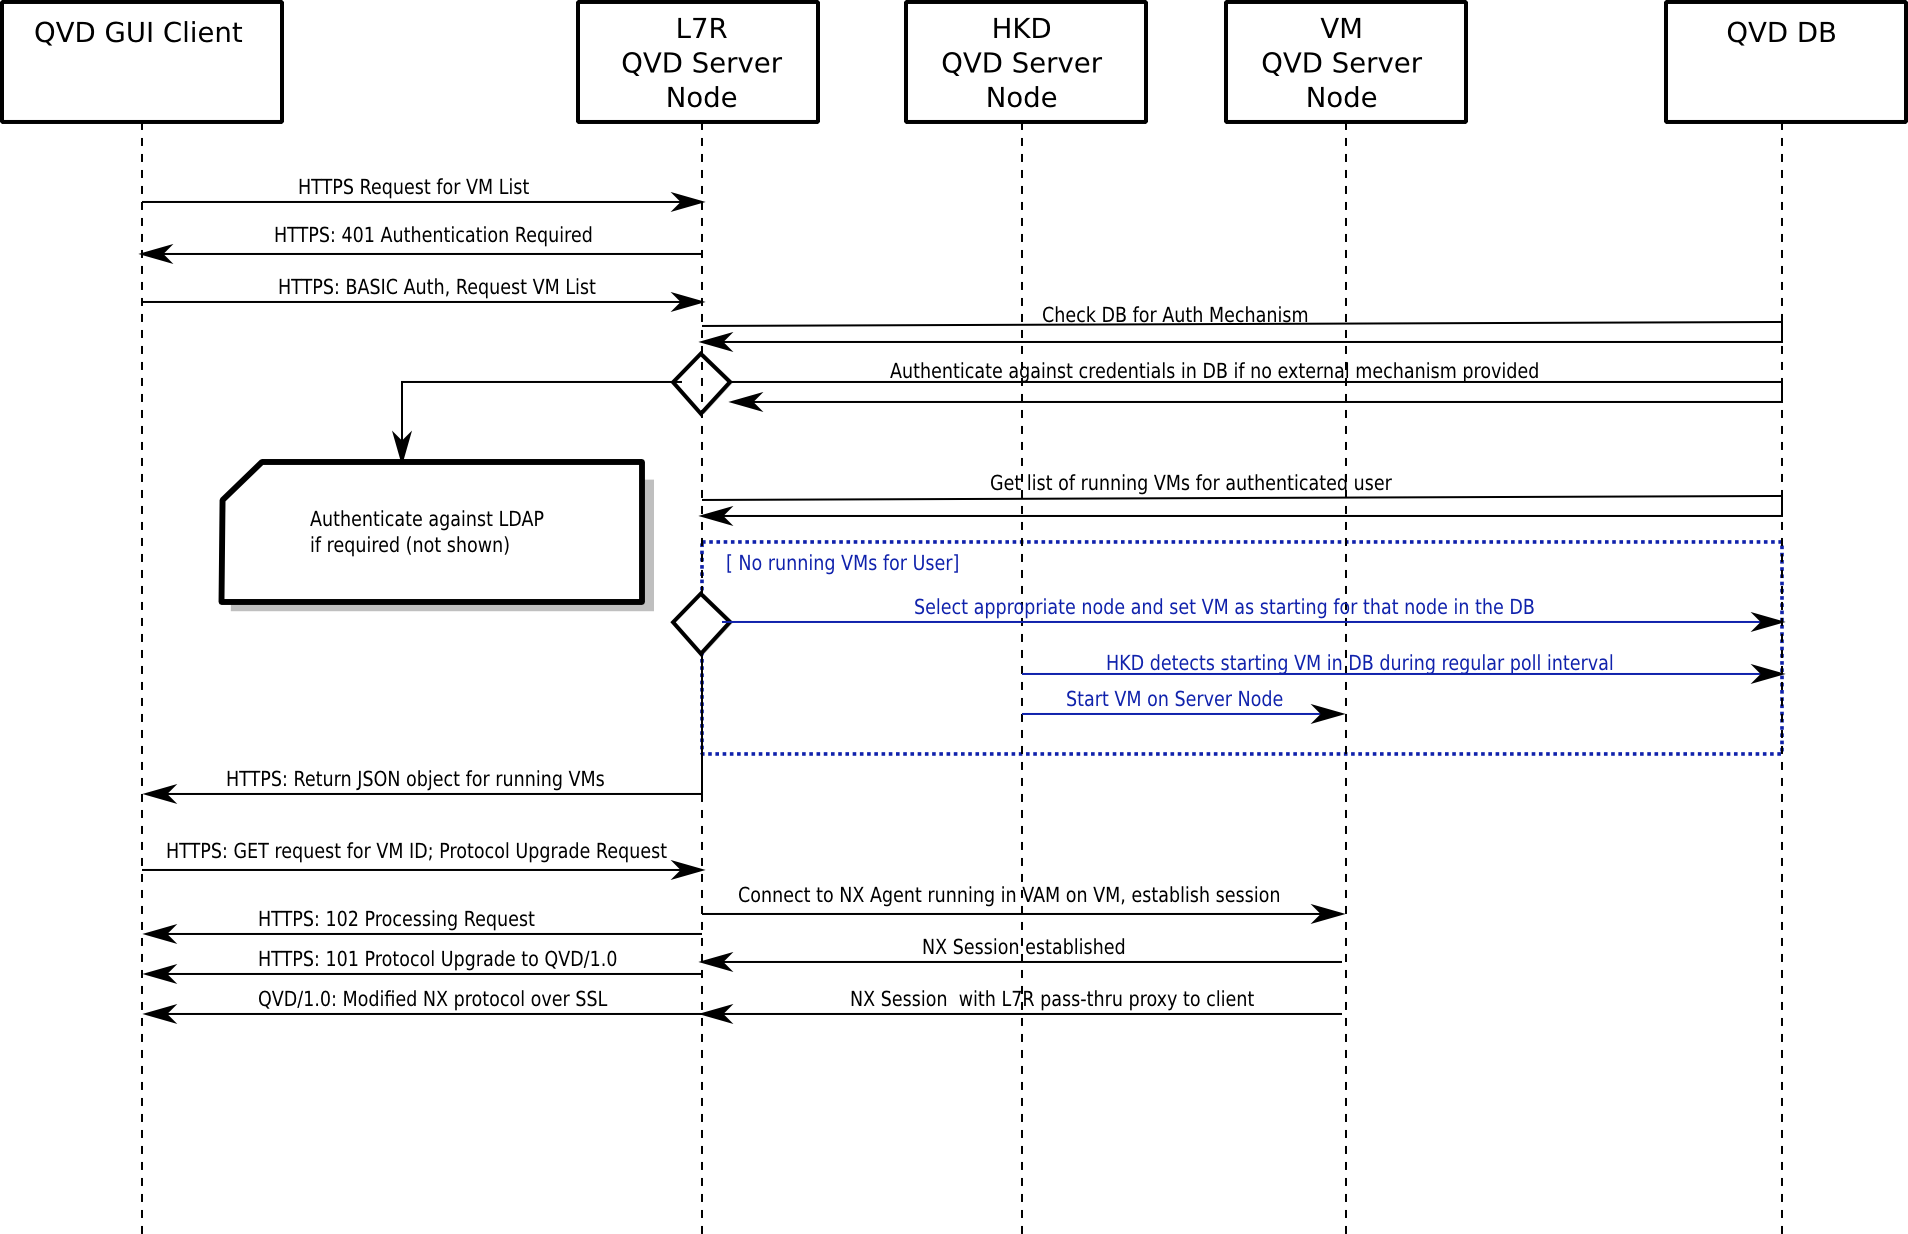
The QVD Client connects directly to the L7R component of the HKD. The Client initiates a connection over HTTPS, where it is prompted to provide HTTP BASIC authentication credentials.
The L7R will then connect to the backend database to determine how authentication should take place (i.e. locally or using an external LDAP directory) and take the appropriate steps to perform the authentication process. The L7R will return an HTTP OK response if the authentication was successful, or will return a 401 Unauthorized if authentication fails.
Once authenticated, the client requests a list of virtual machines that are available to the user. The server responds with a JSON formatted list of virtual machine IDs and their corresponding status. The client selects an appropriate virtual machine to connect to and submits a GET request with the ID of the virtual machine at a standard GET variable. It also requests a protocol upgrade to QVD/1.0 within the HTTP request headers.
The L7R performs the necessary steps to ensure that the virtual machine is up and waiting for connections using the NX protocol. If the virtual machine is not running on any server node, it will determine which node it should be started on and automatically start a virtual machine for that user. In all events, the L7R will determine which node is running the virtual machine and will forward all requests to this machine for all further handling, including checking to see that an NX session can be set up. During this process, the L7R will return a series of HTTP 102 responses indicating the progress of the processing required to establish a connection with the Virtual Machine. If the virtual machine is available, the L7R establishes a connection to the nxagent running on the virtual machine and becomes a pass-thru proxy for the NX session. Once the session is set up, the L7R will issue a final HTTP 101 (Switching Protocols) response to the client, and the protocol for all future interactions with the client will be upgraded to the NX protocol, secured using SSL. The L7R updates the QVD Database to set the status for the virtual machine to indicate that a client is connected.
From this point onward, all communications between the client and the Virtual Machine are performed over the NX protocol via the L7R. When the client disconnects, the L7R updates the QVD Database to represent the change in virtual machine status.
The process flow is indicated in the following diagram:
1.2.4. L7R in an HA load-balanced environment
As already mentioned, Server Nodes are designed for a fully load-balanced environment. In order to cater for this, the L7R element of each HKD is capable of redirecting traffic for a particular virtual machine to any other Server Node in the environment.
The usual configuration is such that a Virtual Machine is started for each user on any one of the server nodes. When a user is authenticated by any L7R within the solution, the L7R determines which server node is currently running a virtual machine for the authenticated user. This is achieved by querying the QVD Database. If a running virtual machine is detected within the environment, the L7R will reroute all traffic for that connection to the appropriate server node.
If no virtual machine is currently running for the user, the L7R makes use of an internal algorithm to determine the most appropriate node to start a new virtual machine for the user. This algorithm is based on assessing which node has the highest quantity of free resources, calculated as the weighted sum of free RAM, unused CPU, and a random number to bring some entropy to the result.
When an appropriate node has been selected, the database is updated so that a virtual machine will be started by the HKD on the correct host. The L7R will then reroute all traffic for that connection to the server node that has been selected to run the new virtual machine.
1.2.5. Virtualization Technologies
QVD supports two different virtualization technologies: KVM (Kernel Virtual Machine) and LXC (Linux Containers). Each virtualization technology comes with its own set of advantages and will prove more useful for particular use cases. Therefore, a good understanding of your own requirements and an understanding of these two technologies will help you to determine how to configure your QVD deployment.
KVM Virtualization
The Kernel Virtual Machine (KVM) is a fully featured hypervisor that runs inside of the kernel of the linux host operating system. The hypervisor ensures absolute separation from the underlying host operating system, allowing you to load completely different operating systems and distributions into each virtual machine and expect them to function just as if they were running on completely separate hardware.
While there is some debate over whether KVM is actually a Type-1 bare-metal hypervisor, since it does require the linux Kernel in order to function, most virtualization experts agree that combined with the linux Kernel, KVM functions in exactly the same way as any other bare-metal hypervisor, such as Xen or VMware’s ESXi. In fact, in the recently published SPECvirt 2011 benchmark reports, KVM came second in performance only to VMWare ESX, indicating a high level of viability as a commercial-grade virtualization platform.
Since KVM uses absolute separation, it is much easier to configure and manage than LXC. However, although it offers competitive performance to other hardware hypervisors, each virtual machine is necessarily running its own kernel. Resources need to be dedicated to each virtual machine, whether they are being used or not. In this way, KVM is not as efficient as LXC, but offers much greater flexibility and ease of management.
LXC Virtualization
Linux Containers (LXC) provide Operating system-level virtualization. In this way, they act as an alternative to the full hardware-level virtualization provided by the KVM hypervisor. LXC behaves in a similar manner to a chrooted environment within Linux, but offers a greater level of isolation and management of resources between containers through the use of namespaces and cgroups. For instance process IDs (PIDs), network resources and mounts for each container will be isolated from other containers and can be logically grouped together to apply resource management rules and other policies specific to the container. This allows you to gain many virtualization benefits while keeping down overall resource requirements and by re-using the same kernel across virtual machines. LXC is fully supported by the Linux Kernel, and has been included in QVD since version 3.1.
1.2.6. Virtual Machines and VMA
Virtual Machines are started by the HKD on a per-user basis. In a production environment, it is usual for there to be a number of different QVD Node Servers running in parallel. Virtual Machines are started for different users across the different QVD Server Nodes, so that there is one virtual machine instance running for each user that needs to be provisioned. If a virtual machine has not been started for a user, and the user connects and authenticates against an L7R, the L7R will use its load-balancing algorithm to determine which node should run the user’s virtual machine and the database will be updated so that the virtual machine will be started on the appropriate node.
When Virtual Machines are started, they load an "Operating System Flavour" or OSF. The parameters for the Virtual Machine are determined by data stored within the QVD-DB for each OSF. In general, the OSF’s Disk Image is loaded from a network share. There is a separate chapter within this document dedicated to creating, editing and managing OSFs.
Virtual Machines make use of overlays in order to best utilize different elements of the Guest operating system, and in order to make particular elements persistent. For instance, while write activity is not persistent within the actual OSF that is loaded, it is important that data written to the user’s home folder or desktop is stored for future connections to the virtual desktop.
Within instances of QVD that make use of KVM virtualization, this is achieved by storing the user’s home directory within a qcow2 image. This is loaded over the home directory within the OSF that is running in the Virtual Machine.
In instances of QVD that make use of LXC virtualization, this is achieved by
taking advantage of unionfs mounts
[<Once again, note that it is
possible to use alternative methods to create a union style mount, including
using the aufs module or by simply using bind mounts to achieve the same
purpose.>]
. The user’s home data and any overlay data is stored within a
separate directory outside of the image used for a virtual machine. These
folders can then be mounted over the base image at runtime, in order to create
a container specific to each user and virtual machine.
The qcow2 image or user home directory is usually stored on a network share, so that it is accessible to any server node within the environment. If the user’s virtual machine is later started on a different Server Node, the user’s home directory can be loaded at run time and the user’s modified data will always be available to the user. Overlays can also be used to make other data such as log and tmp files persistent from a user perspective.
Depending on the virtualization technology configured within QVD, virtual machines will be started either using KVM or LXC. However, it is important to understand that the images for these two different technologies are very different and it is not possible to switch between virtualization technologies.
Once running, each Virtual Machine must load the QVD-VMA (Virtual Machine Agent) in order to function properly. The VMA will ensure that the nxagent is available so that a client is able to connect to the virtual desktop that is created for the user. It also returns different states that helps the L7R to determine user state, which can be fed back to the QVD-DB. When an OSF is created, it is fundamentally important that the QVD-VMA is installed and configured in order for QVD to work at all.
1.3. QVD Administration
QVD Administration can be performed using one of two tools:
-
qa: a command line utility that can be installed on any machine that has the connectivity to the QVD-DB and that is configured appropriately for this purpose.
-
QVD-WAT: a Web-based Administration Tool that allows an Administrator to remotely access the solution and to perform a variety of administrative tasks using a standard web browser.
Both tools require access to the QVD-DB and will need to be configured for this purpose. Nearly all of the commands that can be performed through either of these tools will simply change values for entities within the QVD-DB. Actions are then carried out by the various QVD Server Node elements based on the changes made within the QVD-DB.
The QVD Administration tools are also be used to load new images into QVD and to configure their runtime parameters. In order to facilitate this functionality, these tools need access to the folders where these images are stored and accessed by the Virtual Server Nodes. Usually, this access is provisioned over a network file share such as NFS.
2. Base QVD Configuration
All QVD Components, except the QVD Client and the QVD VMA, make use of the QVD-DB. As a result any system that makes use of a QVD Component should have a QVD Configuration file that provides the information required to connect to the database.
This information should be configured within a file that is stored at /etc/qvd/node.conf. This path is not created automatically. You can either create it manually, or you can use the provided configuration template by doing the following:
root@myserver:~# cp -R /usr/share/qvd/config /etc/qvd
The node.conf file should at least contain the following:
#
# QVD Node Configuration
#
nodename = mycomputer

# Database connection information.
# database.host: where the QVD database is found
# database.name: the name of the QVD database
# database.user: the user account needed to connect
# database.password: the password needed to connect
database.host = mycomputer
database.name = qvddb
database.user = qvd
database.password = passw0rd

path.log = /var/log/qvd
log.filename = ${path.log}/qvd.log
log.level = INFO
You should ensure that the nodename, database.host, database.name, database.user and database.password contain values that match the environment that you have set up.
Once these settings are in place any utility that requires access to the database will have the appropriate configuration details to do so.
The log related entries must be set here because the QVD components initialize the logging system before connecting to the database.
2.1. Other QVD Configuration Parameters
Outside of the configuration file, QVD stores the majority of its configuration options within the QVD-DB. There are a wide range of parameters that apply to different components within the QVD infrastructure. These parameters can be set using the QVD CLI Administration Utility. We discuss the appropriate steps for this in the chapter titled QVD CLI Administration Utility.
While it is possible to set any of the following configuration parameters within the node.conf file, the settings within the QVD-DB will always have precedence. This means that if a change is made to the settings contained within the database, the settings stored within the configuration file would become obsolete and confusing for future administration work. Therefore, we strongly recommend that these options are only updated within the database using the QVD CLI Administration Utility.
This section describes some of these additional configuration parameters. While there are many other settings which you will be able to view using the QVD CLI Administration Utility, some of these (such as the parameters prepended with the word internal) should never be modified unless under the expert guidance of a QVD Support Engineer. In general, we do not recommend that you change any of these configuration parameters unless you have been guided to do so, either by instruction within this manual, or by QVD Support.
Note that in order to set these parameters, you should have already installed and configured QVD-DB.
|
|
Some configuration parameters may relate to the parameters set for another component in the system. In these cases, you may need to update the parameter in more than one place. A typical example would be the l7r.port setting which would affect the client.host.port setting. |
|
|
Modifying any QVD internal parameter will void any support agreement that you have set out for QVD. These parameters are subject to change in any release of the software and are designed to help developers debug behaviour inside of the product. |
2.1.1. QVD System Paths
The following options are available to change the paths that QVD uses to search for applications, certificates and other QVD specific data.
path.run = /var/run/qvd
path.log = /var/log
path.tmp = /var/tmp
path.storage.root = /var/lib/qvd/storage
path.storage.staging = ${path.storage.root}/staging
path.storage.images = ${path.storage.root}/images
path.storage.overlays = ${path.storage.root}/overlays
path.storage.homes = ${path.storage.root}/homes
path.ssl.certs = ${path.run}/ssl
path.ssl.ca.system = /etc/ssl/certs
path.ssl.ca.personal = .qvd/certs
path.cgroup = /sys/fs/cgroup
path.cgroup.cpu.lxc = /sys/fs/cgroup/cpu/lxc
path.serial.captures = ${path.tmp}/qvd

command.kvm = kvm
command.kvm-img = kvm-img
command.nxagent = /usr/bin/nxagent
command.nxdiag = /usr/bin/nxdiag.pl
command.x-session = /etc/X11/Xsession

command.useradd = /usr/sbin/useradd
command.userdel = /usr/sbin/userdel
The above values are the default values.
-
path.run: the run path (usually referenced by other path options)
-
path.log: the base path to store log output
-
path.tmp: the path to store temporary files
-
path.storage.root: the base path for the main storage area used by QVD
-
path.storage.staging: the staging directory used to hold temporary DIs
-
path.storage.images: the images directory used to hold registered DIs
-
path.storage.overlays: the overlays directory used to hold overlay qcow images
-
path.storage.homes: the homes directory used to hold user home data qcow images
-
path.ssl.certs: the path to store SSL certificates used by QVD
-
path.ssl.ca.system: the path to where system CA certificates are stored
-
path.ssl.ca.personal: the path to where local or personal CA certificates are stored
-
path.serial.captures: the location used to store serial captures (if enabled)
-
command.kvm: the command to run the Kernel Virtual Machine
-
command.kvm-img: the command used to work with QEMU virtual disks within the KVM
-
command.nxagent: the path to the nxagent binary (usually only used by the VMA on an OSF)
-
command.nxdiag: the path to the nxdiag.pl script used by the VMA to ensure that nxagent is running properly
-
command.x-session: the path to the XSession shell script run by the system when an X Windows session is started
-
command.useradd: the path to the useradd script used by the system to add users
-
command.userdel: the path to the userdel script used by the system to remove users
2.1.2. Logging
The following options can be used to change the path to the log file and to control log level output.
path.log = /var/log
log.filename = ${path.log}/qvd.log
log.level = INFO
The above values are the default values.
-
path.log: base path for log files
-
log.filename: the path to the log file
-
log.level: the log level output, values can be: ALL, DEBUG, INFO, WARN, ERROR, FATAL, OFF
These configuration options must be set in the QVD configuration file /etc/qvd/node.conf because the logging system is initialized before connecting to the database. Values set in the QVD database using the qvd-admin tool are ignored.
QVD generates its log with Log::Log4perl which has many logging backends. You may choose send the log output to syslog, file or even to a database. In order to log to syslog, the following configuration variables can be set in node.conf:
log4perl.appender.SYSLOG = Log::Dispatch::Syslog
log4perl.appender.SYSLOG.layout = Log::Log4perl::Layout::PatternLayout
log4perl.appender.SYSLOG.layout.ConversionPattern = %d %P %F %L %c - %m%n
log4perl.rootLogger = DEBUG, SYSLOG
log.level = DEBUG
For a complete breakdown of the different logging options available to you using the log4perl module, please refer to the log4perl documentation.
If you select to log to file, ensure that you use some form of log rotation in order to control the growth of your log files.
2.1.3. L7R Configuration Options
You are able to specify the following additional options to control the L7R:
l7r.as_user = root
l7r.use_ssl = 1
l7r.port = 8443
l7r.address = *
l7r.pid_file = ${path.run}/l7r.pid
l7r.auth.plugins = default
l7r.loadbalancer.plugin = default
l7r.loadbalancer.plugin.default.weight.ram = 1
l7r.loadbalancer.plugin.default.weight.cpu = 1
l7r.loadbalancer.plugin.default.weight.random = 1
The values set above are the default values.
-
l7r.as_user: the user that should be used to run the QVD L7R daemon
-
l7r.use_ssl: whether or not to make use of SSL to encrypt client connections
-
l7r.port: the port that should be listened on for client connections to the L7R (the client.host.port setting for each client would need to be configured for this value as well)
-
l7r.address: the IP address that the L7R should bind to
-
l7r.pid_file: the path to the PID file that is created when the L7R daemon is running
-
l7r.auth.plugins: can be used to provision additional authentication plugins such as OpenSSO
-
l7r.loadbalancer.plugin: can be used to include an alternative load balancing algorithm plugin
-
l7r.loadbalancer.plugin.default.weight.ram: weight to be assigned to RAM resources for the default load balancing algorithm
-
l7r.loadbalancer.plugin.default.weight.cpu: weight to be assigned to CPU resources for the default load balancing algorithm
-
l7r.loadbalancer.plugin.default.weight.random: weight to be assigned to the randomizer for the default load balancing algorithm
2.1.4. HKD Configuration Options
You are able to specify the following additional options to control the HKD:
hkd.vm.starting.max = 6
The value set above is the default value.
-
hkd.vm.starting.max: the maximum number of virtual machines that are concurrently in the starting state that the HKD will allow before starting a new instance on a Server Node
2.1.5. VM Options
There are some options that can be set to control virtual machine behaviour within QVD:
vm.overlay.persistent = 0
vm.kvm.virtio = 1
vm.vnc.redirect = 0
vm.vnc.opts =
vm.serial.redirect = 1
vm.serial.capture = 0
vm.network.ip.start =
vm.network.netmask =
vm.network.gateway=
vm.network.bridge=
vm.network.dns_server=
The values set above are the default values.
-
vm.overlay.persistent: whether to make use of persistent overlays for temporary and log files. Note that this persistent will not be persistent between nodes if the overlay is stored locally for example in a btrfs setup
-
vm.kvm.virtio: whether to make use of the virtio driver for networking (the OSF running in the image must support the virtio driver)
-
vm.vnc.redirect: enable the builtin VNC server when using KVM virtualization. (Useful for troubleshooting an image)
-
vm.vnc.opts: additional configuration for KVM’s builtin VNC server
-
vm.serial.redirect: enable serial port console when using KVM virtualization
-
vm.serial.capture: capture serial console output to file
-
vm.network.ip.start: the start IP address for the range allocated for the virtual machines on the QVD bus network
-
vm.network.netmask: CIDR netmask for the size of the QVD bus network
-
vm.network.gateway: IP of the firewall on the QVD bus network that will be passed by DHCP to the virtual machines
-
vm.network.bridge: Name of the bridge interface
-
vm.network.dns_server: IP of the DNS service to be configured by DHCP on the QVD bus network
Note that the vm.network settings are generally required in order for the QVD-Node servers to function correctly.
3. QVD-DB
The QVD-DB is the glue that ties all of the QVD components together. It makes use of an underlying PostgreSQL DBMS, and should be installed on an Ubuntu 12.04 (Precise Pangolin) GNU/Linux operating system.
All of the configuration and runtime information for the entire QVD VDI is stored in the database and if it fails the full platform will stop working. For that reason, it is highly recommended that the database is installed in a high availability configuration. You can find out how to configure PostgreSQL in an HA configuration at Linux-HA + DRBD + PostgreSQL and High Avaibility PostgreSQL HOWTO.
The actual hardware requirements for QVD-DB are very modest and any modern server with just two CPU cores and 2GB of RAM will be able to support the database load.
|
|
At the moment QVD works only with PostgreSQL 8 or 9. 9.1 is the version shipped with Ubuntu 12.04 (Precise Pangolin), whist SLES 11 provides version 8.3. |
3.1. Installing and configuring QVD-DB
On the system that you intend to install QVD-DB, you will need to add the QVD repository to your apt sources.
Firstly, add the QVD packages public key to your trusted keys (as root):
# wget -qO - https://www.theqvd.com/packages/key/public.key | sudo apt-key add -
Now, add the repository:
# echo "deb http://theqvd.com/packages/ubuntu-trusty QVD-3.5.0 main" > \
/etc/apt/sources.list.d/qvd-35.list
# apt-get update
The preferred way to install the central database is with the package perl-qvd-db. It installs the PostgreSQL database system if needed, and provides the tools to provision the database. You should do this as root, as you will need to perform a number of steps that will require full root privileges:
# apt-get install perl-qvd-db
For SLES the process is similar.
Firstly, add the QVD packages public key to your trusted keys (as root):
# rpm --import https://www.theqvd.com/packages/key/public.key
Now, add the repository:
# zypper ar http://theqvd.com/packages/sles/11SP2/stable QVD
# zypper ref
Use zypper to install the database:
# zypper install perl-QVD-DB
3.1.1. Creating the QVD User and Database
You will need to create a user within PostgreSQL to access the QVD Database, and you will need to create the actual database where QVD can set up its tables and store its data. To do this, you will need to use the sudo command to change to the postgres account:
$ sudo su - postgres
As the postgres user, you can create PostgreSQL user accounts with the createuser command. It will prompt for a password for the new user and ask some details on the user account. In general, you can answer n to all of the options that are presented.
For example, to create a user called qvd you would use the following command.
postgres@myserver:~$ createuser -SDRP qvd
Enter password for new role: passw0rd
Enter it again: passw0rd
|
|
For more information on this command, please refer to the PostgreSQL documentation at: http://www.postgresql.org/docs/9.1/static/app-createuser.html |
The new user can now be assigned as the owner of a database. To create a database for QVD and to assign ownership, use the createdb command. Use the -O switch to set the database’s owner to the account you wish to use. In this case we will set the owner to the new user that we created in the previous step.
postgres@myserver:~$ createdb -O qvd qvddb
|
|
For more information on this command, please refer to the PostgreSQL documentation at: http://www.postgresql.org/docs/9.1/static/app-createdb.html |
3.1.2. PostgreSQL Configuration Requirements
In order to support concurrent access from all the nodes in the QVD farm and handle transactions coherently, the transaction isolation level must be changed from read commited to serializable. This is a very important step that should not be ommited or your database would eventually become inconsistent and QVD fail to work.
Furthermore, it is necessary to allow network access to the database. By default, it is usually set to only listen for queries on localhost. This should be changed to listen on all interfaces.
To do this you must edit the PostgreSQL configuration files postgresql.conf and pg_hba.conf. On Ubuntu they are located in /etc/postgresql/9.1/main. On SUSE systems, you will find these files in /var/lib/pgsql/data.
The transaction isolation level is controlled with the default_transaction_isolation setting. To enable network access to PostgreSQL in general, change the listen_addresses setting from localhost to *.
root@myserver:~# cd /etc/postgresql/9.1/main #this would be /var/lib/pgsql/data on SLES
root@myserver:/etc/postgresql/9.1/main# vi postgresql.conf
listen_addresses = '*'
default_transaction_isolation = 'serializable'
To enable network access for the user qvd, add the following line to pg_hba.conf (its format follows: host database user CIDR-address auth-method [auth-options]).
root@myserver:/etc/postgresql/9.1/main# vi pg_hba.conf
host  qvddb qvd 192.168.0.0/24  md5
|
|
Make sure to replace the default network 192.168.0.0/24 with the network that your QVD platform uses. |
Restart PostgreSQL for the changes to take effect.
# service postgresql restart
for Ubuntu, and for SLES:
# /etc/init.d/postrgresql restart
3.2. Provisioning QVD-DB
The QVD-DB package includes a script that will help you to provision the QVD Database with all of the tables that are required for QVD to function correctly. In order for this script to work, it requires that the QVD Database settings have been correctly entered in the /etc/qvd/node.conf file.
To provision the database, execute qvd-deploy-db.pl (found in folder /usr/lib/qvd/bin/ which you may want to add to your path if you are going to spend any length of time with QVD).
# qvd-deploy-db.pl
Once you have run this command, QVD-DB will be ready to use by any component within the QVD environment.
3.3. Testing access to QVD-DB
Any system that requires access to the database (e.g. any of the QVD Server Node components, the QVD-WAT or the CLI Administration utility) should be tested to ensure that database connectivity is available. This can be easily achieved by connecting to the database and listing the tables used by QVD. To do this, you will need to ensure that you have the PostgreSQL client installed on the host that you are connecting from. You do this by installing postgresql-client on Ubuntu, and postgresql on SLES:
Use apt-get on Ubuntu:
# sudo apt-get install postgresql-client
Use zypper on SLES:
# zypper install postgresql
To list the tables in the QVD database using the PostgreSQL client, you can do the following:
anyuser@otherserver:~$ psql -U qvd -W -h myserver qvddb
Password for user qvd:
psql (9.1.5)

qvddb=> \d

               List of relations
 Schema |      Name       |   Type   |  Owner
--------+-----------------+----------+---------
 public | configs            | table    | hue
 public | di_properties      | table    | hue
 public | di_tags            | table    | hue
 public | di_tags_id_seq     | sequence | hue
 public | dis                | table    | hue
 public | dis_id_seq         | sequence | hue
 public | host_cmds          | table    | hue
 public | host_properties    | table    | hue
 public | host_runtimes      | table    | hue
 public | host_states        | table    | hue
 public | hosts              | table    | hue
 public | hosts_id_seq       | sequence | hue
 public | osf_properties     | table    | hue
 public | osfs               | table    | hue
 public | osfs_id_seq        | sequence | hue
 public | ssl_configs        | table    | hue
 public | user_cmds          | table    | hue
 public | user_extras        | table    | hue
 public | user_extras_id_seq | sequence | hue
 public | user_properties    | table    | hue
 public | user_states        | table    | hue
 public | users              | table    | hue
 public | users_id_seq       | sequence | hue
 public | vm_cmds            | table    | hue
 public | vm_properties      | table    | hue
 public | vm_runtimes        | table    | hue
 public | vm_states          | table    | hue
 public | vms                | table    | hue
 public | vms_id_seq         | sequence | hue
(29 rows)

qvddb=> \q
3.4. Backing up and Restoring QVD-DB
A very simple backup technique would involve dumping the entire PostgreSQL database to file:
# pg_dump -U postgres postgres > yourfile.backup
To rollback your database to match a backup file, you can run the following command:
# psql -U postgres postgres < yourfile.backup
|
|
For advanced operations, check http://www.postgresql.org/docs/9.1/static/backup.html |
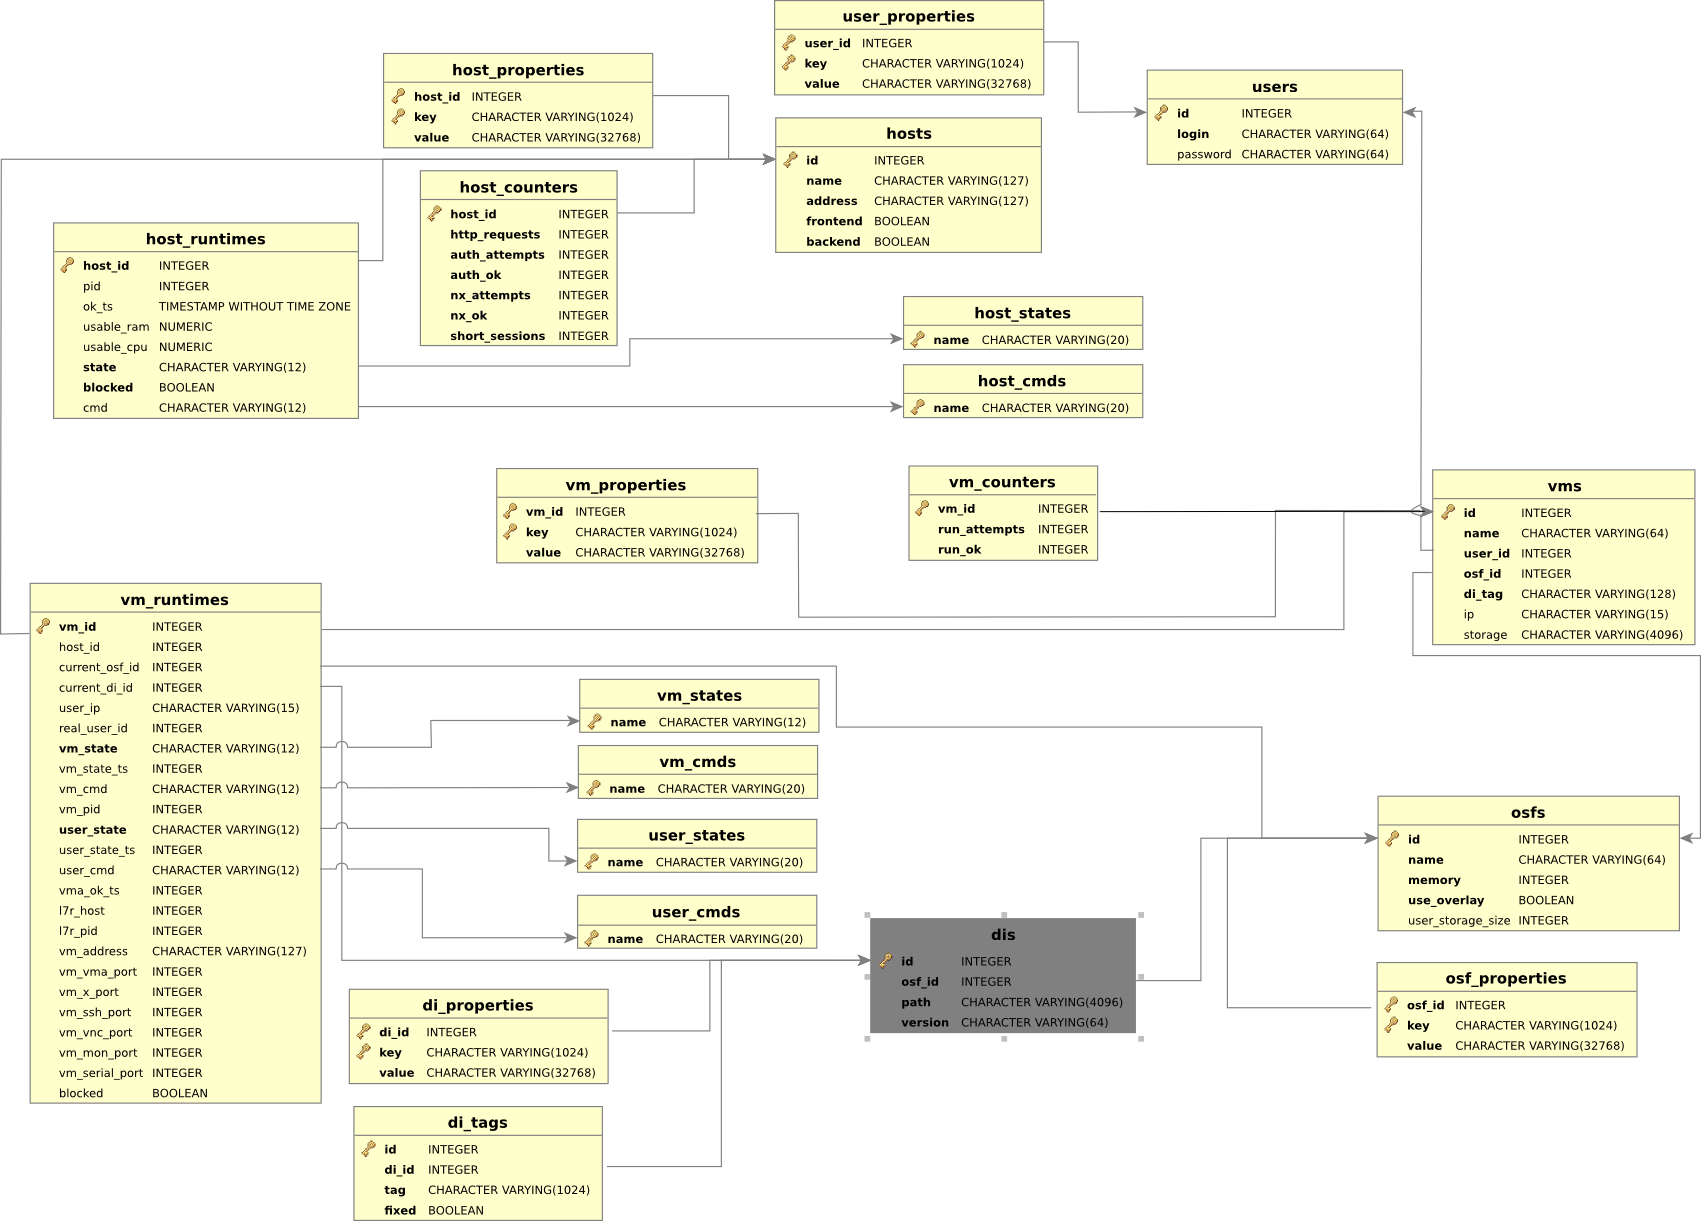
3.5. QVD-DB Data Relationship Model
The following diagram shows the general data model for data stored within the QVD-DB.
|
|
It is recommended that Administrators do not attempt to modify entries in the database directly as it is highly likely that this will break the QVD installation. Any changes made to the data stored in the database, outside of those achieved using the QVD tools, will void any support agreement. |
4. QVD Web Administration Tool
The QVD Web Administration Tool (QVD-WAT) is a web-based GUI that provides QVD system administrators with all of the tools required to administer a fully installed QVD solution. As a web-based utitlity, QVD-WAT can be used remotely to provision new users, configure virtual machines and to monitor the health of the various components within the solution.
4.1. Installing and configuring QVD-WAT
On the system that you intend to install QVD-WAT, you will need to add the QVD repository to your apt sources. For Ubuntu, you can do this as follows:
Firstly, add the QVD packages public key to your trusted keys (as root):
# wget -qO - https://www.theqvd.com/packages/key/public.key | sudo apt-key add -
Now, add the repository:
# echo "deb http://theqvd.com/packages/ubuntu-trusty QVD-3.5.0 main" > \
/etc/apt/sources.list.d/qvd-35.list
# apt-get update
Before proceeding with the installation, it should be noted that as of Ubuntu 14.04, one of the dependencies of the WAT (namely, the package libapache2-mod-fastcgi) is no longer distributed among Ubuntu’s main repository. If you’re installing the QVD WAT in Ubuntu 14.04 or later, you should edit the file /etc/apt/sources.list and uncomment the lines referring to the multiverse repository, then issue an apt-get update to make APT aware of the newly available packages.
# sudo apt-get install perl-qvd-admin-web
For SLES, the process is similar.
Firstly, add the QVD packages public key to your trusted keys (as root):
# rpm --import https://www.theqvd.com/packages/key/public.key
Now, add the repository:
# zypper ar http://theqvd.com/packages/sles/11SP2/stable QVD
# zypper ref
And use zypper to install QVD-WAT.
# zypper install perl-QVD-Admin-Web
The QVD-WAT requires access to the QVD Database. You will need to ensure that the QVD Node configuration file is set up correctly in order for this QVD-WAT to function properly. You can find out how to do this in chapter titled QVD Base Configuration.
As of QVD 3.1, the Web Administration Tool uses the Apache web server (as well as bundling a compatible version of libcatalyst-perl, previously a dependency). The packages provide a basic site file /etc/apache2/site-enabled/qvd-wat.conf, which you may wish to have amend if necessary, though that shouldn’t be necessary for most vanilla setups.
You will need to restart apache afterwards if you do make changes:
# service apache2 restart
or
# /etc/init.d/apache2 restart
if you are using SLES.
4.2. QVD-WAT Web Server Port
By default, QVD-WAT listens on the TCP port 3000 for incoming HTTP requests. If you are running another service on a conflicting port, or you would prefer to use some other port number for some reason, it is possible to change the port used by QVD-WAT by editing or creating /etc/default/qvd-wat. The easiest way to do this is to do:
# echo 'PORT=4000' > /etc/default/qvd-wat
Once you have changed the port, you will need to restart QVD-WAT, to access it on the different port number.
4.3. The QVD-WAT Interface
To access QVD-WAT you can open a web browser and point it at the host where you are running the QVD-WAT service. If locally, you can point your browser to http://localhost:3000/. Note that you will need to specify the port number that QVD-WAT is running on. By default, this is set to 3000, but you are able to change this.
4.3.1. Authentication
QVD-WAT currently only supports authentication for a single user. The default username is set to admin and the default password is also set to admin.
It is possible to change these values using the QVD CLI Administration Utility. On a system that has the QVD CLI Administration Utility installed, run the following commands:
# qa config set wat.admin.login=administrator
# qa config set wat.admin.password=myS3cR3t
The above commands will change the username to administrator and the password to myS3cR3t.
If you are not authenticated and you connect to the QVD-WAT interface, you will be presented with a login screen.
4.3.2. QVD Dashboard
After authentication the administrator is presented with the QVD Dashboard. This screen provides a quick overview of the status of the various components and elements within a QVD solution.
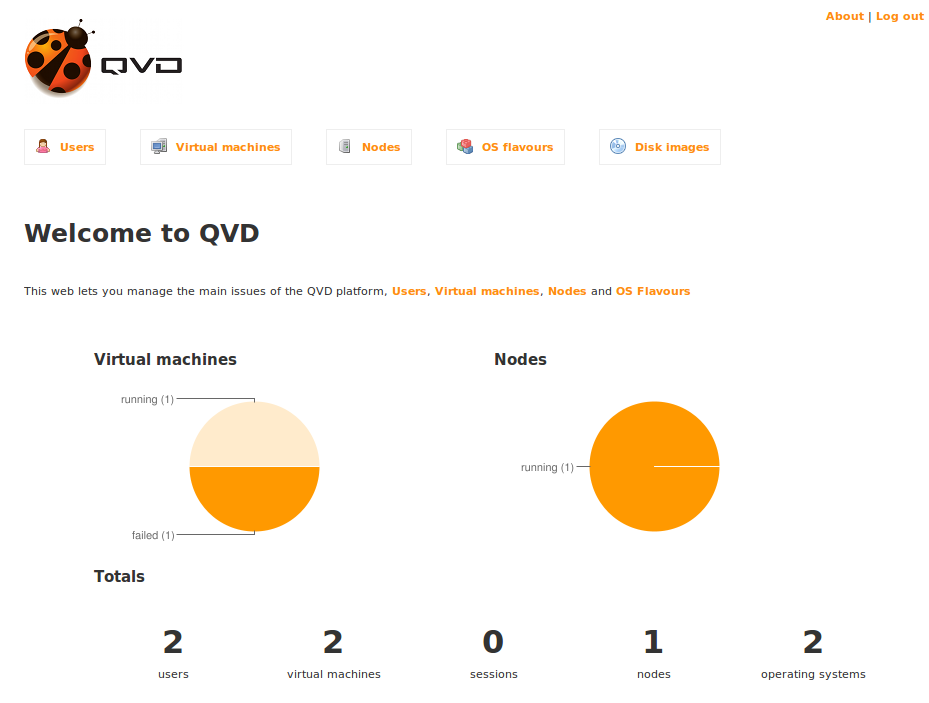
Pie graphs are used to display the proportion of Virtual Machines that are running, stopped or failed; and QVD Server Nodes that are running or stopped.
There is also a summary displaying counters for the numbers of users, virtual machines, actively running sessions, nodes, operating systems and disk images that are active within the QVD infrastructure.
The administrator can return to this screen by clicking on the QVD logo image on the top left of the web page, or alternately setting the browser URL back to the root of the site: http://localhost:3000/.
4.3.3. Navigation
Primary navigation within QVD-WAT is largely handled by a Navigation Bar that runs along the top of all web-pages.

The primary navigation links are as follows:
-
Users: http://localhost:3000/users/ - Provides the screen to manage and add users. Since virtual machines are assigned to users, the option to create a new virtual machine is provided through this channel when you choose to view details for a user.
-
Virtual machines: http://localhost:3000/vm/ - Provides a screen to administer existing virtual machines. A java applet to telnet into any virtual machine’s serial console is also available via this channel, when you choose to view the details for a particular virtual machine. Note that you can only add a virtual machine through the Users link, since they need to be assigned to a user when they are created.
-
Nodes: http://localhost:3000/hosts/ - Provides a screen to add new QVD Server Nodes to the QVD infrastructure, and to view the running state of any existing server node.
-
OS Flavours: http://localhost:3000/osf/ - Provides a screen to add operating system "flavours" to the QVD infrastructure. There is also the option to view and edit the running parameters for any existing image.
-
Disk Images: http://localhost:3000/di/ - Provides a screen to manage disk images for the OSFs. These contain the actual operating system files and directories.
4.3.4. Users
Users are managed within QVD-WAT by clicking on the Users link in the Navigation bar, or by going to the URL http://localhost:3000/users/.
This page displays a list of users that have already been provisioned within the QVD environment. Users are listed by ID along with their login name, and their state within the environment.
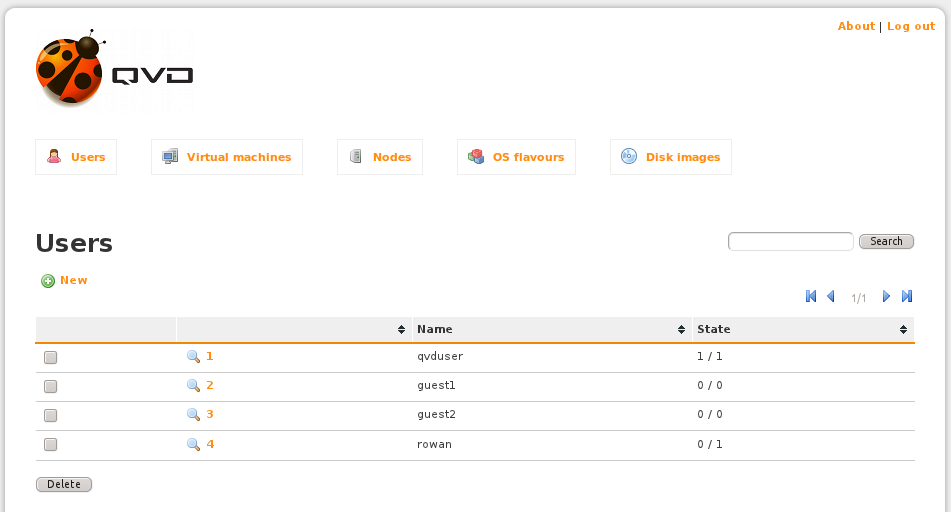
Note that in the above image, users are listed as having different states. A user with state set to 0/0 has no active session and has no virtual machine assigned. A user with state set to 0/1 has a virtual machine assigned but is not currently running a session. A user with state set to 1/1 is currently running a session and has a single virtual machine assigned.
Adding a User
It is simple to add a user to the environment using QVD-WAT. On the Users page, you will
notice that there is a button
 above the user list:
Clicking on the New button will take you to the New User page within the QVD-WAT. Here you are prompted to provide a Login username and Password and to Confirm Password.
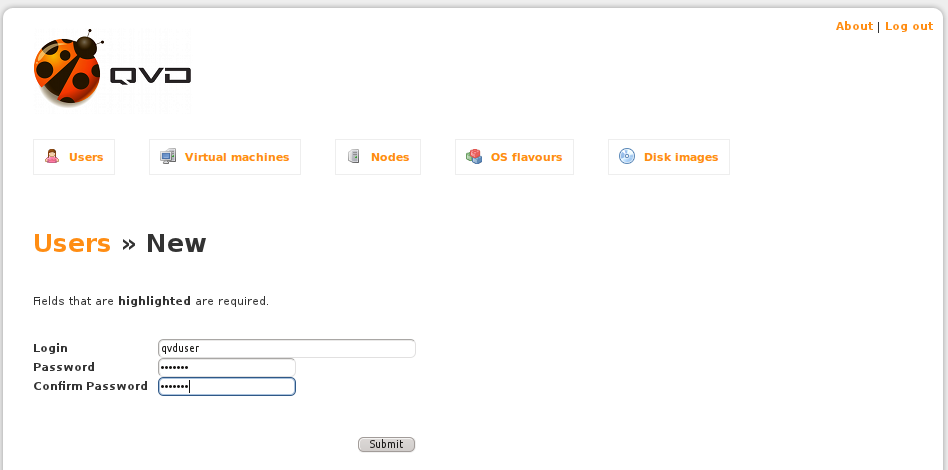
By clicking on the Submit button, the new user will be created within the QVD database.
|
|
If you choose to make use of an external authentication mechanism such as LDAP you will still need to add the users to the QVD Database in order to be able to assign virtual machines to them. The usernames should match the entries in LDAP. The password that is stored for the user within the QVD Database will be ignored and the user will actually authenticate against the credentials stored in LDAP. |
Deleting Users
Deleting users from QVD using the QVD-WAT is simple. On the Users page, you will notice that there is a checkbox next to each user entry in the Users List. By simply checking the checkbox next to each entry that you wish to remove, you are able to select the users that should be deleted. When you have finished your selection, you can click on the Delete button at the bottom of the User List.
You will be prompted to confirm your intention to delete the users from the system. You will need to affirm your decision before the users are actually removed.
Changing a User Password
To change the password for a user, you will need to find the user in the User List
displayed on the Users Page and click on the magnifying glass icon next to the user’s
User ID
 . This will
take you to the User Profile page.
. This will
take you to the User Profile page.
Here, you will be able to locate and click on the
 link.
link.
This will take you to the Change Password page, where you will be able to enter a new password for the user.
|
|
If you have opted to make use of an external authentication mechanism such as LDAP, password changes performed through the QVD-WAT will not update the user’s password within the LDAP directory. |
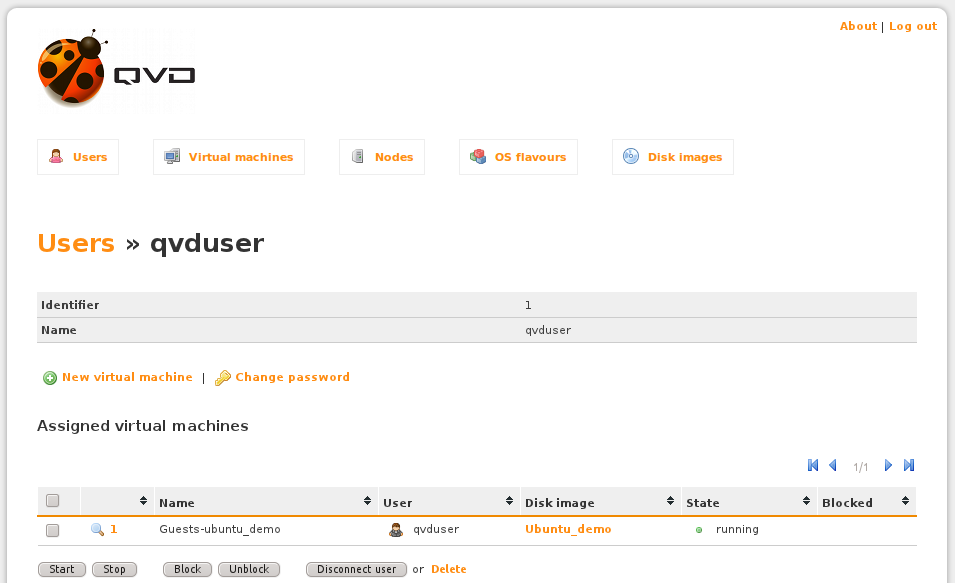
Assigning a Virtual Machine To A User
In order for a user to be able to login to a virtual desktop environment, the user must have a
virtual machine assigned. This is easily achieved by finding the user in the User List
displayed on the Users Page. Click on the magnifying glass icon
next to the user’s User ID. This will
take you to the User Profile page.
On the User Profile page, locate and click on the
 link.
This will take you to the New Virtual Machine Page. Here you can enter a name for the Virtual Machine that
will make it easy to identify. You will then need to select which loaded OSF you would like to run within
the Virtual Machine from the list of OSFs. As soon as you click on an OSF within the list, the virtual
machine will be created and assigned to the current user.
link.
This will take you to the New Virtual Machine Page. Here you can enter a name for the Virtual Machine that
will make it easy to identify. You will then need to select which loaded OSF you would like to run within
the Virtual Machine from the list of OSFs. As soon as you click on an OSF within the list, the virtual
machine will be created and assigned to the current user.

After creating a new virtual machine, you will automatically be taken to the Virtual Machines Page.
|
|
You can assign multiple virtual machines to a single user. These may contain different OSFs, allowing the user to perform a variety of different tasks. If a user attempts to connect using the QVD Client, and multiple virtual machines are available to the user, the user will be presented with a menu of the available virtual machines to select from before the connection is established. |
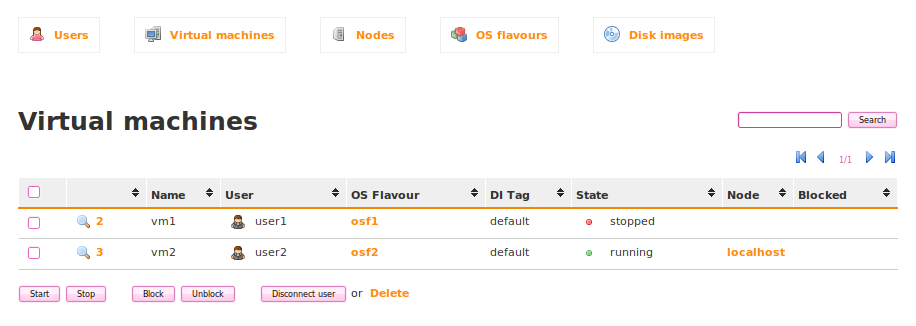
4.3.5. Virtual Machines
The Virtual Machines Page is usually accessed by clicking on the Virtual Machines link in the Navigation bar, or by going to the URL http://localhost:3000/vm/, within the QVD-WAT.
This page displays a list of Virtual Machines that have already been created and assigned to users within the QVD environment. Virtual Machines are listed by ID along with their name, the user that they have been assigned to, the OSF that they will load, their state within the environment, and the node where the virtual machine is running.
Starting and Stopping Virtual Machines
While the L7R component of any Server Node that receives an authentication request will automatically start an instance of a virtual machine for the user that has been authenticated, if one is not already running, this takes time and delays the client from presenting the desktop to the user. It is usually a good idea to start up virtual machine instances beforehand, so that users do not have to wait for an image to boot.
Starting a Virtual Machine within the QVD-WAT is trivial. Check the checkboxes next to each of the Virtual Machines that you wish to start and then click on the Start button at the bottom of the list.
|
|
If you want to start all of the listed Virtual Machines, you can click on the checkbox in the header of the table. |
While a machine is starting up, you will see that the state first changes to starting_2 and then eventually changes to running. If something goes wrong during the startup, the state will change to failed and usually the Blocked flag will be set.
To stop any Virtual Machine within the environment, follow the same procedure. Check the checkboxes for the Virtual Machines that you want to stop, and then click on the Stop button at the bottom of the list.
Virtual Machine Blocking and Unblocking
Virtual Machines can enter a Blocked state. This means that even if they are started, a user will not be able to login to the desktop using the client. Usually machines automatically enter a Blocked state if they fail to start correctly or if there is some problem either with their network configuration or with the QVD-VMA that should be running on each virtual machine. However, it is also possible to force the Blocked state using the QVD-WAT. This is usually done if an administrative task needs to be performed on the Virtual Machine, and the administrator does not want anybody to be accessing the virtual machine at the same time.
In order to Block a Virtual Machine, check the checkbox next to the Virtual Machine that you want to disable, and then click on the Block button at the bottom of the Virtual Machine list. You will be prompted to confirm that you intend this action.
Once the Virtual Machine has been blocked, you will be able to access it via the Terminal Console in order to perform maintanence.
It is equally trivial to Unblock a Virtual Machine. Check the checkbox next to the Virtual Machine that you want to enable, and then click on the Unblock button at the bottom of the Virtual Machine list. You will be prompted to confirm that you intend this action.
Unblocking a Virtual Machine that has failed to start properly will not fix the problem. It only really makes sense to Unblock a Virtual Machine if you have purposefully Blocked it or if you have just finished resolving a startup problem. If a machine is Blocked as a result of a startup failure, you will more than likely need to edit the underlying OSF.
Deleting a Virtual Machine
Since it is possible to assign more than one Virtual Machine to a user, there may be times that you wish to delete a particular virtual machine. This is a trivial action. On the Virtual Machines page, check the checkbox next to the Virtual Machine that you want to delete, and then click on the Delete link at the bottom of the Virtual Machine list. You will be prompted to confirm that you intend this action.
Disconnecting a User
During periods of maintenance, you may find that you need to disconnect users from their Virtual Machines. This can be acheived easily. On the Virtual Machines page, check the checkbox next to the Virtual Machine that you want to disconnect a user from, and then click on the Disconnect User button at the bottom of the Virtual Machine list. You will be prompted to confirm that you intend this action.
This action is performed without any warning to the user. The client will simply disconnect the moment that the command is issued. While no data will be lost, unless the Virtual Machine is restarted, the user will be unaware of the reason for the dropped connection. As a result, this action should be used with care.
Editing Runtime Parameters
It is possible to edit the runtime parameters for any virtual machine. To do this, you will need to go to
the Virtual Machines page and find the virtual machine within the Virtual Machine List. Each Virtual Machine
entry includes the Virtual Machine identifier and a magnifying glass icon
which acts as a link through to a page
where you are able to view the current runtime parameters for that Virtual Machine.

In order to edit any of these parameters, you can click on the
 button to render this page as a form that allows you to change some of the runtime options within the
virtual machine.
button to render this page as a form that allows you to change some of the runtime options within the
virtual machine.
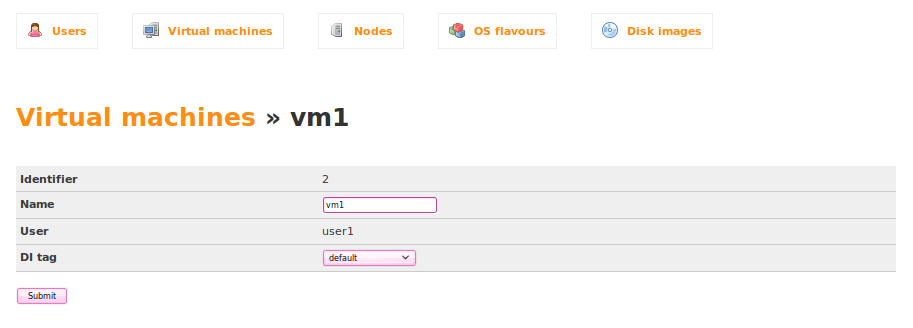
Here you are able to change the following parameters:
- Name
-
The virtual machine name that will be listed in the QVD-WAT and that will be presented to the user in a menu if the user has more than one Virtual Machine assigned.
- DI Tag
-
The Disk Image tag this VM will use. Most of the time this will be either default or head.
Terminal Console
At the bottom of the VM Runtime Parameters Page there is a
 button.
Clicking on the Telnet Viewer button will open a separate window containing a Java applet that will automatically telnet into
the Serial Port on the Virtual Machine, allowing an Administrator to connect and to login in order to perform administrative
duties for a particular Virtual Machine.
button.
Clicking on the Telnet Viewer button will open a separate window containing a Java applet that will automatically telnet into
the Serial Port on the Virtual Machine, allowing an Administrator to connect and to login in order to perform administrative
duties for a particular Virtual Machine.
In general, major administration is directly performed on a DI, so that changes are implemented across all virtual machines sharing the same image, however there are particular instances where an Administrator may need to access a running virtual machine to help a user or to troubleshoot a problem. Most frequently, this utility will be used by an Administrator when a virtual machine fails to start correctly and enters a Blocked state.
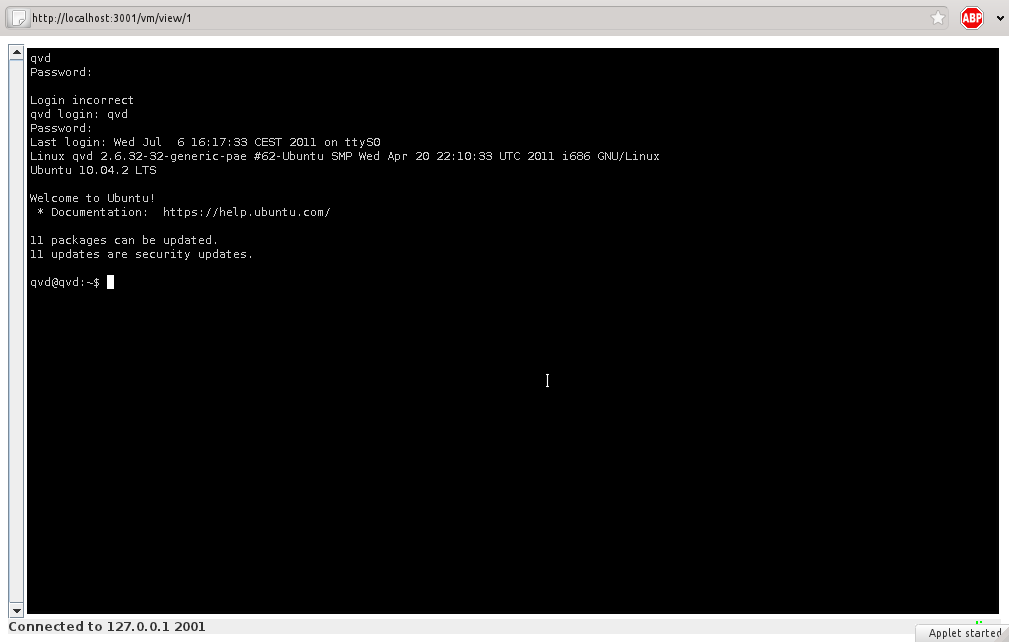
The java Telnet applet is only provided as a convenience to remote administrators. It is equally possible to use any other standard telnet application to access the serial port used for a Virtual Machine on any QVD Server Node by specifying the IP address of the Server Node and the port number for the Serial Port.
4.3.6. Nodes
The Nodes Page is usually accessed by clicking on the Nodes link in the Navigation bar, or by going to the URL http://localhost:3000/hosts/, within the QVD-WAT.
This page displays a list of QVD Server Nodes that have already been provisioned within the QVD environment. Nodes are listed by ID along with their name, IP Address, and their state within the environment.

While it is possible to click on the magnifying glass icon
next to the identifier for any node, to view the details for a particular node, you should be able
to view all of this data immediately from the Nodes Page directly in the Nodes List.
Adding Nodes
In order for a QVD Server Node to function properly within the QVD environment, it needs to be registered
within the QVD-DB. To do this, you can add the Server Node details within the QVD-WAT. Go to the Nodes Page
and click on the
button. This will take you to the
New Node Page.
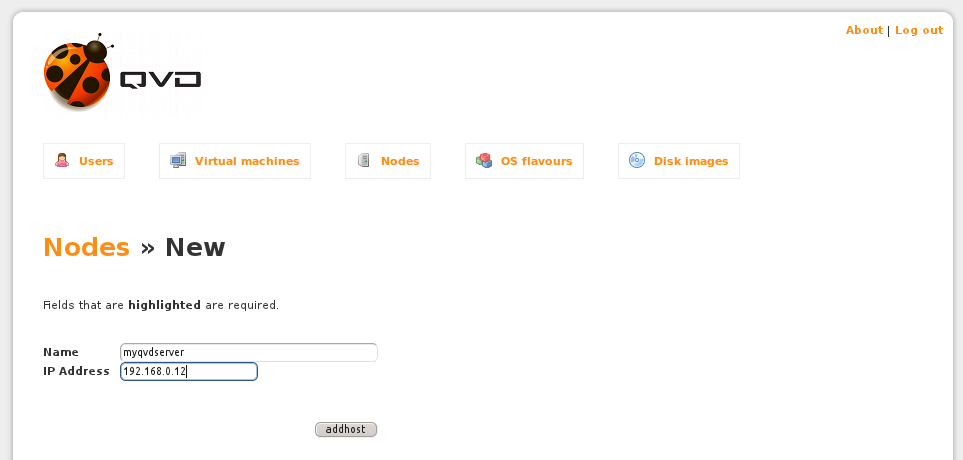
On this page, you should enter a name to identify the node that you are adding (usually the hostname would be a good option) and provide the IP address for the node. Click on the addhost button to register the node within QVD-DB.
Blocking and Unblocking Nodes
Just as with Virtual Machines, it is possible to Block access to a Server Node. This will disable the Server Node from any behaviour within the QVD infrastructure. This is effectively the same as shutting down the Server Node, in the sense that to the rest of the environment the Server Node will be unavailable. If the Server Node is currently hosting any number of virtual machines, and a client attempts to connect the client will not be able to access that Virtual Machine and will receive an error notifying it that the server is currently under maintenance. Clients that are already connected to virtual machines running on a Node that has been blocked will remain connected until they are either forced to disconnect by an Administrator or they disconnect of their own accord.
To change the state of a Server Node to Blocked you can check the checkbox next to the Server Node in the Node List on the Nodes Page. Then click on the Block button at the bottom of the list.
Unblocking a Server Node is as simple as checking the checkbox next to the Server Node in the Node List on the Nodes Page and then clicking on the Unblock button at the bottom of the list.
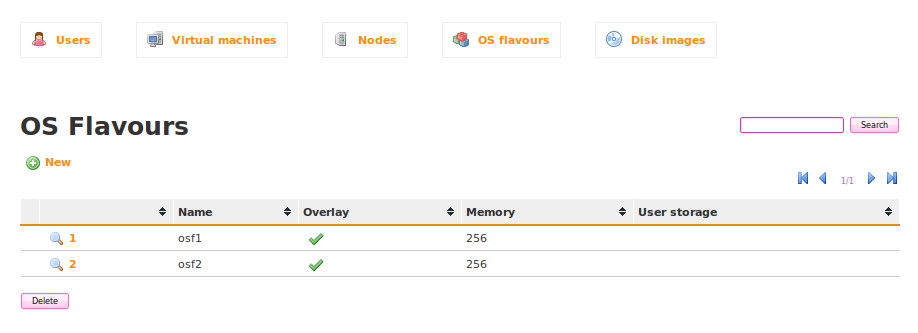
4.3.7. OS Flavours
The OS Flavours Page is usually accessed by clicking on the OS Flavours link in the Navigation bar or by going to the URL http://localhost:3000/osf/, within the QVD-WAT. QVD uses an Operating System Flavour (OSF) to load into each virtual machine that it creates for every user. The OSF provides the user’s desktop environment and all of the user’s applications. This manual goes into depth about creating, editing and managing OSFs and Virtual Machines. Please refer to the part labelled Operating System Flavours and Virtual Machines for more information on this.
The OS Flavours Page lists any OSFs that are already registered into the QVD-DB. OSFs are listed by ID along with their name, whether they have overlays enabled and the memory allocated for them to run. OSFs need at least one DI (Disk Image) linked to them. This DI is which actually contains the files and directories that comprise the Operating System that is run inside the Virtual Machine.
Adding an OSF
In order to use an OSF, it needs to be registered into the QVD-DB along with its runtime parameters.
To do this, you can add the OSF within the QVD-WAT. Go to the OS Flavours Page and click on the
button. This will take you to the New OSF Page.
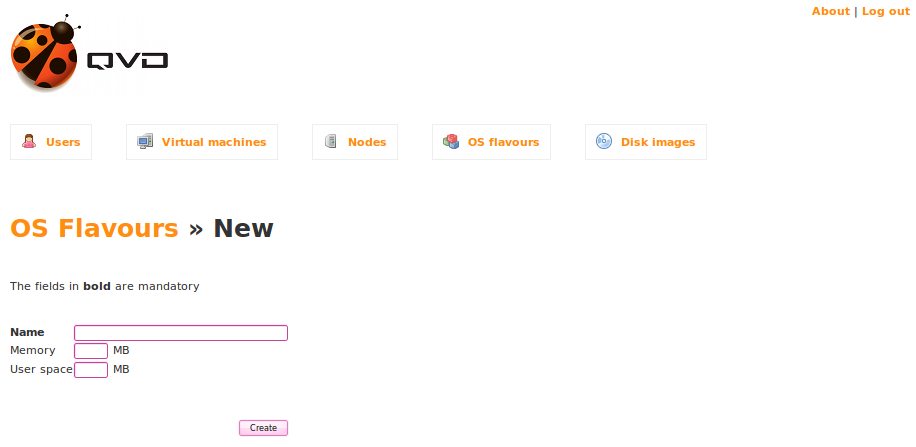
This page presents a number of runtime parameters for the OSF that you are adding.
-
Name: This field is mandatory. You should use it to provide a name for the OSF that will allow you to identify it when adding it to a Virtual Machine or when linking a Disk Image to it.
-
Memory: This field is optional. It is used to allocate system memory to the Operating System. It has a default value of 256 MB. While the default value should be sufficient for a basic desktop, on most production systems, you would probably increase this to at least 512 MB for the Gnome or KDE desktop environment to run comfortably.
-
User space: This field is optional. It is used to allocate disk space to a user for the purpose of storing a home directory. By default, this option is usually not set and the user’s home will not be persistent. That means that if the virtual machine is restarted, any user data will be lost. Setting a value here will create a virtual disk of the size specified. This ensures that user data is persistent, and helps to enforce quotas and to prevent user home directories from unlimited growth which could impact on other users of the QVD environment.
Finally, click on the Create button to load the OSF.
Deleting an OSF
Deleting OSFs from QVD using the QVD-WAT is simple. On the OS Flavours page, you will notice that there is a checkbox next to each OSF entry in the list. By simply checking the checkbox next to each entry that you wish to remove, you are able to select the OSFs that should be deleted. When you have finished your selection, you can click on the Delete button at the bottom of the Image List.
You will be prompted to confirm your intention to delete the OSF from the system. You will need to affirm your decision before the image is actually removed.
4.3.8. Disk Images
OSFs only contain information about the Operating System that will run inside the Virtual Machine, but they don’t hold the actual Operating System. For this, a Disk Image is needed. Disk Images relate Operating System image files with OSFs, so several images files can be used with a given OSF. This mechanism allows the administrator to roll back to a previous, known-good image file if a newer one is found to have some kind of problem.
The way this works is by tagging. DIs can be tagged with several strings, and on the other hand VMs have a DI Tag field that refer to these tags. This way, when a VM starts, the Disk Image which has the specified tag is chosen.
When adding Disk Images, they are automatically tagged with a string like 2011-03-04-000. This is a unique string that identifies that DI. It contains the current date and a sequential number.
Other meaningful tags a DI can have are head and default. head is always assigned to the most recent DI. This is useful for VMs that must always run the latest image—just set their DI Tag field to head and they will always use new DIs as they are added to the system.
If this behaviour isn’t desired, you can use the tag default. This tag isn’t reassigned when DIs are added, so you can expect VMs to be using always a specific DI. Whenever the administrator tags a different DI as default, though, all VMs using the tag default will start using it from their next boot.
In the Disk Images listing in the WAT, you can see and change which image is the default for each OSF. The column Default in the listing serves both of these purposes.
Adding an Image
Disk Images must be registered into the QVD-DB before you can make use of them. The
QVD-WAT can be used to register images in the database. Go to the Disk Images page
and click on the
button.

-
OS Flavour: This field is mandatory. The list will show the existing OS Flavours in the system, and you can choose the OSF this Image will be associated to.
-
Image file: Selecting an image from the list of images is compulsory. The list will only be populated with the image files that are available within /var/lib/qvd/storage/staging. If no files are available within this directory, the field will appear empty and you will not be able to proceed from this point.
-
Delete after action: A checkbox that allows you to either delete the original image from the staging directory once it has been added, or to keep it available as a staging image. This option is available because the original image file is copied to /var/lib/qvd/storage/images once you have loaded it into QVD. You may want to delete the image file from the staging directory to save disk space, but you may equally want to reuse it with alternative memory and user space settings for another group of users. It is optional to delete the temporary image file.
Finally, click on the Create button to load the Disk Image. It may take some time to copy the image file and to update the database. Please be patient while this action completes.
Deleting an Image
When a Disk Image is no longer deemed necessary, it can be removed from the system. This can be easily done from the Disk Images page. Just as with OSFs, you can click the checkbox next to each entry that you wish to remove, then click on the Delete button at the bottom of the list.
You will be prompted to confirm your intention to delete the OSF from the system. You will need to affirm your decision before the image is actually removed.
|
|
If a copy of your image file is not available in the staging directory or in a backup, you will lose the image file completely. Since these are usually very large and take some time to create, you may want to create a backup before you proceed with this action. |
Setting default Images
As explained in Disk Images, more than one DI can be assigned to an OSF and there’s a field in each VM parameters (DI Tag) that selects which of these DIs is to be used on a per VM basis. VMs that choose the tag head will always use the latest DI in the relevant OSF. VMs that choose a given numeric tag will use it. VMs that choose the default tag will use whatever DI is set as default in each OSF.
In the listing of DIs there are some radio buttons that allows the user to select which of the DIs among each OSF has the default tag. It is best to sort the list by OSF to see this clearly. To set a given DI as default, just check its radio button (which will uncheck the currently checked DI in the same OSF) and then click on the Set defaults button. From now on, the next time a VM using that OSF and having default in its DI Tag field is started, it will use the newly selected DI.
You can change more than one DI at the same time by checking the desired radio buttons, then clicking on Set defaults once instead of changing one default DI each time.
5. QVD Server Nodes
QVD Server Nodes are the work-horses within the QVD infrastructure. The nodes are run by a single binary component, the HKD or House Keeping Daemon that tracks the status of virtual machines. The HKD is responsible for starting and stopping virtual machines. The HKD monitors the health of each virtual machine and then updates status information within the QVD Database, so that other Nodes and the administration tools are able to function accordingly. In general, the HKD is responsible for managing virtual machine status.
The HKD also invokes the L7R - A Layer-7 Router that acts as the broker within the server environment, responsible for authenticating users, establishing sessions and routing connections to the appropriate virtual IP addresses. In general, the L7R is responsible for managing user status.
Usually Server Nodes are installed across a number of systems running as a cluster. This means that within a typical deployment you are likely to have any number of Server Nodes that will need to be installed and configured.
You should familiarize yourself with the general architecture of a server node by referring to the chapter in this manual labelled Components and Architecture and in particular the subsection labelled QVD Server Architecture.
5.1. Installation of a QVD Server Node
On any of the systems that you intend to install the QVD Server Node components, you will need to add the QVD repository to your apt sources.
Firstly, add the QVD packages public key to your trusted keys (as root):
# wget -qO - https://www.theqvd.com/packages/key/public.key | sudo apt-key add -
Now, add the repository:
# echo "deb http://theqvd.com/packages/ubuntu-trusty QVD-3.5.0 main" > \
/etc/apt/sources.list.d/qvd-35.list
# apt-get update
To install all of the QVD Server Node components and their dependencies, run the following command:
# apt-get install perl-qvd-node
This will install all of the qvd-node components along with any existing dependencies. In general we recommend that the QVD CLI Administration Utility is installed on any of the QVD Server Node systems as well, since it is common to work directly from these systems to configure QVD quickly. You can find out more about this utility in the following chapter labelled QVD CLI Administration Utility.
5.2. Base Configuration
As with most other QVD infrastructure components, every QVD Server Node requires access to the QVD Database. You will need to ensure that the QVD Node configuration file is set up correctly in order for the QVD Server Node to function properly. You can find out how to do this in chapter titled QVD Base Configuration.
Unlike most other components, QVD Server Nodes require an additional entry within the QVD Base Configuration file in order to be able to quickly search within the QVD-DB. This is a single line entry that should be appended to your configuration, containing the nodename which should match the name that you assign to your node when you register it within the QVD-DB, either using QVD-WAT or using the QVD CLI Administration Utility.
In general, we recommend that you name your nodes using the hostname of the system that they are running on.
This can be quickly achieved by doing something like the following:
echo "nodename=`hostname`" >> /etc/qvd/node.conf
5.3. Networking Requirements
QVD Server Nodes make use of a network bridge and virtual network interfaces to facilitate networking across each of the virtual machines that run on the node. In order to automatically provision IP addresses to virtual machines, QVD also runs a DHCP server that will allocate IP addresses within the virtual network range to virtual hosts as they boot up. It is therefore extremely important that you choose a network range that is unlikely to conflict with any of your other existing infrastructure for this purpose. Services running on systems in the same IP network may be affected by QVD or any of the virtual machines that run within QVD.
There are a number of configuration steps that may need to be configured manually in order to properly set up the networking for a QVD Server Node. There are often other ways to achieve an appropriate network configuration, so we provide these only as guidelines.
5.3.1. Set dnsmasq to be controlled by QVD
QVD uses dnsmasq as a DHCP and DNS server for the virtual machines that run in a node. In order to function correctly, dnsmasq needs to be run by the HKD process.
Firstly, check that dnsmasq is installed. On Ubuntu, issue the following command and check the Status:
# dpkg -s dnsmasq
On SUSE, try:
# rpm -q dnsmasq
If it’s not installed, go ahead and do so, using your package manager, either apt-get install dnsmasq, or zypper in dnsmasq.
By default, the Ubuntu package starts the process running as a daemon in the background, so you need to stop it from starting automatically. This is done with the following commands on Ubuntu:
# service dnsmasq stop # sed -i s/ENABLED=1/ENABLED=0/ /etc/default/dnsmasq
On SLES dnsmasq is managed under the chkconfig command and is disabled by default, so you shouldn’t need to do anything here. However, in case dnsmasq has been enabled or to be on the safe side, you can ensure that it is turned off by running the following command as root:
# chkconfig dnsmasq off
|
|
This step is essential in order for QVD to work using KVM virtualization. For LXC virtualization, it is possible to specify whether or not to make use of DHCP to configure the networking within your virtual machines. |
5.3.2. Configure IP forwarding
IP Forwarding is required in order to route clients to the correct location. You can do this quickly by running the following command.
# echo 1 > /proc/sys/net/ipv4/ip_forward
Unfortunately, when you reboot you host system, this change will be lost. To make it permanent, you can edit /etc/sysctl.conf and uncomment the line:
net.ipv4.ip_forward=1
You can force sysctl to reload its settings after you have edited this file by running:
# sysctl -p
5.3.3. Configure a Network Bridge
There are a number of ways to go about configuring your network bridge and the appropriate routing to make sure that a QVD client is routed to the correct virtual machine.
The easiest method is to set up a static network interface and to configure a set of iptables routing rules to perform the NAT required to translate IP addresses between your real and virtual network interfaces. Using NAT is necessary within a mononode installation, but on a deployment using multiple nodes and where different components run on different systems, the iptables routing rules would not be necessary.
To configure you networking on Ubuntu, edit the file /etc/network/interfaces and add the following lines:
auto qvdnet0 iface qvdnet0 inet static pre-up brctl addbr qvdnet0 pre-up iptables -t nat -A POSTROUTING -o eth0 -j SNAT --to-source 192.168.0.2 pre-up iptables -t nat -A PREROUTING -d 192.168.0.2 -p tcp --dport 8443 -j DNAT --to-destination 10.3.15.1 post-down brctl delbr qvdnet0 address 10.3.15.1 netmask 255.255.255.0
It is important to note that in the above example you will need to change the IP address 192.168.0.2 to the IP address of the network interface that you intend your clients to connect to. In the example above we are using the 10.3.15.0/24 range for the virtual network used by QVD. This range should be unique within your infrastructure and should be dedicated to QVD usage, so that services starting within QVD do not impact on other systems within your network.
While there are other cleaner approaches to setting up your network, these sometimes run into problems with particular network interfaces such as WIFI. The approach listed above should work for most systems. Remember that the NAT provided using iptables, as presented in the example above, is only required for mononode installations.
Once you have written the network configuration to file, you should bring up the network bridge interface.
# ifup qvdnet0
5.3.4. Configure QVD for your Networking
In order for QVD to properly manage virtual machine setup and the subsequent routing, you will need to change some configuration settings within QVD-DB. It is recommended that you make use of the QVD CLI Administration Utility to do this.
These settings are used to provide a dedicated networking environment for your virtual machines to run. You should use IP addresses and network ranges that do not conflict with your existing network infrastructure. In the example below we are using the 10.3.15.0/24 range for the virtual network used by QVD. This range should be unique within your infrastructure and should be dedicated to QVD usage, so that services starting within QVD do not impact on other systems within your network.
# qa config set vm.network.ip.start=10.3.15.50 # qa config set vm.network.netmask=24 # qa config set vm.network.gateway=10.3.15.1 # qa config set vm.network.dns_server=10.3.15.254 # qa config set vm.network.bridge=qvdnet0
|
|
If you are running AppArmor on your host machine, you may find that it prevents the host machines from accessing the internet. We are working on an AppArmor profile for QVD that will be made available in due course. For now, suffice to say that tearing down your current AppArmor profiles with /etc/init.d/apparmor teardown will stop AppArmor from preventing the QVD from running. If this is unacceptable due to a production environment, please get in touch with support. |
These settings are described in more details in the section of the QVD Administration Manual entitled Virtual Machine Options in the Base QVD Configuration chapter.
5.4. Configuring SSL
The QVD server needs an x509 certificate and private key for securing network connections. For a production installation you should use a certificate issued by a recognized certificate authority, such as Verisign or Thawte. For testing purposes you can use a self-signed certificate. We provide instructions on creating a self-signed certificate in the QVD Installation Guide.
If you have a certificate signed by a third party, you can register it with QVD using the QVD CLI Administration Utility:
# qa config ssl key=/path/to/private/key.pem cert=/path/to/server/certificate.pem
6. QVD CLI Administration Utility
The QVD Command Line Administration utility is a perl script that can interact with the QVD-DB to perform a wide range of administrative operations within the QVD infrastructure. It can be used as an alternative to the QVD Web Administration Tool (QVD-WAT) and can be installed on any system with access to the QVD-DB.
|
|
As of QVD 3.1.1, the /usr/lib/qvd/bin/qvd-admin.pl has been symlinked to /usr/bin/qa. Future releases of QVD will use qa as the QVD command line tool. You can of course still use the full path to the perl script. |
6.1. Installing and configuring the QVD CLI Administration Utility
On any of the systems that you intend to install the QVD CLI Administration Utility, you will need to add the QVD repository to your apt sources.
Firstly, add the QVD packages public key to your trusted keys (as root):
# wget -qO - https://www.theqvd.com/packages/key/public.key | sudo apt-key add -
Now, add the repository:
# echo "deb http://theqvd.com/packages/ubuntu-trusty QVD-3.5.0 main" > \ /etc/apt/sources.list.d/qvd-35.list # apt-get update
To install the QVD CLI Administration Utility, run the following command:
# apt-get install perl-qvd-admin
The process is similar for SLES.
Firstly, add the QVD packages public key to your trusted keys (as root):
# rpm --import https://www.theqvd.com/packages/key/public.key
Now, add the repository:
# zypper ar http://theqvd.com/packages/sles/11SP2/stable QVD
# zypper ref
To install the QVD CLI Administration Utility, run the following command:
# zypper install perl-QVD-Admin
The QVD Administration utility requires access to the QVD Database. You will need to ensure that the QVD Node configuration file is set up correctly in order for this tool to function properly. You can find out how to do this in the QVD-DB Chapter in the section titled QVD Database Configuration.
6.2. QVD CLI Command List
The QVD CLI Administration Utility provides a large set of administrative functions that can be used to control all of the components and elements that are involved within the QVD environment.
A complete list of functions or commands available through the QVD CLI Administration Utility can be obtained using the --help switch.
root@altar:~# qa --help Valid command expected, available subcommands: config del config get config set config ssl di add di del di list di tag di untag host add host block host del host list host propdel host propget host propset host unblock osf add (*) osf del (*) osf list user add user del user list user passwd user propdel user propget user propset vm add vm block vm del vm disconnect_user vm edit vm list vm propdel vm propget vm propset vm ssh vm start vm stop vm unblock vm vnc
|
|
Any of the commands presented above can be prepended or appended with the --help switch in order to obtain a more detailed description of the syntax. |
6.3. Using Filters To Add Control To Operations
Many of the operations available through the QVD CLI Administration Utility also admit a filter (using the -f switch) to limit an action to a particular element or entity. Filters are essentially matches on elements within table columns, as provided in a standard SQL WHERE statement. Filters accept the asterisk (*) as a wildcard character and accept (,) to build chains of AND statements.
Most commonly used filters are on ID of an element or on a name. For instance, using the host list operation as an example, you can limit the entries returned by filtering on id or name:
# qa host list -f name=sha* Id Name Address HKD Usable RAM Usable CPU VMs assigned Blocked State _____________________________________________________________________________________ 1 shamash 192.168.0.12 103:14:31 296.676 16172.48 0 0 starting
When using the CLI Administration Utility to view VM status, it is common to use filters to view virtual machines in a particular state or belonging to a particular user or where a VM has a particular user_state. For instance, the following example will show you how to chain together a number of filters to view all virtual machines that belong to users with usernames starting al, where the virtual machine is running and the user is connected:
# qa vm list -f user=al*,state=running,user_state=connected Id Name User Ip OSF DI_Tag DI Host State UserState Blocked ____________________________________________________________________________________________________ 1 alison alison 172.20.127.254 test default 2012-03-05-000 qvd_test running connected 0 7 antony antony 172.20.127.232 live default 2012-02-15-000 qvd_test2 running connected 0
6.4. Basic Administrative Operations
In this section we will look at some of the more common administrative tasks that the QVD CLI Administration Utility gets used for.
6.4.1. Changing QVD Configuration Settings
QVD has a wide range of very specific configuration settings that control various components within the infrastructure. We discuss some of these here.
To change a QVD configuration setting using the QVD CLI Administration Utility you can do the following:
# qa config set myproperty="this is a value"
It is also possible to get all of the current configuration settings from the database and list them:
# qa config get
Finally, it is possible to delete a QVD configuration setting from the database:
# qa config del myproperty
6.4.2. Adding a QVD Server Node
It is common to use the QVD CLI Administration Utility to add new QVD Server Nodes to the QVD Database. This can be done very quickly from the command line with the following command:
# qa host add name=NewNode address=192.168.0.12
Deleting a QVD Server Node is just as simple:
# qa host del -f "name=NewNode"
6.4.3. Configuring SSL for QVD
QVD Server Nodes need to be configured to make use of SSL. Currently the only way to do this is to make use of the QVD CLI Administration Utility:
# qa config ssl --help
config ssl: Sets the SSL certificate and private key
usage: config ssl key=mykey.pem cert=mycert.pem
Sets the SSL certificate to the one read from the file mycert.pem, and the
private key to the one read from mykey.pem.
Example: config ssl key=certs/server-key.pem cert=certs/server-cert.pem
It is recommended that wherever possible you make use of a trusted CA-signed certificate.
6.4.4. Adding an OSF
You can easily add an OSF to QVD using the QVD CLI Administration Utility if you are on a host that has access to the shared storage where the images are stored:
# qa osf add name=myOSF use_overlay=no memory=1024 user_storage_size=2048
There is only one compulsory value to add an OSF, which is name. If the other parameters are left unspecified, the default parameters are used instead. These are:
-
memory=256
-
use_overlay=y
-
user_storage_size=undef (no limit to user storage)
You can get a list of currently available OSFs by doing the following:
# qa osf list
6.4.5. Adding a DI
Using the QVD CLI Administration Utility, you can attach a Disk Image (DI) to any existing OSF within the system. This process can take some time, since the database is updated and the actual disk image file is copied into the storage/images directory within the shared storage.
By attaching a DI to a particular OSF, it decouples the actual disk image from the image that will be served to an end user. This means that you can make changes to the disk image and then simply update the OSF, so that when a user reconnects the image is automatically updated without the user experiencing any discontinuity in the service.
# qa di add path=/var/lib/qvd/storage/staging/qvd-guest.img osf_id=1
Both path and osf_id are compulsory in order to add a DI. When the DI is added, the image specified in path is copied to the read-only storage area set up for storing active DIs (usually /var/lib/qvd/storage/images).
You can get a list of currently available images by doing the following:
# qa di list
6.4.6. Tagging a DI
DIs can be tagged with arbitrary strings at will. The WAT only allows users to set DIs as default in each OSF but the CLI gives greater flexibility.
To tag a DI as default just use the di tag command:
# qa di tag di_id=42 tag=default
You can tag DIs with any string, not just default or head. This allows you to use meaningful names for the tags, for example "acrobat_bug_fixed", for use within Virtual Machines' DI Tag field.
Tags are useful, because they allow you to attach a new version of a Disk Image to an OSF without affecting anybody using the current or default image for an OSF. This allows you to roll out a change, and migrate particular Virtual Machines using an OSF to the new image while you test it out. If the image fails for some reason or does not meet your requirements, it is simple to rollback to the default image and allow your users to continue to work while you make corrections.
6.4.7. Selecting the DI tag VMs will use
In order to tell a VM that it should use a DI that has a specific tag, we edit the VM to change its di_tag field. So if for example if we just corrected an Acrobat bug in a DI and set the "acrobat_bug_fixed" tag to it, we can use that DI in a VM using the following:
# qa vm edit di_tag=acrobat_bug_fixed -f vm_id=42
Upon next boot of the VM with id 42, it will use the DI with this tag.
6.4.8. Adding and Deleting Users
It is common to use the QVD CLI Administration Utility to quickly add and remove users.
# qa user add login=peter password=s3cr3t # qa user del -f login=guest3
You can also list all QVD users using the list option:
# qa user list
Please note that, as explained in the Installation Guide, it isn’t advisable to create a user whose username already exists in any disk image.
6.4.9. Resetting a User Password
You can change a user’s password using the QVD CLI Administration Utility:
# qa user passwd user=guest
In the above example, we are changing the password for the user login guest. You will be prompted to provide a new password.
6.4.10. Adding and Deleting Virtual Machines
Adding and deleting virtual machines using the QVD CLI Administration Utility easy. You can specify the user and the OSF either by ID or by name:
# qa vm add name=GuestVM user_id=1 osf_id=1 OR: # qa vm add name=GuestVM user=peter osf=myOFS
You can easily delete a Virtual Machine using the following command:
# qa vm del -f "name=GuestVM"
6.4.11. Starting and stopping virtual machines
The QVD CLI Administration Utility can be used to start and stop Virtual Machines. If not specified with a particular filter, the action will be to start or stop all virtual machines. Usually you would run this command specifying a filter to identify the actual virtual machine that you wish to start or stop. Examples follow:
# qa vm stop -f "user=guest*" # qa vm start -f "id=1"
The load-balancing policy determines the node where the VM is started.
6.4.12. Blocking and Unblocking Virtual Machines
Virtual Machines can be flagged as Blocked. When in this state, the QVD Client application will not be able to connect to the Virtual Machine. This can either be forcefully implemented by an Administrator to perform an Administrative task, or can take place when the HKD fails to properly start a virtual machine.
The following commands can be used to either forcefully flag a Virtual Machine as blocked, or can be used to unblock a Virtual Machine that has been set in this state.
# qa vm block -f "id=2" # qa vm unblock -f "name=GuestVM"
Please refer to Virtual Machine Blocking and Unblocking in the chapter on the QVD Web Administration Tool for more information on setting this state.
6.4.13. Troubleshooting Virtual Machines
The QVD CLI Administration Utility also provides options to connect to a Virtual Machine without using the client application. These are useful for debugging an image that fails to work in QVD. Currently, the supported options include serial port console, SSH and VNC access.
To access the serial console for a Virtual Machine, run the following command:
# qa vm console -f id=1
This will open a session to the serial port on the Virtual Machine with the id of 1. If you are using KVM virtualization your Virtual Machine will need to have had serial console enabled: see for example the Serial Console HOWTO for Ubuntu.
To ssh into a Virtual Machine, run the following command:
# qa vm ssh -f name=myVM -- -l qvd
This will open an SSH connection to the Virtual Machine named myVM using the username qvd. Your Virtual machine would need to have OpenSSH installed and configured.
If you are using KVM virtualization with VNC access enabled and you have the vncviewer VNC client installed, you can run the following command to open a VNC connection.
# qa vm vnc -f name=myVM
The VNC console is not available when using LXC.
6.4.14. Setting Custom Properties for a Virtual Machine
QVD includes the option to set custom properties for a virtual machine that can be set and retrieved using the QVD CLI Administration Utility. These are useful if you need to write your own scripted behaviours or wish to take advantage of VMA Hooks. Custom properties are often used when writing your own plugins for the L7R such as Authentication or Load Balancing modules.
Custom properties are supported for the host, user and vm configuration parameters.
To add a custom property, you can use the propset command:
# qa user propset beverage=beer -F login=rowan propset in 1 users.
Outputting the contents of all of the custom properties that have been set for a configuration parameter can be achieved by using the propget command:
# qa user propget rowan beverage=beer
Finally, you can delete a custom property by using the propdel command:
# qa user propdel beverage Are you sure you want to delete the prop in all users? [y/N] y
7. QVD GUI Client
The QVD client is available for Microsoft Windows, Linux and Mac OS X (Beta) platforms. The client is available in English and Spanish and will default to the system locale.
7.1. Installing the Windows Client
You can download the QVD client software installer from:
Once you have finished downloading the installer, run it as a normal executable file and follow the wizard through the installation process.
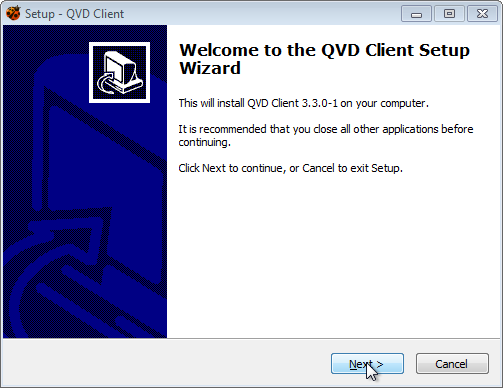
Once you have finished the installation, you can either run the client from the shortcut on your Windows desktop (if you selected to add the shortcut) or from the QVD menu in your Applications menu. This will open the client so that you are ready to connect.
7.2. Installing the Mac OS X Client
You can download the QVD client package from:
The package will install the QVD client into your Applications folder. To run the client double click on the ladybug icon.
7.3. Installing the Linux Client
Installing the QVD Client on an Ubuntu Linux platform is a simple procedure.
Firstly, add the QVD packages public key to your trusted keys (as root):
# wget -qO - https://www.theqvd.com/packages/key/public.key | sudo apt-key add -
Now, add the repository:
# echo "deb http://theqvd.com/packages/ubuntu-trusty QVD-3.5.0 main" > \
/etc/apt/sources.list.d/qvd-35.list
# apt-get update
You will now be able to install the client with the following command.
# apt-get install perl-qvd-client
On SLES the process is similar.
Firstly, add the QVD packages public key to your trusted keys (as root):
# rpm --import https://www.theqvd.com/packages/key/public.key
Now, add the repository:
# zypper ar http://theqvd.com/packages/sles/11SP2/stable QVD
# zypper ref
You will now be able to install the client with the zypper command.
zypper install perl-QVD-Client
Depending on your Desktop Environment, you should be able to access the client within your Applications menu, usually under the Internet submenu. Alternatively, you can run the client GUI from the console using the command qvd-client.
7.4. Connecting to your Virtual Desktop
Once you have the GUI client running, you can enter the Username for the user that you created in QVD, the Password that you configured for the user, the Server hostname or IP address for the QVD Server Node that you created, and you can choose the level of compression for the connection by selecting a Connection type.
By default, the Connection type is set to Local. This setting is appropriate for connections over a local area network. There are also options for ADSL, which would be appropriate for any broadband connection, and for Modem which can be used in cases where bandwidth is severely limited or impaired.
Changing the Connection type will increase the compression used to deliver the virtual desktop across your network connection. It also increases the amount of caching that the client performs to limit the amount of screen refreshing that needs to take place.
In general, using heavy compression and caching will still afford your users the ability to work comfortably within their virtual desktops. However the quality of graphical rendering will be a little inferior.
Once you have completed entering your connection details, simply click on the button labelled Connect and your virtual desktop should load.
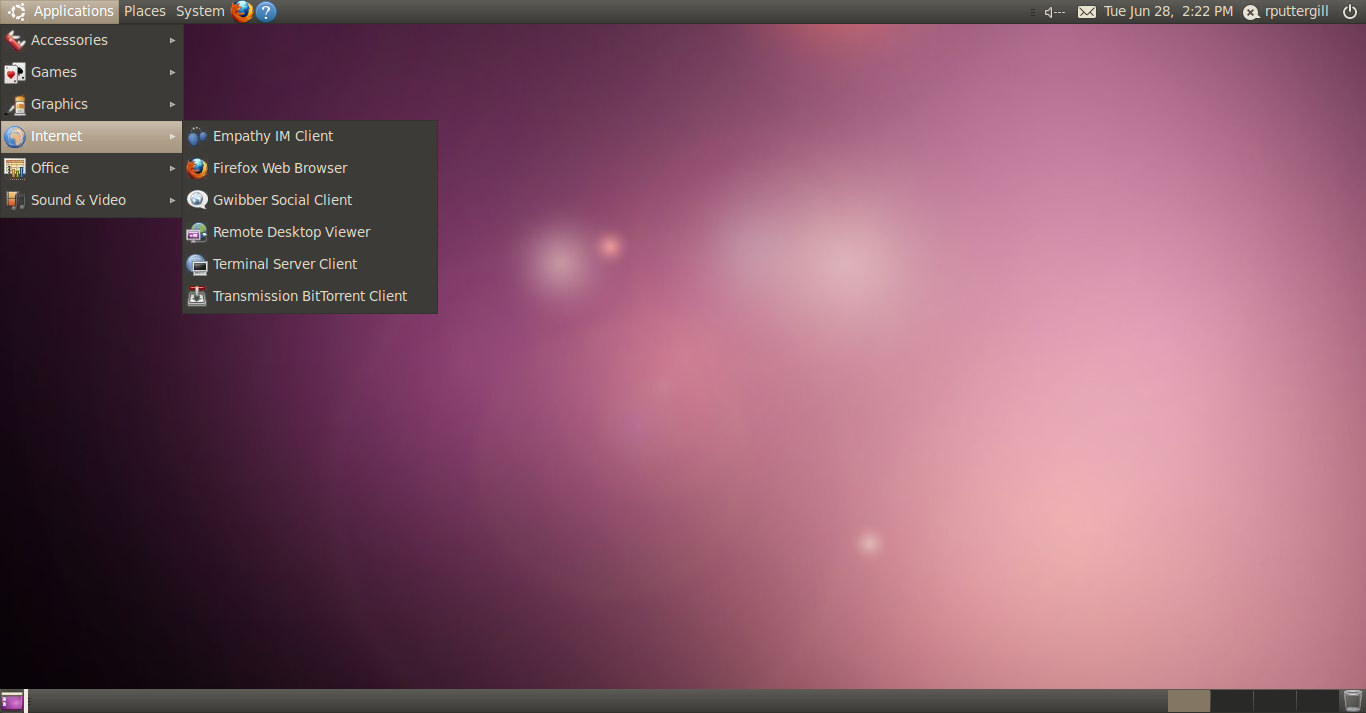
7.5. QVD Client Shared Folders
QVD can provide access to local folders on the user’s client machine from the virtual desktop.
7.5.1. Setting Up Shared Folders
QVD shared folders are enabled by default. If you wish to disable this feature, the following line can be used to set and reset the option in the client.conf file:
client.slave.enable=0
To locate the client.conf file, see the next section on Additional Settings.
7.5.2. Using Shared Folders
By default, redirects the user’s home directory (%USERPROFILE% for Windows clients and $HOME for Linux and Mac OS X). In addition to this, QVD provides access to locally attached drives:
-
All Windows drives (C:, D: etc)
-
/Volumes for Mac OS X.
-
/media for Linux.
The folders will appear in the user’s home directory under a sub-folder called Redirected. GNOME and other recent Linux desktops will also show a shortcut icon on the desktop and in the file manager, depending on configuration.
7.5.3. Adding Additional Shares (Linux Only)
To share additional folders between the client and the virtual machines, QVD provides a command line tool for Linux users only to do so, qvd-slaveclient, which is invoked as follows:
$ qvd-slaveclient share /path/to/folder
|
|
qvd-slaveclient, like most QVD commands is located in /usr/lib/qvd/bin so this will have to be appended to the $PATH environment variable, or simply use the full path. |
qvd-slaveclient is not yet available on Windows or Mac OS X. Future releases of the QVD client will include a graphical user interface for selecting the folders to share.
7.6. Additional Settings For QVD Client
The QVD client provides several configuration options that can be used to fine tune the performance as well as customize the user experience. By default, these settings are found in the client.conf file. Under Mac OS X and Linux this file is in the user’s home directory at ~/.qvd/client.conf, as well as in /etc/qvd, although this is superceded by the user file if one exists. On Windows, client.conf is to be found within %APPDATA%\.qvd\client.conf.
The QVD GUI client also offers convenient access to some of the basic user settings in the Settings tab at startup. The tab itself can be enabled or disabled in client.conf - see below for further details.
7.6.1. QVD Config File
You are able to specify the following additional options to control the client software on a workstation:
client.link = local client.geometry = 1024x768 client.fullscreen = 1 client.slave.enable = 1 client.slave.command "/path/to/custom/slave-command" client.audio.enable = 1 client.printing.enable = 1 client.host.port = 8443 client.host.name = loadbalancer.mydomain.com client.user.name = guest client.use_ssl = 1 client.force.host.name = loadbalancer.mydomain.com client.force.link = local client.remember_password = 0 client.show.remember_password = 0 client.show.settings = 1
The values set above are the default values.
-
client.link: can be: modem, isdn, adsl, wan, lan, local or a bandwidth specification (56k, 1m, 100m…)
-
client.geometry: used to report the size and the depth of the client display, if unset use full screen
-
client.fullscreen: used to run the client in fullscreen mode
-
client.slave.enable: whether or not to enable the slave channel, used by the shared folder feature. Enabled by default
-
client.slave.command: point the QVD client machine to the slave client binary or an alternative
-
client.audio.enable: used to enable the PulseAudio server in the client. Can also be configured in the OSF
-
client.printing.enable: used to enable Printer sharing with the client. Can also be configured in the OSF
-
client.host.port: the L7R port the client should connect to (this setting relates to the l7r.port setting configured for your server nodes)
-
client.host.name: the L7R host the client should connect to (usually the frontend IP address of a loadbalancer)
-
client.user.name: the user name for client authentication
-
client.use_ssl: whether or to use SSL in client-server communications. Enabled by default
-
client.force.host.name: forces the hostname available to the client, so that it is only able to connect to this host
-
client.force.link: forces the client link parameter, so that it is not possible to select an alternative option within the GUI.
-
client.remember_password: controls whether or not the client remembers the password used for the previous connection
-
client.show.remember_password: controls whether or not the option to Remember Password is displayed within the GUI.
-
client.show.settings: shows the settings tab on the client
7.6.2. QVD GUI Settings
The following image illustrates the settings currently available in the QVD client.
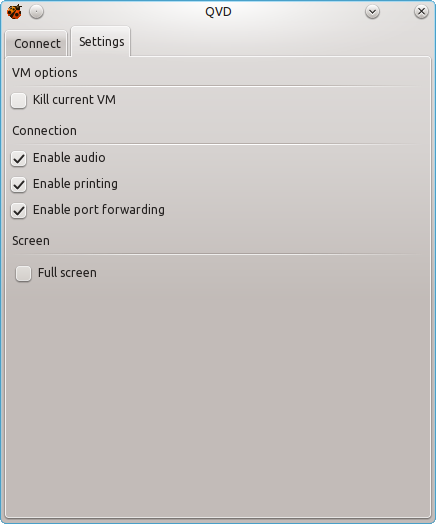
-
Kill current VM: this shuts down the running VM to which the user is trying to connect. Useful for situations where the user wants to ensure they are using the latest disk for their OSF and also potentially where the user is having trouble connecting to their VM
-
Enable audio: enables the PulseAudio server in the client
-
Enable printing: enables printer sharing with the client
-
Enable port forwarding: enables the port forwarding required for folder sharing
-
Full screen: runs the client in fullscreen mode
7.6.3. QVD Client Logs
The QVD client logs, by default, to ~/.qvd/qvd-client.log on Mac OS X and Linux, and %APPDATA%\.qvd\qvd-client.log on Windows. You can alter the logging levels to one of ALL, DEBUG, INFO, WARN, ERROR, FATAL, OFF in the config file as follows:
log.level = ALL
7.7. Environment variables sharing
In QVD 3.5 it is possible to share environment variables between the machine where QVD Client is executed and Authentication plugins server side since version 3.5.13.
For that, it will be necessary to enable it via the following client configuration token:
client.auth_env_share.enable = 1
Then configure as much environment variables as you need with the tokens:
client.auth_env.share.list.0 = MYNAME client.auth_env.share.list.1 = MYADDRESS client.auth_env.share.list.2 = MYCITY
To learn how to access the shared variables, the source code includes a testing Authentication Plugin:
ext/QVD-L7R/lib/QVD/L7R/Authenticator/Plugin/AuthTester.pm
7.8. QVD Binaries
In addition to the standard QVD Clients QVD offers several compiled binaries for the above platforms as well as a few others such as iOS, Android, Raspberry Pi and FreeBSD. Please note that these binaries are experimental and may be feature incomplete. With the exception of the Windows and OS X clients, the binaries are statically compiled and should be able to run without any additional libraries.
-
Linux These should run under any recent distribution without additional libraries, simply set the executable bit and run.
-
FreeBSD As with the Linux client, set the executable bit and run.
-
Mac OS X and IOS clients.
The OS X client needs libstdc++ and libSystem which should be available on recent OS X versions.-
qvdclient_x86_64-apple-darwin11 (64 bit client)
The IOS binaries will need Cydia and an X Server. Here for completeness, it is advisable to wait for the official client in the iTunes store. -
qvdclient_armv7-apple-darwin11 (for older IOS devices, should still work on newer ones)
-
The binaries have a few mandatory options which can be obtained by using the -? switch, for example
$ ./qvdclient -?
./qvdclient [-?] [-d] -h host [-p port] -u username -w pass [-g wxh] [-f]
-? : shows this help
-v : shows version and exits
-d : Enables debugging
-h : indicates the host to connect to. You can also set it up in the env var QVDHOST.
The command line argument takes precedence, if specified
-p : indicates the port to connect to, if not specified 8443 is used
-u : indicates the username for the connection. You can also set it up in the env var QVDLOGIN
The command line argument takes precedence, if specified
-w : indicates the password for the user. You can also set it up in the env var QVDPASSWORD
The command line argument takes precedence, if specified
-g : indicates the geometry wxh. Example -g 1024x768
-f : Use fullscreen
-l : Use only list_of_vm (don't try to connect, useful for debugging)
-o : Assume One VM, that is connect always to the first VM (useful for debugging)
-n : No strict certificate checking, always accept certificate
-x : NX client options. Example: nx/nx,data=0,delta=0,cache=16384,pack=0:0
-c : Specify client certificate (PEM), it requires also -k. Example -c $HOME/.qvd/client.crt -k $HOME/.qvd/client.key
-k : Specify client certificate key (PEM), requires -c. Example $HOME/.qvd/client.crt -k $HOME/.qvd/client.key
You may wish to set environment variables for debugging purposes and to prevent your credentials being visible. The following variables are recognised by the QVD client:
QVDHOST : Specifies the host to connect to, if not specified with -h
QVDLOGIN : Specifies the username, if not specified with -u
QVDPASSWORD : Specifies the password, if not specified with -w
QVD_DEBUG : Enables debugging, can also be enabled with -d
QVD_DEBUG_FILE : Specifies the file to log debugging info
DISPLAY : Needed to be correctly setup. In some environments you might need to
run one of the following:
export DISPLAY=localhost:0; xhost + localhost
xhost +si:localuser:$LOGNAME
|
|
XAUTHLOCALHOSTNAME workaround
Some recent Linux distributions introduced the XAUTHLOCALHOSTNAME environment variable to store the local host name at the start of the X session. The NX libraries do not recognize this variable, instead referring to the X authority file. This may result in the QVD binary authenticating but failing to fully connect to the QVD desktop with the error X connection failed with error 'No protocol specified'. There are three workarounds for this. Enable host based authentication: $ export DISPLAY=localhost:0; xhost + localhost Enable server interpreted local user authentication: $ xhost +si:localuser:$(whoami) Add the hostname to the X authority file: $ xauth add "$(/bin/hostname)/unix:0" MIT-MAGIC-COOKIE-1 \
$( xauth list "localhost/unix:0" | awk '{print $3}' )
|
Design Considerations and Integration
In this part of the manual, we explore things that will affect the design of your solution, such as your virtualization technologies, storage requirements and authentication mechanisms.
1. Shared Storage
Since there are multiple server-side components within the QVD infrastructure, and each of these will usually be installed on a number of different physical systems, it is important to set up some shared storage facility that is accessible to all of the hosts within your server farm.
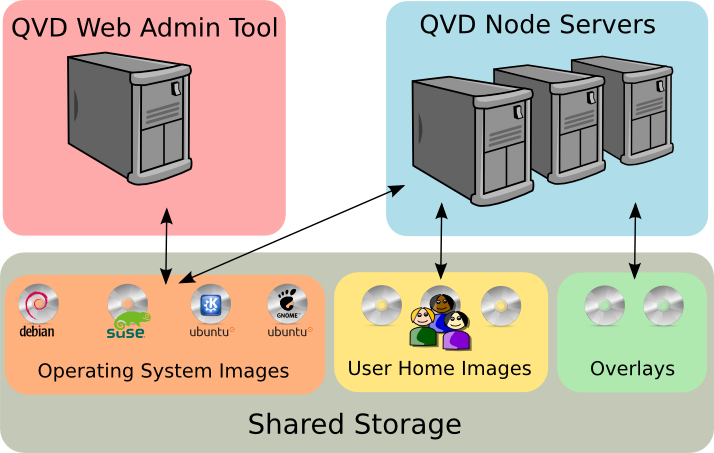
The currently supported network file sharing services are GFS or OCFS2 on top of some SAN server (i.e. iSCSI, AoE, etc.) and NFS.
QVD usually keeps all commonly used files in the directory location:
/var/lib/qvd/storage
|
|
All of the paths used by QVD are configurable items, so you should keep in mind that although this is the default location, the pathnames within your infrastructure may be different depending on your configuration. You can check these configuration settings using the QVD CLI Administration Utility. |
While some of the components do not need access to all of the QVD Storage folders, and in some cases you can opt to have some of these folders running locally on one system, we recommend that all of these folders are accessible within some form of network based shared storage.
|
|
Backing up your the QVD folders that are kept in your Shared Storage facility is highly recommended. At a minimum, you should ensure that the folders where your user home data is stored and the folders where your Disk Images are stored are backed up in line with your disaster recovery strategy. |
1.1. Storage Folders
There are a variety of folders that belong in the storage path. Many of these are specific to the type of virtualization that you choose to make use of within your environment.
1.1.1. General Storage
-
staging: temporary location for all DIs that you want available in the QVD-WAT for the purpose of loading as an image. Files located here are available within QVD-WAT when you select to add an image. The image file will be copied out of this directory and into the images folder when it is enabled using one of the administration tools. The staging folder can either be hosted locally or on a network share, but must be accessible to the QVD-WAT.
-
images: location of the DIs (Disk Images) that are loaded by the nodes for each Virtual Machine that is created. These need to be accessible to QVD Server Nodes and to the QVD-WAT. This directory might be stored on a network share, but in a very simple configuration where the QVD-WAT is either not used or is hosted on the same system as the QVD Server Node, it can be hosted locally which will help to improve performance. Note that where KVM virtualization is used, the image is loaded into the virtual machine from this directory. When LXC virtualization is used, the image is extracted from this directory into the basefs directory, before it is loaded.
1.1.2. KVM Storage Directories
-
homes: location of user home data. Under KVM, home data is stored in individual files as qcow2 images. The homes directory should be accessible to all QVD Server Nodes usually on some type of network file share such as NFS, OCFS2 or GFS2.
-
overlays: location used to store overlays for data that is constantly written to the Operating System in order for it to function correctly, such as temporary files and variable data etc. Usually this folder can be hosted locally, but for persistent behavior in your virtual machines, you can choose to store these on a network share and configure QVD to make your virtual machines persistent.
1.1.3. LXC Storage Directories
-
basefs: location of the DIs (Disk Images) that are loaded by the nodes for each Virtual Machine that is created. These need to be accessible to QVD Server Nodes and to the QVD-WAT. This directory might be stored on an network share, but in a very simple configuration where the QVD-WAT is either not used or is hosted on the same system as the QVD Server Node, it can be hosted locally which will help to improve performance. The basefs folder will contain a subdirectory for each DI, which will in turn contain the complete filesystem tree for a functioning operating system
-
homefs: location of user home data. Under LXC, home data is stored within subdirectories inside the homefs directory, named according to the user-id and the osf-id stored within the QVD-DB. The homefs directory should be accessible to all QVD Server Nodes usually on some type of network file share such as NFS, OCFS2 or GFS2.
-
overlayfs: location used to store overlays for data that is constantly written by the Operating System, such as temporary files and application logs. Usually this folder can be hosted locally, but for persistent behavior in your virtual machines, you can choose to store these on a network share and configure QVD to make your virtual machines persistent.
-
rootfs: location of the running LXC once all required mountpoints have been mounted and configured. Usually this folder is local to each QVD Node Server, for performance, but it could equally be stored within the shared storage space.
1.1.4. LXC Storage Directories (BTRFS)
With version 3.2, QVD introduced support for the btrfs file system. This differs subtly from the standard LXC setup by extracting each Disk Image into a read-only btrfs subvolume and by snapshotting the overlay (non persistent data) for each new VM. This is considerably more efficient than extracting the overlay into a folder due to btrfs' Copy-on-Write capabilities as well as offering significant reduction in load to the shared storage by offloading non persistent data onto the local node. This performance gain comes at a price, however, in that this data will be lost in the event that a client is assigned to a new node.
-
basefs: location of the extracted DIs (Disk Images) that are loaded by the nodes for each Virtual Machine that is created. With a btrfs system, each image is unpacked into its own subvolume in basefs. This will be used by each VM that uses this DI. For a btrfs system this must be stored locally to each node.
-
homefs: location of user home data. As with the normal LXC setup, home data is stored within subdirectories inside the homefs directory, named according to the user-id and the osf-id stored within the QVD-DB. The homefs directory should be accessible to all QVD Server Nodes usually on some type of network file share such as NFS, OCFS2 or GFS2.
-
overlayfs: location of non persistent data such as temporary and log files. When a container is started, the overlay data is created inside its own btrfs subvolume within overlayfs. For each subsequent VM using this disk image, QVD creates a snaphot of this subvolume and the snapshot is used as the container root file system. Since btrfs can create snapshots and subvolumes cheaply with very little overhead, this happens almost in real-time. Since this must be done locally with a btrfs system, it greatly reduces load on the shared storage. However, it must be noted that this data is therefore not persistent and will be lost if the load balancer directs a user to another node. QVD will still honor the vm.overlay.persistent setting but this persistence will only be for consecutive sessions on the same node.
-
rootfs: location of the running LXC once all required mountpoints have been mounted and configured. With a btrfs setup, this data has to be stored locally to the node.
1.2. NFS
In this section of the document we will provide instructions for setting up NFS for QVD, as this is one of the more commonly used protocols for shared storage. We will provide instructions for Ubuntu 14.04 (Trusty Tahr) and for SUSE Linux Enterprise Server (SLES) 11, however you should be able to extrapolate these instructions to provide NFS access for any distribution.
|
|
We recommend that you run through the following process before installing any QVD Server components to ensure that when the QVD components are installed, they are automatically making use of the NFS share from the beginning. This way, you are less likely to run into trouble migrating files and creating directories in the longer term. |
1.2.1. Installing the NFS Server
First install the NFS Server. For Ubuntu, this can be done as root using the command:
# apt-get install nfs-kernel-server
And for SLES:
# zypper install nfs-kernel-server
1.2.2. Configuring the NFS Server
Add an entry to /etc/exports as follows:
/var/lib/exports *(rw,sync,no_subtree_check,no_root_squash)
Note that this would mean that on your NFS Server, you would set up each of the QVD storage directories within the path /var/lib/exports. You can choose an appropriate location if you would prefer to host these files at an alternative path.
Once you have added your path entry within the NFS Server’s exports, you should reload the NFS Server. For Ubuntu (as root):
# /etc/init.d/nfs-kernel-server reload
Similarly, For SLES:
# /etc/init.d/nfsserver reload
The NFS Server should now be making the configured path available over the network.
1.2.3. Mounting the NFS directory on QVD Hosts
Each host system that is running any QVD server component will now need to be configured to access the NFS share that we have configured on the NFS server.
First, create the mountpoint on your host systems:
# mkdir -p /var/lib/qvd/storage
Ensure that you have the tools required to access an NFS share installed on your host systems. On Ubuntu, you need to install nfs-common:
# apt-get install nfs-common
On SLES, install nfs-client:
# zypper install nfs-client
To ensure that the NFS file system is always mounted at boot time, edit your /etc/fstab to add the following line:
nfsserver:/var/lib/exports /var/lib/qvd/storage nfs rw,soft,intr,rsize=8192,wsize=8192 0 0
Note that in the line above nfsserver is the name of the server hosting the NFS Share. You should substitute this with the IP address or resolvable hostname of your NFS Server.
Once you have finished editing your fstab, you should be able to mount the NFS export on your host systems:
# mount /var/lib/qvd/storage
Finally, you should check that the NFS export has been properly mounted. You can do this by running the mount command and then checking the output to see that your NFS export is listed:
# mount ... nfsserver:/var/lib/exports on /var/lib/qvd/storage type nfs (rw,soft,intr,rsize=8192,wsize=8192,addr=172.20.64.22)
2. LXC Virtualization inside QVD
2.1. LXC Technology Basics
LXC virtualization runs directly within the kernel of the host operating system, so that processes running within guest containers are actually visible within the host. As a result, containers share kernel space which is more efficient, since only a single kernel is loaded on the host running your virtual desktops. On the other hand, this means that all of your virtual machines necessarily run the same kernel, so kernel customizations per machine are not possible. Since many distributions tweak kernel configuration options to suit the environment, it is usually advisable that the same distribution is used for each container as is running on the host platform.
Each container has its own filespace running on the host’s filesystem, called the rootfs. A container’s filesystem hierarchy looks identical to the linux installation that it is running, and is directly accessible from within the host environment. This makes it possible to actually access the underlying filesystem of a running container from its parent host. This can be very useful from a troubleshooting and debugging perspective. It also makes LXC containers much easier to access and update for system administrators. On the other hand, the nature of LXC virtualization and its specific requirements make it more difficult to configure and easier to break. In particular, it is essential that processes and scripts that require direct access to hardware (such as udev) do not run within container space. Frequently, package requirements and dependencies may make this difficult to maintain for inexperienced administrators.
|
|
As you might imagine, we wouldn’t recommend that you attempt any write operations on a running container from within the host. Whilst it is technically possible, it may yield unexpected results. |
Unlike a traditional chroot, LXC provides a high level of isolation of processes and resources. This means that each container can be allocated its own network address and can run processes without directly affecting other containers or the parent host system.
LXC can be used outside of QVD quite easily, and any LXC image that can run within QVD can be loaded on any linux system with LXC support. In order to run a container using LXC outside of QVD, you will need to create a config file for your container, providing details of mountpoints, control groups, networking requirements and console access. See man lxc.conf for options. When running an LXC container within QVD, QVD will automatically generate a configuration file for the container before it is started, in order to ensure that it is configured correctly to run within the QVD environment.
Containers can be created directly from the filesystem of any functional linux installation, but will almost certainly require some modification in order to work. This modification usually involves removing any processes or scripts that directly access hardware, and manually recreating device nodes. Most distributions with LXC support also include templates, which are essentially bash scripts that will set up a base installation of the operating system within a container for you automatically.
Templates can go a long way toward getting you started and should be used as a baseline toward creating your LXC images, however they vary across distributions and usually fall short of generating a fully functional configuration, and certainly require that you install many more packages manually in order to bring a container up to a level where it is usable within QVD.
2.2. When to Use LXC
It is important that you are able to determine the best use-cases for LXC, as opposed to using KVM. Both technologies have their advantages and should be used in different situations. In general, LXC should offer superior overall performance to KVM and will scale better, since the virtualization that it is offering has less overhead. On the other hand, KVM will offer much greater flexibility and will allow you to run a wider variety of guest operating systems.
Here are some basic guidelines that you should follow when determining whether or not to use LXC:
-
The disk image that you are going to create will be shared among many users
-
The guest operating system that you want to install uses exactly the same kernel as the host (i.e. the kernel will be identical). It is strongly recommended that the guest distribution is identical to that of the host
-
You wish to further abstract the virtualization in order to be able to run other guest operating systems within QVD, by running KVM within an LXC environment. This is a highly complex configuration and will not be presented in this documentation. Nonetheless, the QVD team has succeeded in creating Microsoft Windows virtual desktops using this methodology.
In general, it is easier to set up and configure QVD to use KVM virtualization, and it has proven to be easier for administrators to work with KVM images. If you are in doubt or are new to QVD, we recommend using KVM.
If you have a good understanding of QVD already, and are already familiar with LXC, you will find that the support for LXC within QVD will help you to deploy complex LXC configurations very easily. You will also find that the nature of this type of virtualization provides you with much better administration capability and that you are able to achieve more efficient use of your hardware.
2.3. QVD LXC Implementation Details
In this section, we will take a closer look at how LXC is implemented within QVD.
2.3.1. Disk Image Storage and Structure
QVD makes use of unionfs-fuse in order to handle union style mount points. This allows QVD to mount directories containing user home data and temporary data typically handled as overlays within KVM onto the running LXC. Since the LXC disk image is a read-only system, unionfs-fuse facilitates the mount of writable storage areas. It is therefore essential that the fuse kernel module is loaded at system startup.
Since LXC Virtualization implementation differs dramatically from KVM, QVD stores all of the data associated with each virtual machine deployment in logically distinct directories within the QVD storage location.
While the staging and images directories are used in common with KVM, the majority of functional activity takes place outside of these directories. When a Virtual Machine is started for a user, the Disk Image that will be used within the Virtual Machine is literally extracted from the tarball stored in the images directory into a subfolder within the basefs folder.
When the Virtual Machine is started the filesystem that is extracted under the basefs folder is mounted together with the user’s home data, stored in the homefs folder, and the relevant overlay data (in overlayfs), onto a runtime directory within rootfs. This runtime directory is then used to load the LXC and serve the Virtual Desktop to the end user.
The folder content, structure and purpose are described in more detail below.
basefs
For each virtual machine that has been started within the QVD environment, a subfolder is created within the basefs folder. This subfolder is named using the convention that it is prefixed with the ID assigned to the virtual machine within QVD-DB and is suffixed with the name of the Disk Image file that was loaded for that machine. Therefore, within the basefs folder, it is likely that you will see folders named similarly to the following:
# ls -l /var/lib/qvd/storage/basefs/ total 4 drw-r--r-- 18 root root 4096 2012-02-20 11:59 2-image.0.22.tgz
In this example, the folder is named 2-image.0.22.tgz. This is because the filesystem contained under this folder belongs to the virtual machine with an ID==2, and the disk image that is loaded here is from the disk image file named image.0.22.tgz. Within this folder is a typical linux filesystem:
# ls /var/lib/qvd/storage/basefs/2-image.0.22.tgz/ bin dev etc lib lib64 media mnt opt root sbin selinux srv sys tmp usr var
Using unionfs-fuse, the filesystem represented in this folder will be mounted in conjunction with the filesystems represented in the homefs and overlayfs folders inside the rootfs folder at runtime.
homefs
User home data is stored within the homefs folder. According to convention, user home directories are stored within a folder named in the following way:
<id of VM>-<id of User>-homefs
This makes it possible for a single user to have multiple home environments for different virtual desktops, based on the virtual machine that the home directory is mounted in.
overlayfs
This directory contains overlay data used within the virtual machine. Since the contents of the basefs image are treated as a read-only filesystem, an overlay is created to handle data that the running virtual machine may need to write to the operating system. Typically, this data is in the form of log data, runtime PIDs, lock files and temporary files.
Each virtual machine has its own overlayfs directory, and this is named following the convention:
<id of DI>-<id of VM>-overlayfs
Note that if a virtual machine fails to start properly for some reason, a temporary overlay folder is created. This folder is named with the prefix "deleteme-". The folder is retained to allow you to view log files specific to a virtual machine that may have failed to start, in order to assist you with the debugging process.
rootfs
This directory contains the mountpoints for running LXC Virtual Machine instances. Each mount point is named following a convention where it is prefixed with the ID of the virtual machine within the QVD-DB. The mountpoint directory is created when the container is first started. Since it is only used to mount the filesystem of a running container, it will only contain anything when a container is actually running. If the container is stopped, the directory is unmounted and will remain empty until the container is restarted.
2.3.2. Networking
Similarly to QVD’s KVM implementation, you need to create a bridge interface on the QVD Node host. When a virtual machine starts, a virtual network interface is created and bound to the bridge interface. In order for this to function correctly, you will need to configure QVD with the IP range used for virtual machines. The bridge interface should be configured with an IP address below the range used for virtual machines but still in the same network.
2.4. QVD Base Configuration
By default, QVD is configured to make use of KVM virtualization. Before you attempt to load any LXC Disk Images into the QVD infrastructure, you should ensure that QVD has been reconfigured to use LXC. In order to do this, you should update the following configuration parameters using the QVD Admin Command Line Utility:
# qa config set vm.hypervisor=lxc # qa config set vm.lxc.unionfs.bind.ro=0 # qa config set vm.lxc.unionfs.type=unionfs-fuse # qa config set command.unionfs-fuse=/usr/bin/unionfs
In SLES, the unionfs binary is provided by QVD and is located in /usr/lib/qvd/bin/unionfs, therefore the last command in the list above should be modified to reflect this path.
Note that once you have reset these QVD system parameters, you will need to restart the HKD on each of your QVD Server nodes:
# /etc/init.d/qvd-hkd restart
Assuming that you have already configured your networking correctly, QVD should be able to load and run LXC images.
2.4.1. LXC Control Groups (cgroups)
QVD containers use cgroups (control groups), a Linux kernel feature designed to limit resource usage of process groups on the system. A virtual filesystem is mounted under the directory /sys/fs/cgroup in which various controllers, known as subsystems, can be configured. This directory can be changed by modifying the path.cgroup setting in the QVD database, although this should not be necessary.
By default, a cpu subsystems for the container is placed under the default directory /sys/fs/cgroup/cpu This behaviour is controlled by the QVD setting path.cgroup.cpu.lxc which is defined by default as follows:
path.cgroup.cpu.lxc=/sys/fs/cgroup/cpu/lxc
Again, there should be no need to change this on a default install.
2.4.2. Loading LXC Images into QVD
Standard QVD administration tools, such as the QVD-WAT and the QVD Command Line Administration Utility, can be used to load an LXC image into QVD. The important difference here is that the file will take the form of a gzip-compressed Unix tar-archive, as opposed to a qcow2 image. It is absolutely imperative that the environment has been preconfigured for LXC virtualization, or images will be copied into the wrong folder and will fail to load when a virtual machine is started.
To load an LXC image into QVD from the command line you will need to take the following steps:
Add an Operating System Flavor to host your image file:
# qa osf add name=MyOSF
Now add your Disk Image to the OSF
# qa di add path=/var/lib/qvd/storage/staging/my_image.tar.gz osf=MyOSF
This will take some time, as the image will be copied from the staging directory into the images directory.
Now add a User that you can test this image against
# qa user add login=test password=test
Finally create a Virtual Machine for the User, and attach the OSF that this Virtual Machine will use at runtime
# qa vm add name=TestVM user=test osf=MyOSF
If your QVD installation is properly set up, you will now be able to start the Virtual Machine and test it.
2.4.3. Starting an LXC Virtual Machine
Starting an LXC Virtual Machine within QVD is no different to starting a KVM virtual machine. It can either be started manually using the QVD Admin Command Line Utility, or it can be started automatically by the HKD when a client attempts to connect to the virtual desktop handled by the Virtual Machine. For testing purposes, it is usually advisable to start the virtual machine from the command line:
# qa vm start -f name=TestVM
You can monitor the startup process either from the QVD-WAT, or by listing the status of the virtual machine.
# qa vm list -f name=TestVM Id Name User Ip OSF DI_Tag DI Host State UserState Blocked 1 TestVM nicolas 172.20.127.254 test default 2012-03-05-000 qvd-test3 starting disconnected 0
As the virtual machine boots, it will change state. If the Virtual Machine starts without a problem, you should check that you are able to connect to it using the QVD Client and that the virtual desktop is rendered. If the virtual machine does not start correctly, or you are unable to access the virtual desktop, you may need to perform some debugging.
2.4.4. Accessing an LXC Virtual Machine for Debugging
Since you are actually able to access the filesystem of a running LXC image directly from the host operating system, it is possible to tail log files and to do a fair amount of debugging directly from the host where the virtual machine is running. It is important to note, though, that it is highly inadvisable to attempt any write operations to a running container’s filesystem.
When an LXC Virtual Machine is started, its various components are merged together using unionfs and are mounted into the rootfs folder in QVD’s storage area (usually /var/lib/qvd/storage/rootfs). Inside this space, it is possible to view the state of a running instance in realtime. This means that you can quickly access log files and configuration information from the host operating system. Often, this is the best way to quickly debug problems within a running instance.
In general, it is better to access a running container via its console. There are two ways that you can do this.
The first method is to use the console facility provided with the qvd-admin command line utility:
# qa vm console -f name=test
The second method is to access the console of the container directly using the lxc-console command. This avoids using the QVD code which provides a wrapper for this. If you have direct access to the host on which the virtual machine is running, you will need to find out the virtual machine’s ID:
# qa vm list -f name=test Id Name User Ip OSF DI_Tag DI Host State UserState Blocked 1 test nicolas 172.20.127.254 test default 2012-03-05-000 qvd-test3 running disconnected 0
Once you have the ID, you will be able to run the lxc-console command to access the console of the virtual machine. Usually the lxc containers run with a name constructed out of the string qvd- followed by the ID of the virtual machine:
# lxc-console -n qvd-1 Type <Ctrl+a q> to exit the console Welcome to SUSE Linux Enterprise Server 11 SP2 (x86_64) - Kernel 3.0.13-0.27-default (tty1). sles11-sp2 login:
Note that you can exit the console by using the <Ctrl+a q> key-sequence. Once you have gained console access, you will be able to review log files and start or stop various services. It is important to remember that many aspects of a running container are not actually writable. This means that while you may be able to install applications and make changes to files on a running container, these changes will only be temporary. When the container is stopped, these changes will be lost. If you need to make lasting changes to an LXC container, you will need to edit the actual disk image. This can either be done by directly modifying files for the image in /var/lib/qvd/storage/basefs, or by modifying the LXC Disk Image by running it inside of an independantly running container started up using the LXC tools provided with your distribution.
2.5. Creating LXC Disk Images
Please refer to the section dedicated to this topic in the Operating System Flavours and Virtual Machines section of this document for more information.
3. Authentication
Although QVD does provide its own authentication framework, which stores its users within the QVD database, it is quite common to require integration with another authentication framework so that changes to user passwords etc, do not need to be replicated within the QVD-DB.
QVD does provide a certain level of integration with external resources. In this chapter, we will explore two of the more common integration requirements, and the level of support offered by QVD for these authentication frameworks.
3.1. LDAP and Active Directory Integration
The most commonly used authentication framework is LDAP, and QVD supports LDAP authentication out of the box. This includes support for Microsoft’s Active Directory which makes use of LDAP versions 2 and 3.
3.1.1. Testing Your LDAP Server
Before you attempt to configure QVD to authenticate against LDAP or Active Directory, it is advisable to test your server first to ensure you have the right credentials and Distinguished Name (DN) for the server. To do this, you will need to have ldap-utils (Ubuntu) or the `openldap2-client (SLES) installed on your QVD node.
Once that is done, query your server with the following command for LDAP:
# ldapsearch -xLLL -H ldap://example.com -b "dc=example,dc=com" cn=admin cn
If using Active Directory, use this command instead:
# ldapsearch -LLL -H ldap://example.com:389 -b ‘dc=example,dc=com’ \ -D ‘EXAMPLE\jdoe’ -w ‘password’ ‘(sAMAccountName=jdoe)’
In either instance, amend your query to match that of your own server. Check the results of the LDAP query to satisfy yourself that connection to your LDAP server is possible from your QVD node.
3.1.2. Configuring QVD for LDAP Authentication
LDAP Authentication is configured within QVD by setting a few configuration keys in the QVD database. This can be achieved using the QVD CLI Administration Utility.
# qa config set l7r.auth.mode='ldap' # qa config set auth.ldap.host='ldap://example.com:389' # qa config set auth.ldap.base='dc=example,dc=com'
In the above example, we have changed the QVD authentication mode to LDAP, we have set the LDAP Host and port number to example.com on port 389. And we have set the LDAP base DN that should be searched for matching users to dc=example,dc=com.
With these basic configuration elements, QVD will search the LDAP directory for a matching username, and then perform a BIND against that user using the credentials supplied by the client. By default, the search is performed with scope base and filter (uid=%u). Using our example host above, a client connecting with the Username set to guest would need a corresponding entry uid=guest,dc=example,dc=com within the LDAP server running on host example.com available on port 389.
You can change the scope and filter settings for the search, to allow QVD to scan other branches and attributes to find a matching user:
# qa config set auth.ldap.scope=sub # qa config set auth.ldap.filter='(|(uid=%u)(cn=%u))'
The above examples change the default search scope for LDAP authentication to sub and the filter will cause the search to match users with either the uid or the cn equal to the provided username.
3.1.3. Configuring QVD for Active Directory Configuration
Active Directory configuration is similar to LDAP configuration, but requires a small tweak to the auth.ldap.filter setting as below:
# qa config set l7r.auth.mode='ldap' # qa config set auth.ldap.host='ldap://example.com:389' # qa config set auth.ldap.base='OU=People,DC=example,DC=com' # qa config set auth.ldap.scope='sub' # qa config set auth.ldap.binddn='CN=Administrator,CN=Users,DC=example,DC=com' # qa config set auth.ldap.bindpass='password' # qa config set auth.ldap.filter='(sAMAccountName=%u)'
Here QVD matches the user’s name against sAMAccountName which is the logon name for the Windows user.
3.1.4. Limitations
While it is trivial to get QVD to authenticate users against LDAP, you will still need to create matching users within your QVD-DB in order to assign virtual machines to them. The Auto Plugin discussed in the next section allows you to provision users and assign them a default virtual machine automatically as they connect.
QVD tools allowing you to change user passwords within QVD will not update passwords within an LDAP backend, as this may affect the functioning of other facilities within your infrastructure. While these tools will report success for a password change, it is important to understand that the password that has been changed is the one stored within QVD-DB for the user, and not the password within the LDAP directory. If you use LDAP Authentication, the login process completely ignores passwords stored within QVD-DB. Password changes should be made using the tools that you usually make use of to manage your users.
3.1.5. LDAP Reference
-
l7r.auth.plugins (Required). Set to "ldap" to enable.
-
auth.ldap.host (Required). Can be a host or an LDAP uri as specified in Net::LDAP
-
auth.ldap.base (Required). The search base where to find the users with the auth.ldap.filter (see below)
-
auth.ldap.filter (Optional by default (uid=%u)). The string %u will be substituted with the login name
-
auth.ldap.binddn (Optional by default empty). The initial bind to find the users. By default the initial bind is done as anonymous unless this parameter is specified. If it contains the string %u, that is substituted with the login
-
auth.ldap.bindpass (Optional by default empty). The password for the binddn
-
auth.ldap.scope (Optional by default base). See the Net::LDAP scope attribute in the search operation. If this is empty the password provided in during the authentication is used
-
auth.ldap.userbindpattern (Optional by default empty). If specified an initial bind with this string is attempted. The login attribute is substituted with %u.
-
auth.ldap.deref (Optional by default never). How aliases are dereferenced, the accepted values are never, search, find and always. See Net::LDAP for more info.
-
auth.ldap.racf_allowregex (Optional by default not set). This is a regex to allow to authenticate some RACF error codes. An example setting would be "^R004109 ". One of the common cases is R004109 which returns an ldap code 49 (invalid credentials) and a text message such as "R004109 The password has expired (srv_authenticate_native_password))". If you don’t have RACF this is probably not for you. Example RACF errors:
-
R004107 The password function failed; not loaded from a program controlled library.
-
R004108 TDBM backend password API resulted in an internal error.
-
R004109 The password has expired.
-
R004110 The userid has been revoked.
-
R004128 Native authentication password change failed. The new password is not valid or does not meet requirements.
-
R004111 The password is not correct.
-
R004112 A bind argument is not valid.
-
R004118 Entry native user ID (ibm-nativeId,uid) is not defined to the Security Server.
-
3.1.6. Authentication Algorithm
If auth.ldap.userbindpattern is defined then a bind is tried with this DN substituting %u with the login. If it is successful the user is authenticated and if it fails the following steps are attempted:
-
A bind as anonymous user (if auth.ldap.binddn is not defined, if not a bind as that user is done) and search for the userdn, with the search path specified in auth.ldap.base and the user filter specified as auth.ldap.filter. The auth.ldap.filter gets substituted %u with the login name. If no user is found authentication fails.
-
If a userdn is found a bind with that user is tried.
3.2. Automatic User Provisioning Plugin
When using an alternative authentication mechanism, such as the LDAP authentication plugin, there is a common requirement to automatically provision users who have authenticated against the provided plugin. The Auto Plugin is designed to cater to this requirement.
When QVD is configured to authenticate against an external source, such as LDAP, QVD usually does not have have any record for the users that log in. When the Auto Plugin is enabled, the user record is created automatically. User records created this way are provided with a default virtual machine, as specified in the plugin configuration.
To enable the plugin, add "auto" to the list of enabled plugins in the L7R configuration:
# qa config set l7r.auth.plugins=auto,ldap
Note that in the example above, we are using the auto plugin in conjunction with the ldap authentication plugin.
You will now need to tell the auto plugin which OSF to use when creating a virtual machine for the user:
# qa config set auth.auto.osf_id=1
In this case, new users who are authenticated using LDAP will automatically be provisioned with a user account and a VM will be created using the OSF ID that we have specified.
It is also possible to force the use of a particular Disk Image using the DI Tag functionality. This can be done by setting the following configuration option:
# qa config set auth.auto.di_tag="testing"
A typical example to use the LDAP Plugin and the Auto Plugin in conjunction would require you to run the following commands:
# qa config set l7r.auth.plugins=auto,ldap # qa config set auth.ldap.host=ldaps://myldap.mydomain.com:1636 # qa config set auth.ldap.base=ou=People,dc=example,dc=com # qa config set auth.ldap.scope=sub # qa config set auth.ldap.filter='(&(objectClass=inetOrgPerson)(cn=%u))' # qa config set auth.auto.osf_id=1
|
|
Use quotes around any special characters that may be subject to shell expansion or otherwise interpreted in a way that you have not intended such as pipes, brackets, ampersands and so on. |
This would mean that as users authenticated for the first time, using QVD, they would be authenticated using your LDAP repository and they would be automatically provisioned with a default desktop to start work immediately.
3.3. OpenSSO and OpenAM
QVD is capable of providing support for other authentication platforms such as the federation and access management framework developed by Sun Microsystems and known as OpenSSO.
|
|
Since Oracle’s acquisition of Sun in 2010, OpenSSO has been discontinued, but a fork known as OpenAM is available from ForgeRock. |
In order for OpenSSO or OpenAM to function within QVD, the appropriate plugin should be installed onto all of your QVD Server Nodes and you will need to configure the VMA within each of your OSFs where you want to provide federation support.
Currently, this is an advanced configuration option that will require some professional help to implement. Customers who choose to pay for support can be provided with instructions and help deploying this facility.
3.4. Environment variables sharing
In QVD 3.5 is possible to share environment variables between the machine where QVD Client is executed and Authentication plugins since version 3.5.13.
See Client section for more information.
4. Load Balancing
4.1. Introduction
QVD is designed to be used in a load-balanced environment. Since a typical deployment makes use of several QVD Server Nodes to run all of the virtual machines, it is common to have Clients connect to these through a hardware load balancer.Since a virtual machine could run on any single Server Node, and a client could connect to any other Server Node, QVD’s L7R will handle the forwarding of a connection to the correct Server Node. However, since each Server Node has limited resources, running virtual machines need to be equitably distributed to maximize system resources across the Server Node cluster.
If a Virtual Machine is not already running for a connecting user, the L7R will determine which Server Node would be most appropriate to use in order to start a new virtual machine for that user. QVD uses its own load balancing algorithm to determine which node should be used for the new virtual machine. This algorithm assesses which node has the highest quantity of free resources, calculated as the weighted sum of free RAM, unused CPU, and a random value to bring some entropy to the result. Once the best candidate Server Node has been selected, the QVD-DB is updated to indicate that the virtual machine should be started on this Server Node, and the virtual machine is automatically started by the Server Node’s HKD.
This whole process is known as QVD Load Balancing, and it is used to ensure that running virtual machines are equitably distributed across all of the Server Nodes. This maximizes the resources available to any virtual machine to preserve healthy functionality.
4.2. QVD Health Checking
When using an external load balancer to route traffic to the different QVD Server Nodes, you will generally need some method to perform health-checking against each of the L7R instances. The QVD L7R component includes a simple health checking facility that responds over HTTP.
Typically, you will need to configure your load balancer to perform an HTTP GET on the URL: https://hostname/qvd/ping where hostname is the hostname or IP address for the Server Node instance. The query will return a text string with the content "I am alive!" if the server is healthy and available.
Some of our users take advantage of the software load balancing provided by Linux Virtual Server (LVS). An example of the configuration required within the ldirectord.cf file follows:
autoreload = no
checkinterval = 1
checktimeout = 3
negotiatetimeout = 3
logfile="/var/log/ldirectord.log"
quiescent = yes
virtual = 150.210.0.72:8443
checkport = 8443
checktype = negotiate
httpmethod = GET
protocol = tcp
real = 150.210.4.1:8443 gate 10
real = 150.210.4.2:8443 gate 10
receive = "I am alive!"
request = "/qvd/ping"
scheduler = wlc
service = https
4.3. Changing the weighting in the QVD Load Balancer
The default QVD Load Balancing algorithm calculates the current system load for each of the available server nodes by multiplying the available RAM, available CPU and a random number in order to score each system in the cluster. As we have already mentioned, these figures are weighted, so that you can alter how the load balancer functions.
Increasing the weight on the RAM variable in the algorithm will cause the load balancer to add precedence to systems with more available RAM.
Increasing the weight on the CPU variable in the algorithm will cause the load balancer to add precedence to systems with more available CPU.
Increasing the weight on the random variable in the algorithm will cause the load balancer to increase the likelihood that a more random server node will be selected.
These weights are controlled as configuration settings within QVD-DB, and can be altered using the QVD CLI Administration Utility:
# qa config set l7r.loadbalancer.plugin.default.weight.cpu=3 # qa config set l7r.loadbalancer.plugin.default.weight.ram=2 # qa config set l7r.loadbalancer.plugin.default.weight.random=1
In the above example, we have assigned more weight to CPU resources, slightly less to RAM, and even less to the randomiser. This will result in new virtual machines being started on the Server Nodes that tend to have more CPU resources available.
4.4. Building a Custom QVD Load Balancer
Since QVD is an open-source product built largely in Perl, it is relatively simple to build your own customized QVD Load Balancer that uses an alternate algorithm. A typical use case would be where you have a dedicated set of Server Nodes that you would prefer to use over another set.
QVD has a plugin system for load balancers. A load balancer plugin is a subclass of QVD::L7R::LoadBalancer::Plugin that has to be within the package QVD::L7R::LoadBalancer::Plugin.
4.4.1. Plugin API
get_free_host($vm) = $host_id
Return the id of the node on which the virtual machine $vm should be started. A load balancer has to implement at least this method.
The parameter $vm is QVD::DB::Result::VM object. It gives you access to the virtual machine’s attributes and properties. The attributes and properties of the VM’s user and OSF can be accessed through $vm→user and $vm→osf respectively. Other data can be accessed through QVD::DB.
init()
Initialize the load balancer. Use this if your load balancer has to be set up, for example by loading a persistent cache.
4.4.2. Minimal example: random assignment
This load balancer assigns virtual machines to random backend nodes.
Operating System Flavours and Virtual Machines
In this part of the manual, you will find all of the information that you need to create, edit and manage an Operating System Flavour (OSF) that will get loaded into your Virtual Machines. We also explore the Virtual Machine Agent in a little more detail to see how you can use it to trigger your own functionalities based on actions performed by users accessing the Virtual Machine.
1. DI Creation
1.1. Introduction
An OSF (Operating System Flavour) is actually composed of two elements: a DI (Disk Image), and some runtime parameters stored within the QVD-DB when the Disk Image is loaded into QVD using QVD-WAT or the QVD CLI Administration Utility. In this chapter, we will concern ourselves largely with the actual Disk Image part of the OSF, since the runtime parameters are covered in the other relevant chapters.
QVD uses DIs in order to serve groups of users that make use of a common set of applications. By using a single image to cater to a number of users, it becomes easier to administer desktop environments for all of your users. It also improves overall security, since a policy can be applied to each group of users.
In this way, if a group of users require a particular application, you can install it once and the change will apply to all of the users that share the same DI. Equally, you can remove an application from an entire group’s desktop environment.
DIs can easily be duplicated, so that you can quickly create additional environments for different subsets of users. By copying a base image, you can edit the copy and provide additional applications or other customizations to a second set of users without having to repeat a full operating system installation.
In this way QVD can massively reduce administration and maintenance, improve desktop conformity, and ease security policy implementation.
In this chapter, we will look at the process involved in creating your own base Disk Image for an OSF, so that you can implement an environment that is perfectly suited to your users.
1.2. System Requirements for KVM Images
You can create a DI that can be loaded into QVD on any Linux system that you have available for the task. In order to create an image, you will need to meet the following base requirements:
-
Server x86 with virtualization extensions (Intel or AMD).
-
Linux Operating System (preferably Ubuntu, in order to conform with these instructions)
-
At least 10 GB free disk space
-
qemu-kvm installed
-
An Ubuntu Desktop installation ISO to be used for your Guest operating system
1.3. Creating a KVM Image
In order to create your DI, you will need to download the installer of the guest operating system that you intend to serve to your users. Since the DI will need to support the QVD VMA we recommend that you use an Ubuntu variant as your choice of operating system, since it will prove easier for you to set up and configure this environment. It is possible to make use of any other Linux-based operating system but you may need professional help creating a functional image.
For customized packages, we recommend that you install Ubuntu using the Desktop alternate installer. You will need to visit http://www.ubuntu.com/download/ubuntu/alternative-download in order to find the installation ISO that you should download.
1.3.1. Create a QCOW2 File
QVD will make use of the qcow2 disk image format to create a virtual disk that will be used to store the DI. This virtual disk file is essentially the base hard disk used within each virtual machine.
In order to create the qcow2 disk image file, Ubuntu users need to run the following command:
# kvm-img create -f qcow2 example.img 8G
On SLES, a similar invocation as follows:
# qemu-img create -f qcow2 example.img 8G
In the command, the file that will be created will be called example.img and will have a virtual hard disk size of a maximum of 8GB. In actuality, the qcow2 will only create a relatively small image file. One of the features of the qcow2 format is that it can expand the image as required. The 8GB limit is applied to prevent the image from growing too large without any control.
|
|
Remember that user’s home directories will not be stored within this image, so the limit to the image file size will not affect user home space. |
1.3.2. Installing the Operating System
Once you have created the virtual disk file that you will install the base Operating System into, you need to load it into a virtual machine and boot the Ubuntu CD installer image within the virtual machine.
You can do this on Ubuntu by running kvm in the following way:
# kvm -hda example.img -cdrom ubuntu-12.04-alternate-i386.iso -m 1G
Alternatively, you can invoke kvm on SLES as follows:
# qemu-kvm -hda example.img -cdrom ubuntu-12.04-alternate-i386.iso -m 1G
In the example command above, the ubuntu-12.04-alternate-i386.iso is the installer ISO that you would have downloaded from the Ubuntu website.
KVM should load a basic virtual machine that will boot the installer ISO. You should be able to follow the instructions in the installer to complete a standard Ubuntu installation within the virtual machine. You will notice that you are installing into the virtual hard disk which is only 4GB in size. During the installation, you will be prompted for a username and password. You should select a username and password that you will use to manage package installation and other administrative tasks within the DI at a future date.
When you have completed the installation, the installer will prompt you to reboot. You should allow the installer to reboot and KVM will restart the virtual machine, this time booting off the virtual hard disk and loading your newly installed Operating System.
1.4. Adding and Configuring the VMA
In order for QVD to be able to serve the Operating System Image to connecting clients, the image will need to have the QVD VMA (Virtual Machine Agent) installed. This is provided as a package from the QVD repositories.
Firstly, add the QVD packages public key to your trusted keys (as root):
# wget -qO - https://www.theqvd.com/packages/key/public.key | sudo apt-key add -
Now, add the repository:
# echo "deb http://theqvd.com/packages/ubuntu-trusty QVD-3.5.0 main" > \
/etc/apt/sources.list.d/qvd-35.list
# apt-get update
Similarly, on SLES.
Firstly, add the QVD packages public key to your trusted keys (as root):
# rpm --import https://www.theqvd.com/packages/key/public.key
Now, add the repository:
# zypper ar http://theqvd.com/packages/sles/11SP2/stable QVD
# zypper ref
Now install the VMA:
# zypper install perl-QVD-VMA
This will add the QVD package repository to your apt resources, update the package cache and then install the QVD VMA and all of its dependencies.
1.4.1. VMA Configuration
Once the vma is installed, it will need to be properly configured. Configuration settings for the VMA are stored in the file at /etc/qvd/vma.conf. The configuration file is read by the VMA when it is started, so any changes to the configuration file will require that the VMA is restarted in order for the changes to come into effect.
The VMA can be restarted by running the command:
# sudo /etc/init.d/qvd-vma restart
There are some basic configuration parameters that can be configured within the VMA to facilitate how a client will interact with the virtual machine.
Audio
vma.audio.enable
Possible values:
0 ⇒ Audio is not enabled in the virtual machine (Default) 1 ⇒ Audio is enabled in the virtual machine
|
|
In order to get Audio working within QVD, you will need to ensure that your DI is configured correctly. Usually it is easiest if you make use of PulseAudio (default in Ubuntu) and that it is configured to enable network access to local sound devices. You can configure this using the program paprefs. |
Printing
vma.printing.enable
Possible Values:
0⇒ Printers are not enabled (Default) 1⇒ Printers are enabled
The QVD client and the VMA will map all the printers configured on the client. Currently, you will need to ensure that the required printer drivers are installed on the DI.
PID location
vma.pid_file
The place where the pid resides, by default /var/run/qvd/vma.pid
Keyboard
vma.default.client.keyboard
The default keyboard in the virtual machine, this value is used if no other values are detected by the client. The default value is pc105/en. To modify this the value must be in format layout/distribution
Default link
The default NX connection link is set by this paramenter unless the client overrides this value. Usually, the QVD client will set its own value.
vma.default.client.link
Possible values for this key are:
local adsl (Default) modem
VMA Hooks
The VMA can also have a variety of additional configuration entries that control actions within the running operating system for the virtual machine, based on particular activities relating to QVD. These are known as VMA Hooks. We discuss these settings in significantly more detail in the chapter titled VMA Hooks.
1.4.2. Shared Folders
By default QVD provides access to various folders on the local client, with support for Windows, Linux and OSX.
Setting Up Shared Folders
QVD shared folders are enabled by default. You can disable them by unsetting the vma.slave.command parameter in the vma.conf file in the virtual machine:
vma.slave.command =
|
|
Explicitly disabling the setting in the VMA (presuming the user has no root access) can assist the adminstrator in limiting what can be copied to and from the virtual machine, online services notwithstanding. |
Shared folders may also be disabled using the QVD client configuration. You can read more about configuring shared folders in the QVD client in the Shared Folders chapter.
Troubleshooting Shared Folders
The file sharing feature uses the SFTP protocol and uses sshfs to mount the file system in the virtual machine. Any problems related to mounting are logged in /var/log/qvd-nxagent.log. Some common problems are:
- fuse: device not found, try modprobe fuse first
-
The device node /dev/fuse was not found. Pay no attention to the "modprobe" command in the error message: in LXC virtualization kernel modules are loaded in the host system, and chances are the fuse module is already loaded. Create the missing device node with:
 # mknod /dev/fuse c 10 229
 # chmod a+rw /dev/fuse
- fuse: failed to open /dev/fuse: Permission denied (LXC only)
-
The user account created by the VMA doesn’t have sufficient permissions to access /dev/fuse. On many systems only users in the fuse group can access /dev/fuse. You can either change the permissions of /dev/fuse to less restrictive with chmod a+rw /dev/fuse, or add the user to the fuse group by default. In Ubuntu, this can done by adding the fuse group to the EXTRA_GROUPS variable in /etc/adduser.conf. In SUSE, edit the /etc/default/useradd file and add the fuse group to GROUPS.
- Segmentation fault
-
If the locale is not correctly set, sshfs 2.4 crashes when trying to get the current character encoding. Make sure you have installed the appropriate locales or language packs.
- Folder is mounted in Redirected, but icon is not shown on the desktop
-
Whether mounts are shown on the desktop depends on the desktop environment you use. If you are using a GNOME variant, likely Nautilus is configured to not show mounted volumes on the desktop. The following will correct that:
# gsettings set org.gnome.nautilus.desktop volumes-visible true
Shared Folders Technical Implementation
The QVD client will listen for incoming TCP connections from the qvd-slaveclient and forward them to the nxagent running the machine. This is achieved by having the client run the nxproxy command with the option slave=1.
When the nxagent receives a forwarded connection, it executes the slave server program qvd-vma-slaveserver (the default value for the configuration setting vma.slave.command).
To share a folder, the slave client sends a HTTP PUT request and starts sftp-server, which provides access to the files in the folder to be shared. The server creates a mount point and utilizes sshfs to mount this folder.
Additional commands may be passed to the QVD client via the config file with the client.sshfs.extra_args directive:
client.sshfs.extra_args=-o atomic_o_trunc -o idmap=user
For example, changing idmap to allow_other may be useful when connecting from Windows where the operating system may be unable to perform user/group ID mapping.
Desktop Environment Compatibility
Compatible file managers will pick up the signal of a new volume having been mounted and react by adding an icon to the sidebar or creating a desktop shortcut.
-
Nautilus (GNOME) adds an icon to the sidebar and on the desktop.
-
PCManFM (LXDE) adds icons to the sidebar, but not on the desktop.
1.5. Setting up Serial Port access
In order for an Administrator to connect to the running Virtual Machine via a serial connection you will need to configure access within the DI that you have created.
To configure the serial port you will need to perform the following steps as the root user in your running virtual machine:
# sudo editor /etc/init/ttyS0.conf
Add the configuration
# ttyS0 - getty
#
# This service maintains a getty on ttyS0 from the point the system is
# started until it is shut down again.

start on stopped rc RUNLEVEL=[2345]
stop on runlevel [!2345]

respawn
exec /sbin/getty -L 115200 ttyS0 xterm
Once the Serial Port has been configured, the default settings for any Server Node will allow you to access a running Virtual Machine using telnet or the QVD CLI Administration Utility with a command like:
# qvd-admin vm console -f id=1
2. Creating and Configuring LXC Disk Images
The process involved in creating an LXC Disk Image very much depends on the operating system or distribution that you wish to run. However, there are a number of common essential guidelines that should be followed in order to create a functional image. In this document, we will present a rough outline of the steps that need to be taken, and will then provide some base examples of how this is done for Ubuntu and for SUSE systems.
The following list provides a basic outline of the steps that need to be taken to prepare an image in order to have it run within the QVD:
-
Install a copy of the base operating system into a file-space. On Debian-based systems, this can be achieved using debootstrap, while on SUSE systems, zypper can be used. It is also possible to simply use the filesystem created during an original installation.
-
Manually recreate the device nodes in /dev
-
Remove any hardware references in your init scripts. This process is very specific to the operating system that you are using.
-
Add the QVD sources to your repositories, and add the qvd-vma package along with its dependencies. This can be done in a number of ways including a simple chroot, running the container within lxc, or using zypper --root within SLES environments.
-
Update the system inittab
-
Create an fstab
Typically, most Linux distributions provide templates that can be used to automate the steps required to build a base installation within a container. These templates are essentially shell scripts that automate many of the steps required to install the base operating system, to remove hardware references in the init scripts and to create device nodes. These scripts are usually stored in /usr/lib/lxc/templates/, but you should not need to modify them. Instead, you can usually invoke the template that you wish to use by running the lxc-create command with the -t switch:
# lxc-create -n MyUbuntuContainer -t ubuntu
# lxc-create -n MySLESContainer -t sles
|
|
The template for SLES linux is only provided with SLES 11 SP3 and up. In fact, due to many of the complications in creating functional containers on earlier versions of SLES, we recommend that LXC under QVD is only used on these versions of SLES. Even when using this version of SLES, you will be required to perform a number of modifications to the default template. |
We suggest that you take the time to look over the template scripts to understand what they are doing. During some installations, some modification to the template script may be required and it is important that you know what the script is trying to achieve. The list of steps presented above should provide some outline for the majority of work handled by a template script.
If you take advantage of the lxc-create command, as specified above, you will be notified that you have not provided a configuration file. This is not extremely important, since QVD will actually generate configuration files for your containers as required. However, if you intend to use a container outside of QVD, you may need to create a configuration for your container after it has been created. Some instruction on how to do this is presented for each distribution in the subsections below.
Remember that if you use the lxc-create command, the container that is created will only include the packages required for a minimal installation of the distribution that you are creating. Once this container has been created, you will still be required to install a wide variety of applications in order to set up a functional desktop environment.
|
|
Some of the more feature rich desktop environments, such as Gnome and KDE are often packaged in such a way that their dependencies include packages that directly access hardware. This can cause trouble when trying to set up an LXC image. Therefore, we recommend that when using LXC virtualization you take advantage of one of the more lightweight desktop environments, such as LXDE or LXQT. While it is possible to use Gnome or KDE, you will need to be particularly experienced at package management and in your configuration capabilities. In our examples and demonstration images, we generally use LXDE or LXQT to minimize configuration issues. |
2.1. Ubuntu Image
The following outline should guide you through preparing and setting up an LXC image on an Ubuntu system.
Setting up and configuring a base LXC image on Ubuntu is relatively easy if you take advantage of the template that is packaged with LXC. To get started, use the lxc-create command to build a simple container:
# lxc-create -n MyUbuntuContainer -t ubuntu
This will invoke the debootstrap command to download a base Ubuntu installation, and will perform some basic tasks such as the recreation of your device nodes. Although you will be notified that no configuration file has been provided, a very basic configuration will be created for you by the template script, but will not include any networking options. This isn’t a problem as QVD will handle your configuration parameters when the image is loaded into the QVD framework, and the container will automatically share the network resources of the host system if a network configuration has not been provided. Once the command has finished running, the image and its configuration file will be stored in /var/lib/lxc under a directory that matches the name that you provided following the -n switch.
A container created using the default template is not in any state that can be used within the QVD framework. To begin with, it will not have X Window installed and it will not have any desktop environment available. It is possible to build a simple container and then to chroot into it to install the packages required for a desktop environment by doing the following:
# chroot /var/lib/lxc/MyUbuntuContainer/rootfs/
# apt-get install lubuntu-desktop
This may help you to get to a point where you can continue to work toward building your disk image, but the preferred approach is for you to edit the template script before you create your container. Ideally, your template script should at least include the commands that should be used to handle the installation of packages for your desktop environment as well as the QVD VMA packages. The QVD team maintains its own set of modified template scripts that will ensure that a desktop environment and the necessary QVD VMA packages are also installed. These templates are not supported, but may help you to get started. Template scripts are usually installed in /usr/lib/lxc/templates.
If you are using the lxc-ubuntu template, the easiest way to ensure that the majority of required packages are installed is to add the packages for the items that you want to include to the list of packages that are downloaded for the base installation, for instance if you would like to include Ubuntu LXDE, try editing the template file to locate and modify the following line:
packages=dialog,apt,apt-utils,iproute,inetutils-ping,vim,isc-dhcp-client,isc-dhcp-common,ssh,lsb-release,gnupg,netbase,ubuntu-keyring,lubuntu-desktop
Note that although this should help you to get started, it is quite possible that some packages may not get installed. If you find that you are having trouble, but your container has been built. It is better to add packages from within a chroot environment than from a running container.
You should now be ready to start your linux container from the command line:
# lxc-start -n MyUbuntuContainer
This will start the boot process, which you will be able to watch within the console. Once it has finished loading, you should be able to login as root using the password set up by your template. Usually the password is set to root if you are using one of the default templates.
|
|
You should now follow the instructions to install and configure the QVD VMA and to set up Serial Port Access. |
When you have finished setting up your image, you can stop it from a different console or tty on the host system:
# lxc-stop -n MyUbuntuContainer
Note that when creating a container from one of the templates, network access will rely on the configuration used by the host system (if possible) and these resources will be shared between containers. This is not very secure, but is usually fine to prepare an image for use within QVD, as the QVD infrastructure will provide its own configuration for the image when it actually runs inside of QVD. However, if you are having trouble with your networking within the container, or you are having trouble starting a container you may find that it is helpful to change how the container accesses the network. The usual approach is to create a bridge interface that can be used to route traffic to the virtual interface that is created when you start the container. Under Ubuntu, you can easily create a bridge interface by editing your network configuration file in /etc/network/interfaces:
# The primary network interface
#iface eth0 inet dhcp

auto br0
iface br0 inet dhcp
       bridge_ports eth0
       bridge_fd 0
       bridge_maxwait 0
In this example, we have attached the usual ethernet port that connects the machine to the network to the bridge, which will obtain an IP address using DHCP. You will need to bring up your bridge interface in order to start using it:
# ifup br0
Now you will need to change the network parameters inside your LXC configuration for the container that you are working on. Usually, this means that you will need to edit the file /var/lib/lxc/MyUbuntuContainer/config where MyUbuntuContainer is the name of your container. Add the following lines to the configuration file:
lxc.network.type = veth
lxc.network.flags = up
lxc.network.link = br0
When the container is started, a virtual interface attached to the bridge will be created on the host system and made available to the container once it has started.
2.2. SLES Image
The following outline should guide you through preparing and setting up an LXC image on a SLES 11 SP3 system. Note that due to limited support for LXC in previous versions of SLES, QVD is only supported on versions above SLES 11 SP3.
SLES 11 SP3 includes its own template for building a base SLES container for LXC. This means that it is possible to use the lxc-create command to quickly build a container. However, while the template will create a functional container with a base installation of SLES, adding new packages or modifying the container can quickly break its functionality under LXC. This makes it fairly important that you modify the template to automatically install the packages that you need at build time. To proceed, open the template in an editor and locate the following line:
# zypper --quiet --root $cache/partial-$arch --non-interactive --gpg-auto-import-keys in --auto-agree-with-licenses --no-recommends -t pattern base
This line is responsible for downloading and installing the base packages for SLES. You need to add the following lines in order to create a template that includes the LXDE desktop and the necessary packages to install and configure QVD:
# zypper --quiet --root $cache/partial-$arch --non-interactive --gpg-auto-import-keys in --auto-agree-with-licenses --no-recommends -t pattern lxde
# zypper --quiet --root $cache/partial-$arch --non-interactive --gpg-auto-import-keys in --auto-agree-with-licenses --no-recommends postgresql-libs
# zypper --quiet --root $cache/partial-$arch --non-interactive --gpg-auto-import-keys in --auto-agree-with-licenses --no-recommends intlfonts-ttf
You should also add the following lines to install the QVD VMA packages:
# zypper ar http://theqvd.com/packages/sles/11SP3/stable QVD
# zypper --quiet --root $cache/partial-$arch --non-interactive --gpg-auto-import-keys in --auto-agree-with-licenses --no-recommends qvd-vma
Now use the lxc-create command to generate a container:
# lxc-create -n MySLESContainer -t sles
Once these steps have been taken, you should be able to start up your linux container from the command line:
# lxc-start -n MyUbuntuContainer
This will start the boot process, which you will be able to watch within the console. Once it has finished loading, you should be able to login as root using the password set up by your template. Usually the password is set to root if you are using one of the default templates.
When you have finished setting up your image, you can stop it from a different console or tty on the host system:
# lxc-stop -n MyUbuntuContainer
Note that sometimes configuring network parameters correctly in SLES can be relatively tricky and will require use of the YaST configuration utility. If you are struggling to configure your network parameters, you may find it easier to use a chrooted environment to complete the setup and configuration of your disk image. You can find out more about this in the next section.
|
|
You should now follow the instructions to install and configure the QVD VMA and to set up Serial Port Access. |
2.3. Editing a DI
At any point, you are able to quickly edit a DI. This means that you can add new applications or remove existing applications, or you can implement new policies.
In order to edit an existing image, ensure that no users are connected and using the image that you want to edit. Stop any Virtual Machines that are currently making use of the DI, and block access to them so that no users can connect and start up a virtual machine while you are working on its underlying image.
3. Disk Image Aging
QVD 3.4 and later provides the ability to "age" disk images. Simply put, this means setting an expiry date on a disk image, which means that the administrator can be assured that the user is running the latest disk image. The need for this feature becomes apparent when we consider a scenario where the user is connected to a VM but a newer DI is available. Disconnecting the user at random is not desirable and this is where disk image aging is useful.
Disk image age limits can be set in the form of hard and soft expiry limits. The soft limits can be set to trigger a hook or mechanism of the administrator’s choosing to alert the user of the need to log out as soon as is feasible. This hook would also be responsible for ensuring that a VM is restarted when the user disconnects, allowing QVD to serve up the new disk image. The great thing about soft limits is that they are extremely flexible – the hook can be any Linux executable, meaning that the administrator chooses how they want to react the soft limit being reached.
By contrast, hard limits are a much simpler proposition. For particularly trenchant users who are perhaps indisposed or choose to ignore requests to log out, hard limits provides an option to forcibly restart a VM. This means that the administrator can set a limit to ensure that all users are using the latest disk image with whatever new features and security upgrades are deemed necessary.
The expiry limits can be set wherever a DI tag is added or amended.
# qa di tag di_id=15 tag=default expire-soft=now expire-hard="NEXT SAT"
The datetime parameters are fairly flexible, accepting the same formats as the at command. The at manpage describes this in greater detail:
At  allows  fairly  complex  time specifications, extending the POSIX.2
standard.  It accepts times of the form HH:MM to run a job at a specific time
of day.  (If that time is already past, the next day is assumed.)  You may also
specify midnight, noon, or teatime (4pm) and you can have a time-of-day
suffixed with AM or PM for running in the morning or the evening.  You can also
say what day the job will be run, by giving  a  date  in  the  form month-name
day  with  an  optional year, or giving a date of the form MMDD[CC]YY,
MM/DD/[CC]YY, DD.MM.[CC]YY or [CC]YY-MM-DD.  The specification of a date must
follow the specification of the time of day.  You can also give times like now
+ count time-units, where the time-units can be minutes, hours, days, or weeks
and you can tell at to run the job today by suffixing the time with today and
to run the job tomorrow by suffixing the  time  with tomorrow.
3.1. Implementation
Disk image aging is designed to upgrade virtual machines to the latest version of a disk image matching a particular virtual machine. It is not, however, intended to be a mechanism to enforce arbitrary reboots to the virtual machines. The expiration limits will only be set under the following conditions:
-
a new disk image is uploaded for the OSF/tag combination assigned to the virtual machine
-
a tag matching a running virtual machine is assigned to another disk image
-
the tag on a virtual machine is changed to that matching another disk image
3.2. Setting Expiration Limits
Expiration limits for a virtual machine are optional and can take the form of hard and soft limits, set using the expire-soft and expire-hard arguments. Either or both can be set. Typically the limits will be set when adding a new disk image:
# qa di add path=./ubuntu-13-04.tar.gz osf_id=5 expire-soft=now \
expire-hard=tomorrow
1 VM have had their expiration dates set (2013-08-05T23:34:00, 2013-08-06T23:34:00)!
In this instance, all running virtual machines using an osf_id of 5 and tagged to use head, i.e. the latest disk image will have their expiration dates set to now for soft and tomorrow for the hard limits.
Limits can also be set when editing a virtual machine using qa vm edit or by setting a disk image tag to that matching a running virtual machine:
# qa di tag di_id=15 tag=head expire-soft=now
1 VM have had their expiration dates set (2013-08-05T23:39:00, undef)!
DI tagged
In this example, we have set the disk image tag head to an existing disk image. Since there are running instances of the previous "latest" version of that disk image, the limits will be set.
Both hard and soft expiration times are deleted when a virtual machine is rebooted, regardless of whether the designated time has been reached.
3.3. Soft Expiration Limits
The QVD "House Keeping Daemon" or HKD tracks the status of the virtual machines, and monitors the expiration times. When a soft limit is reached, the HKD will alert the virtual machine through the "Virtual Machine Agent" (VMA) that that runs as a daemon inside each virtual machine. If configured, the VMA will call a hook (an executable of the administrator’s choosing) to be executed that can request a user to shut down.
The HKD will continue to monitor the expiration limits for a virtual machine at hourly intervals. If the limit still exists, which is to say the virtual machine has not yet been rebooted, it will alert the VMA again, which in turn will call the appropriate executable, and will continue to do so until the limit has been deleted.
3.3.1. Configuring the DI
Soft limit settings are not enabled out of the box in QVD 3.5.0. Rather, the onus is on the image creator to configure the VMA and decide on the action taken when a soft limit is reached.
VMA Configuration
To configure the VMA to act on a soft expiration limit, the following line must be set in /etc/qvd/vma.conf in the disk image:
vma.on_action.expire = <path to executable>
VMA Hooks
Because the image aging in QVD is designed to be as flexible as possible, how the virtual machine interacts with the user is entirely to the administrator. Below we provide a simplified example of a hook that the QVD VMA might call. The first script, "hook.sh", identifies the user running the local desktop in the machine and then calls a second script, "notify-user.sh", as that user, which in turn invokes an xmessage popup on the desktop to request the user to reboot. Which option the user selects determines the return code, if this is 0, a reboot is initiated, if not the script terminates.
|
|
This is just a simple example of a QVD expiration hook to give the reader a feel for the concept. It is not intended for use in a production environment. A real world example may wish to determine whether the script has been called already and not yet received a response from the user to avoid a proliferation of xmessages. |
3.4. Hard Expiration Limits
Hard expiration limits work in a similar fashion to the soft limits, with one significant difference. Instead of calling an executable to perhaps prompt or warn the user of an impending reboot, the HKD simply restarts the machine.
3.5. KVM
Once the virtual machines have all been stopped, locate the DI file that you wish to edit and run it within KVM.
On Ubuntu, you can run it as follows:
# kvm -hda example.img -m 512
And on SLES:
# qemu-kvm -hda example.img -m 512
KVM will load a virtual machine and allow you to login as the user that you created when you installed the Operating System. You can now perform any administration tasks as this user.
When you have completed any work on the DI, shut it down. You can mark the virtual machines that require access to the image as unblocked and allow them to start up again.
3.6. LXC
Once the virtual machines have all been stopped, locate the LXC container that you wish to edit in the Shared Storage within the basefs directory. Depending on your requirements, you can either chroot the directory and work directly within it as needed or you can load it as an LXC instance. Since loading an image into a separate LXC instance generally requires that you configure networking properly and provide a configuration file it is generally recommended that you rather attempt to perform modifications to an image using a chroot.
The example below shows how you can use bind mounts and chroot to access an LXC disk image to perform updates:
# mount -o bind /proc /var/lib/qvd/storage/basefs/1-image1.tgz/proc/
# mount -o bind /dev /var/lib/qvd/storage/basefs/1-image1.tgz/dev/
# mount -o bind /sys /var/lib/qvd/storage/basefs/1-image1.tgz/sys/
# chroot /var/lib/qvd/storage/basefs/1-image1.tgz
#
When you have finished making changes, remember to exit and unmount your bind mounts:
# exit
# umount /var/lib/qvd/storage/basefs/1-image1.tgz/proc
# umount /var/lib/qvd/storage/basefs/1-image1.tgz/dev
# umount /var/lib/qvd/storage/basefs/1-image1.tgz/sys
#
If everything has gone well, you should try to start a virtual machine that makes use of this image to ensure that it starts up correctly. If it starts properly, mark the virtual machines that require access to the image as unblocked and allow them to start up again.
It is important that you test an LXC image after making changes to ensure that nothing has changed a configuration to have direct access to hardware. Packages that have udev as a dependency can often result in trouble if you have not taken steps to prevent udev from running.
4. VMA Hooks
4.1. Introduction
VMA Hooks can be configured within an DI to trigger functionality within a Virtual Machine when particular QVD related events take place. This allows you to automatically modify platform behavior to adapt the operating system to address particular client-related requirements and to solve concrete problems.
Hooks are added as configuration entries within the VMA configuration file on the underlying DI. Therefore, by editing the /etc/qvd/vma.conf file and adding an entry similar to the following:
vma.on_action.connect = /etc/qvd/hooks/connect.sh
It is possible to ensure that the script /etc/qvd/hooks/connect.sh running on the virtual machine will be executed every time that a user connects to the virtual machine.
It is also possible for QVD to provision scripts with command line parameters that are specific to QVD, such as:
-
State changes, actions, or the provisioning process that has triggered the call to the hook.
-
Virtual machine properties defined in the administration database
-
Parameters generated by the authentication plugins.
-
User connection parameters.
-
Parameters supplied by the client program.
Hooks have their own log file, stored within /var/log/qvd/qvd-hooks.log on the virtual machine. This makes it possible to view which hooks have triggered scripts to run and to debug any unusual behavior.
4.2. Action Hooks
Action Hooks are executed every time that a particular action begins.
If the hook fails with a non-zero error code, the action will be aborted.
All action hooks receive these parameters.
-
qvd.vm.session.state: Current X-Windows server state
-
qvd.hook.on_action: Action that triggers the hook.
4.2.1. connect
key: vma.on_action.connect
This hook is executed when a user starts (or resumes) an X-Windows session using the QVD Client. The script will execute after all Provisioning Hooks have been triggered.
It also receives the following parameters by default:
-
qvd.vm.user.name : the user’s login.
-
qvd.vm.user.groups : groups that the user belongs to.
-
qvd.vm.user.home : the user’s directory home.
This hook is capable of receiving other connection parameters and any additional parameters assigned to the VM within the QVD-DB.
4.2.2. pre-connect
key: vma.on_action.pre-connect
This hook is executed when a user starts (or resumes) an X-Windows session from the QVD Client, with the difference that it will trigger a script to execute before any of the Provisioning Hooks are implemented.
Parameters for pre-connect are the same as that for connect.
4.2.3. stop
key: vma.on_action.stop
This hook is executed when an X-Windows session receives a request to be closed. This behavior usually occurs when the VMA receives such a request from the QVD-WAT or the QVD CLI Administration Utility.
There are no additional parameters for this hook.
4.2.4. suspend
key: vma.on_action.suspend
This hook is executed when an X-Windows session is suspended. This usually happens if a user closes the QVD Client application.
There are no additional parameters for this hook.
4.2.5. poweroff
key: vma.on_action.poweroff
This hook is executed when the virtual machine is shut down.
There are no additional parameters for this hook.
4.2.6. expire
key: vma.on_action.expire
This hook is executed when a soft expiry limit on the virtual machine is reached. Typically this would be used to ask the user to reboot at their earliest convenience to upgrade a disk image.
There are no additional parameters for this hook.
|
|
There is no hook for the hard expiry limit, when the limit is reached the HKD will forcibly reboot the virtual machine. |
4.3. State Hooks
State Hooks are executed when changes within the X-Windows session take place. These hooks will always receive the parameter qvd.hook.on_state with the current X-Windows state.
4.3.1. connected
key: vma.on_state.connected
This hook is executed once a connection has been successfully established between the QVD Client and the X-Windows server that runs in the virtual machine.
4.3.2. suspended
key: vma.on_state.suspended
This hook executes once the user closes the QVD Client and the X-Windows session is in the suspended state.
4.3.3. stopped
key: vma.on_state.disconnected
This hook executes when the X-Windows session ends.
4.4. Provisioning Hooks
Provisioning Hooks receive the same parameters that are available to the connect Action Hook.
4.4.1. add_user
key: vma.on_provisioning.add_user
When a user is connected for first time, if the user still does not exist, a new account is created for him in the virtual machine.
By default the account is created with the useradd command.
The hook add_user allows an Administrator to modify this process and create the user account using an alternate method or script.
4.4.2. after_add_user
key: vma.on_provisioning.after_add_user
Once the user account has been created, this hook can be used to perform additional actions related to setting up the user account within the virtual machine, such as the automatic configuration of an email client or other similar tasks.
4.4.3. mount_home
key: vma.on_provisioning.mount_home
By default, QVD mounts the first partition of the device configured with the entry "vma.user.home.drive" on the directory "/home" where the user’s home directory is created (by the hook add_user). Should this partition not exist, it is created on the fly.
With this hook it is possible to change this process so that some other behavior takes place instead, such as mounting a "/home" directory from an NFS server.
Operational Procedures
In this part of the manual, we will cover topics related to day-to-day operational procedures, such as backups and logging, along with some of the more frequently used commands used within the QVD in order to control access to a server node or virtual machine while performing basic administrative tasks.
1. Backups
1.1. Backing up QVD-DB
Since QVD makes use of the open-source PostgreSQL database in order to handle its database requirements, backing up your QVD data can be achieved using standard PostgreSQL backup and restore commands.
To backup your database, you can simply run the following command to output the database content to file:
# sudo su - postgres
# pgdump qvd > qvddb.sql
Restoring the database is as simple as piping the SQL content back into the pgsql client:
# sudo su - postgres
# pgsql qvd < qvddb.sql
PostgreSQL also gives you the ability to pipe content from one database into another, making it relatively simple to replicate the database:
# pgdump -h host1 qvd | pgsql -h host2 qvd
For more complex backup requirements, refer directly to the PostgreSQL documentation at http://www.postgresql.org/docs/9.3/static/backup-dump.html for more information.
Remember that once you have dumped your database to file, the file should be backed up following your usual backup strategy.
Note that you may also find that it is useful to backup your database configuration files, so that if you need to reinstall and configure your database you are able to do so quickly and with your configuration data at hand. On Ubuntu systems, these files are usually located at /etc/postgresql/9.1/main. On SUSE Linux systems, you will be able to find these files at /var/lib/pgsql/data.
1.2. Backing up Shared Storage
All of QVD’s disk images, user home data and overlay data is usually stored in some form of Shared Storage facility accessible using a network file sharing protocol like NFS, GFS or OCFS2. Although particular data, such as the overlay data and images stored within the staging directory, are not critical during disaster recovery, we recommend that this data is backed up alongside active disk images and user home data if possible.
Understanding how files are stored within the Shared Storage accessed by QVD will help you to plan a reasonable backup strategy. Please refer to the section titled Shared Storage for more information.
1.3. Backing up Configuration Files
Since the majority of QVD’s configuration data is stored within the database and QVD’s configuration files are relatively simple to create, they are not usually considered to have high-priority within a backup strategy. Nonetheless, for nearly all components within the QVD infrastructure, configuration files are stored within /etc/qvd. Note that all QVD Server Nodes should have identical configuration files, so only one copy needs to be stored.
2. Logging
2.1. Database Logs
Since QVD makes use of the open-source PostgreSQL database, logging options are controlled by editing the PostgreSQL configuration files. To change logging parameters, please refer to the PostgreSQL documentation at: http://www.postgresql.org/docs/9.3/static/runtime-config-logging.html
On Ubuntu, PostgreSQL keeps database logs in: /var/log/postgresql/. On SUSE, PostgreSQL keeps database logs in: /var/lib/pgsql/data/pg_log.
|
|
If you are new to PostgreSQL you might find the pgAdmin tool handy, particularly for monitoring server status, logs and transactions. You can find out more about the tool at http://www.pgadmin.org/ |
2.2. QVD Server Node Logs
QVD Server Nodes also keep their own log files. These are usually located at /var/log/qvd.log. Log output format and logging facilities are controlled using the Perl logging module Log4perl. Configuration of the logging within the QVD can be controlled by setting various configuration parameters. These are covered in more depth in the section on Log Configuration.
2.3. QVD Virtual Machine Logs
The QVD VMA is installed within the disk image that is used by each virtual machine as it starts up. By default, the VMA will log locally inside the virtual machine itself, but can be optionally set up to log to a syslog compatible daemon either on the host node, or to a remote server.
2.3.1. Logging Locally
If logging is not configured in a virtual machine’s vma.conf, it will default to logging to its own log file at /var/log/qvd.log within the virtual machine. This can be explicitly set, or changed, within the vma.conf file as follows:
log.level = DEBUG
log.filename = /var/log/qvd/qvd.log
The log level itself can be one of ALL, DEBUG, INFO, WARN, ERROR, FATAL, OFF.
|
|
Content other than user data that is written to disk within a virtual machine will make use of the overlay facility provided by QVD. |
To review log data written to file within a virtual machine, if possible you should access the running virtual machine via the console:
# qa vm console -f id=1
If you are using LXC virtualization, it is often easier to access log files directly from the parent QVD Server Node. Remember that for a running environment, its filesystem is constructed as it is started and mounted into /var/lib/qvd/storage/rootfs. This means that for any virtual machine, it is possible to directly view the log files from the parent host:
# tail /var/lib/qvd/storage/rootfs/1-fs/var/log/qvd.log
QVD also stores a backup of the overlay for any LXC virtual machine that fails to start properly. These backups can be accessed in /var/lib/qvd/storage/overlayfs and are usually prefixed with deleteme- and are named following a similar convention to that followed for the naming of successful overlays. See overlayfs for more information.
2.3.2. Logging Remotely
Logging remotely to a daemon supporting the syslog protocol can be desirable for a couple of reasons. Firstly, it keeps the logs for all the virtual machines that have been configured thus in one place which makes accessing the logs easier and more logical. Secondly, in a situation where the administrator may not be able to access a virtual machine’s log for some reason, for example if it is not starting up, logging remotely might help in identifying the problem.
To set up remote logging, you will need a configured remote logging server, and to make some changes within your disk image, both to QVD’s vma.conf file, and to the syslog settings to send any syslog messages on to the remote logging server.
To demonstrate we will use Rsyslog which has become the default logging utility for many of the major Linux distributions over recent years, including Ubuntu, SUSE, and Red Hat, and is reliable and easy to set up. Because QVD uses Log4perl, it should be syslog server agnostic, so you should be able to use these instructions with syslog-ng amongst other alternatives if needs be.
Should rsyslog not be available on your server, install it as follows for Ubuntu:
# apt-get install rsyslog rsyslog-relp
or, if using SUSE:
# zypper in rsyslog rsyslog-module-relp
|
|
This will probably uninstall any other conflicting syslog program you have, so make sure that this is acceptable for the machine (QVD node or otherwise) that you are using. |
That done, we will need to configure rsyslog to accept remote connections. In this example, we will use the Reliable Event Logging Protocol (RELP) as we have found it to be just that, but you may of course use TCP or UDP as you see fit. To set up rsyslog to use RELP, create the file 30-remote.conf in the folder /etc/rsyslog.d/, and enter the following configuration:
$ModLoad imrelp
$InputRELPServerRun 2514

$template remotefile,"/var/log/%HOSTNAME%-%syslogfacility-text%.log"
*.* ?remotefile
This loads the RELP input module, and sets the server to listen on port 2514. Next, it tell rsyslog to generate the log filename dynamically, depending on the hostname of the client. The following line tells rsyslog to log all messages to this dynamically formed file. Now, restart rsyslog:
# service rsyslog restart
Next you will need to configure the QVD image to log remotely to this server. Inside the QVD image that you will be using, create in the folder /etc/rsyslog.d/ a file called 00-remote.conf and enter the following configuration:
$ModLoad omrelp
*.* :omrelp:<hostname or IP address>:2514
Make sure to enter the IP address or hostname of the logging server. This configuration will tell rsyslog on the virtual machine to load the RELP output module, and to use port 2514 on your rsyslog server. Furthermore, it will log all output (.) to this remote host.
|
|
Ensure that the RELP module is available, and if not install it (the package is rsyslog-relp on Ubuntu and rsyslog-module-relp on SUSE). |
Finally, edit the file /etc/qvd/vma.conf on the virtual machine and enter the following to instruct QVD to log to syslog:
log4perl.appender.SYSLOG = Log::Dispatch::Syslog
log4perl.appender.SYSLOG.layout = Log::Log4perl::Layout::PatternLayout
log4perl.appender.SYSLOG.layout.ConversionPattern = %d %P %F %L %c - %m%n
log4perl.rootLogger = DEBUG, SYSLOG
log.level = DEBUG
Of course, having set syslog itself to log remotely, this log data will get passed by rsyslog to the remote server you have set up. To test this, simply use the logger command inside your image and the output should be in the logging server’s logs.
3. Commonly Used Commands
When performing regular administration tasks, it may be cumbersome working with the QVD-WAT, particularly if you need to script behaviors. For systems administrators, we include this section to provide examples for some of the more commonly used commands that can be issued using the QVD CLI Admin Utility. If you need more guidance on the commands available to you, please refer back to the chapter where we discuss the QVD CLI Admin Utility in more detail.
3.1. QVD Server Node Administration
When performing maintenance on a Server Node, it is common to require that users are blocked from accessing the Server Node while you are working. This can be easily achieved by using the QVD CLI Admin Utility:
# qa host block -f name='qvd*'  #block access on any server node host with name beginning with 'qvd'
# qa host list -f address='192.168.0.2' #list the details for any host with IP Address '192.168.0.2'
Once you have finished performing maintenance, remember to unblock the host:
# qa host block -f name='qvd*' #allow access on any server node host with name beginning with 'qvd'
It can also be useful to check QVD Server Node Host Counters to monitor access to a Server Node:
# qa host counters
Id Name      HTTP Requests  Auth attempts Auth OK NX attempts NX OK Short sessions
__________________________________________________________________________________
1  qvd-test3 168            84            84      77          77    65
2  qvd-test4 275            122           118     109         109   52
|
|
It’s crucial that all nodes in a QVD install are time synchronized, i.e. use of NTP is essential, or the system may behave unpredictably. Unless you are using Xen or similar and all boxes are synchronized by the host machine, you will need to install the appropriate NTP package for your system (named ntp for both Ubuntu and SLES) on each system that is to be a node, and configure each one to synchronize with a central NTP server. Since your nodes may not all have access to the internet, it might be a good idea to have one device on your network act as the local time server for the others, and this also makes correlating system events easier. That is beyond the scope of this guide, please see http://ntp.org for further information. |
3.2. VM Administration
When performing maintenance on Virtual Machines or when updating images, it is often the case that you will need to prevent access to a group of users, or to force them to disconnect. Filters can be used to control how actions are effected. The following examples provide some common usage of the QVD CLI Admin Utility to control virtual machines while you are performing maintenance:
# qa vm block -f user_id=5         #block access on any VM where the user has an id=5
# qa vm unblock -f name=test       #unblock access on any VM where the name=test
# qa vm disconnect_user -f id=23   #force disconnect the user on VM with id=23
# qa vm start -f id=1              #manually start the VM with id=1
# qa vm stop -f osf_id=2           #manually stop all VMs using the OS Flavour with id=2
# qa vm del -f user_id=5           #delete all Vms for the user with id=5
Glossary
- QVD
-
The Quality Virtual Desktop, a set of server components and a client application that provides remote virtual desktop access to users.
- QVD Client
-
A modified NX Client capable of connecting to a Virtual Machine running on a QVD Server Node. The client is available for Linux and Windows operating systems.
- QVD-DB
-
The QVD database. This is installed on top of a PostgreSQL RDBM Server. All of the server-side components within the QVD infrastructure rely on the database to communicate with each other and to implement functionality.
- QVD Server Node
-
A host that is running the QVD Server Node components, including the HKD and maybe some instances of the L7R (depending on whether there are some clients connected or not). Usually there are multiple QVD Server Nodes within a typical deployment. The Virtual Machines that the QVD Client accesses run on different QVD Server Nodes.
- QVD-WAT
-
The QVD Web Administration Tool. This is a web-based GUI that allows an Administrator to configure and monitor the running of the QVD environment.
- QVD CLI Administration Utility
-
A Perl script that provides a command line interface with which the QVD environment can be monitored and managed.
- HKD
-
The House Keeping Daemon is a QVD Server Node daemon. It is responsible for starting and stopping Virtual Machines and for performing virtual machine health checking. The HKD also invokes the L7R and forks the process one the connection is up and running.
- L7R
-
The Layer-7 Router which acts as the broker for all QVD Client connections. This is a invoked by the HKD. It is responsible for authenticating users and routing client requests to the appropriate Server Node running the Virtual Machine for an authenticated user. It also monitors session status.
- VMA
-
The Virtual Machine Agent is a QVD component that runs inside of a virtual machine to facilitate client connectivity to the virtual desktop and that is responsible for listening to management requests sent by the HKD. It also provides a number of hooks that allow an Administrator to customize behaviors within the virtual machine.
- VMA Hook
-
A facility within the VMA to trigger other functionality (usually through the use of scripts) within the virtual machine, based on particular state changes within the virtual machine.
- Virtual Machine
-
A Virtual Machine is a virtualized system running on top of a base Operating System. Usually the virtualized system loads an OSF for the purpose of running a virtual operating system.
- OSF
-
An Operating System Flavour is loaded into any number of virtual machines on a QVD Server Node in order to serve a virtual desktop to a client. The OSF is usually installed into QVD along with particular runtime parameters such as the amount of system memory that should be available to it.
- DI
-
A Disk Image is a qcow2 image that has been created as a virtual disk containing an installed operating system. This image is then associated to an OSF.
- User
-
Person using the QVD service, usually connected using the QVD Client.
- Administrator
-
A user who has permission to access the management platform, usually via the QVD-WAT or through the QVD CLI Administration Utility
- Session
-
The period that a user is actually connected to a virtual machine.
- KVM
-
Kernel Virtual Machine. This is a hypervisor that is installed into the Linux Kernel to achieve type-1 virtualization. QVD makes use of KVM in order to run the virtual machines required to serve virtual desktops to end users.
- LXC
-
Linux Containers. This is a virtualization technology that is included in the Linux Kernel. It uses a similar approach to the standard Linux chroot command, but provides a greater degree of separation of resources. QVD can make use of LXC instead of KVM in order to run the virtual machines required to serve virtual desktops to end users. LXC virtualization is a lot less resource intensive, allowing you to take better advantage of existing hardware to service more users.