Preface
This document will give you all the information that you need to install, administrate and manage all of the components of QVD in a QVD solution. As an open source product, QVD is constantly growing and improving. We make every effort to maintain our documentation as complete as possible and we encourage readers to notify us of any improvement in the documentation. If you have any questions or suggestions, please send us an email to info@theqvd.com.
The document is divided into three main parts:
-
The first part discusses the core of the components that form a solution, the way they interact and the way they are installed and configured.
-
The second part deals with integration problems and the behaviour adjustments inside QVD to achieve better performance or to be more scalable.
-
The third part works to give you all the information that you may need to create and administrate the disc of the operating system, images and virtual machines that are loaded in each virtual desktop.
We also provide a bibliography of external material that helps you obtain a better comprehension of the different technologies involved in a QVD solution. We also provide a glossary with commonly used terms.
This manual is complemented by the Architecture one, and its reading is recommended to understand certain concepts.
1. What is QVD?
QVD (Quality Virtual Desktop) is a VDI (Virtual Desktop Infrastructure) solution focused on Linux. The software is designed to completely virtualize the Linux desktop, so that the client systems can connect to a central server and load their desktop environments and applications. This means that when users work from their local machine, all the programs, applications, processes and data used remain in the server and are executed centrally. Virtualization offers a series of advantages:
-
Users can change between computers in a network and continue working as if they were located in the same desktop, with complete access to all its applications and data
-
Administrators have greater control over the applications that are installed in the user’s system, and are able to administrate the user’s data more easily to make backup copies and scan for viruses, etc.
-
It is easier for administrators to provide new desktop environments and deploy applications for new users
-
Downtime is reduced in case of hardware errors
-
Users can access their desktop and applications by means of a variety of different devices, including laptops, PCs and smartphones
-
Users can work both remotely and securely with the same desktop and applications without the need for a VPN
-
Improved general system and data security
-
Reduced hardware, maintenance and administration costs
The QVD server virtualizes each Linux desktop. This can be done using one of the two virtualization technologies. The most common is that the Linux Kernel-based virtual machine (KVM) is used as a complete hypervisor type 1 (bare metal), however, since QVD 3.1, it is also possible to make use of Linux Containers (LXC) to achieve the virtualization of the Operating System. This virtualization helps to maintain each user’s environment as its own discrete entity, to improve security and stability. Virtualization allows the possibility to provide users with a variety of Operating Systems or environments, depending on their requirements. These are loaded as independent images in the QVD server.
In general, you will only load one or two images for all your users. These images provide the base operating system and the working environment which is replicated for each virtual machine. When a user connects to the server, making use of the application client, an exclusive Virtual Machine is started for that user. This also provides a"prison" which prevents any inadequate behaviour by the system from affecting other users. When the user disconnects, the virtual machine is stopped. This means that if the user’s environment has developed a problem, a disconnection can revert the environment back to its original state. This provides a higher level of security than if the user were working on an independent workstation.
In order to maintain the user’s data, such as desktop settings, documents and other user-specific information, there are two options. The first and the most common method, is to store the information in an NFS shared resource. In this way, the data can be stored in a NAS device or in a SAN, where they can be administrated easily. A second option is to load a second image in the virtual machine. This image is persistent, since it can be updated by the user, and the changes are stored for each time that the image is reloaded. Both methods are equally valid. By maintaining the user’s data separate from the core image, QVD helps to guarantee that should a core image be damaged or there be a system failure, you will be able to minimize the time needed for disaster recovery.
Access to the desktop is gained from each workstation, by means of a client that uses the NX protocol to communicate with the server and deliver the desktop and applications to the client. The NX protocol is used to manage remote X Windows connections and provides superior compression which means high performance even when the desktop is accessed via a low bandwidth connection. Moreover, QVD is able to wrap the NX protocol with SSL to protect connectivity so that users can work safety and securely, even if they access their desktops remotely. QVD provides client software to be run on a variety of operating systems and devices: Linux, Windows, OSX or even Android or Ios. This means that wherever you are, regardless of the system you have access to, you will be able to run the client application to access your desktop.
1.1. Some notes about this manual
In general, it is supposed that most of the users of QVD will take advantage of the KVM Virtualization offered in the product. As a result, the majority of this guide assumes that the product will be configured this way. If the user chooses LXC for the virtualization, there may be some differences in the configuration. In the cases where this is especially important, we have included information for both virtualization platforms. However, we have also included a separate chapter about LXC virtualization that tries to provide additional help for users who decide to explore this option. Similarly, although we offer packages for other strains of Linux like SUSE Linux Enterprise Server (SLES), we assume that most users will use Ubuntu Linux. As a result, many of the commands of this guide, together with the location of the setup files, etc., are generally provided with the supposition that you are using Ubuntu Linux. For the users of SLES, we have also tried to indicate the significant differences in configuration.
Administration of QVD
The administration of QVD can be done using one of the three following tools:
-
QVD CLI: a command line utility of that can be installed in any node and lets you manage the solution by command line and automate tasks through scripts.
-
WAT: a web-based administration tool that lets the administrator remotely access to the solution and perform a variety of administrative tasks through a standard web browser.
-
API: the API (new in QVD 4) lets you integrate the solution with third parties, since it uses a REST interface. Moreover, it is necessary in order for the other two to work, having the logic centralized.
Both the online utility of command (CLI) or the WAT require access to the API QVD and will need to be configured for this purpose. The API will have to be installed in at least one node of the solution, although it can be installed in as many as requiered. Almost all the commands that can be done through any of these tools will simply change the values for the organizations in the QVD-DB (via API). The different behaviours are executed by the different elements of the nodes of the QVD solution based on the changes done in the QVD-DB. The QVD administration tools will also be used to load new images in QVD and to configure their parameters of time and execution. To facilitate this functionality, these tools need access to the folders where they are stored and accessed by the nodes of virtualization. Generally, this access is provisioned in a shared resource of network files, like NFS.
1. Basic configuration of QVD
In general, both the architectural and administrative components of QVD require connection to the database of the product. This implies that these components need a configuration file with the connection data to the same. This is also the only configuration that is required regarding files. The rest of configurations of the solution are in the database and is made directly through the pertinent administrative tools.
The configuration of the HDK is inside the file /etc/qvd/node.conf. This access path is automatically created if you choose to install QVD via the packets that we provide. If you choose another method, you should create it manually, and you can use the configuration template provided:
root@myserver:~# cp -R /usr/share/qvd/config /etc/qvd
The file node.conf must contain at least the following:
#
# QVD Node Configuration
#
nodename = mycomputer

# Database connection information.
# database.host: where the QVD database is found
# database.name: the name of the QVD database
# database.user: the user account needed to connect
# database.password: the password needed to connect
database.host = mycomputer
database.name = qvddb
database.user = qvd
database.password = passw0rd

path.log = /var/log/qvd
log.filename = ${path.log}/qvd.log
log.level = INFO
You must ensure that the nodename, database.host, database.name, database.user and database.password contain values that coincide with the ones that you have configured. Once these settings are in place, any utility that requires access to the database will have the correct configuration to do so.
The entries related to the log must be established here because the relevant QVD components are started before connecting to the database.
The configuration of the API component is in the file /etc/qvd/api.conf. The configuration is identical to node.config and you can start from this file to do it. You only require two extra parameters:
api.user = qvd
api.group = qvd
These parameters define the permissions with which the API is executed. The ones that are shown here are only an example. For security reasons, and in line with the general recommendation, do not use the user root for this purpose.
From the version 4.0 of QVD, the components WAT and CLI no longer require a connection to the database, but to the API. They now therefore have their own configuration files. For the CLI /etc/qvd/qa.conf:
qa.url = https://api.yourqvdserver.com:443/
qa.tenant = *
qa.login = superadmin
qa.password = superadmin
qa.format = TABLE
qa.insecure = 0
qa.ca = /etc/qvd/certs/ca.conf
For the WAT /usr/lib/qvd/lib/wat/config.json:
{
   "apiUrl": "https://api.yourqvdserver.com:443"
}
In any case, you should configure all these files according to your own requirements.
1.1. Other parameters of configuration of QVD
Outside the configuration file, QVD stores most of its configuration in the QVD-DB. There is a wide range of parameters that are applied to different components inside the infrastructure QVD. These parameters can be configured using the QVD CLI administration utility. We discuss the appropriate steps for this in the chapter titled QVD CLI administration utility. It is also possible to change them via the WAT from version 4.0. This is explained in its own manual.
Although it is possible to establish any of the following configuration parameters inside the file node.config, the configuration inside the QVD-DB will always take precedence. This means that if a change in the settings contained in the database is made, the settings stored in the configuration file become obsolete and this is confusing for future administrative tasks. So, we strongly recommend that these options are only updated inside the database using the QVD CLI administration utility.
This section describes some of these additional configuration parameters. Although there are many other settings that can be seen using the QVD CLI, some of them (such as the parameters that start with "intern") must never be modified without the help of a QVD support engineer of . In general, we do not recommend that you change any of these configuration parameters without the supervision of the QVD support group. In fact, in the WAT these parameters do not appear.
Take into account that to establish these parameters, you should have installed and configured QVD-DB.
|
|
Some configuration parameters can be related to the component parameters of the system. In these cases, it is possible that you should update the parameter in more than one place. A typical example would be the setting of the l7r.port which would affect the configuration client.host.port . |
|
|
We insist that the intern parameters are for internal use of the product and the administrator is not expected to modify them. They will be subjected to changes in any launches of the software and they are designed to help the developers debug the behaviour inside the product. |
1.1.1. Paths of the QVD system
The following options are available to change the paths that QVD uses to look for applications, certificates and other specific data of QVD.
path.run = /var/run/qvd
path.log = /var/log
path.tmp = /var/tmp
path.storage.root = /var/lib/qvd/storage
path.storage.staging = ${path.storage.root}/staging
path.storage.images = ${path.storage.root}/images
path.storage.overlays = ${path.storage.root}/overlays
path.storage.homes = ${path.storage.root}/homes
path.ssl.certs = ${path.run}/ssl
path.ssl.ca.system = /etc/ssl/certs
path.ssl.ca.personal = .qvd/certs
path.cgroup = /sys/fs/cgroup
path.cgroup.cpu.lxc = /sys/fs/cgroup/cpu/lxc
path.serial.captures = ${path.tmp}/qvd

command.kvm = kvm
command.kvm-img = kvm-img
command.nxagent = /usr/bin/nxagent
command.nxdiag = /usr/bin/nxdiag.pl
command.x-session = /etc/X11/Xsession

command.useradd = /usr/sbin/useradd
command.userdel = /usr/sbin/userdel
The above values are those set by default.
-
* path.run *: access path (it is usually referenced by other access path options)
-
* path.log *: base access path to store logs
-
* path.tmp *: the path to store temporary files
-
* path.storage.root *: the base path for the main area of storage used by QVD
-
* path.storage.staging *: this directory is used to temporarily store DIs. From version 4.0, it can also be used as a multitenant image library.
-
* path.storage.images *: the image directory used to store registered DIs
-
* path.storage.overlays *: the overlay directory used to maintain the qcow images superimposed
-
* path.storage.homes *: the directory where the images of users' starting directories are stored when qcow is used
-
* path.ssl.certs *: the path to store SSL certificates used by QVD
-
* path.ssl.ca.system *: the path where the system CA certificates are stored
-
* path.ssl.ca.personal *: the path where the local or personal CA certificates are stored
-
* path.serial.captures *: the location used to store serial captures (if enabled)
-
* command.kvm *: the command to execute KVM
-
* command.kvm-img *: the command used to work with QEMU virtual disks within KVM
-
* command.nxagent *: the access path to nxagent binary (it is usually only used by the VMA in an OSF)
-
* command.nxdiag *: the access path to thenxdiag.pl script used by the VMA to make sure that nxagent is executed correctly
-
* Command.x-session *: the access path to the XSession shell script executed by the system when an X Windows session is started
-
* Command.useradd *: the access path to the useradd script used by the system to add users
-
* Command.userdel *: the access path to the userdel script used by the system to delete users
1.1.2. Logging
The following options can be used to change the path to the log file and to control the output of the logging level.
path.log = /var/log
log.filename = ${path.log}/qvd.log
log.level = INFO
The values above are the default values.
-
* path.log *: base path of the log files
-
* log.filename *: access path to the log file
-
* log.level *: the output of the logging level, the values can be: ALL, DEBUG, INFO, WARN, ERROR, FATAL, OFF
These options must be configured in the QVD configuration file /etc/qvd/node.conf because the logging system is started before the connection to the database. If these values are established in the database, they will be ignored.
QVD generates its log through Log::Log4perl, a standard perl module that offers many possibilities regarding methods of logging. You can choose to send the output to syslog, to a file or even to a database. To send the log to syslog, the following configuration settings can be established in node.conf:
log4perl.appender.SYSLOG = Log::Dispatch::Syslog
log4perl.appender.SYSLOG.layout = Log::Log4perl::Layout::PatternLayout
log4perl.appender.SYSLOG.layout.ConversionPattern = %d %P %F %L %c - %m%n
log4perl.rootLogger = DEBUG, SYSLOG
log.level = DEBUG
To obtain a complete breakdown of the different logging options available in Log4perl, consult the documentation found at: log4perl.
If you choose to save your logs in a file, make sure to use a suitable method of handling growing log file size.
1.1.3. Options of configuration of the L7R
You can specify the following additional options to control the L7R:
l7r.as_user = root
l7r.use_ssl = 1
l7r.port = 8443
l7r.address = *
l7r.pid_file = ${path.run}/l7r.pid
l7r.auth.plugins = default
l7r.loadbalancer.plugin = default
l7r.loadbalancer.plugin.default.weight.ram = 1
l7r.loadbalancer.plugin.default.weight.cpu = 1
l7r.loadbalancer.plugin.default.weight.random = 1
The values that appear above are those set by default.
-
* l7r.as_user *: the user that must be used to execute the QVD L7R process
-
* l7r.use_ssl *: use SSL or not to encode the client connections
-
* l7r.port *: the port that must be listened to for the client’s connections with the L7R (the configuration client.host.port for each client should also be configured for this value)
-
* l7r.address *: the IP address to which the L7R must connect
-
* l7r.pid_file *: the path to the PID file that is created when the process L7R is being executed
-
* l7r.auth.plugins *: it can be used to provide additional authentication complements like OpenSSO
-
* l7r.loadbalancer.plugin *: it can be used to include an alternative load balancing algorithm plugin
-
* l7r.loadbalancer.plugin.default.weight.ram *: assigned weight to RAM resources for the default load balancing algorithm
-
* l7r.loadbalancer.plugin.default.weight.cpu *: assigned weight to the CPU resources for the default load balancing algorithm
-
* l7r.loadbalancer.plugin.default.weight.random *: assigned weight to the randomizer for the default load balancing algorithm
1.1.4. Options of configuration of the HKD
You can specify the following additional options to control the HKD:
hkd.vm.starting.max = 6
The value set in the example above is the predetermined value. * * hkd.vm.starting.max *: the maximum number of virtual machines that the HKD will allow concurrently in "starting" mode before launching a new instance in a server node.
1.1.5. Options de VM
There are some options that be configured to control the behaviour of the virtual machine inside QVD:
vm.overlay.persistent = 0
vm.kvm.virtio = 1
vm.network.ip.start =
vm.network.netmask =
vm.network.gateway =
vm.network.bridge =
vm.network.dns_server =
Take into account the if you use the CLI Legacy administration utility you may also need these parameters:
vm.vnc.redirect = 0
vm.vnc.opts =
vm.serial.redirect = 1
vm.serial.capture = 0
The values shown above are the values set by default.
-
* vm.overlay.persistent *: if you choose to make use of the persistent overlays for temporary files and registry files. Take into account that this persistence will not be extended between the nodes if the overlay is stored locally, for example in a btrfs configuration
-
* vm.kvm.virtio *: the virtio controller will be used for the network connection (the OSF that is being executed in the image must support the virtio controller)
-
* vm.vnc.redirect *: enables the integrated VNC server when using KVM virtualization. (Useful to solve problems of an image)
-
* vm.vnc.opts *: additional configuration for the KVM integrated VNC server
-
* vm.serial.redirect *: enables the console of the serial port when using KVM virtualization
-
* vm.serial.capture *: captures the output of the serial console in the file
-
* vm.network.ip.start *: the starting IP address for the range assigned to the virtual machines in the network reserved for QVD
-
* vm.network.netmask *: CIDR network mask for the size of the network reserved for QVD
-
* vm.network.gateway *: IP of the firewall in the network reserved for QVD that will be transmitted by DHCP to the virtual machines
-
* vm.network.bridge *: Name of the interface in network bridge mode
-
* vm.network.dns_server *: IP of the DNS service that will serve the virtual machines by DHCP in the network reserved for QVD
Be aware that the configuration of vm.network is generally required for the QVD nodes to work correctly.
2. QVD-DB
The QVD-DB is the glue that joins all the QVD components together. It makes use of an underlying DBMS of PostgreSQL version 9.3 or later (from QVD4.1).

All the configuration information and execution times of all the QVD structure is stored in the database and if it fails, the whole platform will stop working. For this reason, it is highly recommended that the database is installed in high availability mode. You can find outhow to configure PostgreSQL in a HA Setting in
and
The real hardware requirements for QVD-DB are very modest and any server with just two CPU cores and 2 GB of RAM will be able to load the database.
|
|
QVD only works with PostgreSQL 9.3 or later, since its notification functions are used. |
2.1. Installation and configuration of QVD-DB
In the system where you are going to install QVD-DB, you will have to add the QVD repository to its fonts apt.
Firstly, add the public key of the QVD parcels to your trusted keys (like root):
# wget -qO - https://www.theqvd.com/packages/key/public.key | sudo apt-key add -
Now, add the repository:
/etc/apt/sources.list.d/qvd.list
# apt-get update
For commercial packages:
# echo "deb http://$USER:$PASSWORD@theqvd.com/commercial-packages/ubuntu/xenial QVD-4.1.0 main" > \
/etc/apt/sources.list.d/qvd.list
# apt-get update
|
|
$USER and $PASSWORD are the credentials received when the suscription is purchased. |
The recommended way to install the central database is with the packet perl-qvd-db. You will also need the client software of PostgreSQL to execute these steps (check the PostgreSQL documentation ). All these steps require root privileges:
# apt-get install perl-qvd-db.
For SLES:
Firstly, add the public key of the QVD packages to your trusted keys (as root):
# rpm --import https://www.theqvd.com/packages/key/public.key
Now, add the repository:
# zypper ar http://theqvd.com/packages/sles/12SP1/QVD-4.1.0 QVD
# zypper ref
For commercial packages:
# zypper ar http://theqvd.com/commercial-packages/sles/12SP1/QVD-4.1.0 QVD
 User Name: $USER
 Password: $PASSWORD
# zypper ref
|
|
$USER and $PASSWORD are the credentials received when the suscription is purchased. |
Use zypper to install the database:
# zypper install perl-QVD-DB
For Centos:
Firstly, add the public key of the QVD packages to your trusted keys (as root):
# rpm --import https://www.theqvd.com/packages/key/public.key
Now, add the repository:
# yum-config-manager --add-repo http://theqvd.com/packages/centos/7.2/QVD-4.1.0/
For commercial packages:
# echo "[QVD-4.1.0]" > /etc/yum.repos.d/QVD-4.1.0.repo
# echo "name=QVD-4.1.0" >> /etc/yum.repos.d/QVD-4.1.0.repo
# echo "baseurl=http://$USER:$PASSWORD@theqvd.com/commercial-packages/centos/7.2/QVD-4.1.0/" | sed 's/@\(.*@\)/%40\1/' >> /etc/yum.repos.d/QVD-4.1.0.repo
# echo "enabled=1" >> /etc/yum.repos.d/QVD-4.1.0.repo
|
|
$USER and $PASSWORD are the credentials received when the suscription is purchased. |
Use yum to install the database:
# yum install perl-QVD-DB
2.1.1. Creation of the user and the QVD database
You will need to create a user inside PostgreSQL to access the QVD database, and you will need to create the real database where QVD can configure its tables and store its data. To do this, you will need to use the sudo command to switch to the postgres account:
$ sudo su - postgres
As a postgres user, you can create PostgreSQL user accounts with the command createuser. It will ask for a password for the new user and some details about the user’s account. In general, you can answer n to all the options that appear. For example, to create a user called qvd, we would use the following command.
postgres@myserver:~$ createuser -SDRP qvd
Enter password for new role: passw0rd
Enter it again: passw0rd
|
|
For more information about this command, use the PostgreSQL documentation: http://www.postgresql.org/docs/9.3/static/app-createuser.html |
The new user can be now assigned as owner of a database. To create a database for QVD and assign the owner, use the command createdb. Use the parameter -O to establish the owner of the database to the account that you want to use. In this case, we establish the owner for the new user that we created in the previous step.
postgres@myserver:~$ createdb -O qvd qvddb
|
|
For more information about this command, use the PostgreSQL documentation: http://www.postgresql.org/docs/9.3/static/app-createdb.html |
2.1.2. Configuration requirements of PostgreSQL
With the objective of allowing concurrent access from all the nodes of the QVD farm and manage the transactions in a coherent way, the transaction isolation level must be changed from read committed to serializable. This is a very important step that must not be omitted or its database could become incoherent and QVD may stop working.
It is also necessary to allow the database to have network access. By default, it is configured to only listen to the queries in localhost. This must be changed to listen in all the interfaces.
To do this, you must edit the PostgreSQL configuration filespostgresql.conf y pg_hba.conf. In Ubuntu they are found in /etc/postgresql/9.3/main. In SUSE , you will find these files in /var/lib/pgsql/data.
The transaction isolation level is controlled through the setting default_transaction_isolation. To enable general network access to PostgreSQL, change the setting listen_addresses from localhost to *.
root@myserver:~# cd /etc/postgresql/9.3/main #this would be /var/lib/pgsql/data on SLES
root@myserver:/etc/postgresql/9.3/main# vi postgresql.conf
listen_addresses = '*'
default_transaction_isolation = 'serializable'
To enable network access for the qvd user, add the following line to pg_hba.conf (with the following format: host database user CIDR-address auth-method [auth-options]).
root@myserver:/etc/postgresql/9.3/main# vi pg_hba.conf
host  qvddb qvd 192.168.0.0/24  md5
|
|
Make sure that you replace the default network192.168.0.0/24 for the network that your QVD platform uses. |
Restart PostgreSQL for all the changes to take effect.
For Ubuntu:
# service postgresql restart
and for SLES:
# /etc/init.d/postrgresql restart
2.2. Supply of QVD-DB
The packet QVD-DB includes a script that will help to populate the QVD database with all the tables that are necessary for QVD to work correctly. For this script to work, it is necessary that all the settings of the QVD database have been correctly introduced in the file /etc/qvd/node.conf. To deploy the database, execute qvd-deploy-db.pl (located in the folder /usr/lib/qvd/bin/. Add this directory to your system paths if you are going to be administrating a QVD solution).
# qvd-deploy-db.pl
Once you have executed this command, QVD-DB will be ready to be used by any component inside the QVD environment.
2.3. Access test to QVD-DB
You must check that you can access the database from all the nodes that require it (that is, all the nodes that have the HKD component or the API component installed). The simplest way to verify this is by connecting to the database from them and list the tables used by QVD. To do this, you must make sure that you have the PostgreSQL client installed in the node from which it is connecting. You can install it by means of the packet postgresql-client in Ubuntu and postgresql in SLES:
In Ubuntu:
# sudo apt-get install postgresql-client
In SLES:
# zypper install postgresql
To list the tables in the QVD database using the PostgreSQL client, you can do the following:
anyuser@otherserver:~$ psql -U qvd -W -h myserver qvddb
Password for user qvd:
psql (9.3)

qvddb=> \d

                            List of relations
 Schema |                     Name                     |   Type   | Owner
--------+----------------------------------------------+----------+-------
 public | acl_role_relations                           | table    | qvd
 public | acl_role_relations_id_seq                    | sequence | qvd
 public | acls                                         | table    | qvd
 public | acls_id_seq                                  | sequence | qvd
 public | administrators                               | table    | qvd
 public | administrators_id_seq                        | sequence | qvd
 public | all_acl_role_relations                       | view     | qvd
 public | all_role_role_relations                      | view     | qvd
 public | configs                                      | table    | qvd
 public | di_properties                                | table    | qvd
 public | di_tags                                      | table    | qvd
 public | di_tags_id_seq                               | sequence | qvd
 public | dis                                          | table    | qvd
 public | dis_id_seq                                   | sequence | qvd
 public | host_cmds                                    | table    | qvd
 public | host_counters                                | table    | qvd
 public | host_properties                              | table    | qvd
 public | host_runtimes                                | table    | qvd
 public | host_states                                  | table    | qvd
 public | hosts                                        | table    | qvd
 public | hosts_id_seq                                 | sequence | qvd
 public | log                                          | table    | qvd
 public | log_id_seq                                   | sequence | qvd
 public | operative_views_in_administrators            | view     | qvd
 public | operative_views_in_tenants                   | view     | qvd
 public | osf_properties                               | table    | qvd
 public | osfs                                         | table    | qvd
 public | osfs_id_seq                                  | sequence | qvd
 public | properties_list                              | table    | qvd
 public | properties_list_id_seq                       | sequence | qvd
 public | qvd_object_properties_list                   | table    | qvd
 public | qvd_object_properties_list_id_seq
            | sequence | qvd
 public | role_administrator_relations                 | table    | qvd
 public | role_administrator_relations_id_seq          | sequence | qvd
 public | role_role_relations                          | table    | qvd
 public | role_role_relations_id_seq                   | sequence | qvd
 public | roles                                        | table    | qvd
 public | roles_id_seq                                 | sequence | qvd
 public | session                                      | table    | qvd
 public | ssl_configs                                  | table    | qvd
 public | tenants                                      | table    | qvd
 public | tenants_id_seq                               | sequence | qvd
 public | user_cmds                                    | table    | qvd
 public | user_properties                              | table    | qvd
 public | user_states                                  | table    | qvd
 public | users                                        | table    | qvd
 public | users_id_seq                                 | sequence | qvd
 public | versions                                     | table    | qvd
 public | views_setups_attributes_administrator        | table    | qvd
 public | views_setups_attributes_administrator_id_seq | sequence | qvd
 public | views_setups_attributes_tenant               | table    | qvd
 public | views_setups_attributes_tenant_id_seq        | sequence | qvd
 public | views_setups_properties_administrator        | table    | qvd
 public | views_setups_properties_administrator_id_seq | sequence | qvd
 public | views_setups_properties_tenant               | table    | qvd
 public | views_setups_properties_tenant_id_seq        | sequence | qvd
 public | vm_cmds                                      | table    | qvd
 public | vm_counters                                  | table    | qvd
 public | vm_properties                                | table    | qvd
 public | vm_runtimes                                  | table    | qvd
 public | vm_states                                    | table    | qvd
 public | vms                                          | table    | qvd
 public | vms_id_seq                                   | sequence | qvd
 public | wat_log                                      | table    | qvd
 public | wat_log_id_seq                               | sequence | qvd
 public | wat_setups_by_administrators                 | table    | qvd
 public | wat_setups_by_administrators_id_seq          | sequence | qvd
 public | wat_setups_by_tenants                        | table    | qvd
 public | wat_setups_by_tenants_id_seq                 | sequence | qvd
(69 rows)


qvddb=> \q
2.4. Backup copy and restoring QVD-DB
A very simple backup copy technique would be to dump the entire PostgreSQL database to a file:
# pg_dump -U postgres postgres > yourfile.backup
To revert the database so that it coincides with a backup copy file, you can execute the following command:
# psql -U postgres postgres < yourfile.backup
|
|
For advanced operations, see http://www.postgresql.org/docs/9.3/static/backup.html |
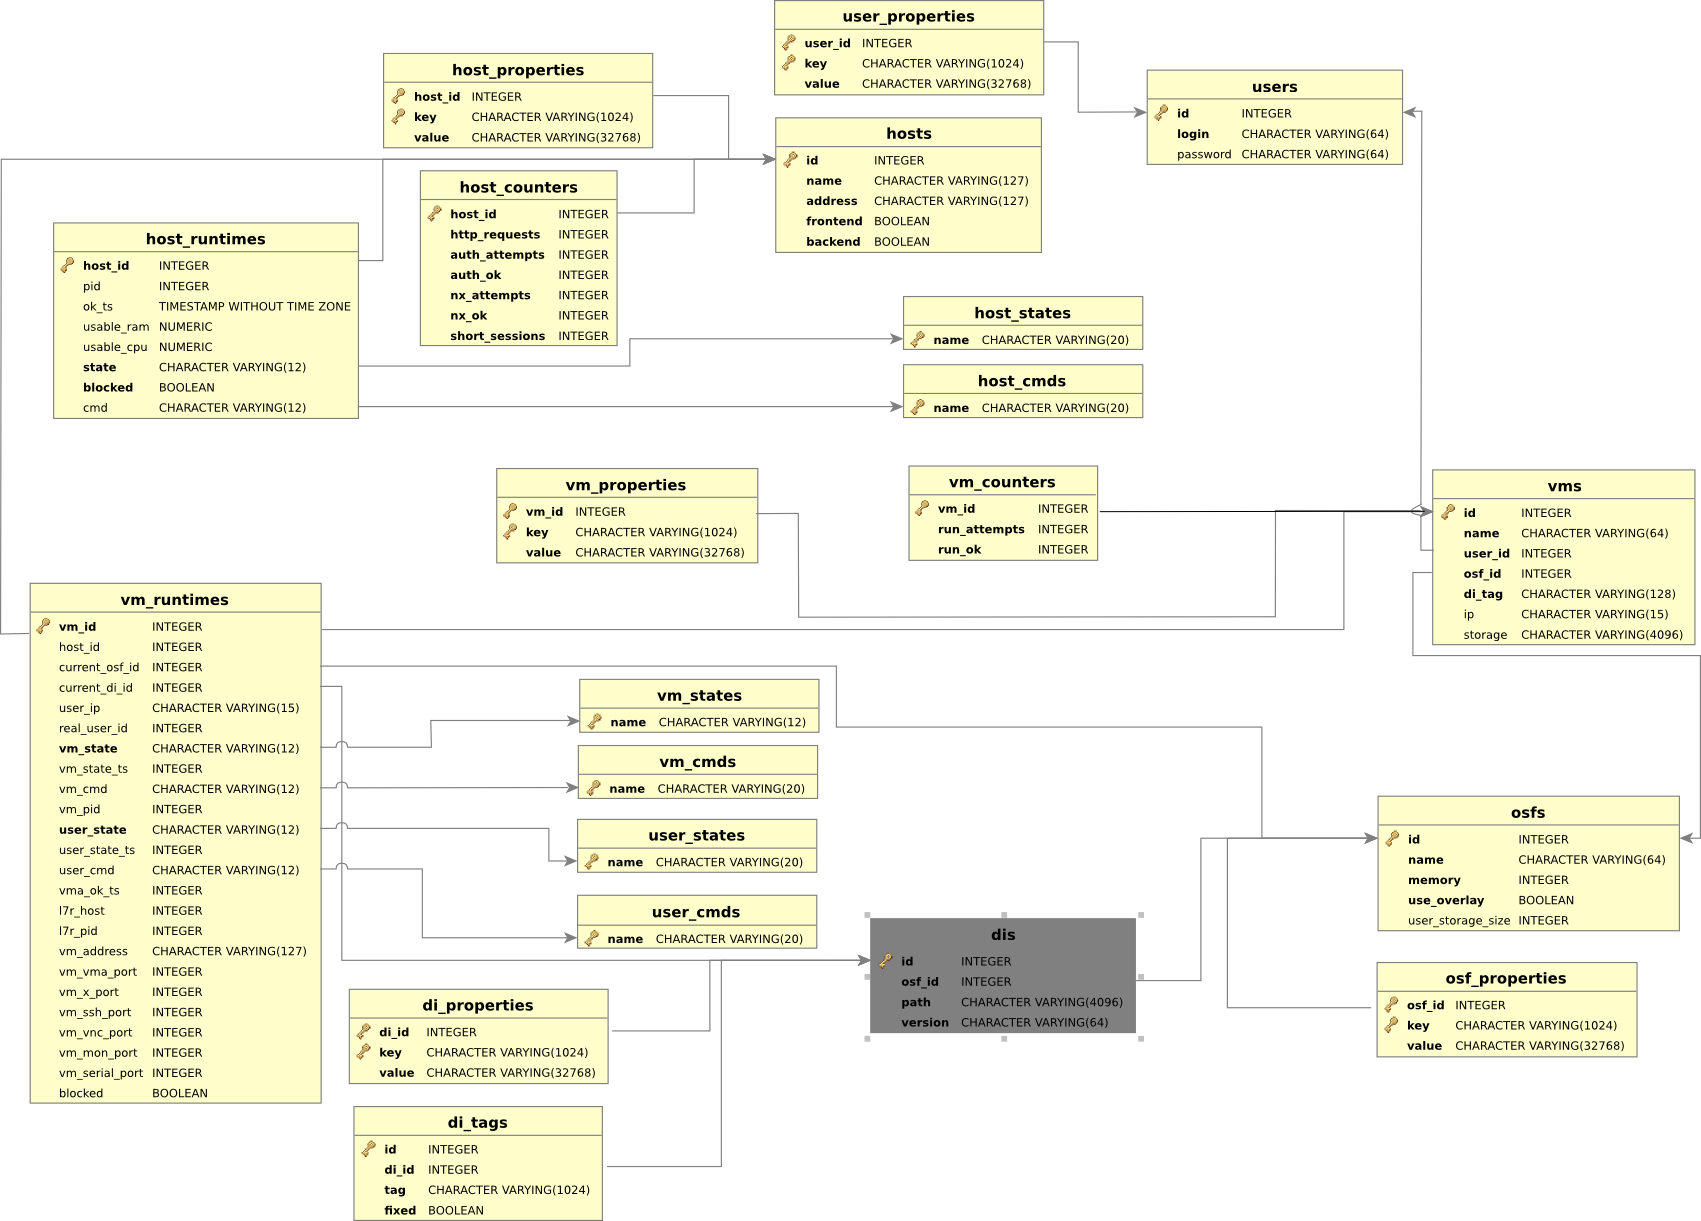
2.5. Relational model of QVD-DB data
The following diagram shows the general model of QVD-DB data.
|
|
It is recommended that Administrators do not try to modify directly in the database, since it is very likely that the QVD installation will stop working. |
3. QVD server nodes
The QVD server nodes are the engine of the infrastructure QVD. The nodes execute only one binary component, the HKD or House Keeping Daemon which keeps track of the status of the virtual machines. The HKD is also responsible for starting and stopping the virtual machines. It also supervises the status of each virtual machine and updates the status information inside the QVD database, so other nodes and administration tools can work accordingly. In general, the HKD is responsible for administrating the status of the virtual machines.
The HKD also invokes the L7R (Level 7 Router) intermediary between the client and the server, responsible for authenticating users, establishing sessions and routing the user to his or her virtual machine when they connect. In general, the L7R is responsible for administrating the status of the user.
The common installation of the nodes is in a cluster or farm. This means that inside a typical deployment there are likely to be any number of server nodes.
To be familiar with the general architecture of a server node check the Architecture Manual of QVD.
3.1. Installation of a QVD server node
In any of the systems in which you are going to install the components of QVD server node, you will have to add the QVD repository to your apt fonts.
Firstly, add the public key of the QVD parcels to your trusted keys (like root):
# wget -qO - https://www.theqvd.com/packages/key/public.key | sudo apt-key add -
Now, add the repository:
/etc/apt/sources.list.d/qvd.list
# apt-get update
For commercial packages:
# echo "deb http://$USER:$PASSWORD@theqvd.com/commercial-packages/ubuntu/xenial QVD-4.1.0 main" > \
/etc/apt/sources.list.d/qvd.list
# apt-get update
|
|
$USER and $PASSWORD are the credentials received when the suscription is purchased. |
To install all the components of a QVD server node and its dependencies, execute the following command:
# apt-get install perl-qvd-node
For SLES:
Firstly, add the public key of the QVD packages to your trusted keys (as root):
# rpm --import https://www.theqvd.com/packages/key/public.key
Now, add the repository:
# zypper ar http://theqvd.com/packages/sles/12SP1/QVD-4.1.0 QVD
# zypper ref
For commercial packages:
# zypper ar http://theqvd.com/commercial-packages/sles/12SP1/QVD-4.1.0 QVD
 User Name: $USER
 Password: $PASSWORD
# zypper ref
|
|
$USER and $PASSWORD are the credentials received when the suscription is purchased. |
To install all the components of QVD Server node in SLES, execute the following command:
# zypper install perl-QVD-HKD perl-QVD-L7R
For Centos:
Firstly, add the public key of the QVD packages to your trusted keys (as root):
# rpm --import https://www.theqvd.com/packages/key/public.key
Now, add the repository:
# yum-config-manager --add-repo http://theqvd.com/packages/centos/7.2/QVD-4.1.0/
For commercial packages:
# echo "[QVD-4.1.0]" > /etc/yum.repos.d/QVD-4.1.0.repo
# echo "name=QVD-4.1.0" >> /etc/yum.repos.d/QVD-4.1.0.repo
# echo "baseurl=http://$USER:$PASSWORD@theqvd.com/commercial-packages/centos/7.2/QVD-4.1.0/" | sed 's/@\(.*@\)/%40\1/' >> /etc/yum.repos.d/QVD-4.1.0.repo
# echo "enabled=1" >> /etc/yum.repos.d/QVD-4.1.0.repo
|
|
$USER and $PASSWORD are the credentials received when the suscription is purchased. |
To install all the components of QVD Server node in Centos, execute the following command:
# yum install perl-QVD-HKD perl-QVD-L7R
This will install all the components of the qvd node together with any dependency. In general, we recommend that the QVD CLI administration utility be installed in all the QVD Server nodes, since it is common to work directly from these systems and lets you configure QVD quickly. More information about this utility in Utility of Administration CLI of QVD.
3.2. Basic configuration
As with the majority of the other infrastructure components of QVD, each QVD server node requires access to the QVD database. You must make sure that the QVD server node configuration file is written correctly so that the QVD server node functions correctly. You can see how to do this in the chapter Basic Configuration of QVD
Unlike the majority of the other components, each QVD server node requires an additional entry in the QVD base configuration file in order to be able to search quickly inside the QVD-DB. This is a single line entry that must be annexed to theconfiguration and contains the nodename that must coincide with the name you assigned to its node when you registered it in the QVD-DB, whether using the WAT or the QVD CLI administration utility. In general, we recommend you name your nodes using the host name of the system in which they are being executed.
This can be done quickly by doing the following:
echo "nodename=`hostname`" >> /etc/qvd/node.conf
3.3. Network requirements
The QVD server nodes make use of a network bridge and of virtual network interfaces to provide network interfaces to each of the virtual machines that are executed in the node. In order to provide IP addresses to virtual machines, QVD also executes a DHCP server that will assign the IP addresses within the the virtual network range to the virtual hosts as they are started. So, it is very important to choose a network range that is unlikely to conflict with any of their other existing infrastructures for this purpose.
|
|
Services that are executed in systems of the same IP network can be affected by QVD or any of the virtual machines that are executed in QVD. |
There is a series of configuration steps that it may be necessary to perform manually to correctly configure the network of a QVD server node. There are often other ways to obtain a suitable network configuration, so we only provide them as guidelines.
3.3.1. Establish dnsmasq to be controlled by QVD
QVD uses dnsmasq as a DHCP and DNS server for the virtual machines that are executed in a node. To work correctly, dnsmasq needs to be executed by the HKD process.
Firstly, check that dnsmasq is installed. In Ubuntu, execute the following commands and check the status:
# dpkg -s dnsmasq
In SUSE:
# rpm -q dnsmasq
If it is not installed, do it now using your package manager, whether apt-get install dnsmasq, or zypper install dnsmasq.
By default, the Ubuntu package starts the process that is executed as a daemon in the background, so you should avoid it starting automatically. This is done with the following commands in Ubuntu:
# service dnsmasq stop
# sed -i s/ENABLED=1/ENABLED=0/ /etc/default/dnsmasq
In SLES, dnsmasq is managed under the command chkconfig and it is disabled by default, so you should not need to do anything. However, should dnsmasq have been enabled or simply to make sure, you can check that it is disabled executing the following command as root:
# chkconfig dnsmasq off
|
|
This step is essential for QVD to work using KVMvirtualization. For LXC it is possible to specify if it must use DHCP or not to configure the network in its virtual machines. |
3.3.2. Configure the IP resend
IP Forwarding is necessary to route the clients to the correct location. You can habilitate it quickly by executing the following command.
# echo 1 > /proc/sys/net/ipv4/ip_forward
Unfortunately, on restarting the host system, this change will be lost. To make it permanent, you can edit /etc/sysctl.conf and uncomment the line:
net.ipv4.ip_forward=1
You can force sysctl to reload its configuration after having edited this file executing:
# sysctl -p
3.3.3. Configuring a network bridge
There are several ways to configure the network bridge and the appropriate routing to make sure that a QVD client is routed to the correct virtual machine.
The easiest method is to configure the static network interface and a set of iptables routing rules to perform the necessary NAT to translate the IP addresses between its real and virtual network.
To configure its network in Ubuntu, edit the file /etc/network/interfaces and add the following lines:
auto qvdnet0
iface qvdnet0 inet static
  pre-up brctl addbr qvdnet0
  pre-up iptables -t nat -A POSTROUTING -o eth0 -j SNAT --to-source 192.168.0.2
  pre-up iptables -t nat -A PREROUTING -d 192.168.0.2 -p tcp --dport 8443 -j DNAT --to-destination 10.3.15.1
  post-down brctl delbr qvdnet0
  address 10.3.15.1
  netmask 255.255.255.0
It is important to point out that in the previous example you will need to change the IP address 192.168.0.2 to the network interface IP address to which you wish its clients to connect. In the example above we use the range 10.3.15.0/24 for the virtual network used by QVD. This range must be unique inside its infrastructure and must only be used by QVD, so the services that start in QVD do not interfere with other systems in the network.
While there are other cleaner approaches to configure its network, these sometimes have problems with specific types of network interfaces,such as WIFI. The approach mentioned above should work for the majority of systems.
Once the network configuration has been written to file, the network bridge interface should become active.
# ifup qvdnet0
3.3.4. Configure QVD for its network
For QVD to correctly manage the configuration of the virtual machine and the subsequent routing, you will need to change some of the configuration settings inside QVD-DB. It is recommended you use the QVD CLI Administration Utility to do this. You can also use the WAT if you have already configured it.
These settings are used to provide a dedicated network environment for the Virtual Machines. You must use IP addresses and network ranges that do not conflict with its existing network infrastructure. In the following example the range 10.3.15.0/24 is used for the virtual network used by QVD.
# qa4 config set tenant_id=-1,key=vm.network.ip.start,value=10.3.15.50
# qa4 config set tenant_id=-1,key=vm.network.netmask,value=24
# qa4 config set tenant_id=-1,key=vm.network.gateway,value=10.3.15.1
# qa4 config set tenant_id=-1,key=vm.network.dns_server,value=10.3.15.254
# qa4 config set tenant_id=-1,key=vm.network.bridge,value=qvdnet0
|
|
If AppArmor is being executed in your host machine, you can check to it does not allow the host machines to access the Internet. We have a profile of AppArmor for QVD available in the packages. In any case, it is also possible to disable AppArmor with /etc/init.d/apparmor teardown. This will stop AppArmor and will let QVD run normally. If this is unacceptable in the production environment, use the profile mentioned and ask the QVD support team for help if necessary. |
These settings are described in more detail in the section of the QVD Administration manual titled Virtual Machine Options in the chapter Basic configuration of QVD.
This can quickly be done like this:
3.4. Configuration of SSL
The QVD server needs an X509 certificate and a private key to protect the network connections. For an installation in production you must use a certificate issued by a trusted certification authority, like Verisign or Thawte. For the tests you can use a self-signed certificate. We provide instructions about the creation of self-signed certificates in the QVD Installation Guide. If you have a certificate signed by a third party, you can register it with QVD using the QVD CLI administration utility:
# qa config ssl key=/path/to/private/key.pem,cert=/path/to/server/certificate.pem
4. The API of QVD
In version 4 of QVD, a REST interface has been created that lets you control the solution. The interface has been created to facilitate the integration of the product with third parties, although on an internal level, either the WAT or the command lines have been redesigned to make a use of it.
The API is therefore now the standard control of the solution, and has its own documentation. This documentation is not necessary to administrate the platform, and is only of interest for integrators and programmers.
The starting and stopping commands are:
# /etc/init.d/qvd-api start
# /etc/init.d/qvd-api stop
The log is in:
/var/log/qvd/qvd-api.log
5. Web administration tool of QVD
In version 4 of QVD, the web administration tool (WAT) has exponentially grown in capabilities and functionality. So much so, that from this version on, WAT has its own administration manual. Please read the manual to obtain information about the same.
Take into account that such a manual is complementary to this one, and probably you have to read this document before completely understanding the one of WAT.
|
|
as noted above, the WAT depends on the API, and cannot work without it. |
6. CLI Administration utility of QVD
|
|
from the version 4.0, QVD has a new administration tool: qa4. This tool has a different syntax fromthe one before and it is documented here. The previous tool has been maintained for reasons of backward-compatibility and it is documented in the annex Administration utility Legacy CLI de QVD. |
The QVD command line administration utility is a perl script that can interact with the QVD-DB via the API (from version 4 of QVD) to perform a wide range of operations inside the QVD infrastructure. It can be used as an alternative to the QVD web administration tool (QVD-WAT) and can be installed in any system with access to the API.
6.1. Installation and configuration of the QVD CLI administration utility
In any of the systems in which you are going to install the QVD CLI administration utility, you will have to add the QVD repository to the apt fonts.
Firstly, add the public key of the QVD parcels to your trusted keys (like root):
# wget -qO - https://www.theqvd.com/packages/key/public.key | sudo apt-key add -
Now, add the repository:
/etc/apt/sources.list.d/qvd.list
# apt-get update
For commercial packages:
# echo "deb http://$USER:$PASSWORD@theqvd.com/commercial-packages/ubuntu/xenial QVD-4.1.0 main" > \
/etc/apt/sources.list.d/qvd.list
# apt-get update
|
|
$USER and $PASSWORD are the credentials received when the suscription is purchased. |
To install the QVD CLI Administration utility, execute the following command:
# apt-get install perl-qvd-admin4
For SLES:
Firstly, add the public key of the QVD packages to your trusted keys (as root):
# rpm --import https://www.theqvd.com/packages/key/public.key
Now, add the repository:
# zypper ar http://theqvd.com/packages/sles/12SP1/QVD-4.1.0 QVD
# zypper ref
For commercial packages:
# zypper ar http://theqvd.com/commercial-packages/sles/12SP1/QVD-4.1.0 QVD
 User Name: $USER
 Password: $PASSWORD
# zypper ref
|
|
$USER and $PASSWORD are the credentials received when the suscription is purchased. |
To install the QVD CLI Administration utility, execute the following command:
# zypper install perl-QVD-Admin4
For Centos:
Firstly, add the public key of the QVD packages to your trusted keys (as root):
# rpm --import https://www.theqvd.com/packages/key/public.key
Now, add the repository:
# yum-config-manager --add-repo http://theqvd.com/packages/centos/7.2/QVD-4.1.0/
For commercial packages:
# echo "[QVD-4.1.0]" > /etc/yum.repos.d/QVD-4.1.0.repo
# echo "name=QVD-4.1.0" >> /etc/yum.repos.d/QVD-4.1.0.repo
# echo "baseurl=http://$USER:$PASSWORD@theqvd.com/commercial-packages/centos/7.2/QVD-4.1.0/" | sed 's/@\(.*@\)/%40\1/' >> /etc/yum.repos.d/QVD-4.1.0.repo
# echo "enabled=1" >> /etc/yum.repos.d/QVD-4.1.0.repo
|
|
$USER and $PASSWORD are the credentials received when the suscription is purchased. |
To install the QVD CLI Administration Utility, run the following command:
# yum install perl-QVD-Admin4
The QVD CLI administration utility requires access to the QVD API. You must make sure that the file qa.conf is correctly configured, as it is detailed in: Basic Configuration of QVD.
6.2. List of QVD CLI Commands
The QVD CLI administration utility provides a wide range of administration functions that can be used to control components and elements that are involved in the QVD environment.
You can obtain a complete list of these functions specifying the parameter usage:
# qa4 usage

==============================================================================
                           AVAILABLE COMMANDS
==============================================================================

   For a specific explanation of the following commands run:
   usage <COMMAND>
   i.e. usage login

== CLI GENERAL MANAGEMENT COMMANDS

   usage (retrieves instructions about the usage of the app)

   login (Intended to log in as a QVD administrator)

   logout (Intended to log out)

   password (Intended to change current QVD administrator password)

   block (Intended to change current QVD administrator pagination block)

   version (Retrieves information about the QVD version the app is connected to)

   log (retrieves log entries about the QVD server activity)

== QVD OBJECTS COMMANDS

    vm (Intended to QVD virtual machines management)

    user (Intended to QVD users management)

    host (Intended to QVD hosts management)

    osf (Intended to QVD OSFs management)

    di (Intended to QVD disk images management)

    tenant (Intended to QVD tenants management)

    role (Intended to QVD roles management)

    acl (Intended to QVD acls management)

    admin (Intended to QVD administrators management)

    config (Intended to QVD configuration management)
Any of the commands presented above can be invoked specifying usage to obtain a more detailed description of the syntax.
For example:
# qa4 usage vm

======================================================================================================
                                             VM COMMAND USAGE
======================================================================================================

== CREATING A NEW VM

  vm new <ARGUMENTS>

  For example:
  vm new name=myvm, user=myuser, osf=myosf (Creates a VM with user 'myuser', osf 'myosf' and name 'myvm')

== GETTING VMs

  vm get
  vm <FILTERS> get
  vm <FILTERS> get <FIELDS TO RETRIEVE>

  For example:
  vm get (retrieves default fields of all VMs)
  vm name=myvm get (retrieves default fields of all VMs with name 'myvm')
  vm name=myvm get name, id, ip (retrieves 'name', 'id' and 'ip' of VMs with name 'myvm')

  Ordering:

  vm ... order <ORDER CRITERIA>
  vm ... order <ORDER DIRECTION> <ORDER CRITERIA>

  For example:
  vm get order name (Ordering by 'name' in default ascendant order)
  vm get order asc name, id (Ordering by 'name' and 'id' in ascendant order)
  vm get order desc name, id (Ordering by 'name' and 'id' in descendent order)

== UPDATING VMs

  vm set <ARGUMENTS>
  vm <FILTERS> set <ARGUMENTS>

  For example:
  vm set di_tag=default (Sets new value for di_tag in all VMs)
  vm name=myvm set name=yourvm, di_tag=default (Sets new values for name and di_tag in VM with name myvm)

  Adding custom properties:

  vm <FILTERS> set property key=value
  vm <FILTERS> set property key=value, key=value, ...

  For example:
  vm set property mykey=myvalue (Sets property mykey in all VMs)
  vm name=myvm set property mykey=myvalue, yourkey=yourvalue (Sets properties mykey and yourkey in VM with name myvm)

  Deleting custom properties:

  vm <FILTERS> del property key
  vm <FILTERS> del property key, key, ...

  For example:
  vm del property mykey (Deletes property mykey in all VMs)
  vm name=myvm del property mykey, yourkey (Deletes properties mykey and yourkey in VM with name myvm)

  Blocking/Unblocking VMs

  vm <FILTERS> block
  vm <FILTERS> unblock

  For example:
  vm block (Blocks all VMs)
  vm name=myvm block (Blocks VM with name myvm)

== REMOVING VMs

  vm del
  vm <FILTERS> del

  For example:
  vm del (Removes all VMs)
  vm name=myvm del (Removes VM with name myvm)

== EXECUTING VMs

  vm <FILTERS> start
  vm <FILTERS> stop
  vm <FILTERS> disconnect

  For example:
  vm start (Starts all VMs)
  vm name=myvm stop (Stop VM with name myvm)


======================================================================================================
                                             DEFAULT FILTERS
======================================================================================================

  The filter key 'name', and the operator '=' are considered as defaults. So the following is a right
  syntax:

  <QVD OBJECT COMMAND> <QVD OBJECT NAME> <ACTION COMMAND>

  For example:
  vm myVM get (Equal to vm name=myVM get)
  vm myVM set name=yourVM (Equal to vm name=myVM set name=yourVM)

======================================================================================================
                                             COMPLEX FILTERS
======================================================================================================

  A filter is a key/value pair. Key and value can be related by means of different kinds of
  IDENTITY OPERATORS (=, >, <, etc.). Different operators allow different kinds of values
  (numeric, alphanumeric, arrays, ranges...). Moreover, two or more filters can be joined by means
  of LOGICAL OPERATORS (coordination, disjunction and negation operators).

  DIFFERENT IDENTITY OPERATORS:
  Supported operators:

  =  (equal)
  != (not equal)
  <  (less than)
  >  (greater that)
  <= (less or equal than)
  >= (greater or equal than)
  ~  (matches with a common expression: the SQL LIKE operator)

  For example:
  key1 = 1,
  key1 < 3,
  key1 > 3,
  key1 <= 3,
  key1 >= 3
  key1 = [1,2,3] (key1 must be in (1, 2, 3))
  key1 = [1:3] (key1 must be between 1 and 3)
  key1 = This_is_a_chain
  key1 = 'This is a chain' (A value with blanks must be quoted)
  key1 = "This is a chain" (A value with blanks must be quoted)
  key1 ~ %s_is_a_ch% (key1 must match the SQL commodins expression %s_is_a_ch%)
  key1 ~ '%s is a ch%' (key1 must match the SQL commodins expression %s_is_a_ch%)
  key1 ~ "%s is a ch%" (key1 must match the SQL commodins expression %s_is_a_ch%)

  LOGICAL OPERATORS
  Supported operators

  , (the AND operator)
  ; (the OR operator)
  ! (the NOT operator)

  (These operators have left precedence. In order to override this behaviour you must
   group filters with '(' and ')')

  For example:
  key1=value, key2=value, key3=value (key1 AND key2 AND key3)
  (key1=value; key2=value), key3=value ((key1 OR key2) AND key3))
  !key1=value (This expression means: NOT key1)
  !key1=value, key2=value, key3=value (NOT ( key1 AND key2 AND key3))
  (! key1=value), key2=value, key3=value ((NOT key1) AND key2 AND key3))

======================================================================================================
6.3. Use of filters to control operations
Many of the available operations through the QVD CLI administration utility also allow filters to limit an action to an element or a particular entity. The filters are essentially coincidences with the elements inside the columns of the table, just as a standard SQL query would provide with the WHERE clause. The filters accept comparisons, wildcards and logical operators.
If, for example, we would like to obtain machines with an id greater than 12000 belonging to the tenant qvd_test:
# qa4 vm "id>12000,tenant=qvd_test" get
.-------+----------+------+---------+-----------+------+---------------------------------------+-------------+-----------+-----------+---------+--------------.
| id    | tenant   | name | blocked | user      | host | di                                    | ip          | ip_in_use | di_in_use | state   | user_state   |
+-------+----------+------+---------+-----------+------+---------------------------------------+-------------+-----------+-----------+---------+--------------+
| 12604 | qvd_test | Java |       0 | test_user |      | 14000-Desktop_Development-Java.tar.gz | 10.10.53.79 |           |           | stopped | disconnected |
'-------+----------+------+---------+-----------+------+---------------------------------------+-------------+-----------+-----------+---------+--------------'
Total: 1
When the CLI administration utility is used to see the state of the VM, it is common to use filters to see virtual machines in a specific state or belonging to a particular user or where a virtual machine has a defined user_state.
The following example will show you how to chain together a series of filters to see all the virtual machines that belong to users with usernames that start with qvd, where also the virtual machine is stopped and the user is disconnected:
# qa4 vm "user~qvd%,state=stopped,user_state=disconnected" get
.-------+---------+------------------+---------+----------+------+-------------------------------+--------------+-----------+-----------+---------+--------------.
| id    | tenant  | name             | blocked | user     | host | di                            | ip           | ip_in_use | di_in_use | state   | user_state   |
+-------+---------+------------------+---------+----------+------+-------------------------------+--------------+-----------+-----------+---------+--------------+
| 10800 | qvd_43  | Desktop_Standard |       0 | qvd-test |      | 10000-Desktop_Standard.tar.gz | 10.13.25.100 |           |           | stopped | disconnected |
| 10900 | qvd_75  | Desktop_Standard |       0 | qvd-test |      | 10000-Desktop_Standard.tar.gz | 10.13.25.180 |           |           | stopped | disconnected |
| 10500 | qvd_264 | Desktop_Standard |       0 | qvd-test |      | 10000-Desktop_Standard.tar.gz | 10.13.23.120 |           |           | stopped | disconnected |
| 10100 | qvd_115 | Desktop_Standard |       0 | qvd-test |      | 10000-Desktop_Standard.tar.gz | 10.13.24.220 |           |           | stopped | disconnected |
| 10200 | qvd_155 | Desktop_Standard |       0 | qvd-test |      | 10000-Desktop_Standard.tar.gz | 10.13.24.160 |           |           | stopped | disconnected |
| 10102 | qvd_77  | Desktop_Standard |       0 | qvd-test |      | 10000-Desktop_Standard.tar.gz | 10.13.25.30  |           |           | stopped | disconnected |
'-------+---------+------------------+---------+----------+------+-------------------------------+--------------+-----------+-----------+---------+--------------'
Total: 6
6.4. Basic administrative operations
In this section we will examine some of the most common administrative tasks for which the QVD CLI administration utility is used.
6.4.1. Change the QVD configuration settings
QVD has a wide range of very specific configuration settings that control various components inside the infrastructure. We discuss some of them here.
To change a QVD configuration parameter of via the QVD CLIadministration utility, you can do the following:
# qa4 config set tenant_id=-1,key=myproperty,value="this is a value"
It is also possible to obtain all the configuration settings of the database and list them:
# qa4 config get
Lastly, it is possible to return a configuration to its original value:
# qa4 config set tenant_id=-1,key=qvd.prop default
6.4.2. Adding a QVD server node
It is common to use the QVD CLI administration utility to add new QVD server nodes to the QVD database. This can be done quickly from the command line with the following instruction:
# qa4 host new name=myhost, address=10.3.15.1
The elimination of a QVD server node is equally simple:
# qa4 host name=myhost del
6.4.3. Add an OSF
You can easily add an OSF to QVD using the QVD CLI administration utility:
# qa4 osf new name=myOSF
There is only one compulsory value to add an OSF, which is name. If the other parameters are left unspecified, theirdefault values are used instead. These are:
-
* Memory * = 256
-
* Use_overlay * = y
-
* User_storage_size * = undef (without limit for user storage)
You can obtain a list of currently available OSF doing the following:
# qa4 osf get
6.4.4. Adding a DI
Using the QVD CLI administration utility, you can attach a disk image (DI) to any existing OSF within the system. This process can take quite some time, since in addition to updating the database, the real disk image file is copied in the directory storage/images inside the shared storage.
On attaching a DI to a particular OSF, we keep the real disk separate from the image that will be served to the final users. This means that you can make changes in the disk image and simply update the OSF, so when the user connects again the image is automatically updated without the user experiencing any disruption to the service.
# qa4 di new disk_image=test-image.tar.gz, osf=retest
Both disk_image and osf are compulsory to add a DI. When the DI is added, the image specified in the path is copied in the read-only storage area configured to store active DIs (usually /var/lib/qvd/storage/images).
You can obtain a list of currently available images by doing the following:
# qa4 di get
6.4.5. Tagging DIs
The DIs can be tagged with arbitrary chains freely. To tag a DI as default, use the command di tag:
# qa4 di <filtro> tag <tag1>,<tag2>,...
# qa4 di disk_image=mydi tag default, head, mytag
You can tag DIs with any chain, not only default or head. This lets you use significant names for the tags, for example "software_bug_fixed", for use inside the field DI Tag of the virtual machines.
Tags are useful, since they let you attach a new version of a disk image to an OSF without affecting anybody that is using the current image or default image for an OSF. This lets you implement a change and migrate specific virtual machines using a different OSF for the new image while you are testing. If the image fails for any reason or it does not meet your requirements, it is easy to go back to the default image and let the users continue working while corrections are made.
6.4.6. Choosing the DI tag that the virtual machines will use
In order to tell a virtual machine that it must use a DI with a specific tag, we edit the VM to change its di_tag field. So if for example we have just finished correcting a software error in a DI and we create the tag "software_bug_fixed", we can use this DI in a VM using the following command:
# qa4 vm set di_tag=default
# qa4 vm name=myvm set di_tag=default
The next time the VM myvm is started, it will use the DI with this tag.
6.4.7. Adding and eliminating users
It is common to use the QVD CLI administration utility to quickly add and eliminate users.
# qa4 user new login=peter,password=s3cr3t
# qa4 user login=guest3 del
You can also list all the users of QVD by means of the list option:
# qa4 user get
Be aware that, as explained in the Installation guide, it is not advisable to create a user whose username already exists in any disk image.
6.4.8. Resetting a user password
You can change a user’s password via the QVD CLI Administration utility:
# qa4 user name=guest set passwd=newpassword
In the example above, we are changing the password for the user of log in guest. You will be asked to provide a new password.
6.4.9. Adding and eliminating virtual machines
Adding and eliminating virtual machines via the QVD CLI administration utility is easy. You can specify the user and the OSF by ID or by name:
# qa4 vm new name=GuestVM,user_id=1 osf_id=1
# qa4 vm new name=GuestVM,user=peter,osf=myOFS
You can easily eliminate a virtual machine using the following command:
# qa4 vm "name=GuestVM" del
6.4.10. Starting and stopping virtual machines
The QVD CLI administration utility can be used to start and stop virtual machines. Unless specified with a particular filter, the action will start or stop all the virtual machines. This command is usually executed specifying a filter to identify the real virtual machine that you wish to start or stop. Examples:
# qa4 vm "user~guest%" stop
# qa4 vm id=1 start
The balancing policy determines the node where the VM will start.
6.4.11. Blocking and unblocking virtual machines
Virtual Machines can be marked as "blocked". When they are in this state, the QVD Client application will not be able to connect to the Virtual Machine. This task can be executed by an administrator to carry out an administration task or can take place when the HKD is unable to correctly manage a virtual machine. The following commands can be used to mark a virtual machine as "blocked" or can be used to unblock a virtual machine that has been set in this state.
# qa4 vm "id=2" block
# qa4 vm "name=GuestVM "unblock
Check block and unblock the virtual machine in the manual of the WAT to obtain more information on how to configure this state.
6.4.12. Troubleshooting virtual machines
|
|
In this version of the administration tool, the old methods of access by console or vnc to the virtual machines have been disabled. These methods are no longer in use and are of no interest given the new tools that the WAT provides. |
6.4.13. Configuration of customized properties for a virtual machine
QVD includes the option to configure customized properties for a virtual machine that can be set and recovered via the QVD CLI administration utility. This is useful if you need to write your own behaviours or wish to take advantage of the VMA hooks (See the relevant section about this).
The customized properties are often used when you write your own plugins for the L7R, such as the authentication modules or load balancing.
The customized properties are compatible with the configuration parameters: host, user and vm
To add a customized property, you can use the command propset:
# qa4 user name=myuser set property mykey=myvalue, yourkey=yourvalue
You can obtain the content of all the customized properties that have been set for a configuration parameter using the command:
# qa4 user get property
Finally, you can eliminate a customized property using the command propdel:
# qa4 user name=juan property del beverage
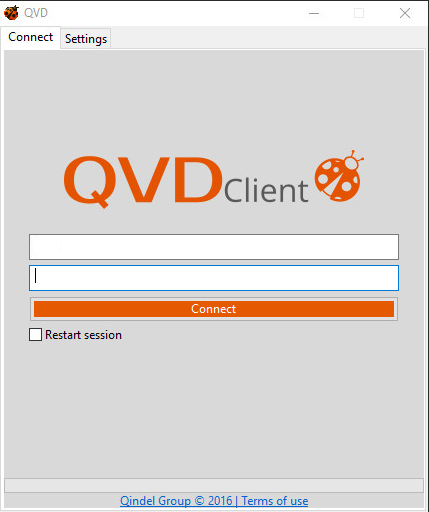
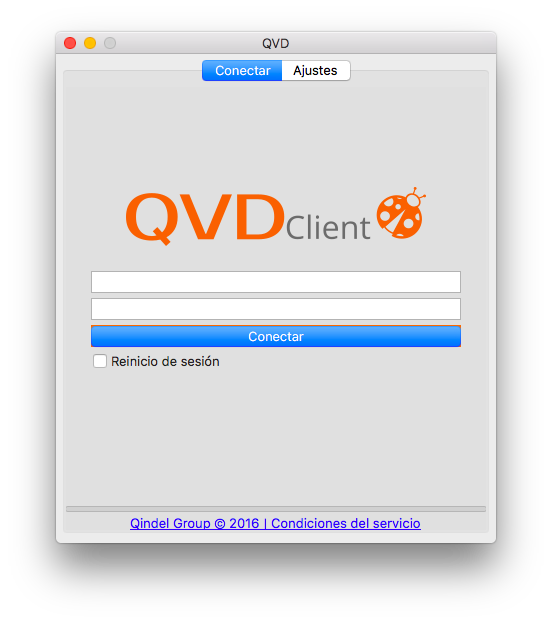
7. QVD GUI Client
The QVD client is available for Microsoft Windows, Linux and Mac OS X platforms The client is available in English and Spanish and by default it will be set to the regional configuration of the system.
7.1. Installation of the Windows client
You can download the QVD client software installer from:
Once you have finished downloading the installer, run it as a normal executable file and follow the assistant during the installation process.
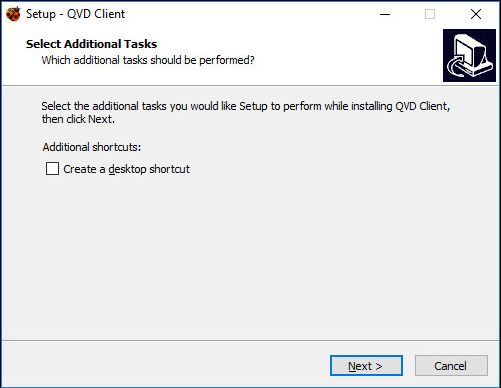
Once you have finished the installation, you can run the client from the shortcut on the Windows desktop (if you have selected to add the shortcut) or from the QVD menu in the applications menu. This will open the client so that it is ready to connect.
7.2. Installation of the Mac OS X client
You can download the QVD client package from:
The package will install the QVD client in the Applications directory. To launch the client, double click on the ladybird icon or via the spotlight native search system by pressing command + space bar and typing qvd.
7.3. Installation of the client Linux
Installing the QVD client in an Ubuntu Linux platform is an easy procedure.
Firstly, add the public key of the QVD parcels to your trusted keys (like root):
# wget -qO - https://www.theqvd.com/packages/key/public.key | sudo apt-key add -
Now, add the repository:
/etc/apt/sources.list.d/qvd.list
# apt-get update
For commercial packages:
# echo "deb http://$USER:$PASSWORD@theqvd.com/commercial-packages/ubuntu/xenial QVD-4.1.0 main" > \
/etc/apt/sources.list.d/qvd.list
# apt-get update
|
|
$USER and $PASSWORD are the credentials received when the suscription is purchased. |
Now you can install the client with the following command.
# apt-get install perl-qvd-client
For SLES:
Firstly, add the public key of the QVD packages to your trusted keys (as root):
# rpm --import https://www.theqvd.com/packages/key/public.key
Now, add the repository:
# zypper ar http://theqvd.com/packages/sles/12SP1/QVD-4.1.0 QVD
# zypper ref
For commercial packages:
# zypper ar http://theqvd.com/commercial-packages/sles/12SP1/QVD-4.1.0 QVD
 User Name: $USER
 Password: $PASSWORD
# zypper ref
|
|
$USER and $PASSWORD are the credentials received when the suscription is purchased. |
You can now install the client with the zypper command.
zypper install perl-QVD-Client
For Centos:
Firstly, add the public key of the QVD packages to your trusted keys (as root):
# rpm --import https://www.theqvd.com/packages/key/public.key
Now, add the repository:
# yum-config-manager --add-repo http://theqvd.com/packages/centos/7.2/QVD-4.1.0/
For commercial packages:
# echo "[QVD-4.1.0]" > /etc/yum.repos.d/QVD-4.1.0.repo
# echo "name=QVD-4.1.0" >> /etc/yum.repos.d/QVD-4.1.0.repo
# echo "baseurl=http://$USER:$PASSWORD@theqvd.com/commercial-packages/centos/7.2/QVD-4.1.0/" | sed 's/@\(.*@\)/%40\1/' >> /etc/yum.repos.d/QVD-4.1.0.repo
# echo "enabled=1" >> /etc/yum.repos.d/QVD-4.1.0.repo
|
|
$USER and $PASSWORD are the credentials received when the suscription is purchased. |
You can now install the client with the yum command.
yum install perl-QVD-Client
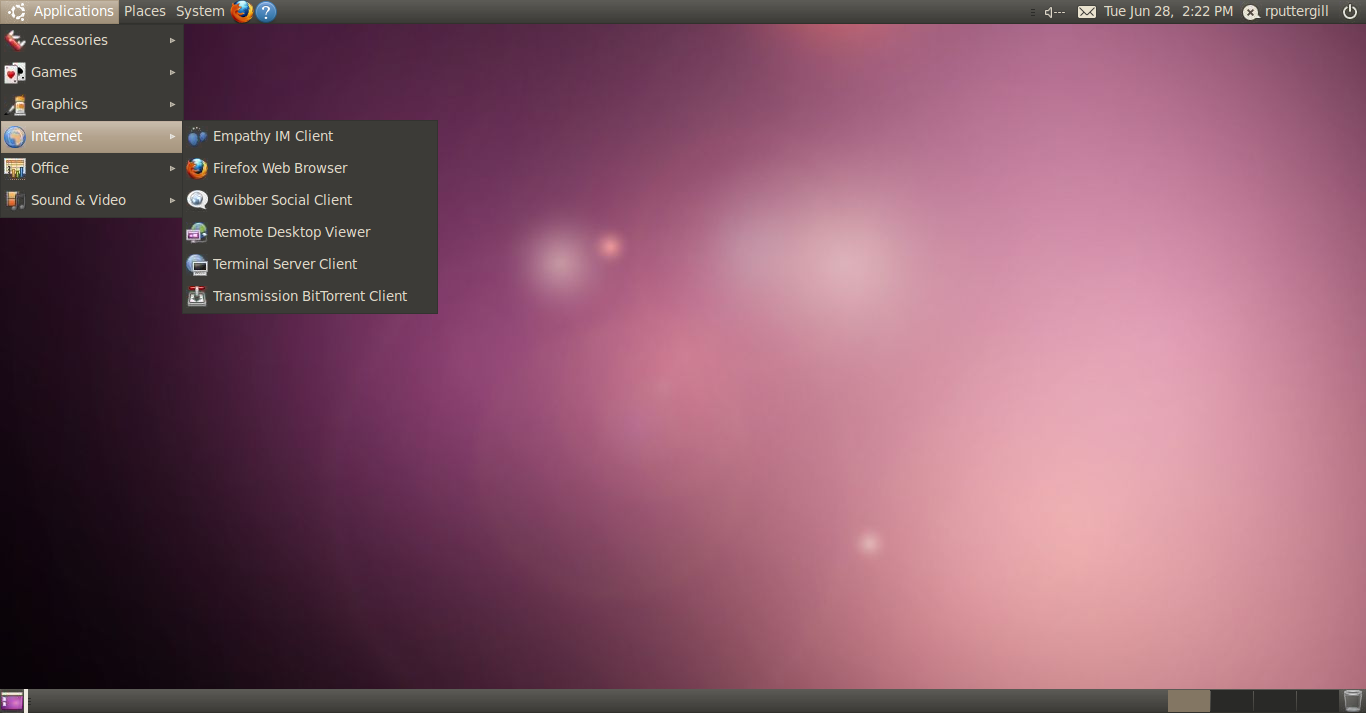
Depending on the desktop environment, you should be able to access the client inside the menu "Applications", usually in the submenu "Internet". Alternatively, you can execute the client GUI from the console using the command qvd-client.
7.4. Connection to your virtual desktop
Once you have the GUI client running, you can introduce the User’s Name for the user that you created in QVD, the Password that you configured for the user, the Server hostname or IP address for the QVD server node created, and you can choose the compression level of the connection by selecting Type of connection.
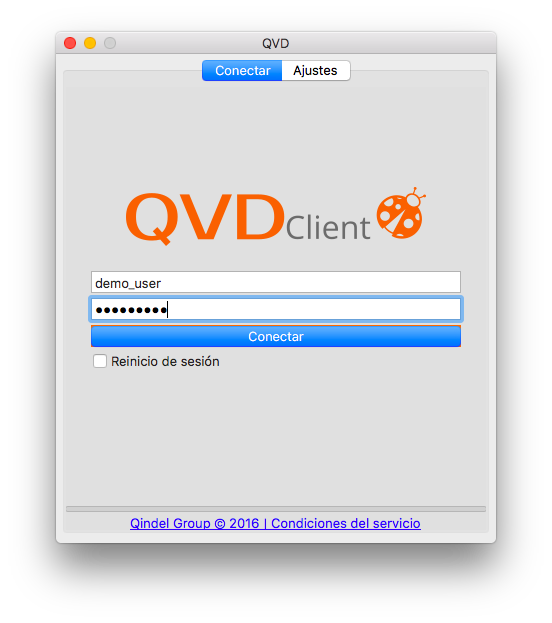
By default, the Type of connection is established in Local. This configuration is suitable for connections through a local area network. There are also options for ADSL that would be suitable for any broadband connection, and for modem which can be used in cases where the bandwidth is severely limited or damaged.
Changing the type of connection will increase the compression used to deliver the virtual desktop through the network connection. It will also increase the amount of cache used by the client to limit the number of screen refreshes necessary.
In general, the use of heavy compression and the storage in cache will still enable users the ability to work comfortably in their virtual desktops. However, the graphic quality will be slightly lower.
Once you have finished introducing the details of your connection, just click on the button labelled Connect and your virtual desktop should load.
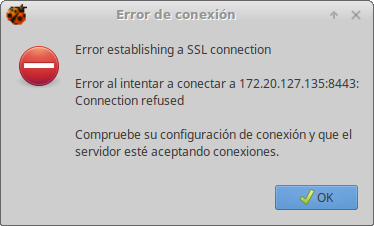
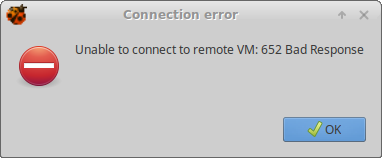
7.4.1. Possible errors in the connection
The client has several error messages depending of different outcomes.
-
Login error: The pair user/password is incorrect and the client cannot be stablished.

-
Server Failure: There was a server failure and a connection cannot be stablished. This may happend because the HKD is not running.

-
Connection Failure: Connection configuration is incorrect and a connection cannot be stablished. Please, check the configuration previously set in the client, the server url.
-
Virtual Machine blocked: The virtual machine is blocked and a connection cannot be stablished.
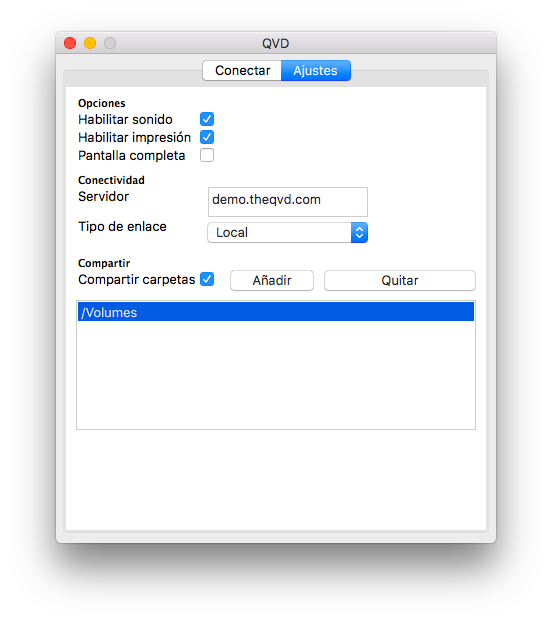
7.5. Shared folder of the QVD client
QVD can provide access to local folders in the user’s client machine from the virtual desktop.
7.5.1. Use of shared folders
To activate this option, select it in the configuration tab.
When the shared folders are activated for the first time, the main user directory is redirected (%USERPROFILE% for Windows clients and /home/%user% for Linux and Mac OS X).
On activating the option, a list of shared folders is shown. From this screen it is possible to eliminate folders in the list and add others.
The folders will appear in the user’s personal directory in a subfolder called redirect. GNOME and other recent Linux desktops will also show a shortcut icon on the desktop and in the file administrator, depending on the configuration.
7.6. Additional configuration for the QVD client
The QVD client offers several configuration options that can be used to adjust the performance and customize the user experience. By default, these configurations are found in the file client.conf. Under Mac OS X and Linux, this file is found in the user’s personal directory in ~/.qvd/client.conf, and in /etc/qvd, although the user’s file replaces it if it exists. In windows,client.conf is found inside %APPDATA%\.qvd\client.conf.
The QVD client GUI also offers convenient access to some of the basic configurations of the user in the tab "Configuration" in Start. The tab can be activated or deactivated in client.conf - see below for more details.
7.6.1. QVD configuration file
You can specify the following additional options to control the client software on a workstation:
client.link = local
client.geometry = 1024x768
client.fullscreen = 1
client.slave.enable = 1
client.slave.command "/path/to/custom/slave-command"
client.audio.enable = 1
client.printing.enable = 1
client.host.port = 8443
client.host.name = loadbalancer.mydomain.com
client.user.name = guest
client.use_ssl = 1
client.force.host.name = loadbalancer.mydomain.com
client.force.link = local
client.remember_password = 0
client.show.remember_password = 0
client.show.settings = 1
client.usb.enable=
client.usb.share_list=139a:0608@3210bf331301,0f45:2421
client.file_sharing.enable=1
client.share.0=/home/user/Documents
client.share.1=
The values that appear above are the ones set by default:
-
client.link: can be: modem, isdn, adsl, wan, lan, local or a specification of bandwidth (56k, 1m, 100m…)
-
client.geometry: used to inform about the size of the screen of the client. If it is not used, it will become to full screen mode
-
client.fullscreen: full screen mode
-
client.slave.enable: habilitate or not the slave channel, that controls the functions of the shared folder and printing
-
client.slave.command: command to execute for the slave
-
client.audio.enable: habilitate pulse Audio server in the client. The image of the virtual machine of the user must support this option or it will not work
-
client.printing.enable: Habilitate the shared printers in the client. The image of the virtual machine of the user must support this option or it will not work.
-
client.host.port: HKD port to which the client must connect
-
client.host.name: HKD host or load balancer to which the client must connect
-
client.user.name: User’s name for the authentication (in multitenant mode the format would be user@tenant)
-
client.use_ssl: Activate or deactivate the use of SLL in the communication with the QVD server. Activated by default
-
client.force.host.name: Strength in the host name in the client to only get connected to this host (it makes it impossible that the user changes it through the graphical interface)
-
client.force.link: The same as the previous one but for the type of link
-
client.show.remember_password: It controls if the user has the option of saving his password or not (Remember password is showed in the GUI)
-
client.remember_password: It controls if the user’s password is saved or not
-
client.show.settings: Show or hide the tab of configuration
-
client.usb.enable: It habilitates the sharing of USB devices (only in Linux)
-
client.usb.share_list: List of shared devices
-
client.file_sharing.enable: It habilitates the sharing of folders
-
client.share.[number]: List of shared folders (a line per folder, its number starts in zero and must be successive)
7.6.2. Configuration of the QVD GUI
The following image shows the settings currently available in the QVD client.
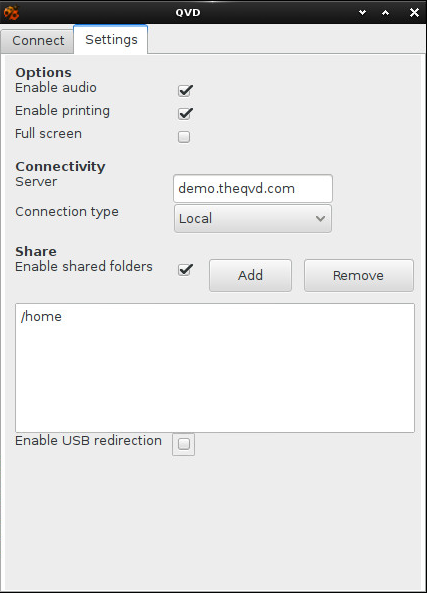
-
Restart current VM (in the main screen): this closes the VM in execution to which the user is trying to connect. It is useful for when the user needs to update the last image provided by the administrator and also to potentially allow the user to solve for himself instability problems in his VM (cannot connect, not shown correctly, etc…)
-
Activate audio: activates the PressAudio server in the client
-
Enable printing: allows the sharing of printers with the virtual machine
-
Full screen: executes the client in full screen mode
-
Share folders: allows you to share, add and delete folders
-
USB/IP: This option is only for the Linux client. It lets you use the characteristics of the USB/IP linux kernel. With it, local USB devices can be shared with the remote virtual machine, so to all intents and purposes, it would be as if the device were physically connected to it. This characteristic of the kernel is experimental, and therefore, so is our functionality. Some devices, such as flash drives and the like work quite well; while others, more sensitive to time lags, like webcams, work quite badly.
7.6.3. Registers of the QVD client
By default, the Qvd client leaves its logs in ~/.qvd/qvd-client.log in Mac OS X and Linux and %APPDATA%\.qvd\qvd-client.log in Windows. You can change the levels of logging to one of ALL, DEBUG, INFO, WARN, ERROR, FATAL, OFF in the configuration file in the following way:
log.level = ALL
7.7. QVD Binaries
In addition to the standard Qvd clients, the QVD team offers several compiled binaries for the above platforms, and some others such as iOS, Android, Raspberry Pi and FreeBSD. Be aware that these binaries are experimental and may be incomplete. With the exception of the Windows and OS X clients, the binaries are compiled statically and must be able to be executed without additional libraries.
-
Linux These must be executed in any recent distribution without additional libraries, simply give it execution permissions and execute.
-
FreeBSD As with the Linux client, give it execution permissions and execute.
-
Mac OS X and IOS clients.
The OS X client needs libstdc++ and libSystem, which should be available in recent versions of OS X.-
qvdclient_x86_64-apple-darwin11 (64 bit client)
The IOS binaries need Cydia and an X server. -
qvdclient_armv7-apple-darwin11 (for older IOS devices, although it should work in the new ones)
-
Binaries have some compulsory options that can be obtained through the use of the parameter -? , for example
$ ./qvdclient -?
./qvdclient [-?] [-d] -h host [-p port] -u username -w pass [-g wxh] [-f]

  -? : shows this help
  -v : shows version and exits
  -d : Enables debugging
  -h : indicates the host to connect to. You can also set it up in the env var QVDHOST.
       The command line argument takes precedence, if specified
  -p : indicates the port to connect to, if not specified 8443 is used
  -u : indicates the username for the connection. You can also set it up in the env var QVDLOGIN
       The command line argument takes precedence, if specified
  -w : indicates the password for the user. You can also set it up in the env var QVDPASSWORD
       The command line argument takes precedence, if specified
  -g : indicates the geometry wxh. Example -g 1024x768
  -f : Use fullscreen
  -l : Use only list_of_vm (don't try to connect, useful for debugging)
  -o : Assume One VM, that is connect always to the first VM (useful for debugging)
  -n : No strict certificate checking, always accept certificate
  -x : NX client options. Example: nx/nx,data=0,delta=0,cache=16384,pack=0:0
  -c : Specify client certificate (PEM), it requires also -k. Example -c $HOME/.qvd/client.crt -k $HOME/.qvd/client.key
  -k : Specify client certificate key (PEM), requires -c. Example $HOME/.qvd/client.crt -k $HOME/.qvd/client.key
It is possible that you wish to establish environment variables for debugging purposes and to avoid that your credentials are visible. The QVD client recognizes the following variables:
QVDHOST : Server to which to wish to connect
QVDLOGIN : User to authenticate with the server
QVDPASSWORD : User's password
QVD_DEBUG : Enables the debugging log
QVD_DEBUG_FILE : It specifies in which file to save the debugging log
DISPLAY : Required to run correctly.
          Additionally, in some systems you may need to execute the following:
            export DISPLAY=localhost:0; xhost + localhost
            xhost +si:localuser:$LOGNAME
|
|
XAUTHLOCALHOSTNAME Alternative solution
Some recent distributions of Linux introduced the environment variable XAUTHLOCALHOSTNAME to store the local hostname when starting the X session. NX libraries do not recognize this variable, but instead they refer to the file X authority file. This can result in a correct authentication of QVD, but that you are unable to totally connect to the QVD desktop with the error X connection failed with error 'No protocol specified'. There are three solutions for this. Enable the authentication based on host: $ export DISPLAY=localhost:0; xhost + localhost Enable the local user authentication interpreted by the server: $ xhost +si:localuser:$(whoami) Add the hostname to the file X authority file: $ xauth add "$(/bin/hostname)/unix:0" MIT-MAGIC-COOKIE-1 \
$( xauth list "localhost/unix:0" | awk '{print $3}' )
|
Design and integration considerations
1. Shared storage
Since there are several server-side components inside the QVD infrastructure, and each of them is usually installed in different systems, it is important to have an installation of shared storage accessible to all the hosts of your server farm.
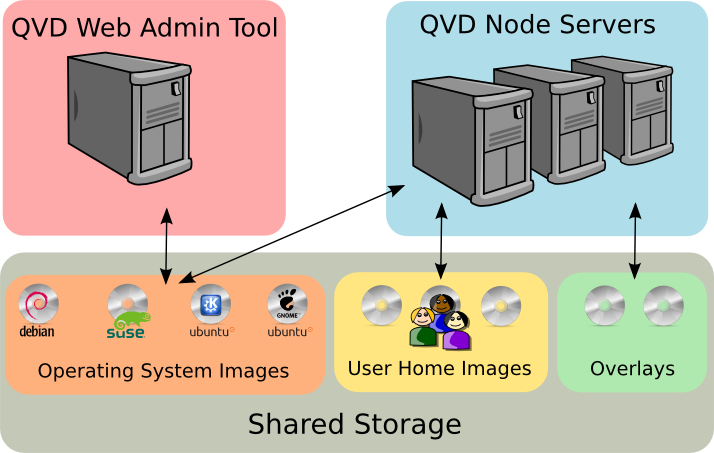
Online files exchange services currenlty supported are GFS or OCFS2 in the upper part of some SAN servers (it is iSCSI, AoE, etc.) and NFS. QVD generally maintains all the commonly use files in the location: /var/lib/qvd/storage
|
|
all the routes used by QVD are configurable items, so you must take into account that although it is the default location, the names of the infrastructure can be different depending on their configuration. You can check these settings through the command line administration utility of QVD or the WAT. |
Although some of the components do not need access to all the storage folders of QVD and, in some cases, you can choose to have some of these folders in execution locally in a system, we recommend all of them be accessible inside some form of network-based shared storage.
|
|
You should keep a security copy of the QVD folders that are saved in your shared storage. At the very least, you should make sure that the folder where the persona data of the user is saved and the folders where the disc images are located are supported by your disaster recovery strategy. |
2. Storage folders
There is a variety of folders that belong to the storage route. Many of them are specific for the type of virtualization that you choose to use inside your environments.
2.1. General Storage
-
staging: temporary location for all the Dis that you wish to have available in the WAT with the purpose of loading as a new image. The files located here will be available in the WAT when you choose to add an image. The image file will be copied from this directory to Images when the image is created with one of the administration tools. The staging folder can be locally located or in a shared network resource, but must be accessible from the API.
-
images: location of the DIs (Disk Images) that are loaded by the nodes for each virtual machine that is created. This folder must be accessible for all the server nodes of QVD and the API. It can be stored in a shared network resource, but in a simple configuration, in which the WAT is not used or is in the same system of the server node of QVD, it can be locally located to improve efficienty. Take into account that when KVM is used as a virtualization, the image is loaded in the virtual machine directly from this desktop. When the LXC virtualization is used, the image is taken from this desktop in the directory basefs, before it is loaded.
2.1.1. KVM storage directories
-
homes: location of the personal directory of the user. In KVM, the user’s home data is stored in an only individual file as image qcow2. The directory homes must be accessible for all the server nodes of QVD, usually in a type of shared storage by network like NFS, OCFS2 or GFS2.
-
overlays: location used to store overlays for data that is in constant writing in the operating system to work properly, like for example temporary files, changeable data, etc. This folder is usually locally located, but for the persistent behaviour in your virtual machines, you can choose to store it in a shared network resource and configure QVD for persistent virtual machines.
2.1.2. LXC storage Directories
-
basefs: location of the DIs (Disk Images) that the nodes load for each virtual machine that is created. This folder must be accessible for all the server nodes of QVD and the API. It can be stored in a shared network resource, but in a simple configuration, in which everything is in the same system as the server node of QVD, it can be locally located to improve efficiency. The folder basefs will have a subdirectory for each DI that at the same time will have the file tree for each operating system.
-
homesfs: location of the user’s personal directory. In LXC, the data of the home are storage in subdirectories inside the directory homefs, named as the user-id and the osf-id stored in the QVD-DB. The directory homefs must be accessible to all the server nodes of QVD, usually in a type of shared storage of network files, like NFS, OCFS2 or GFS2.
-
overlaysfs: location used to store overlays of data that are in constant use by the operating system, such as temporary files and application logs. Generally, this folder can be locally located, but for the persistent behaviour in your virtual machines, you can choose to store it in a shared network resource and configure QVD for persistent virtual machines.
-
rootfs: location of LXC in execution once all the required assembly points are assembled and configured. This folder is usually local for each Server Node QVD, for efficiency reasons, but it can also be stored in the shared storage.
2.1.3. LXC storage directories (BTRFS)
With version 3.2, QVD introduced support for the btrfs filesystem. This differs slightly from the standard LXC configuration extracting each disc image in a read only btrfs subvolume and making a snapshot of the overlay (non persistent data) for each new VM. This is considerably more efficient than extracting the image in a folder due to the capacities of copy in writing of btrfs, offering a significant reduction in the load of the shared storage through the persistent download in the local node. This gain has a price, however, in the sense that this data will be lost if a client is assigned to a new node.
-
basefs: location of the extracted DIs (Disk Images) that load the nodes for each virtual machine that is created. With a btrfs system, each system is unpacked in its own subvolume in basefs. This volume will be used by each VM that uses this DI. For a btrfs system this must be stored locally in each node.
-
homefs: location of the user’s personal directory. As with the normal LXC configuration, the origin data are stored in the subdirectories of the homefs directory that is named according to the id of the user and the osf-id storage in the QVD-DB. The homefs directory must be accessible to all the server nodes of QVD usually in a type of shared network resource, like NFS, OCFS2 or GFS2.
-
overlaysfs: location of non-persistent data, like temporary files and of log. When a container is started, overlay data is created inside its own btrfs subvolume, in the overlayfs. For each subsequent VM using this disk image, QVD creates a snapshot of this subvolume and the snapshot is used as the root filesystem of the container. From btrfs very cheap snapshots and subvolumes can be created with very little overhead. This happens almost in real time. Since in a btrfs system this must be done locally, the load is enormously reduced in the shared storage. However, we have to point out that, therefore, this data is not persistent and it will be lost if the load balancer runs a user in another node. QVD will still maintain the configuration vm.overlay.persistent but this persistence will only be for consecutive sessions in the same node.
-
rootfs: location of the LXC container in execution once all the required assembly points are assembled and configured. With a configuration of btrfs, this data has to be locally stored in the node.
2.2. NFS
In this part of the document we will give you directions to configure NFS for QVD, since this is one of the most used protocols for the shared storage. We will provide instructions for Ubuntu 16.04 and for SUSE Linux Enterprise Server (SLES) 12.1, however, you should be able to extrapolate these instructions to provide NFS access for each distribution.
|
|
we recommend you execute the following process before installing any of the components of the QVD server to guarantee that when the QVD components are installed, they automatically use the NFS shared resource from the beginning. This way, you are less likely to have problems to migrate files and create directories in the long-term. |
2.2.1. Installation of NFS server
First install the NFS server. For Ubuntu, this can be done as root using the command:
# apt-get install nfs-kernel-server
And for SLES:
# zypper install nfs-kernel-server
2.2.2. Configuration of NFS server
Add an entry a `/ etc / exports`in this way:
/var/lib/exports * (rw, sync, no_subtree_check, no_root_squash)
Take into account that this would mean that your NFS server would configure one of the QVD directories inside the route /var/lib/exports. You can choose another more appropriate location if you prefer to have these files in another route. Once you have added your route inside the exportations of NFS Server, you should load the NFS Server again. For Ubuntu (as root):
# /etc/init.d/nfs-kernel-server reload
Similarly for SLES:
# /etc/init.d/nfsserver reload
From now on, the NFS Server should make the configured route network available.
2.2.3. Assembly of NFS directory in the hosts of QVD
Each host system that is executing components of QVD will need to be configured to access the NFS shared resource that we have configured in the NFS server. First, create an assembly point in your host systems:
# mkdir -p /var/lib/qvd/storage
Make sure you have the necessary tools to access an NFS shared resource installed in your host systems. In Ubuntu, you must install nfs-common:
# apt-get install nfs-common
In SLES, install nfs-client:
# zypper install nfs-client
To be sure that the NFS filesystem is always assembled from boot up, you must add the following line in /etc/fstab:
nfsserver:/var/lib/exports /var/lib/qvd/storage nfs rw,soft,intr,rsize=8192,wsize=8192 0 0
Take into account that in the previous line, nfsserver is the name of the server that hosts the NFS shared resource. You should substitute this for the IP address or the name of the resolved host by DNS of its NFS Server. Once you have finished editing your fstad, you should be able to mount the NFS resource in the host systems:
# mount /var/lib/qvd/storage
Lastly, you should check that the NFS resource is mounted correctly. You can do this executing the command `mount`and themn verifying the output to see that the NFS resource appears:
mount
...
nfsserver: /var/lib/exports on /var/lib/qvd/storage type nfs (rw,soft,intr,rsize=8192,wsize=8192,addr=172.20.64.22)
3. LXC virtualization inside QVD
3.1. Basic concepts of LXC technology
LXC virtualization is executed directly inside the core of the host operating system, so the processes that are executed inside the guests containers really are visible inside the host. As a result, the containers share the space of the kernel, which is more efficient, since only one kernel is loaded in the host that executes its virtual desktops. Additionally, this means that all the virtual machines necessarily execute the same kernel, so the personalization of the kernel by machine is not possible. Given that many distributions modify the configuration options of the kernel to adapte to the specific environment, it is usually advisable to use the same distribution for each container that is being run in the host platform.
Each container has its own space for files that is executed in the host filesystem, called rootfs. The hierarchy of a container filesystem is identical to the Linux installation that is being executed and can be accessed directly from the host environment. This makes itpossible to access the underlying filesystem of a container in execution from its main host. This can be very useful from a troubleshooting and debugging perspective. It also helps System Administrators access and update the LXC containers. On the other hand, the nature of LXC virtualization and its specific requirements make it more difficult to configure and easier to break. In particular, it is essential that the processes and scripts that require direct access to the hardware (such as udev) are not executed inside the container space. Frequently, the requirements and dependencies of the packet can make maintenance difficult for inexperienced administrators.
|
|
As you can imagine, we do not recommend trying to make writing operations in a container in execution from the host. Although technically possible, it can produce unexpected results. |
Unlike a traditional chroot, LXC provides a high level of isolation of processes and resources. This means that you can assign each container its own network address and itcan execute processes without directly affecting other containers or the main host system.
LXC can easily be used outside QVD, and any LXC image that can executed inside QVD can be loaded in any Linux system with LXC support. To execute a container using LXC outside QVD, you will need to create a configuration file for its container, providing details of assembly points, control groups, network requirements and access to the console. Please read man lxc.conf to see the options. Onexecuting an LXC container inside QVD, the solution will automatically generate a configuration file for the container before it is started, to make sure that it is correctly configured to be executed in the QVD environment.
The containers can be created directly from the filesystem of any functional linux installation, but will almost certainly require some modifications to be able to work. This modification usually implies the elimination of any process or sequence of commands that have direct access to the hardware, and the manual recreation of device nodes. Most of the distributions with LXC support also include templates that are basically bash scripts that will configure a basic installation of the operating system inside a container for you automatically.
The templates can save a lot of time and must be used as a baseline for the creation of your LXC images. However, they vary between distributions and in general they cannot generate a totally functional configuration, and undoubtedly require the manual installation of many more packets to create a container of sufficient level where it is usable inside QVD.
3.2. When to use LXC
It is important to be able to determine the best scenarios to use LXC, as opposed to KVM. Both technologies have their advantages and must be used in different situations. In general, LXC should offer better performance than KVM and will scale better, since the virtualization it offers has less overload. On the other hand, KVM will offer greater flexibility and will permit the execution of a wider variety of guest operating systems.
Here are some of the basic guidelines that you must follow to decide if you wish to use LXC or not:
-
The disk image that you are going to create will be shared between many users
-
The guest operating system that you wish to install uses exactly the same core as the host (which means, the core will be identical). It is strongly recommended that the guests' distribution be identical to that of the host
-
You wish to abstract the virtualization even more to be able to execute other guest operating systems in QVD, executing KVM inside an LXC environment. This is a very complex configuration and will not be presented in this documentation.
In general, it is easier to configure QVD to use KVM virtualization, and has shown to be easier for administrators to work with KVM images. If you have doubts or are new to QVD, we recommend you use KVM.
If you already have a good understanding of QVD and are familiar with LXC, you will find that the support for LXC inside QVD will let you implement complex configurations LXC very easily. You will also find that the nature of this type of virtualization provides you a much better capacity of administration, and that you will be able to achieve a more efficient use of your hardware.
3.3. Details of implementation of QVD LXC
In this section, we will analyze in more detail how LXC is implemented inside QVD
3.3.1. Storage and structure of disk images
QVD makes use of unionfs-fusible to manage the assembly points of the union style. This lets QVD mount directories like the personal directory of the user and temporary data typically managed as overlays inside KVM in the LXC in execution. Since the disk image LXC is a read only system, unionfs-fuse facilitates the assembly of storage areas with writing. So, it is essential that the fuse module of the kernel loads at the beginning of the system.
Since the implementation of LXC differs dramatically from KVM, QVD stores all the associated data with each implementation of virtual machine in directories logically different inside the storage location of QVD.
Whilst the "staging" and "images" directories are used commonly with KVM, most of the functional activity takes place outside these directories. When a virtual machine is started for a user, the disk image that will be used in the virtual machine is extracted literary from the tarball stored in the images directory in a subfolder inside the folder basefs.
When the virtual machine is started, the files system that is extracted under the folder basefs is mounted with the personal directory of the user, stored in the folder homefs and the relevant overlays (in overlays) in a directory in execution time inside rootfs. This directory of execution time is used to load the LXC and serve the Virtual Desktop to the final user.
The content, structure and the purpose of the folder is described in more detail below.
basefs
For each virtual machine that has been started in the QVD environment, a subfolder is created inside the folder basefs. This subfolder is named using as a prefix the ID assigned to the virtual machine inside QVD-DB and has as a suffix the name of the disk image file that was loaded for that machine. So, inside the folder basefs, it is probable that you see folders with names similar to the following:
# ls -l /var/lib/qvd/storage/basefs/
total 4
drw-r--r-- 18 root root 4096 2012-02-20 11:59 2-image.0.22.tgz
In this example, the folder is named 2-image.0.22.tgz. This is because the filesystem contained in this folder belongs to the virtual machine with an ID == 2, and the disk image that is loaded here is from the disk image file called image.0.22.tgz. A typical Linux filesystem is found inside this folder:
# ls /var/lib/qvd/storage/basefs/2-image.0.22.tgz/
bin  dev  etc  lib  lib64  media  mnt  opt  root  sbin  selinux  srv  sys  tmp  usr  var
Using unionfs-fuse, the filesystem represented in this folder will be mounted together with the filesystems represented in the folders homefs and overlayfs inside the folder rootfs during execution time.
homefs
The personal data of the user is stored inside the folder homefs. Following convention, the user startup directories are stored inside a folder called as follows:
<id de la VM>-<user's id>-homefs
This allows a single user to have multiple personal directories for different virtual desktops, based on the virtual machine in which the personal directory is mounted.
overlayfs
This directory contains overlays used in the virtual machine. Given that the content of the basefs image is treated as a read only filesystem, an overlay is created to manage the data that the virtual machine in execution needs to write in the operating system. This data is usually in the form of logs, execution time PIDs, blocking files and temporary files.
Each virtual machine has its own overlays directory and is named following the convention:
<id of DI>-<id of VM>-overlayfs
Take into account that if a virtual machine is not correctly started for any reason, a temporary overlays folder is created. This folder is named with the prefix "deleteme-". The folder is conserved to let you see the specific log files of a virtual machine that may not have started, to help you with the debugging process.
Rootfs
This directory contains the assembly points to execute instances of the virtual LXC machine. Each assembly point is named according to a convention where it is prefixed with the ID of the virtual machine inside QVD-DB. The assembly point directory is created when the container is started. Since it is only used to mount the filesystem of a container in execution, it will only contain something when a container is being executed. If the container is stopped, the directory is unmounted and will remain empty until the container is restarted.
3.3.2. Networks
Similar to the implementation of KVM of QVD, it is necessary to create a bridge interface in the host of QVD Node. When a virtual machine is started, a virtual network interface is created and it is linked with the bridge interface. For it to work correctly, you will have to configure QVD with the IP range used for the virtual machines. The bridge interface must be configured with an IP address lower than the range used for the virtual machines, but still in the same network.
3.4. Configuration of the QVD base
By default, QVD is configured to use KVM virtualization. Before trying to load any LXC disk image in the infrastructure QVD, you must check that QVD has been reconfigured to use LXC. In order to do this, you must update the following configuration parameters via the QVD Admin command line utility (you could also use WAT):
# qa4 config set tenant_id=-1,key=vm.hypervisor,value=lxc
# qa4 config set tenant_id=-1,key=vm.lxc.unionfs.bind.ro,value=0
# qa4 config set tenant_id=-1,key=vm.lxc.unionfs.type,value=unionfs-fuse
# qa4 config set tenant_id=-1,key=command.unionfs-fuse,value=/usr/bin/unionfs
In SLES, the binary unionfs is provided by QVD and is found in /usr/lib/qvd/bin/unionfs, so the last command in the previous list should be modified to reflect this path .
Be aware that once these QVD system parametershave been reestablished, you will have to restart the HKD in each one of your QVD Server nodes:
# /etc/init.d/qvd-hkd restart
Assuming that you have configured your network correctly, QVD should be able to load and execute LXC images.
3.4.1. LXC control groups (cgroups)
The QVD containers use cgroups (control groups), a characteristic of the Linux kernel designed to limit the use of resources of the process groups in the system. A system of virtual files is mounted under the directory /sys/fs/cgroup in which several controllers can be configured, known as subsystems. This directory can be changed modifying the configuration path.cgroup in the QVD database, although this should not be necessary.
By default, the subsystems cpu of the container are placed under the directory by default /sys/fs/cgroup/cpu. This behaviour is controlled by the QVD configuration path.cgroup.cpu.lxc which is defined by default as follows:
path.cgroup.cpu.lxc=/sys/fs/cgroup/cpu/lxc
Again, it should not be necessary to change this in a default installation.
3.4.2. Loading LXC images in QVD
The standard QVD administration tools, like the WAT and the QVD command line administration utility, can be used to load an LXC image in QVD. The important difference here is that the file will take the form of a compressd file with tar-gzip, unlike a qcow2 image. It is absolutely imperative that the environment has been preconfigured for LXC virtualization, or the images will be copied to the incorrect folder and they will not be loaded when a virtual machine is started.
To load a LXC image in QVD from the command line, you should perform the following steps:
Add an OSF to lodge your image file:
# qa4 osf new name=MyOSF
Now add your disk image to the OSF
# qa4 di new path=/var/lib/qvd/storage/staging/my_image.tar.gz,osf=MyOSF
This will take some time, since the image will be copied from the preparation directory in the images directory.
Now add a user to be able to test the image
# qa4 user new name=test,password=test
Finally, create a Virtual Machine for the User and attach the OSF that this Virtual Machine will use in execution time
# qa4 vm new name=TestVM,user=test,osf=MyOSF
If your installation of QVD is correctly configured, you will now be able to start the virtual machine and test it.
3.4.3. Starting an LXC virtual machine
Starting an LXC virtual machine inside QVD is no different from starting a KVM virtual machine. It can be manually started via the QVD command line administration utility or started automatically through HKD when a client tries to connect to the virtual desktop managed by the virtual machine. For testing purposes, in general it is advisable to start the virtual machine from the command line:
# qa4 vm name=TestVM start
You can supervise the starting process from the WAT listing the status of the virtual machine.
# qa4 vm name=vmTest get
.-------+--------+--------+---------+--------+-----------------+-------------------------------+-------------+-------------+-------------------------------+---------+--------------.
| id    | tenant | name   | blocked | user   | host            | di                            | ip          | ip_in_use   | di_in_use                     | state   | user_state   |
+-------+--------+--------+---------+--------+-----------------+-------------------------------+-------------+-------------+-------------------------------+---------+--------------+
| 19165 | testin | vmTest |       0 | testin | qvd-host-node-9 | 90191-Desktop_Standard.tar.gz | 10.2.153.13 | 10.2.153.13 | 90191-Desktop_Standard.tar.gz | running | disconnected |
'-------+--------+--------+---------+--------+-----------------+-------------------------------+-------------+-------------+-------------------------------+---------+--------------'
As the virtual machine starts, its status will change. If the virtual machine is started without any problems, you should check that you are able to connect to it via the QVD client and that the virtual desktop is processed. If the virtual machine is not started correctly or you cannot access the virtual desktop, it is possible that you will have to do some debugging.
3.4.4. Access to a virtual machine LXC for debugging
Since in reality it is possible to access the filesystem of an LXC image in execution directly from the host operating system, it is possible to review the log files and do a great deal of debugging directly from the host where the virtual machine is being executed. It is important to note, however, that it is highly inadvisable to try any writing operation in the filesystem of a container in execution.
When an LXC virtual machine is started, its several components are combined using unionfs and they are mounted in the folder rootfs in the storage area of QVD (generally /var/lib/qvd/storage/rootfs). Inside this space, it is possible to see the status of an instance in execution in real time. This means that you can quickly access the log files and the configuration information from the operating system of the host. This is often the best way to quickly debug the problems inside an instance in execution.
If this is not enough, you can also connect to the instance with ssh through the IP of the same. Obtain the IP of the VM using a command like:
# qa4 vm name=test get
.-------+--------+--------+---------+--------+-----------------+-------------------------------+-------------+-------------+-------------------------------+---------+--------------.
| id    | tenant | name   | blocked | user   | host            | di                            | ip          | ip_in_use   | di_in_use                     | state   | user_state   |
+-------+--------+--------+---------+--------+-----------------+-------------------------------+-------------+-------------+-------------------------------+---------+--------------+
| 19165 | testin | vmTest |       0 | testin | qvd-host-node-9 | 90191-Desktop_Standard.tar.gz | 10.2.153.13 | 10.2.153.13 | 90191-Desktop_Standard.tar.gz | running | disconnected |
'-------+--------+--------+---------+--------+-----------------+-------------------------------+-------------+-------------+-------------------------------+---------+--------------'
Once you have the IP, you will be able to execute the ssh command to access the virtual machine.
3.5. Creation of LXC disk images
To obtain more information, check the disk images creation guides.
4. Authentication
Although QVD provides its own framework of authentication, which stores users in the QVD database, it is pretty common to use another framework of authentication so that changes in the users passwords, etc. do not need to be replicated inside QVD-DB. QVD provides a certain level of integration with external resources. In this chapter, we will explore two of the most common integration requirements, and the level of support offered by QVD for these authentication frameworks.
4.1. LDAP integration and Active Directory
The most used authentication framework is LDAP, and QVD is compatible with LDAP. This includes the compatibility with Active Directory that makes use of versions 2 and 3 of LDAP.
4.2. LDAP integration and Active Directory
The most used authentication framework is LDAP, and QVD is compatible with LDAP. This includes the compatibility with Active Directory that makes use of versions 2 and 3 of LDAP.
4.3. Two-factor authentication 2FA
This module is used to authenticate users using TOTP on top of any other password based authentication mechanism (i.e. using the default or LDAP plugins).
The module breaks the string introduced by the user into the client password field into a password and a token.
The password is then handled by any other configured plugin and the token checked using the TOTP algorithm.
The user secret must be stored as the user property C<l7r.auth.plugin.totp.secret32> encoded in base32. The companion program L<qvd-make-totp-secret> can be used to create the secret and to send it to the user as a QR-code by e-mail.
Parameters
The following configuration settings can be used to customize the plugin:
item l7r.auth.plugin.totp.token_size
size of the token (defaults to six characteres).
item l7r.auth.plugin.totp.interval
Duration of the TOTP interval (defaults to 30 seconds).
item l7r.auth.plugin.totp.t0
Reference t0 value for the TOTP calculation as an offset from the Unix epoch (defaults to zero).
item l7r.auth.plugin.totp.leeway
For how many intervals the token remains valid (defaults to one).
Note that the default options are those used by common services as Google Authenticator.
4.3.1. Test your LDAP server
Before trying to configure QVD to authenticate against LDAP or Active Directory, it is recommendable to test your server first to make sure that it has the correct credentials and the distinctive name (DN) for the server. To do this, you will have to have ldap-utils (Ubuntu) or openldap2-client (SLES) installed in your QVD node.
Once this is done, consult your server with the following command for LDAP:
# ldapsearch -xLLL -H ldap://example.com -b"dc=ejemplo,dc=com" cn=admin cn
If you use Active Directory, use this command instead:
# ldapsearch -LLL -H ldap://example.com: 389 -b 'dc=ejemplo,dc=com' \
-D 'EJEMPLO\jdoe' -w 'password' '(sAMAccountName=jdoe)'
In any case, modify your consultation to make it coincide with the one of its own server. Check the results of the LDAP consultation to make sure that connection to your LDAP server is possible from your QVD nodes.
4.3.2. Configuration of QVD for the LDAP authentication
The LDAP authentication is configured inside QVD through the configuration in the QVD database. This can be doneusing the QVD CLI administration utility or the WAT.
# qa4 config set key tenant_id=-1,=l7r.auth.mode,value='ldap'
# qa4 config set key tenant_id=-1,=auth.ldap.host,value='ldap://example.com:389'
# qa4 config set key tenant_id=-1,=auth.ldap.base,value='dc=example,dc=com'
In the previous example, we have changed the QVD authentication mode to LDAP, establishing the LDAP host to example.com and the port 389. The basedn has also been established where all the users to dc=example,dc=com will be searched. With these basic elements of configuration, QVD will search in the LDAP directory a coinciding user name, and then, it will make a BIND against that user with the credentials supplied by the client. By default, the search is done with scope base`and filter `(uid =% u). Using our example of the previous host, a client with the user name defined as guest would need a correspondent entry `uid=guest,dc=example,dc=com`inside the LDAP server that is executed in the host example.com available in the port 389. You can change the scope and the filter configuration for the search, to let QVD scan other branches and attributes to find a coinciding user:
# qa4 config set key tenant_id=-1,=auth.ldap.scope,value=sub
# qa4 config set key tenant_id=-1,=auth.ldap.filter,value='(|(uid =%u)(cn=%u))'
The previous examples change the default search range for the authentication LDAP to sub and the filter will perform the search to coincide with the users with the uid or the cn the same as the given user’s name.
4.3.3. QVD configuration for the Active Directory configuration
The Active Directory configuration is similar to the LDAP configuration, but with a little adjustment in the parameter auth.ldap.filter as follows:
# qa4 config set key tenant_id=-1,=l7r.auth.mode,value='ldap'
# qa4 config set key tenant_id=-1,=auth.ldap.host,value='ldap://example.com:389'
# qa4 config set key tenant_id=-1,=auth.ldap.base,value='OU=People,DC=example,DC=com'
# qa4 config set key tenant_id=-1,=auth.ldap.scope,value='sub'
# qa4 config set key tenant_id=-1,=auth.ldap.binddn,value='CN=Administrator,CN=Users,DC=example,DC=com'
# qa4 config set key tenant_id=-1,=auth.ldap.bindpass,value='password'
# qa4 config set key tenant_id=-1,=auth.ldap.filter,value='(sAMAccountName=%u)'
Here QVD coincides with the user’s name in sAMAccountName that is the login name for the user of Windows.
4.3.4. Limitations
Although it is trivial that QVD authenticates the users against LDAP, it still needs to create users coinciding inside its QVD-DB to assign virtual machines for them. The ‘Auto Plugin` discussed in the following section lets you provide users and assign to them a default virtual machine automatically when logging in. The QVD tools that let you change the users’ passwords inside QVD do not update LDAP passwords, since this can affect the functioning of other installations inside its infrastructure. Although these tools will say that they were successful changing the password, it is important to understand that the password that has been changed is the one stored in QVD-DB for the user, and not the password inside the LDAP directory. If you use the LDAP authentication, the logging in process completely ignores the passwords stored in QVD-DB. The changes in password are done through the tools that you generally use to administrate users.
4.3.5. LDAP reference
-
l7r.auth.plugins (Required). Establish "ldap" to enable this functionality.
-
auth.ldap.host (Compulsory). It can be a host or an LDAP url as specified in Net::LDAP
-
auth.ldap.base (Compulsory). The search base where you can find users with the auth.ldap.filter (see below)
-
auth.ldap.filter (Optional. By default (uid =%u)). The chain %u will be substituted by the log in name.
-
auth.ldap.binddn (Optional. Empty by default). The initial link to find users. By default, the initial link is made as anonymous unless this parameter is specified. If it contains the chain %u, it is substituted by the login
-
auth.ldap.bindpass (Optional. Empty by default). The password for the binddn
-
auth.ldap.scope (Optional. Base by default). Check the attribute Net::LDAP scope in the search operation. If it is empty, the password used during authentication will be used.
-
auth.ldap.userbindpattern (Optional. Empty by default). If it is specified, an initial bind is tried with this chain. The attribute of the login is substituted by %u.
-
auth.ldap.deref (Optional. Never by default). As the aliases are dereferenced, the accepted values are never, search, find and always. See Net::LDAP for more information.
-
auth.ldap.racf_allowregex (Optional. Not established by default). This is a regex to allow authentication of some RACF Error Codes. A configuration example would be "^R004109". One of the most common cases is R004109 which returns an ldap code 49 (invalid credentials) and a text message like "R004109 The password has expired (srv_authenticate_native_password))". If you do not have RACF this probably is not for you.
Examples of RACF errors (with their original text): * R004107 The password function failed; not loaded from a program controlled library. * R004108 TDBM backend password API resulted in an internal error. * R004109 The password has expired. * R004110 The userid has been revoked. * R004128 Native authentication password change failed. The new password is not valid or does not meet requirements. * R004111 The password is not correct. * R004112 A bind argument is not valid. * R004118 Entry native user ID (ibm-nativeId,uid) is not defined to the Security Server.
4.3.6. Authentication algorithm
If auth.ldap.userbindpattern is defined, a bind is attempted with this DN substituting %u for the login. If this is successful the user is authenticated and if it does not work we try the following steps:
-
If it is defined auth.ldap.binddn, we try a bind as such user.
-
If it not defined, we try the bind as an anonymous user.
-
We look for the userdn, with the specified search route in auth.ldap.base and the filter of user specified as Auth.ldap.filter.99
-
In auth.ldap.filter we substitute %u for the name of login.
-
If a user is not found, the authentication fails.
-
If a userdn is found we try a bind with that user.
Automatic plugin of user provisioning ~~~~~~~~~~~~~~~~~~ When a different authentication mechanism is used, like the authentication plugin LDAP, a common requirement exists for users that have been authenticated against the provided plugin. The Auto Plugin has been designed to satisfy this requirement. When QVD is configured to authenticate in an external source, like LDAP, there is usually no register for the users who login. If the Plugin Auto is set up, the user register is automatically created. The user registers created in this way are provided with a default virtual machine, as specified in the plugin configuration. To set up the plugin, add "auto" to the list of plugins set up in the L7R configuration:
# qa4 config set key tenant_id=-1,=l7r.auth.plugins,value=auto,ldap
Take into account that in the previous example, we are using the plugin auto in conjunction with the LDAP authentication plugin. Now you will need to indicate the automatic complement that OSF will use when creating a virtual machine for the user:
# qa4 config set key tenant_id=-1,=auth.auto.osf_id,value=1
In this case, the new users that authenticate with LDAP will obtain a VM with the ID of OSF that we have specified. It is also possible to force the use of a disk image DI Tag. This can be done adjusting the following configuration option:
# qa4 config set key tenant_id=-1,=auth.auto.di_tag,value="prueba"
A typical example to use the LDAP plugin and the auto plugin together would require to execute the following commands:
# qa4 config set key tenant_id=-1,=l7r.auth.plugins,value=auto,ldap
# qa4 config set key tenant_id=-1,=auth.ldap.host,value='ldaps://myldap.mydomain.com:1636'
# qa4 config set key tenant_id=-1,=auth.ldap.base,value='ou=People,dc=example,dc=com'
# qa4 config set key tenant_id=-1,=auth.ldap.scope,value=sub
# qa4 config set key tenant_id=-1,=auth.ldap.filter,value='(&(objectClass=inetOrgPerson)(cn=%u))'
# qa4 config set key tenant_id=-1,=auth.auto.osf_id,value=1
Tip: use inverted commas between any of the special characters that can be subject to expansion shell or that can be interpreted in an unexpected way, like pipes, brackets, ampersand, etc…
This would mean that as authenticated user for the first time, using QVD they would authenticate using its LDAP repository and would automatically obtain a default desktop to start work immediately.
Load balancing
1. Introduction
QVD is designed to be used in a load balancing environment. Given that a usual installation makes use of several QVD server nodes to execute all the virtual machines, it is common that the clients connect to these through a hardware balancer. Since the virtual machines can be executed in any node, and the clients can be connected to any node, the L7R of QVD makes a bridge connection with the correct node. In fact, given that each node has limited resources, the virtual machines in execution must be equally distributed to maximize the resources of the system through the farm of server nodes.
If a virtual machine is not being executed for the user connecting, the L7R determines which serve node is the most appropriate to start a new virtual machine for that user. QVD uses its own load balancing algorithm to determine which node must be used for the new virtual machine. This algorithm evaluates which node has most free resources, calculated as the weighted sum of free RAM, CPU not used and a random value to bring some entropy to the result. Once the best server node has been selected, the QVD-DB is updated to indicate that the virtual machine must be started in this server node and the virtual machine is automatically started by the HKD of the node. All this process is known as QVD Load Balancing and is used for the virtual machines to be equally distributed in all the server nodes. This maximizes the available resources to any virtual machine, providing in this way the best functionality.
2. QVD health checking
When using an external load balancer to steer the traffic to the different QVD server nodes, generally some method to check the state is needed against each of the instances of HKD. The L7R component includes a service of health checking that answers through HTTP. You will normally need to configure your load balancer to make a HTTP GET in the URL: https://hostname/qvd/ping where hostname is the name of host or IP for the instance of server node. The checking will return a text chain with the content "I’m alive!" if the server is healthy and available. Some of our users take advantage of the load balancer software provided by Linux Virtual Server (LVS). An example of the configuration required in the file Ldirectord.cf :
autoreload = no
checkinterval = 1
checktimeout = 3
negotiatetimeout = 3
logfile="/var/log/ldirectord.log"
quiescent = yes
virtual = 150.210.0.72:8443
    checkport = 8443
    checktype = negotiate
    httpmethod = GET
    protocol = tcp
    real = 150.210.4.1:8443 gate 10
    real = 150.210.4.2:8443 gate 10
    receive = "I am alive!"
    request = "/qvd/ping"
    scheduler = wlc
    service = https
3. Change of the deliberation in the load balancer of QVD
The default QVD load balancer algorithm calculates the current load of the system for each of the server nodes available multiplying the available RAM, available RAM and a random number with the objective of punctuate each system in the cluster. As we have already mentioned, these numbers are pondered, so you can alter the functions of the load balancer.
Increasing the weight of the variable RAM in the algorithm will make the load balance when adding priority to systems with more available RAM.
Increasing the weight of the variable CPU in the algorithm will make the load balance to add precedence to the systems with more available CPU.
Increasing the weight of the random variable in the algorithm will make the load balance increase the probability of choosing a random server. These weights are controlled as configuration settings inside QVD-DB and be altered through the QVD command line administration utility and the WAT:
# qa4 config set key tenant_id=-1,=l7r.loadbalancer.plugin.default.weight.cpu,value=3
# qa4 config set key tenant_id=-1,=l7r.loadbalancer.plugin.default.weight.ram,value=2
# qa4 config set key tenant_id=-1,=l7r.loadbalancer.plugin.default.weight.random,value=1
In the previous example, we have assigned more weight to the resources of the CPU, slightly less to the RAM and even less to the randomizer. This will give as a result machines that are being started in the server nodes and that tend to have more available CPU resources.
3.1. Creation of a customized QVD load balancer
Due to the fact that QVD is an open source product built mostly in Perl, it is relatively simple to build your own customized QVD load balancer that uses whichever algorithm you wish. A typical case would be one in which you have a dedicated set of server Nodes that your prefer to use over any other set. QVD has a system of plugins for load balanceing. A load balancer plugin is a plugin of the subclass of QVD::L7R::LoadBalancer::Plugin that has to be inside the packet QVD::L7R::LoadBalancer::Plugin.
3.1.1. API for plugins
get_free_host($vm) = $host_id
It returns the id of the node in which the virtual machine has to be started $vm. A load balancer has to implement at least this method. The parameter $vm is an object QVD::DB::Result::VM. It gives access to the attributes and properties of the virtual machine. The attributes and properties of the user of the VM and OSF can be accessed through $vm→user and $vm→osf respectively. Other data can be accessed through QVD::DB.
Init()
Starts the load balancer. Use this if your load balancer has to be configured, for example loading a persistent cache.
3.1.2. Minimum example: random assignation
This load balancer assigns virtual machines to random backend nodes.
Operating System Flavours and virtual machines
1. Introduction
An OSF (Operating System Flavour) is really made up of two elements: a DI (Disk Image), and some execution time parameters that are stored in the QVD-DB when the disk image is loaded in QVD using the WAT or the command line.
QVD uses DIs to serve groups of users that make use of a common set of applications. With the use of a single image for each group of users, it is easier to administrate desktop environments for all the users. It also improves security in general, since it can be applied to different policies for each group of users. In this way, if a group of users requires a particular application, it can be installed once and the change will be applied to all the users that share the same DI.
Equally, a desktop application can be deleted for a complete group. The DI can be duplicated easily, so it can quickly create environments for different subsets of users. When copying a base image, you can edit the copy and provide additional applications or other customizations to a second group of users without having to repeat the installation of a complete operating system. In this way, QVD can enormously reduce administration and maintenance, improve the conformity with the desktop and make the implementation of security policies easy.
For more details, please read the manual about creation of disk images.
2. Life cycle of images and VMs
QVD facilitates the updating and modernization of the disk images. In a few words an image can be updated and the virtual machines that are executing it marked with an expiry date. This way the administrator can be sure that the users will start to execute the last disk image from a date. The necessity of this characteristic is evident when we consider a scenario where the user is connected to a virtual machine, but a new DI is available. Disconnecting the user at random is not desirable and here is where the characteristic shows its value.
The limits of expiry can be configured as hard and soft. The soft limits can be established to activate the hook`or mechanism chosen by the administrator to alert the user of the necessity of logging out as soon as possible. The good thing about the `soft limits is that they are extremely flexible: the hook`can be any executable of Linux, which means that the administrator chooses how they want to react to the `soft limit that is approaching.
Contrarily, the hard limits are a much more simple proposal. For the users who choose to ignore the logging out requests, the hard limits provide an option to restart a virtual machine in a forced way. This means that the administrator can establish a limit to guarantee that all the users are using the latest disk image with the new characteristics and security updates that they consider necessary.
The expiry limits can be established in the WAT (check the documents about this tool).
It can also be done through the qa4:
# qa4 vm di_id=1000 set expiration_soft=now
The date and hour parameters are quite flexible, accepting the same formats that the command at. The manual page at describes this in more detail:
At  allows  fairly  complex  time specifications, extending the POSIX.2
standard.  It accepts times of the form HH:MM to run a job at a specific time
of day.  (If that time is already past, the next day is assumed.)  You may also
specify midnight, noon, or teatime (4pm) and you can have a time-of-day
suffixed with AM or PM for running in the morning or
 the evening.  You can also
say what day the job will be run, by giving  a  date  in  the  form month-name
day  with  an  optional year, or giving a date of the form MMDD[CC]YY,
MM/DD/[CC]YY, DD.MM.[CC]YY or [CC]YY-MM-DD.  The specification of a date must
follow the specification of the time of day.  You can also give times like now
+ count time-units, where the time-units can be minutes, hours, days, or weeks
and you can tell at to run the job today by suffixing the time with today and
to run the job tomorrow by suffixing the  time  with tomorrow.
|
|
The expiry of virtual machines is designed to be updated to the latest version of a disk image. In fact, in the WAT, when the image tags are updated, and such change affects the virtual machines in execution, the administrator is automatically invited to set an expiry date for such virtual machines. However, it can also be used to set random limits in the connection time to the virtual machines as determined by the administrator. |
2.1. Setting expiry limits
The expiry limits for a virtual machine are optional and can take the form of the soft`and hard limits, set using the arguments expire-soft and expire-hard. One or both can be configured. The limits will usually be set when relabelling the disk images that affect virtual machines through the WAT.
But they can also be set in the command line:
# qa4 vm di_name=1000-ubuntu-13-04.tar.gz set expiration_soft=now expiration_hard=tomorrow
Total: 3
In this case, all the virtual machine in execution that use such disk image will have its expiry dates established in now for soft and tomorrow for hard.
|
|
In the WAT the dates can be chosen in a calendar, for the convenience of the administrator. |
The limits can also be set directly on virtual machines, without taking into account the id they use:
# qa4 vm id=15 set expiration_soft=now
Total: 1
|
|
The expiry hard and soft times are deleted when the virtual machine it restarted, regardless of whether the assigned time has been reached or not. |
2.2. Limit of Soft Expiry
The House Keeping Daemon or HKD keeps tabs on the state of the virtual machines and supervises the expiry times. When a soft limit is reached, the HKD will alert the virtual machine through the virtual machine’s agent (VMA) that is executed inside each virtual machine. If it is configured, the VMA will call the hook (an executable of the administrator’s choice) that will be executed asking the user to log out (for example).
The HKD will continue to monitor the expiry limits of a virtual machine at hourly intervals. If the limit still exists, which means that the virtual machine has not been restarted, it will alert the VMA again, which at the same time will call the appropriate executable and will continue to do it until the limit has been eliminated.
2.2.1. Configuration of the DI
The settings of the soft limit are not enabled by default in QVD 4.1. Configuring the VMA and deciding about the action to do when a soft limit is reached is a task for the creator of the image.
Configuration of VMA
To configure the VMA to act on a soft expiry limit, the following line /etc/qvd/vma.conf must be specified in the disk image:
vma.on_action.expire = <path to executable>
Hooks of the VMA for expiry
Since the life cycle of the images in QVD is designed to be as flexible as possible, the form in which the virtual machine interacts with the user is entirely the responsibility of the administrator. Here, we offer a simplified example of a hook that the QVD VMA could call:
-
The first script, hook.sh, identifies the user that executes the local desktop in the virtual machine that later calls a second script notify-user.sh.
-
notify-user.sh is executed as that user and at the same time it invokes a pop-up window xmessage in the desktop to request the user to restart.
-
the option the user selects determines the return code: if it is 0, a restart is executed, if not, the script finishes.
|
|
This is only a simple example of a QVD expiry hook to give the reader an idea of the concept. It is not designed for use in a production environment. In the real world, you would probably want to determine if the script has already been called and it has not received an answer from the user yet, to avoid a proliferation of xmessages. |
2.3. Limit of Hard Expiry
The hard expiry limits work similarly to the soft limits, with a significant difference. Instead of calling an executable to perhaps ask for or notify a user of an imminent restart, the HKD simply restarts the machine.
3. Manual update of images
3.1. KVM
The procedure described here must not be executed on an image that is being used by virtual machines. You must stop all these images before (manually or through expiry limits) and block them so they are unable to start, before performing it. You can also, of course, make a copy of the image and work on it, without interrupting the work of its users.
Once all the virtual machines have been stopped, or when the copy has been finished, execute the image inside KVM.
In Ubuntu, you can execute it like this:
# kvm -hda example.img -m 512
And in SLES:
# qemu-kvm -hda example.img -m 512
KVM will load a virtual machine and will let you start as the user you created when you installed the operating system. Now you can perfrom any administration task as this user.
When you have finished any task in the image, stop it. You can mark the virtual machines that require access to the image as "unblocked" and let them start or add the image as if it was new, and modify the labels accordingly. If you do it through the WAT, it will automatically offer to expire the virtual machines whose labels have been affected, and this will oblige the users to update depending on the limits that you set.
3.2. LXC
The condition of the previous section is repeated here. You should not make any changes on an image that is being used, since it will cause instabilities in the solution. Stop the pertinent machines or make a copy of the image that you want to modify.
Once you have done this, check the LXC container that you wish to edit in the shared storage inside the directory basefs (if you have stopped the machines, and if not where you have copied the image). Depending on your requirements, you can use chroot in the directory and work directly inside it as necessary or you can load an instance of LXC. Since loading an image in an instance LXC separately generally requires that you correctly configure the network and provide a configuration file, it is generally recommended to try to make modifications in an image using a chroot.
The following example shows how you can use bind mounts and chroot to access an LXC disk image to perform updates:
# mount -o bind /proc /var/lib/qvd/storage/basefs/1-image1.tgz/proc/
# mount -o bind /dev /var/lib/qvd/storage/basefs/1-image1.tgz/dev/
# mount -o bind /sys /var/lib/qvd/storage/basefs/1-image1.tgz/sys/
# chroot /var/lib/qvd/storage/basefs/1-image1.tgz
#
When you have finished making changes, remember to close and dismount the bind mounts:
# exit
# umount /var/lib/qvd/storage/basefs/1-image1.tgz/proc
# umount /var/lib/qvd/storage/basefs/1-image1.tgz/dev
# umount /var/lib/qvd/storage/basefs/1-image1.tgz/sys
#
When you finish, try to start one of the VMs that use the image that you have just modified, or load it as a new image if you had made a copy so as not to disconnect users.
If everything has gone well, mark the virtual machines that require access to the image as "unblocked" or in the case of having made a new image, update the tags.
It is important to test the LXC image after making changes to make sure that nothing has changed a configuration that can have direct access to the hardware. The packets that have udev as a dependency can often give problems if measures have not been taken to avoid udev being executed.
4. VMA HOOKS
4.1. Introduction
The hooks of the VMA can be configured inside a DI to activate the functionality inside a virtual machine when events related with QVD are produced. This lets it automatically modify the behaviour of the platform to adapt the operating system to the particular requirements related to the clients and solve concrete problems.
The hooks are added as configuration entries inside the VMA configuration file in the underlying DI. So, editing the file `/etc/qvd/vma.conf and adding a similar entry to the following:
vma.on_action.connect = /etc/qvd/hooks/connect.sh
It is possible that the sequence of commands /etc/qvd/hooks/connect.sh will be executed every time that a user connects to the virtual machine.
It is also possible that QVD provides scripts with command line parameters that are specific to QVD, as for example:
-
Changes of state, actions or the process of provisioning that has activated the call to the hook.
-
Properties of the virtual machine defined in the administration database.
-
Parameters generated by the authentication complements.
-
Parameters of connection of the user.
-
Parameters provided by the client programme.
The hooks have their own log file, stored in /var/log/qvd/qvd-hooks.log in the virtual machine. This makes it possible to see which hooks have activated scripts to execute and debug any unusual behaviour.
4.2. Action hooks
Action hooks are executed every time a particular action is started.
If the hook fails with an error code different from zero, the action will be aborted.
All the action hooks receive these parameters:
-
qvd.vm.session.state: current state of the server X-Windows
-
qvd.hook.on_action: Action that activates the hook.
4.2.1. connect
Key: vma.on_action.connect
This hook is executed when a user starts (or restarts) a session of X-Windows using the QVD Client. The script will be executed after all the supply hooks have been activated.
They also receive the following parameters by default:
-
qvd.vm.user.name: the login of the user.
-
qvd.vm.user.groups: groups to which the user belongs.
-
qvd.vm.user.home: the directory of the user in /home.
This hook is able to receive other connection parameters and any additional parameter assigned to the VM inside the QVD-DB.
4.2.2. pre-connect
Key: vma.on_action.pre-connect
This hook is executed when a user starts (or restarts) a session of X-Windows using the QVD Client, with the difference that it will activate a script to be executed before any of the supply hooks are implemented.
The parameters for pre-connection are the same as those for connection.
4.2.3. stop
Key: vma.on_action.stop
This hook is executed when a session of X-Windows receives a request to be closed. This behaviour is usually produced when the VMA receives a request of this type from the QVD-WAT or from the QVD CLI administration utility.
There are no additional parameters for this hook.
4.2.4. suspend
Key: vma.on_action.suspend
This hook is executed when a session of X-Windows is suspended. This usually occurs if a user closes the QVD client application.
There are no additional parameters for this hook.
4.2.5. power off
Key: vma.on_action.poweroff
This hook is executed when a virtual machine is closed.
There are no additional parameters for this hook.
4.2.6. expire
Key: vma.on_action.expire
This hook`is executed when a `soft expiray limit is executed in the virtual machine. Usually, this will be used to ask the user to restart as soon as possible to update a disk image.
There are no additional parameters for this hook.
|
|
There is no hook for the hard expiray limit, when the limit is reached the HKD will forcibly restart the virtual machine. |
4.3. State hooks
The state hooks are executed when changes inside the X-Windows session are produced. These hooks always receive the parameter qvd.hook.on_state with the current state X-Windows.
4.3.1. connected
Key: vma.on_state.connected
This hook is executed once a connection between the QVD Client and the server X-Windows, which is executed in the virtual machine, has been correctly established.
4.3.2. suspended
Key: vma.on_state.suspended
This hook is executed once the user closes the QVD Client and the X-Windows session is in a suspended state.
4.3.3. disconnected
Key: vma.on_state.disconnected
This hook is executed when the X-Windows session is finished.
4.4. Supply hooks
The supply hooks receive the same parameters that are available for the action hook connect.
4.4.1. add a user
Key: vma.on_provisioning.add_user
When a user is connected for the first time. If the user does not exist yet, a new account is created for him in the virtual machine.
By default, the account is created with the command useradd.
The hook add_user lets an administrator modify this process and create the user account using an alternative method or a command sequence.
4.4.2. after_add_user
Key: vma.on_provisioning.after_add_user
Once the user account is created, this hook can be used to perform additional actions related to the configuration of the user account inside the virtual machine, such as the automatic configuration of an email client or other similar tasks.
4.4.3. mount_home
Key: vma.on_provisioning.mount_home
By default, QVD mounts the first partition of the configured device with the entry vma.user.home.drive in the directory "/home" where the main user directory is created (by the hook add_user). If the partition does not exist, it is created on the fly.
With this hook it is possible to change this process to produce any other behaviour, such as mounting a directory /home from a server NFS.
Operational procedures
In this part of the manual, we will cover some topics related to the daily operating procedures, such as backup copies and logs, together with some of the most frquently used commands in QVD to control a server node or the carrying out of basic administrative tasks.
1. Backup copies
1.1. QVD-DB backup copy
Since QVD makes use of the database of PostgreSQL, the backup copy of its QVD data can be done with standard commands of backup copy and restoration of PostgreSQL.
To make a backup copy of its database, you can simply execute the following command to save the content of the database in the file qvddb.sql:
# sudo su - postgres
# pgdump qvd > qvddb.sql
Restoring the database is as simple as channelling the SQL content again against the pgsql client:
# sudo su - postgres
# pgsql qvd < qvddb.sql
PostgreSQL also gives you ability to channel the content of a database to another, so it is relatively simple to replicate the database:
# pgdump -h host1 qvd | pgsql -h host2 qvd
For more complex requirements of backup copy, directly check the documents about PostgreSQL in http://www.postgresql.org/docs/8.3/static/backup-dump.html to obtain more information.
Remember that once you have dumped your database to afile, you must make a backup copy of the file following your usual backup strategy.
You can also find useful to make backup copies of the database configuration files, so if you need to reinstall and configure your database, you can quickly do so and with the available configuration data. In the Ubuntu systems, these files are usually in /etc/postgresql/9.3/main. In SUSE Linux, you will find them in /var/lib/pgsql/data.
1.2. Backup copy of the shared storage
All the disk images of QVD, personal user directory and overlay data are usually stored in some way on accessible shared storage through a protocol exchange of network files such as NFS, GFS or OCFS2. Although the specific data, such as the overlay data and the stored images in the directory of staging, are not critical during a disaster recovery, we recommend that this data be supported together with the active disk images and the personal directory of the user if possible.
Understanding how the files are stored in the shared storage to which QVD accesses will help you plan a reasonable backup copy strategy. To obtain more information, check the section titled Shared storage.
1.3. Backup copy of configuration files
Since most of the configuration data of QVD is stored in the database and the QVD configuration files are relatively simple to create, they are not usually considered a priority in a backup copy strategy, However, for almost all the components inside the QVD infrastructure, the configuration files are stored in /etc/qvd. Take into account that all the QVD server nodes must have identical configuration files (except for the hostname parameter), so you do not have to store more than one copy.
2. Logging
2.1. Registers of the database
Since QVD makes use of the Open Source database PostgreSQL, the logging options are controlled editing the configuration files of PostgreSQL. To change the logging parameters, check the documentation of PostgreSQL in: http://www.postgresql.org/docs/8.3/static/runtime-config-logging.html
In Ubuntu, PostgreSQL keeps the database logs in: /var/log/postgresql/. In SUSE, PostgreSQL keeps them in: /var/lib/pgsql/data/pg_log.
|
|
If you are new to PostgreSQL, you can find the pgAdmin useful, especially designed to supervise the server state, the logs and the transactions. You can obtain more information about the tool in http://www.pgadmin.org/ |
2.2. Registers of QVD server node
The QVD server nodes also save their own log files. These are usually found in /var/log/qvd.log. The exit and facilities are controlled using the module of logging for perl Log4perl. The configuration of the QVD log can be controlled setting some configuration parameters. These are treated in more depth in the section of Log Configuration.
2.3. Registers of the QVD virtual machine
The VMA is installed in the disk image that is used for each virtual machine when it is started. By default, the VMA will write its logs locally in the virtual machine, but it can be optionally configured to log in with a daemon compatible with syslog in the host node or in a remote server.
2.3.1. Local register
If the log is not configured in the vma.conf of a virtual machine, it will remain registered by default in its own file in /var/log/qvd.log inside the virtual machine. This can be explicitly established, or changed, inside the file vma.conf in the the following way:
log.level = DEBUG
log.filename = /var/log/qvd/qvd.log
The level of the log itself can be one of ALL, DEBUG, INFO, WANR, ERROR, FATAL, OFF.
|
|
Any content that is not user’s data that is written in the disk inside a virtual machine will make use the overlay capacities provided by QVD. |
To review the log data written in a file inside a virtual machine, you will need to have access to the virtual machine in execution through the console:
# qa vm console -f id=1
|
|
See that this is the qa legacy utility. The new qa4 utility does not support this function and it is not expected to do so. |
If you are using LXC virtualization, it is often easier to access the log files directly from the server node where it is being executed. Remember that for an environment in execution, its filesystem is built as it is started and is mounted in /var/lib/qvd/storage/rootfs. This means that for any virtual machine it is possible to directly see the log files from the main host where it is being executed:
# tail /var/lib/qvd/storage/rootfs/1-fs/var/log/qvd.log
QVD also stores a backup copy of the overlay for any LXC virtual machine that is not correctly started. These security copies can be seen in /var/lib/qvd/storage/overlayfs and are usually saved with the prefix deleteme-, following a similar convention to the one followed for the successful naming of overlays. To obtain more information, seeoverlayfs.
2.3.2. Remote register
Registering the activity remotely in a daemon that supports the syslog protocol can be desirable for several reasons. Firstly, it maintains the logs for all the virtual machines that have been configured like this in a place where access to the logs is easier and more logical. Secondly, in a situation in which the administrator may not have access the log of a virtual machine for some reason, for example, if it not being started, remote logging can help to identify the problem.
To configure remote logging, you will need a configured remote logging server and make some changes inside the disk image, in the file vma.conf of QVD and in the syslog configuration to send syslog messages to the remote logging server.
To show this we will use the link Rsyslog, which has become the default logging utility for many of the main distributions of Linux in recent years, including Ubuntu, SUSE and Red Hat, and it is reliable and easy to configure. Since QVD uses Log4perl, it should be independent from the destination logging daemon, so it could use these instructions with syslog-ng among other alternatives if necessary.
If rsyslog is not available in its server, install it the following way for Ubuntu:
# apt-get install rsyslog rsyslog-relp
Or, if it uses SUSE:
# zipper in rsyslog rsyslog-module-relp
|
|
This will probably uninstall any other conflicting syslog program that you have, so make sure that this is acceptable for the machine (QVD node or not) that you are using. |
Once this is done, we will have to configure rsyslog to accept remote connections. In this example, we will use the link: Reliable Event Logging Protocol (RELP), since we consider that it is just for this, but of course you can use TCP or UDP as you prefer. To configure rsyslog to use RELP, create the file 30-remote.conf in the folder /etc/rsyslog.d/ and enter the following configuration:
$ModLoad imrelp
$InputRELPServerRun 2514

$template remotefile,"/var/log/%HOSTNAME%-%syslogfacility-text%.log"
*.* ?remotefile
This loads the entry module RELP and establishes that the server listens on the port 2514. Then it tells rsysllog to generate the log file name dynamically, depending on the host name of the client. The following line tells rsyslog to register all the messages in the file formed dynamically. Now, restart rsyslog:
# service rsyslog restart
Then, you will have to configure the QVD image to register remotely to this server. Inside the image QVD that you are going to use, create in the folder /etc/rsyslog.d/ a file called 00-remote.conf and enter the following configuration:
$ModLoad omrelp
*.* :omrelp:<hostname or IP address>:2514
Make sure to enter the IP address or the host name of the logging server. This configuration will tell rsyslog in the virtual machine that it has to load the output model RELP and use the port 2514 in its rsyslog server. It will also send all the output (*.*) to this remote host.
|
|
Make sure that the module RELP is available, and if not, install it (the packet is rsyslog-relp in Ubuntu and rsyslog-module-relp in SUSE). |
Finally, edit the file /etc/qvd/vma.conf in the virtual machine and enter the following to tell QVD to leave its logs in syslogs:
log4perl.appender.SYSLOG = Log::Dispatch::Syslog
log4perl.appender.SYSLOG.layout = Log::Log4perl::Layout::PatternLayout
log4perl.appender.SYSLOG.layout.ConversionPattern = %d %P %F %L %c - %m%n
log4perl.rootLogger = DEBUG, SYSLOG
log.level = DEBUG
With this configuration, the image must send the log of QVD to the remote rsyslog that you have configured. To check it, use the logger command inside the image and the output must be in the logs of the logging server.
3. Commonly used commands
When doing habitual administration tasks, it can bedifficult to work with the WAT, even in spite of the updates of this in the latest version. The command line is particularly useful if you need to carry out scheduled or automated tasks. For system administrators, we include this section to provide examples of some of the most commonly used commands that can be used with the QVD CLI administration utility. If you need more help about the available commands, look again at the chapter Administration utility CLI of QVD> in which we talk about the utility in detail.
3.1. Administration of QVD server nodes
When doing maintenance in a server node, it is common to require users not to access the server node while it is working. This can be easily achieved using the QVD CLIadministration utility:
# qa4 host name~'qvd%' block           # block the access to any node whose name starts with 'qvd'
# qa4 host address='192.168.0.2' get   # list the details of the server with the IP '192.168.0.2'
Once you have finished doing the maintenance, remember to unblock the host:
# qa4 host name~'qvd%' unblock # unblock the access to any server whose name starts with 'qvd'
|
|
It is crucial that all the nodes of a QVD installation are synchronized in time, which means, that the use of NTP is essential to avoid the system behaving in an unpredictable way. Unless you are using Xen or similar and all the nodes are synchronized by the host machine, you will need to install the appropriate NTP packet for your system (called ntp for Ubuntu and SLES) in each system that is going to be a node, and configure each one to synchronize with a central NTP server. Since its nodes do not have to have access to the Internet, it can be a good idea to have a device in your network that acts as the server of local timefor the rest, and this also facilitates the events correlation of the system. This is outside the scope of this guide, please see http://ntp.org for more information. |
3.2. Administration of VM
When doing maintenance in virtual machines or when updating images, it is often necessary to deny access to a group of users or oblige them to disconnect. The following examples provide some of the most common uses of the maintenance of virtual machines with the QVD CLI administration utility:
# qa4 vm user_id=5 block            #Block the access to virtual machines whose user has the id=5
# qa4 vm name=test unblock          #Unblock
 the access to any virtual machine with name=test
# qa4 vm id=23 disconnect_user      #Force the disconnection of the user in the machine with id=23
# qa4 vm id=1 start                 #Manual starting of the machine with id=1
# qa4 vm osf_id=2 stop              #Manual stop of all the machines belonging to the osf with id=2
# qa4 vm user_id=5 del              #Delete all the virtual machines belonging to the user with id=5
ANNEXES
1. Administration utility Legacy CLI of QVD (3.X)
The QVD command line administration utility is a perl script that can interact with the QVD-DB to do a wide range of operations inside the QVD infrastructure. It can be used as an alternative to the QVD web administration tool (QVD-WAT) and can be installed in any system with access to the QVD-DB.
|
|
From QVD 3.1.1, the file /usr/lib/qvd/bin/qvd-admin.pl has been symbolically linked to /usr/bin/qa. Future versions of QVD will use qa as the QVD command line administration utility. Of course, you can use the access path to the script perl. |
1.1. Installation and configuration of the QVD administration utility of CLI
In any of the systems in which the QVD CLI Administration utility is going to be installed, you will have to add the QVD repository to the fonts of apt.
Firstly, add the public key of the QVD parcels to your trusted keys (like root):
# wget -qO - https://www.theqvd.com/packages/key/public.key | sudo apt-key add -
Now, add the repository:
/etc/apt/sources.list.d/qvd.list
# apt-get update
For commercial packages:
# echo "deb http://$USER:$PASSWORD@theqvd.com/commercial-packages/ubuntu/xenial QVD-4.1.0 main" > \
/etc/apt/sources.list.d/qvd.list
# apt-get update
|
|
$USER and $PASSWORD are the credentials received when the suscription is purchased. |
To install the QVD CLI Administration utility, execute the following command:
# apt-get install perl-qvd-admin
For SLES:
Firstly, add the public key of the QVD packages to your trusted keys (as root):
# rpm --import https://www.theqvd.com/packages/key/public.key
Now, add the repository:
# zypper ar http://theqvd.com/packages/sles/12SP1/QVD-4.1.0 QVD
# zypper ref
For commercial packages:
# zypper ar http://theqvd.com/commercial-packages/sles/12SP1/QVD-4.1.0 QVD
 User Name: $USER
 Password: $PASSWORD
# zypper ref
|
|
$USER and $PASSWORD are the credentials received when the suscription is purchased. |
To install the QVD CLI Administration utility, execute the following command:
# zypper install perl-QVD-Admin
For Centos:
Firstly, add the public key of the QVD packages to your trusted keys (as root):
# rpm --import https://www.theqvd.com/packages/key/public.key
Now, add the repository:
# yum-config-manager --add-repo http://theqvd.com/packages/centos/7.2/QVD-4.1.0/
For commercial packages:
# echo "[QVD-4.1.0]" > /etc/yum.repos.d/QVD-4.1.0.repo
# echo "name=QVD-4.1.0" >> /etc/yum.repos.d/QVD-4.1.0.repo
# echo "baseurl=http://$USER:$PASSWORD@theqvd.com/commercial-packages/centos/7.2/QVD-4.1.0/" | sed 's/@\(.*@\)/%40\1/' >> /etc/yum.repos.d/QVD-4.1.0.repo
# echo "enabled=1" >> /etc/yum.repos.d/QVD-4.1.0.repo
|
|
$USER and $PASSWORD are the credentials received when the suscription is purchased. |
To install the QVD CLI Administration Utility, run the following command:
# yum install perl-QVD-Admin
The QVD Administration utility requires access to the QVD database. You should make sure that the configuration file of the QVD node is correctly configured for this tool to work as it should. You can find out how to do this in the chapter of QVD-DB in the section entitled Configuration of the database QVD.
1.2. List of commands QVD CLI
The QVD CLI Administration utility provides a large set of administrative functions which can be used to control components and elements that are involved in the QVD environment.
You can obtain a complete list of the functions through the parameter --help:
root@altar:~# qa --help
Valid command expected, available subcommands:
   config del
   config get
   config set
   config ssl
   di add
   di del
   di list
   di tag
   di untag
   host add
   host block
   host del
   host list
   host propdel
   host propget
   host propset
   host unblock
   osf add (*)
   osf del (*)
   osf list
   user add
   user del
   user list
   user passwd
   user propdel
   user propget
   user propset
   vm add
   vm block
   vm del
   vm disconnect_user
   vm edit
   vm list
   vm propdel
   vm propget
   vm propset
   vm ssh
   vm start
   vm stop
   vm unblock
   vm vnc
|
|
Any of the commands presented previousley can be invoked with the parameter --help to obtain a more detailed description of the syntax. |
1.3. Use of filters to control operations
Many of the available operations through the QVD CLI Administration utility also admit filters (using the modifier -f) to limit one action to an element or a particular entity. The filters are essentially coincidences with the elements inside the columns of the table, just as a standard SQL query would provide in the clause WHERE. The filters accept the asterisk (*) as a wildcard character and (,) as a separator to build AND statement chains. The most frequently used filters are the ID of an element or the name. Using the`host list` as an example, you can limit the returned entries by filtering in id or name:
# qa host list -f name=sha*

Id Name    Address      HKD       Usable RAM Usable CPU VMs assigned Blocked State
__________________________________________________________________________________
1  shamash 192.168.0.12 103:14:31 296.676    16172.48   0            0       starting
When using the CLI administration utility to view the state of the VM, it is common to use filters to see virtual machines in a specific state or belonging to a certain user or where the virtual machine has a particular user_state. The following example will show how to chain together a series of filters to see all the virtual machines that belong to users with usernames that start with al, where, additionally, the virtual machine is being running and the user is connected:
# qa vm list -f user=al*,state=running,user_state=connected
Id Name    User    Ip             OSF  DI_Tag  DI             Host      State   UserState    Blocked
____________________________________________________________________________________________________
1  alison  alison  172.20.127.254 test default 2012-03-05-000 qvd_test  running connected    0
7  antony  antony  172.20.127.232 live default 2012-02-15-000 qvd_test2 running connected    0
1.4. Basic administrative operations
In this section we will examine some of the most common administrative tasks for which the QVD CLI administration utility is used.
1.4.1. Changing the QVD configuration settings
QVD has a wide range of very specific configuration settings which control various components within the infrastructure. We discuss some of them here.
To change a QVD configuration parameter by means of the QVD CLI Administration utility, you can do the following:
# qa config set myproperty="this is a value"
It is also possible to obtain all the current database configuration settings and number them:
# qa config get
Finally, it is possible to delete a QVD configuration parameter of the database:
# qa config del myproperty
1.4.2. Adding a QVD server node
It is common to use the QVD CLI Administration utility to add new QVD server nodes to the QVD database. This can be done very quickly from the command line with the following directive:
# qa host add name=NewNode address=192.168.0.12
The elimination of a QVD server node is equally as simple:
# qa host del -f "name=NewNode"
1.4.3. Configuring SSL for QVD
The QVD server nodes must be configured to use SSL. Currently, the only way of doing this is by using the QVD CLI Administration utility:
# qa config ssl --help

config ssl: Sets the SSL certificate and private key
usage: config ssl key=mykey.pem cert=mycert.pem

    Sets the SSL certificate to the one read from the file mycert.pem, and the
    private key to the one read from mykey.pem.

    Example: config ssl key=certs/server-key.pem cert=certs/server-cert.pem
It is recommended that whenever possible you use a certificate signed by trusted CA.
1.4.4. Adding an OSF
You can easily add an OSF to QVD using the QVD CLI Administration utility if it is in a host that has access to the shared storage where the "images" are stored:
# qa osf add name=myOSF use_overlay=no memory=1024 user_storage_size=2048
There is only one compulsory value to add an OSF, which is name. If the other parameters are left unspecified, their default values are used in their place. These are:
-
* Memory * = 256
-
* Use_overlay * = y
-
* User_storage_size * = undef (unlimited for the storage of users)
You can obtain a list of currently available OSF by doing the following:
# qa osf list
1.4.5. Adding a DI
Using the QVD CLI Administration utility, you can attach a disk image (DI) to any existing OSF inside the system. This process can take quite a long time, since apart from updating the database, the real disk image file is copied in the directory storage/images inside the shared storage.
On attaching a DI to a particular OSF, we keep the real disk separate from the image that will serve the final users. This means that you can make changes in the disk image and simply update the OSF, so that when a user reconnects the image, it is automatically updated without the user experiencing any disruption to the service.
# qa di add path=/var/lib/qvd/storage/staging/qvd-guest.img osf_id=1
Both path and osf_id are compulsory to add a DI. When the DI is added, the image specified in the path is copied in the read only storage area configured to store active DIs (usually /var/lib/qvd/storage/images).
You can obtain a list of currently available images by doing the following:
# qa di list
1.4.6. Labelling DI
The DIs can be freely labelled with arbitrary chains. To label a DI as default, use the command di tag:
# qa di tag di_id=42 tag=default
You can label DIs with any chain, not only default or head. This lets you use significant names for the tags, for example "software_bug_fixed", for use in the DI Tag field of the virtual machines.
Tags are useful, since they let you attach a new version of a disk image to an OSF without affecting anybody that is using the current image or default image for an OSF. This lets you implement a change and migrate specific virtual machines using a different OSF for the new image while it is being tested. If the image fails for any reason or does not meet the desired requirements, it is easy to go back to the default image and let its users continue working while corrections are made.
1.4.7. Selecting the DI tag that the virtual machines will use
In order to tell a virtual machine that it must use a DI with a specific tag, we edit the VM to change its di_tag field. So, if for example we have just corrected a software error in a DI and we create the tag "software_bug_fixed", we can use this DI in a VM using the following command:
# qa vm edit di_tag=software_bug_fixed -f vm_id=42
The next time the VM with ID 42 is started, it will use the DI with this tag.
1.4.8. Adding and deleting users
It is common to use the QVD CLI administration utility to add and delete users quickly.
# qa user add login=peter password=s3cr3t
# qa user del -f login=guest3
You can also list all the users of QVD with the list option:
# qa user list
Keep in mind that, as explained in the Installation Gide, it is not advisable to create a user whose username already exists in any disk image.
1.4.9. Restoring a user’s password
You can change a user’s password via the QVD CLI administration utility:
# qa user passwd user=guest
In the previous example, we are changing the password for the user of login guest. You will be asked to provide a new password.
1.4.10. Adding and deleting virtual machines
Adding and deleting virtual machines via the QVD CLI administration utility is easy. You can specify the user and the OSF by ID or by name:
# qa vm add name=GuestVM user_id=1 osf_id=1
# qa vm add name=GuestVM user=peter osf=myOFS
You can easily delete a virtual machine using the following command:
# qa vm del -f "name=GuestVM"
1.4.11. Starting and stopping virtual machines
The QVD CLI administration utility can be used to start and stop virtual machines. If a particular filter is not specified, the action will start or stop all the virtual machines. This command is usually executed specifying a filter to identify the actual virtual machine that you wish to start or stop. Examples:
# qa vm stop -f "user=guest*"
# qa vm start -f "id=1"
The balancing policy determines the node where the VM will start.
1.4.12. Blocking and unblocking virtual machines
Virtual Machines can be marked as "blocked". When they are in this state, the QVD Client application will not be able to connect to the Virtual Machine. This task can be executed by an administrator to carry out an administrative task or when the HKD is unable to correctly manage a virtual machine. The following commands can be used to mark a virtual machine as "blocked" or they can be used to unblock a virtual machine that has been established in this state.
# qa vm block -f "id=2"
# qa vm unblock -f "name=GuestVM"
Check block and unblock the virtual machine in the WAT manual to obtain more information on how to configure this state.
1.4.13. Troubleshooting virtual machines
|
|
Since this tool is Legacy, it is possible that these options do not work. |
The QVD CLI administration utility also provides options to connect to a virtual machine without using the client application. This is useful to debug an image that does not work in QVD. Currently, the supported options include the serial port console, SSH and VNC access. To access the serial console of a virtual machine, use the following command:
# qa vm console -f id=1
This will open a session in the serial port of the virtual machine with the 1 Id. If KVM virtualization is being used, the virtual machine needs to have the serial console activated: see for example -
To enter a virtual machine by ssh, execute the following command:
# qa vm ssh -f name=myVM -- -l qvd
This will open an SSH connection to the virtual machine called myVM using the username qvd. The virtual machine needs to have OpenSSH installed and configured.
If you are using KVM virtualization with VNC access enabled and you have vncviewer installed, you can execute the following command to open a VNC.
# qa vm vnc -f name=myVM
The VNC console is not available when LXC is used.
1.4.14. Configuration of customized properties for a virtual machine
QVD includes the option to configure customized properties for a virtual machine that can be established and recovered via the QVD CLI administration utility. This is useful if you need to write your own behaviours or wish to take advantage of the VMA hooks (see the relevant section on this).
The customized properties are often used when you write your own plugins for the L7R, like the authentication modules or load balancer.
The customized properties are compatible with the configuration parameters: host, user and vm
To add a customized property, you can use the command propset:
# qa user propset beverage=beer -F login=rowan
propset in 1 users.
You can obtain the content of all the customized properties that have been established for a configuration parameter using the command propget:
# qa user propget
rowan   beverage=beer
Finally, you can delete a customized property via the command propdel:
# qa user propdel beverage
Are you sure you want to delete the prop in all users? [y/N] y
Glossary
- QVD
-
Virtual Quality Desktop, a set of components of server and a client application that provides remote access to the virtual desktop to the users.
- QVD Client
-
A modified NX client able to connect to a virtual machine that is executed in a QVD server node. The client is available for the operativng systems Linux, Windows and MAC OSX. There are also beta versions for IOS and Android.
- QVD-DB
-
The QVD database. This is installed on a server PostgreSQL RDBM. All the components of the server side inside the infrastructure QVD depend on the database to communicate between themselves and to implement the functionality.
- QVD Server Node
-
A host that executes the components QVD Server Node, including the HKD and instances of the L7R (depending on whether there are clients connected or not). There are usually some QVD server nodes inside a typical implementation. The virtual machines to which the QVD client accesses are executed in different QVD server nodes.
- QVD-WAT
-
The Web Administration Tool of QVD. It is a web-based graphical user interface to let an administrator configure and supervise the functioning of the QVD environment.
- QVD CLI Administration Utility
-
A sequence of Perl commands that provide a command line interface with which you can supervise and administrate the QVD environment.
- HKD
-
The House Keeping Daemon is a daemon of the QVD server node. It is responsible for starting and stopping virtual machines and for checking the state of the virtual machine. The HKD also creates an L7R process for each incoming connection.
- L7R
-
The Layer-7 Router acts as an intermediary for all the QVD Client connections. It is invoked by the HKD. It is responsible for authenticating the users and routing the requirements of the client to the appropriate server node that executes the virtual machine for the authenticated user. It also supervises the state of the session.
- VMA
-
The Virtual Machine Agent is a QVD component that is executed inside a virtual machine to facilitate the connectivity of the client with the virtual desktop and that is responsible for listening for the administration requirements sent by the HKD. It also provides a series of hooks that lets an administrator customize behaviours inside the virtual machine.
- VMA Hook
-
An installation inside the VMA that permits the activation of other functionality (generally through the use of scripts) inside the virtual machine, based on particular state changes inside the virtual machine.
- Virtual machine
-
A virtual machine is a virtualized system that works on another operating system. Generally, the virtualized system loads an OSF with the aim of executing a virtual operating system.
- OSF
-
The Operating System Flavour is an entity that lets the administrator create "flavours" or typologies of virtual machine. This way the administrator can assign the users with machines of these "flavours", according to their needs. The OSF is usually configured in QVD together with specific parameters of execution time, such as the amount of memory that must be available for it or the persistence of its disk; it also includes the set of available images for the osf differenciated by tags.
- DI
-
A Disk Image is a qcow2 image that has been created as a virtual disk that contains an installed operating system. In the case of LXC this image is in reality a complete operating system disk image compressed with tar-gz. These images are associated with an OSF.
- User
-
Person that uses the QVD service, usually connected through the QVD Client.
- Administrator
-
A user that has permission to access the management platform, generally through QVD-WAT or through the QVD CLI administration utility
- Session
-
Period in which a user is really connected to a virtual machine.
- KVM
-
Virtual Machine of the Kernel. It is a hypervisor that is installed in the kernel of Linux to get a type 1 virtualization. QVD makes use of KVM to execute the necessary virtual machine to serve the end users.
- LXC
-
Linux containers. This is the virtualization technology included in the Linux kernel. It uses a similar approach to the command chroot of standard Linux, but provides a higher grade of separation of resources. QVD can use LXC instead of KVM to execute the necessary virtual machines to serve the virtual desktops to the end users. LXC virtualization requires less resource, so it lets you make better use of the existing hardware to serve more users.