Product QVD 4.2 Virtual Deckard
QVD Docs Team <documentation@theqvd.com>
Legal notice
1. Introduction
1.1. What is WAT?
WAT is the QVD Web administration panel. A web tool to manage QVD users, virtual machines, nodes, images and set—up parameters.
To this end, it will show on the screen lists with system elements containing enough information to be able to setting them up as well as spotting problems. It will have filtered controls and a wide range of possible actions on the QVD elements, for instance, creating, updating or deleting; and other more specific ones such as starting or stopping the virtual machine, blocking a user to do some maintenance tasks, etc.
Client- Server
Regarding QVD administration, WAT refers to the clients part, feeding from the server via HTTP. In this way it extracts and manages QVD information by calls certified ones to the API of the server. This API also helps the application of command line administration (QVD CLI).
1.2. Browser compatibility
Hereafter the supported browsers are specified to use WAT with all their functionality. The use of older versions and/or browsers do not ensure its proper functioning.
- Desktop
| Chrome | Firefox | Internet Explorer | Opera |
|---|---|---|---|
40+ |
31+ |
11+ |
31+ |
- Mobile devices
| iOS Safari | iOS Chrome | Android Browser | Android Chrome |
|---|---|---|---|
8.4+ |
40+ |
4.3+ |
44+ |
1.3. Interface general structure
WAT interface structure has 6 basic components:
-
Main Page
-
Components distribution
-
Detailed components
-
QVD logo: It is located at the top left-hand corner, by clicking on it you will access the home page.
-
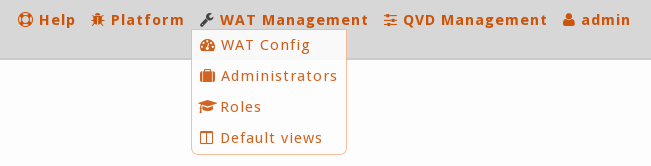
General menu: A permanent menu at the top right-hand corner from where we can select different sections which include a classification of all QVD options:
-
Help: System information and documentation access.
-
Platform: QVD Element Management (Users, Virtual machines, Images…)
-
WAT Management: WAT set-up sections as well as administrators management, permits management, etc.
-
QDV Management: QDV parameter set-up sections.
-
Administrator Area: This section will have the name of the logged on administrator who will be able to access his/her profile, view customization or log out.
This is a drop-down menu, so someone can have direct access to each section options just with one click.
-
Screenshot

In the WAT step by step section, we will separately analise every section to learn its functioning.
-
-
Section Menu: Depending on which section of the general menu we are, there will be a menu with its different options under the head top.
-
Screenshot

-
-
Breadcrumbs: Below the section menu, there will be at all times a link trace from the homepage to the current one.
-
Screenshot

After the breadcrumbs, an icon of a book linked to a modal window will appear with the general documentation of the current section.
-
-
Content: Most of the screen, below the section menu and the breadcrumbs, will be left to show the page content.
-
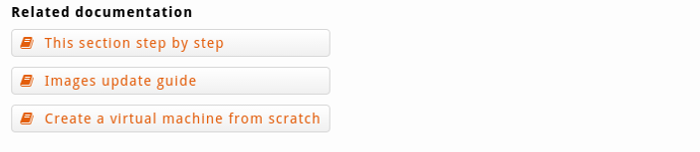
Related documentation: At the bottom of each screen there are several links to parts of the documentation related to the section we are in. These links will open a modal window without exiting the screen where one can check the specific documentation.
-
Screenshot
-
-
Footnote: After all the content, it is the footnote with the application information.
-
1.4. Detail-list structure
The management of WAT elements has common components throughout many sections. These elements form the detail-list structure.
1.4.1. List view
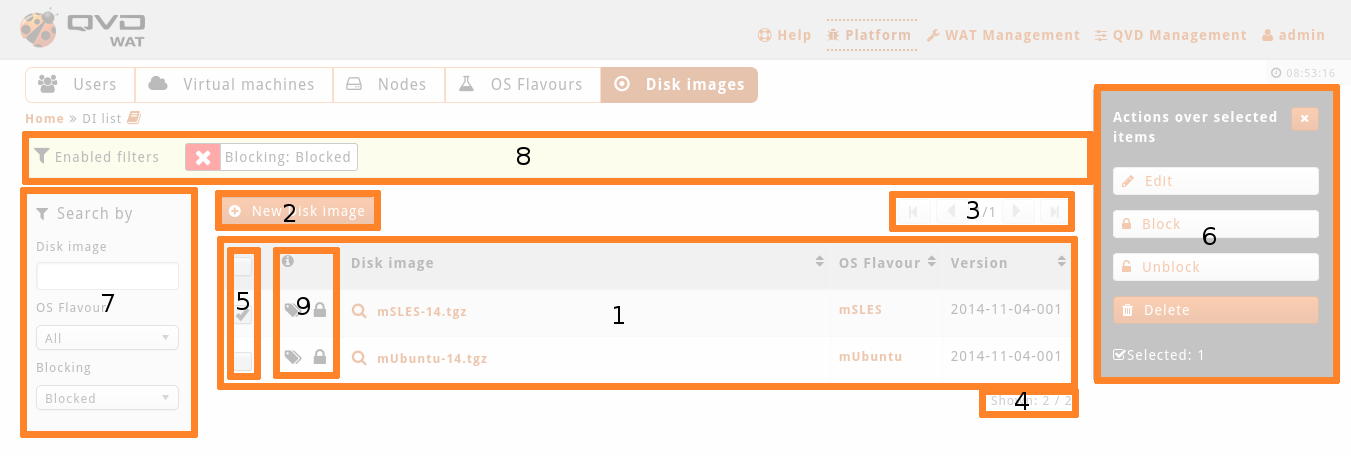
View where a list of paged elements with filter and action controls are shown.
-
Screenshot
- Basic list view
-
- List view after applying a filter
-
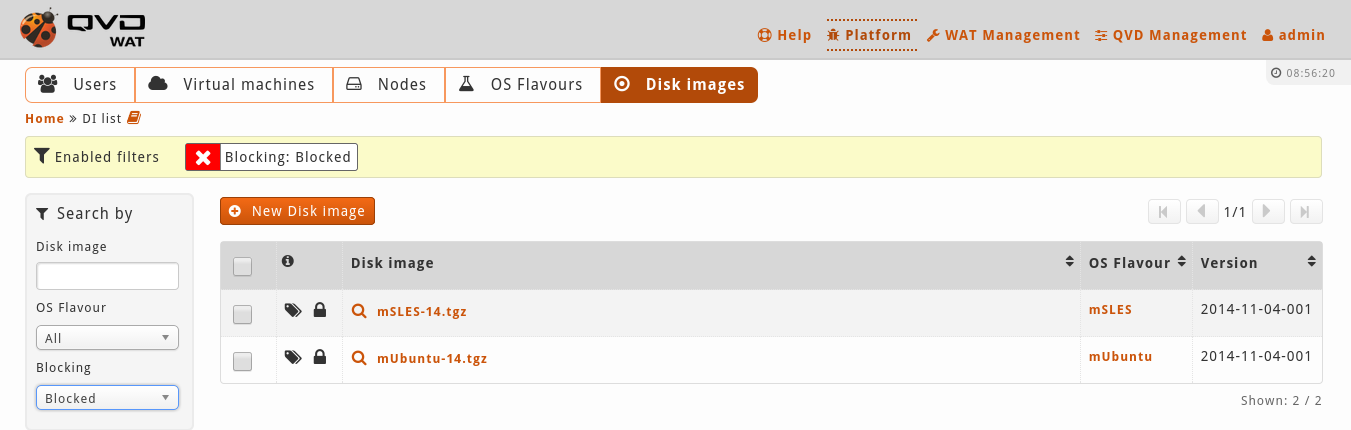
When a view is filtered by some field, so as to point out that it may be possible that all the existing elements are not being shown, a yellow stripe will appear over the list containing all the filters which are on.
From the panel, the filters can be disabled with the cross icon that goes with each of them, by automatically putting "All" value in the corresponding selector.
- List view after applying a filter and selecting an element
-
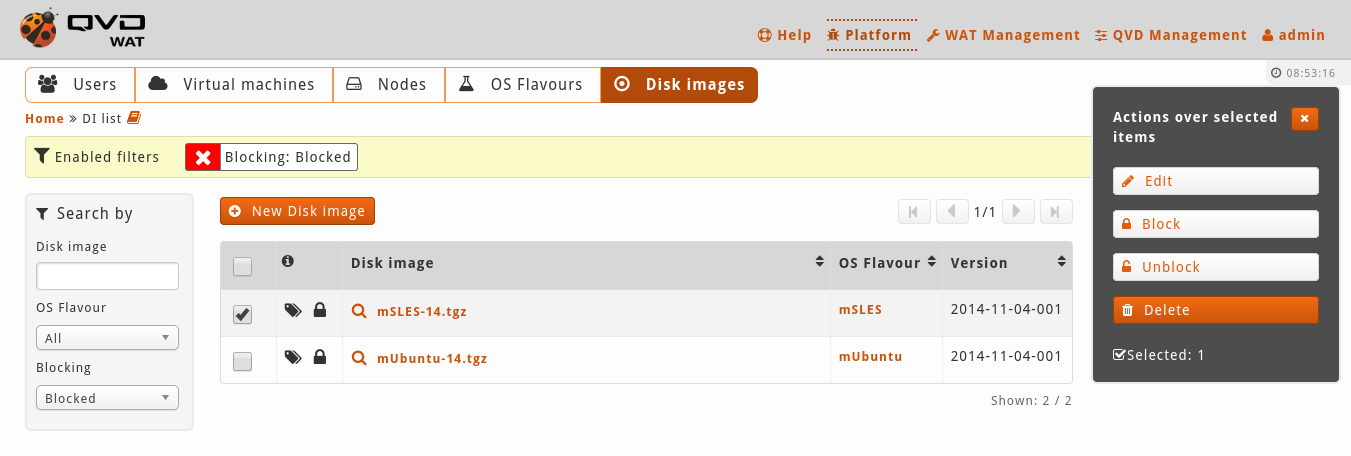
If we select one of the elements, a lateral menu will appear with all the available options on the selected elements. This menu can be closed with a button at the top of the same menu, or by selecting all the elements on the list.
If only one element is edited, it will be a standard edition. However, if two or more are edited at the same time, it will be consider a massive edition, so some fields will not be available for the edition as it will not make sense.
-
Components capture
-
Detailed components
-
Elements table: Elements list which matches the filtered ones (if there is any).
Some of this list columns will have links to other WAT sections (if the system administrator is allowed to see those). The main column which usually corresponds to the element name will have a link to the element detailed view. This link will go together with a magnifier link.
This list will be paged to a number of elements by stting page. The columns in this table can be set (See View Customization in the manual).
-
Button to create a new element
-
Pagination control: If there are not enough elements so as to have several pages, this control will be off. But if there are enough elements, it will allow us to browse within the different pages one by one or to go directly to the first or the last.
-
Selected element and current page information: the number of selected elements (either if they are in the current page or not) and the number of the page shown in relation to the total number of pages.
-
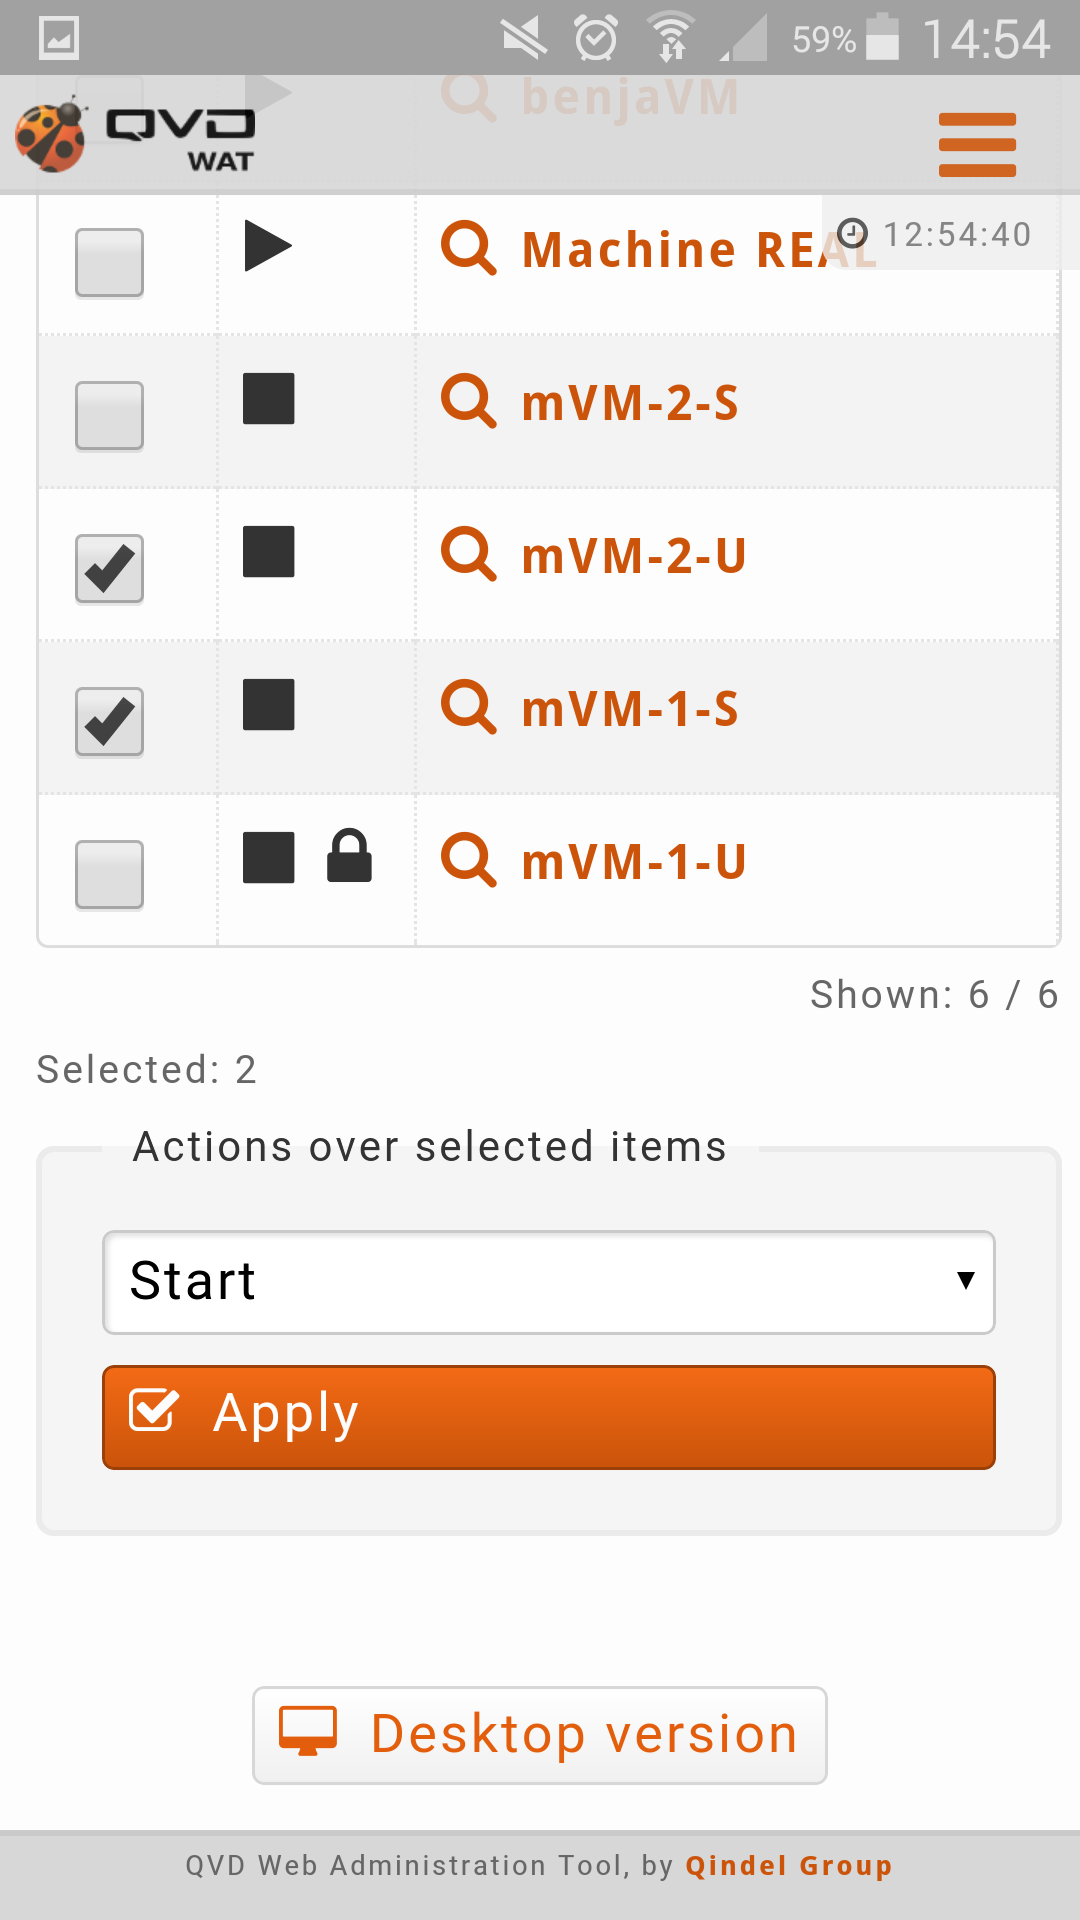
Checkboxes columns to select several elements at the same time and apply an action on them.
-
It is possible to select some elements from different pages by moving within them with the paging control (3). Below the table the number of seleted elements will appear at all times (4).
-
It is also possible to select all the elements with just one click with the checkbox which is at the top of the table in that same column. If there are some pages it will give us the option to select only the visible ones or the elements from all the pages.
-
-
Massive action control on the selected elements. When we select one or more elements from the list with the checkbox column, a menu will be shown on the right with the avalibale options for the selected elements. Among these actions are editing, deleting, locking, unlocking and some more specific actions for each view such as starting and stopping virtual machines.
-
Filtering controls: Depending on the element there will be some filters or others. Besides, these filters can also be set up (see View Customization in the manual).
-
Active filters: If there is some filter on, because it has been selected on the filtering control (7) or because the view has been loaded with the filter on, a box with the active filters will be shown. The unwanted filters can be deleted from here.
-
Information column: Many views contain a column with information icons. With these icons it is possible to see element information in a little place as well as to check if they are blocked, their executing status or if a user is connected or not in the case of the virtual machines, etc.
-
1.4.2. Detail view
View where the element detail data is shown with the related information and the action, edition and deletion controls.
-
Screenshot
-
Componets capture
-
Detailed components
-
Element name
-
Action buttons: On both sides of the name we can find buttons to delete, edit, lock/unlock, start/stop… depending on the kind of element we are in, these buttons may vary.
-
Element data table: Some of them have links to other views.
-
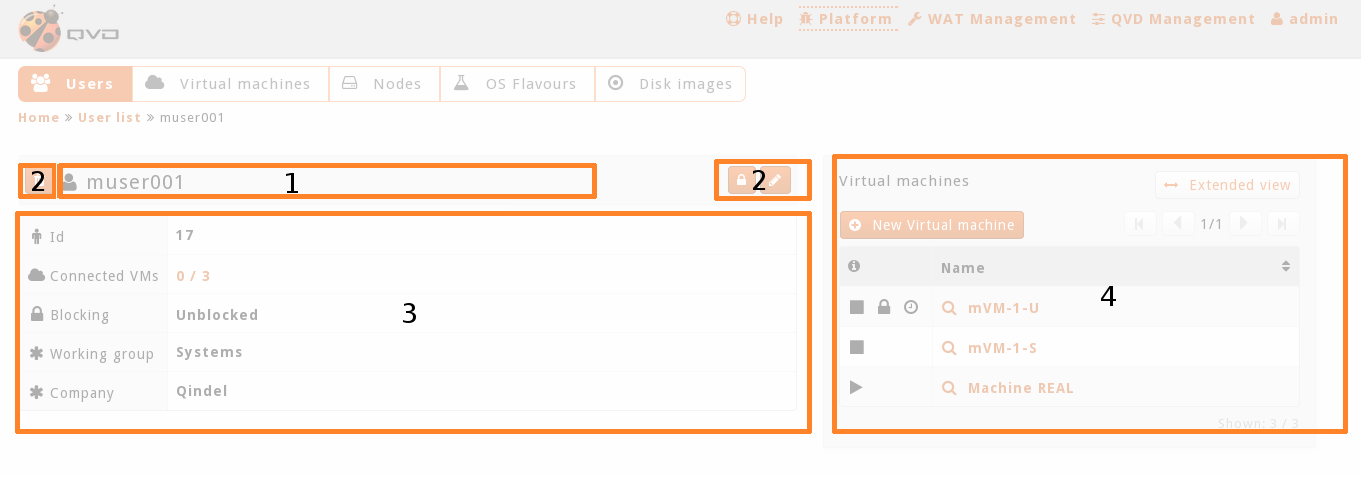
Embedded lists of related elements. Many elements have detail views on a simplify embedded list of related elements.
For instance, on a screenshot, a user’s virtual machines.
This embedded view has a button to access the complete view of those elements, which by default will appear filtered by current element.
For instance, on the screenshoot, we would go to the list view of the filtered virtual machines by user 'muser001'
-
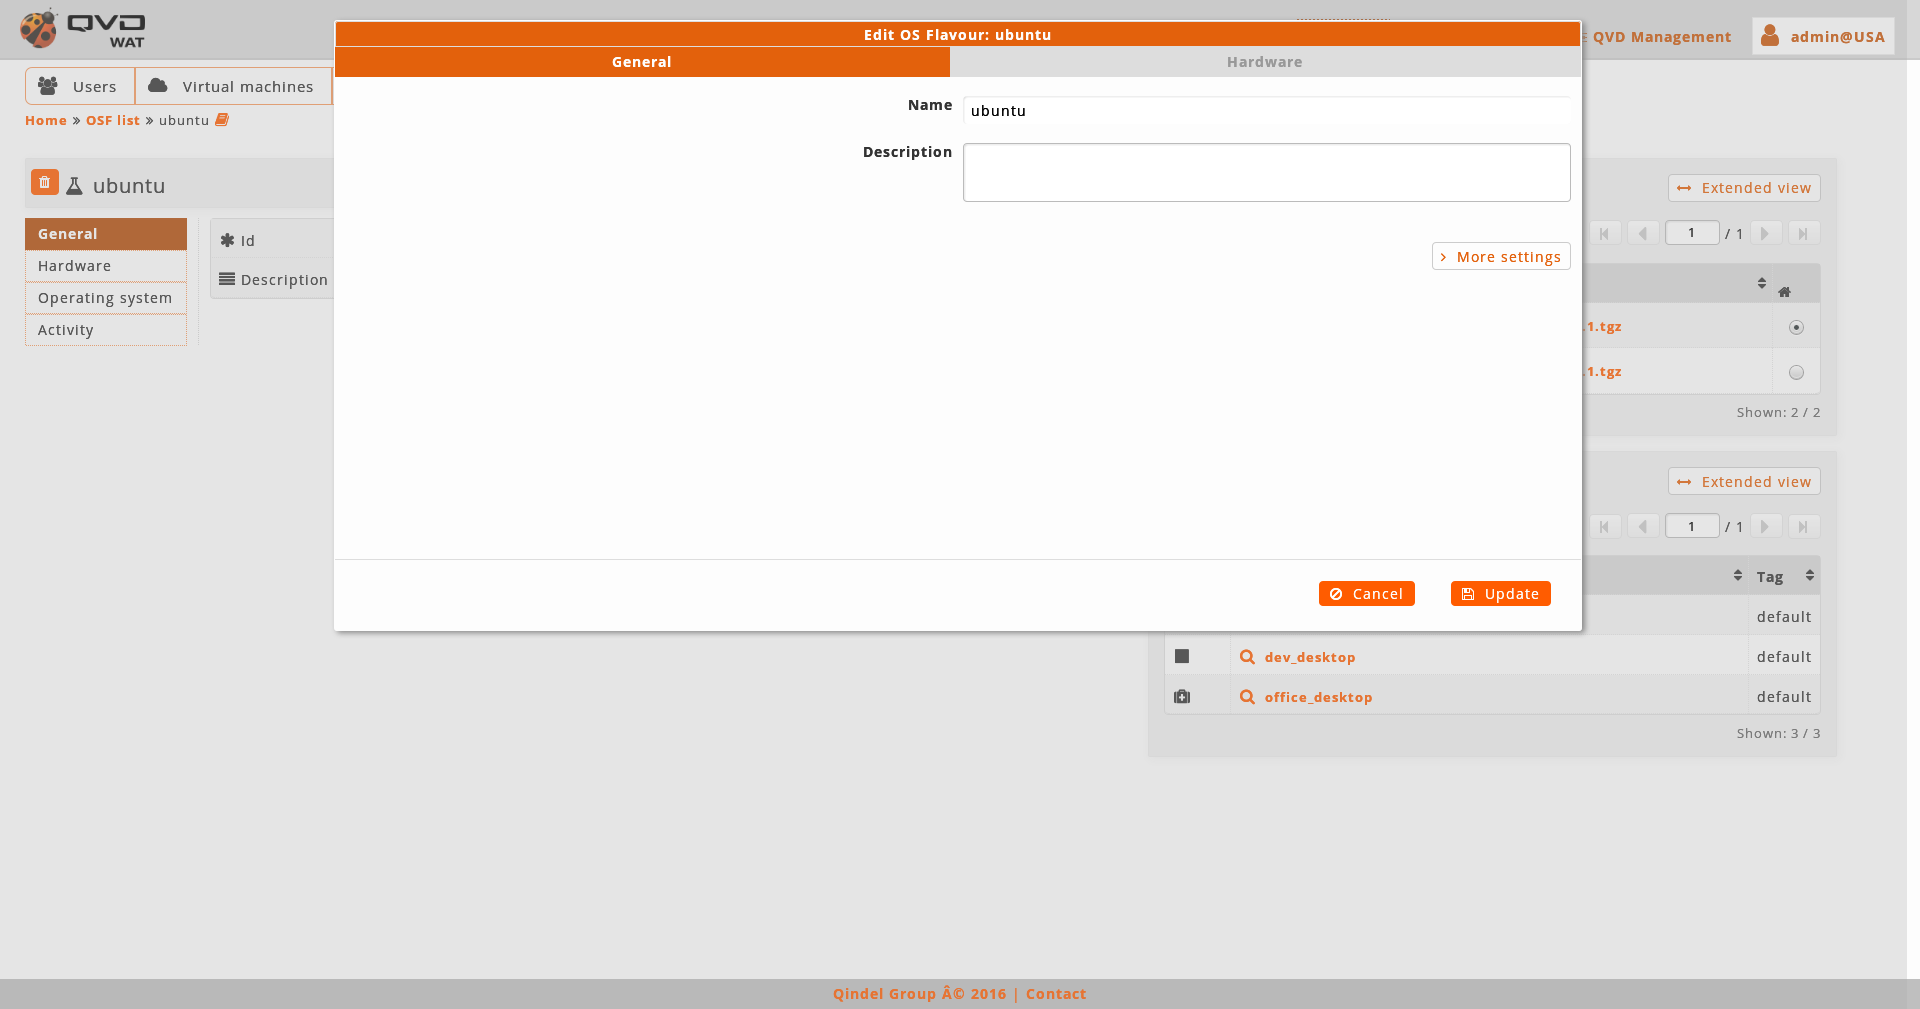
1.4.3. Creation-edition forms
In both views, to create or edit an element, the different forms will be shown on modal windows, without leaving the view context.
1.5. Mobile version ==
The WAT interface is designed to display not only high resolution devices (Desktops, Tablets…) but mobile devices as well. A simplified version will automatically be loaded for small screens.
|

In this version the menu will be a drop-down which we can access by clicking the usual horizontal stripes icon from the menu.
|

- Features
-
The mobile version will have all the functions regarding QVD management. This includes the QVD elements reading, creation, update, deletion and operation: Users, Virtual Machines, Nodes, ODFs and Disc Images.
|
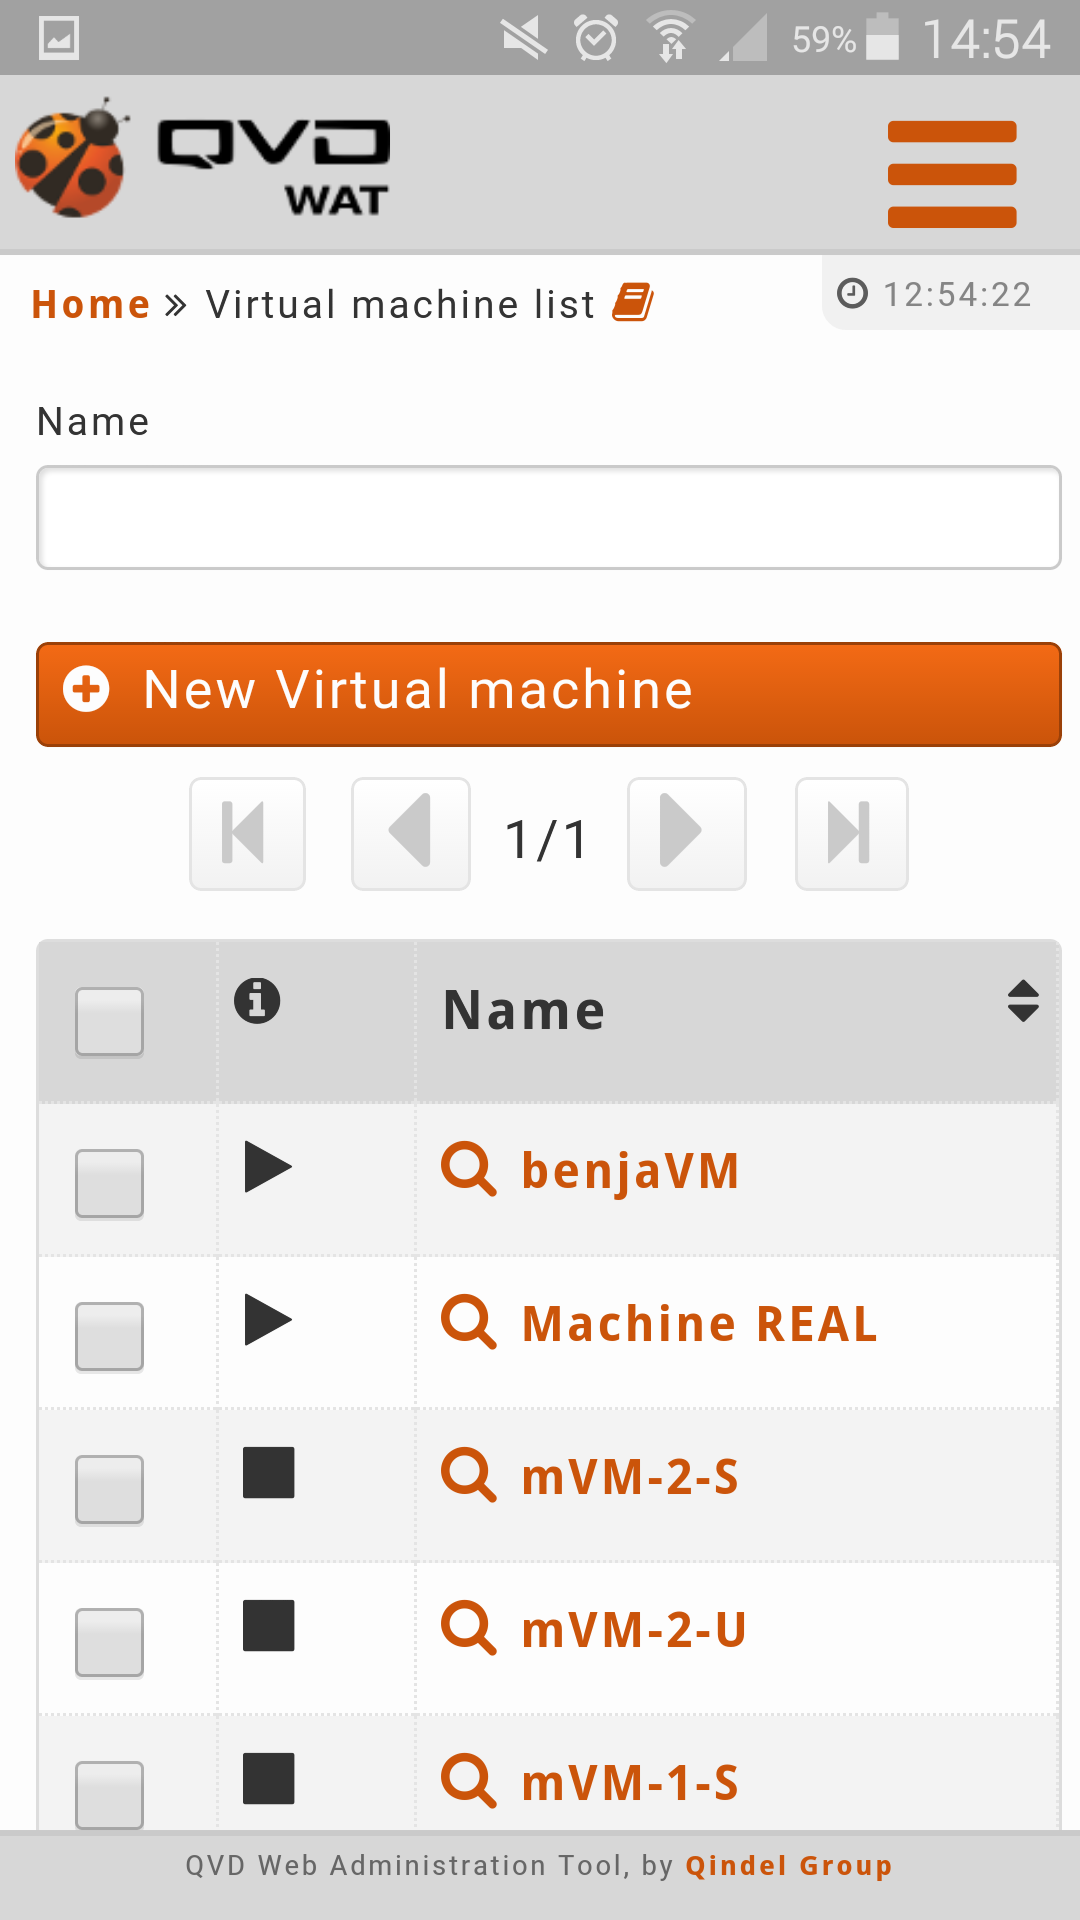
In this way actions such as starting or stopping the virtual machine are available in the same way they are for the Desktop version.
|
Features regarding WAT management, such as permit management or system administrators, will only be accessed from WAT desktop version.
- Forced desktop version
-
It is possible to force the desktop version in mobile devices and in that way access all the functions.
|
1.6. Permits: System Administrator-ACL-Role ==
A system administrator is a user who has been provided with credentials and permits to manage a QVD solution with the administration web tool (WAT).
1.6.1. System Administrators
A system administrator will be created in place of other system administrator from WAT as long as he has the required permits.
It is not enough creating a system administrator so that he can access the system. It will be necessary to assign permits.
1.6.2. Permits
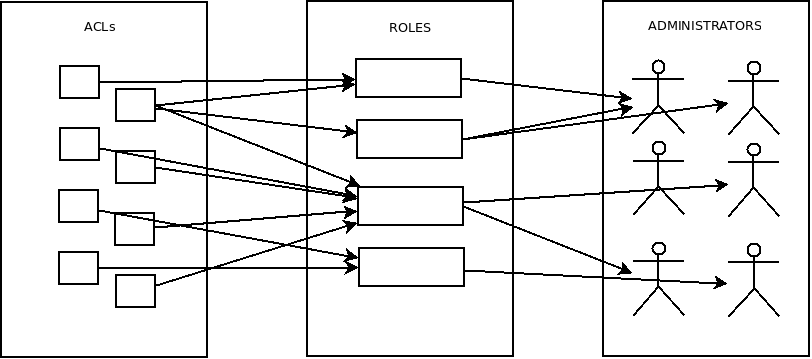
WAT system administrators can be set up to have * different permits to see specific information or to carry out different actions*. These permits are named ACLs.
That assignment will not be carried out directly, but several roles with desirable ACLs will be set up and those roles will be given to the system administrators.
If we don’t have the role or roles we wish for those system administratos, we must create them.
Roles
We can assign ACLs to a role and/or it can inherit it from other roles.
Regarding role inheritance, it is possible to choose which ACLs to inherit and which not to.
A role can inherit from one or more roles, as well as a system administrator can have one or more assigned roles, by adquiring his ACLs. ===== ACLs
The features and the rest of the things to consider from ACLs can be summarise on the following points:
-
ACLs are fixed in the system. They cannot be added or deleted.
-
Every ACL will give permission to see or do only one thing in a type or element or section.
For example:
-
Access disc images section
-
See nodes IP address
-
Delete users
-
Create OSFs
-
Filter virtual machines by user
-
…
-
-
There are specific ACLs to manage system administrators' permits: To assign ACLs to roles, roles to system administrator, etc.
-
A system administrator with the ACLs to manage permits will be able to:
-
Manage all ACLs in the system, and not only those the administrator has in his assigned roles. The system administrator will be able to assign ACLs, which he does not have, to roles and thus to administrators.
-
Manage his own ACLs, in this way being able to get total permits or even lose them. That is why ACLs management is very sensitive.
-
To learn more about set up premits see System Administrators and Permits guide.
2. Step by step
In the guide ' WAT step by step ' we will see from the user login to the most complex sections, going over the different WAT sections, analyzing its use and key aspects.
We find these sections in the general menu placed on the right part of the header.

|
|
it is necessary to bear in mind that no all the administrators need to have the same permissions, and therefore, not all of them will see each of the sections or buttons that are going to be described next. |
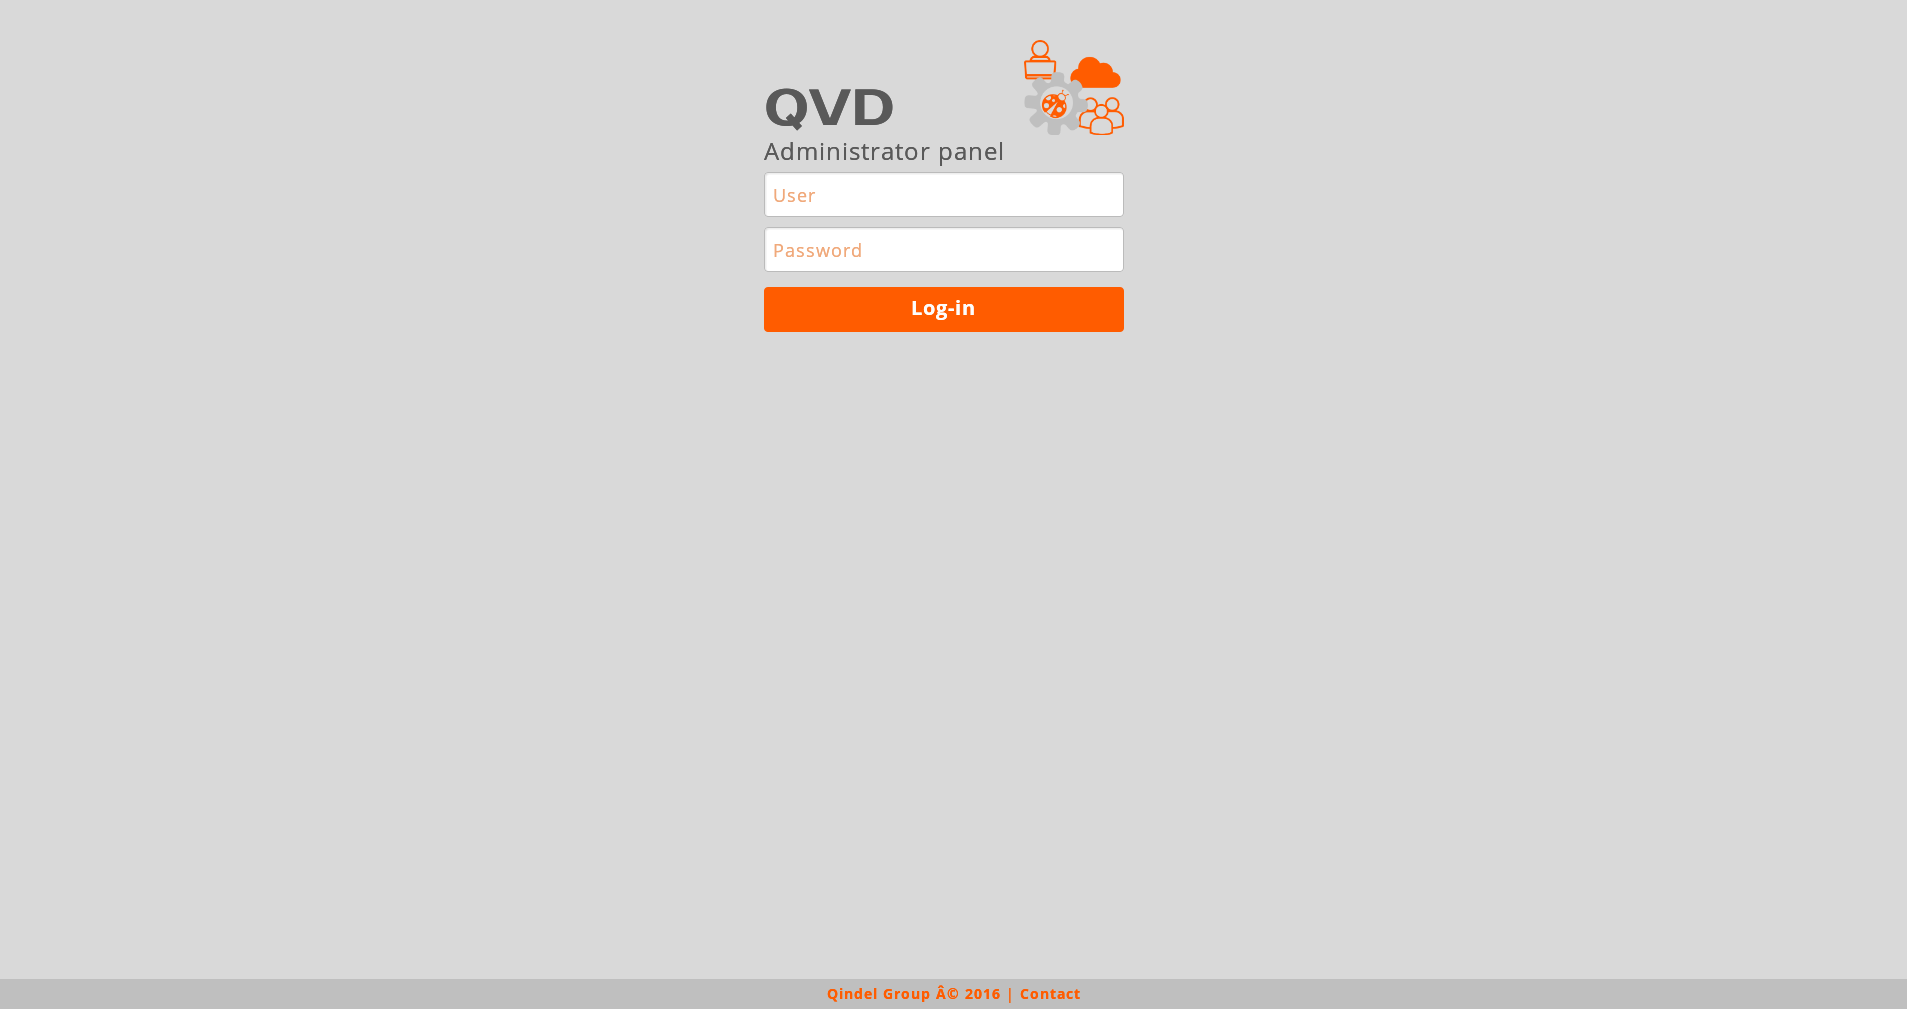
2.1. Login screen
When WAT is loaded, the first thing that appears will be a login screen, where we can authenticate with our credentials username / password.
The first time you log in, you will be asked if you want to save username and password for the future (when the browser allows it)
2.2. Home Page
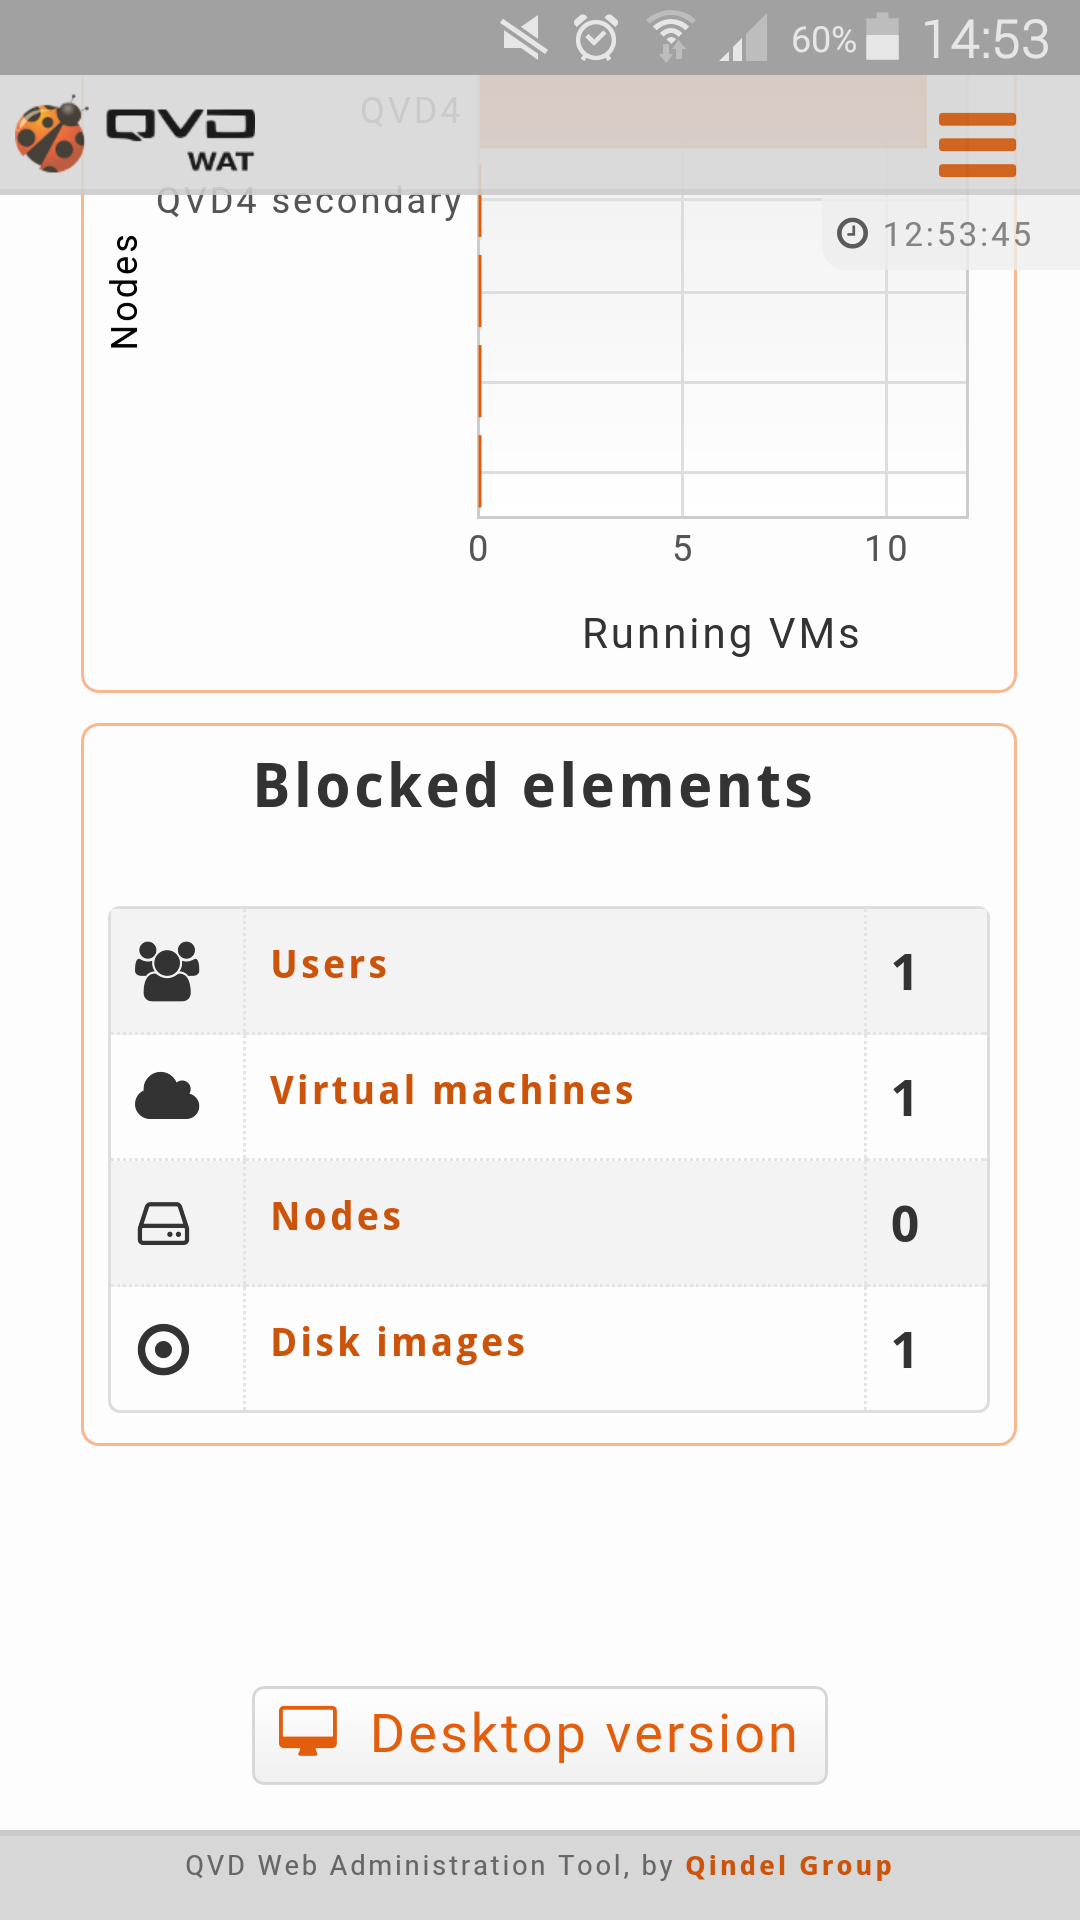
The first screen which is shown when you log in is a tactical view formed by graphs and tables summary of the system.
In addition to this, below the title, there are some buttons available with the uses.
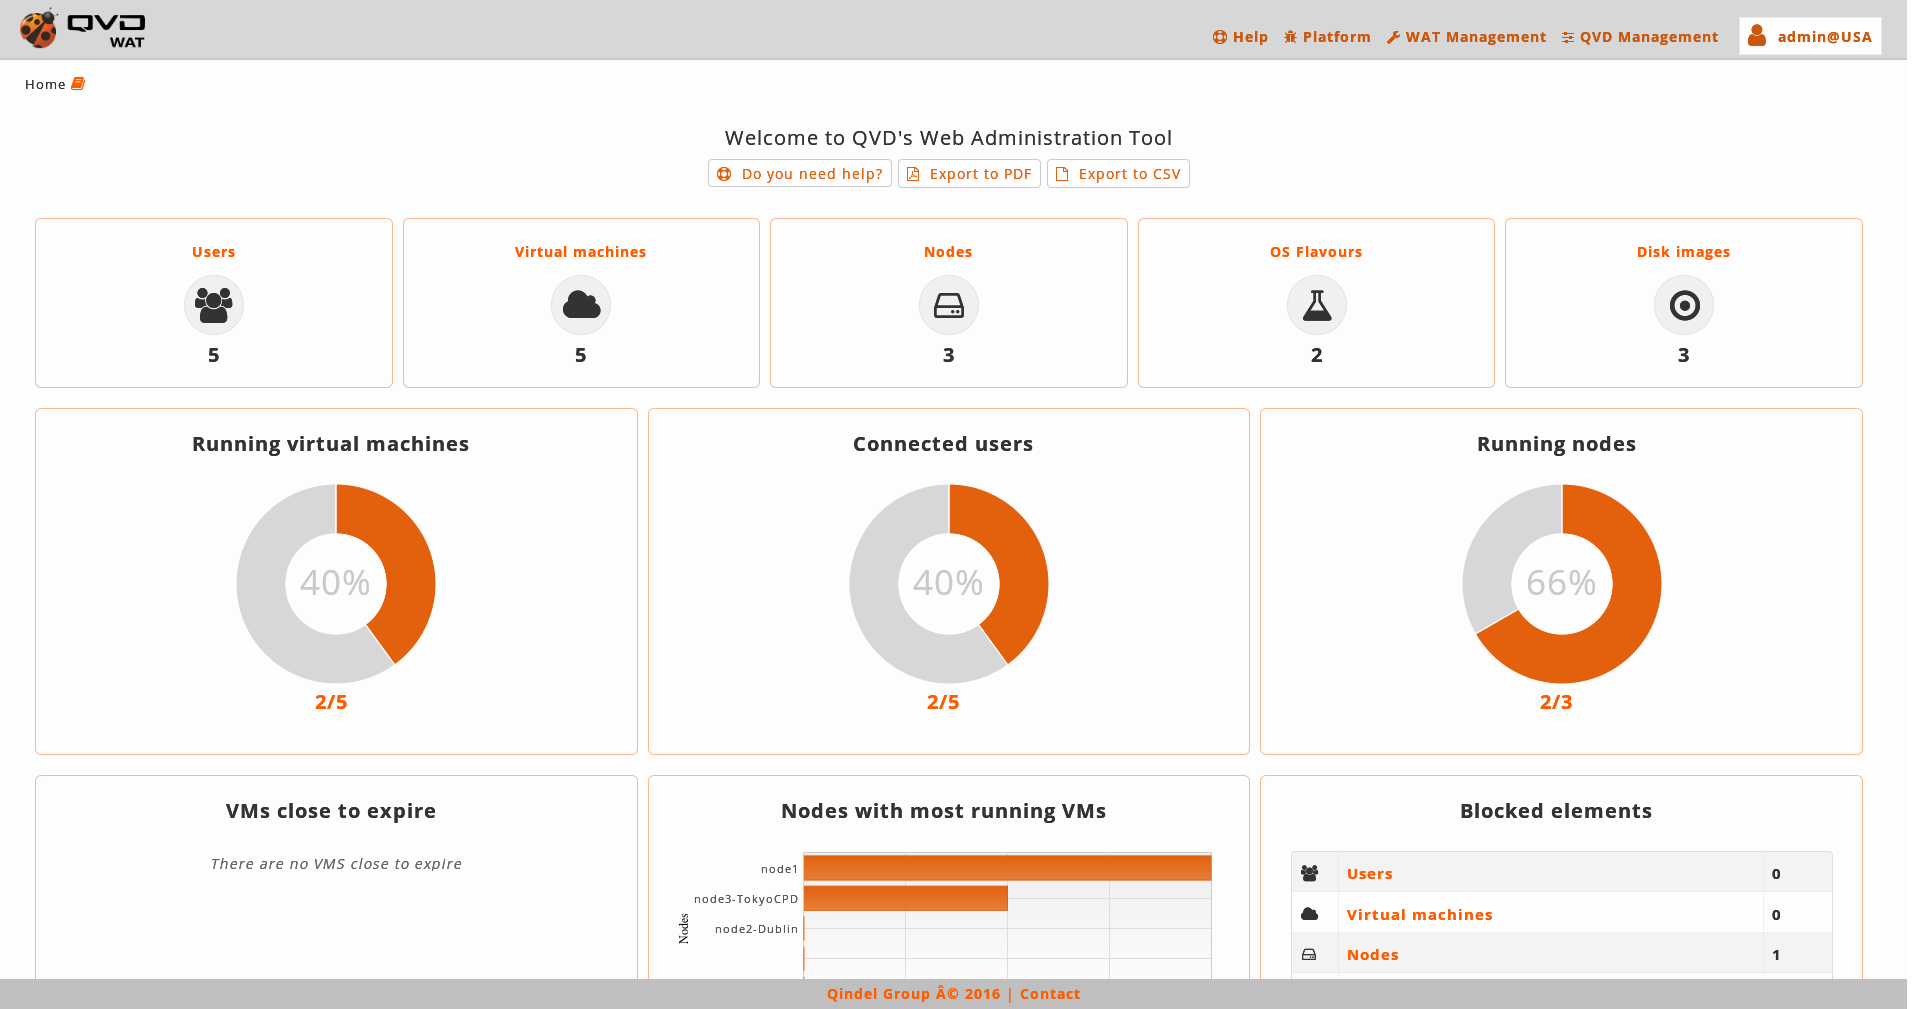
- Uses
-
-
Help: Link to WAT documentation.
-
Export to PDF: With this button a PDF document with the Widgets of statistics will be made and downloaded.
-
Export to CSV: With this button a plain text document with CSV format will be downloaded. It will contain the different statistic data in which the graphs are based.
-
- Widgets of statistics
-
-
*Row 1: Summary of elements. Of each of the basic elements of QVD (Users, Virtual Machines, Nodes, OSFs and Disk Images) their main statistics will be displayed.
-
Users: Number of users, how many of them are blocked and how many of them are connected at least to a virtual machine.
-
Virtual Machines: Number of users, how many of them are blocked and how many of them are connected to at least a virtual machine.
-
-
*Row 2: Circular graphs * with relevant information.
-
*Running virtual machines *: The relation between the virtual machines running with regard to the total of virtual existing machines is shown in a pie chart.
-
Connected Users: The relation between the connected users to at least a virtual machine with regard to the total of existing users is shown in a pie chart.
-
Running Nodes: The relation between the running nodes with regard to the total of existing nodes is shown in a pie chart.
-
-
Row 3: Other summaries.
-
Virtual machines close to expire: The virtual machines whose expiration date is near are displayed.
In this list * hard expiration date *will be taken into account, displaying the time remaining up to that moment. According to the proximity of the expiration the dates will appear in different colours: red (very near), yellow (near) or green (slightly near).
The virtual machines are arranged from the closest to the expiration date to the furthest, taking a critical colour as it gets closer to the moment.
-
Nodes with more virtual machines running: In a bar chart the nodes of the system with more virtual machines running will be displayed. The nodes will be arranged from the one which has more virtual machines to the one with fewest.
-
Blocked elements: In a summary table the counting of QVD blocked elements is displayed. The elements which are likely to be blocked are the users, virtual machines, nodes and disk images.
-
-
2.3. Help

2.3.1. About
This section shows information about which QVD version is being used as well as the WAT revision.
2.3.2. Documentation
In this section we can check the WAT documentation.
The documentation is divided in several guides, we can find among them:
-
An Introduction guide, including a general description of the WAT interface elements, as well as some clues to understand some complex functions.
-
A WAT step by step description where every screen on the different menus is explained through screenshots.
-
A User’s guide with instructions to deal with common tasks, such as, how to face the first steps, change the password, create a virtual machine from scratch, update an image or manage administrators' permits.
Besides, the documentation has a search box to quickly find the results on any available guide.
2.4. Platform
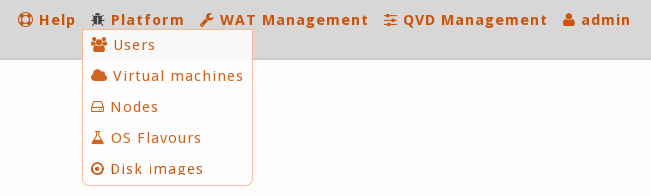
In this section we will find the different QVD elements. It is considered * core administration of QVD*.
All of them have some *common components* with a list view, paging controls, filtering and massive actions, detail view and creation/edition forms. For further information visit "Structure list-detail" in the introduction of the documentation.
2.4.1. Users
In this part the users of QVD are managed including their credentials to access the virtual machines that are configured through the client of the QVD.
- List view
-
The main view is a list with the users of QVD.
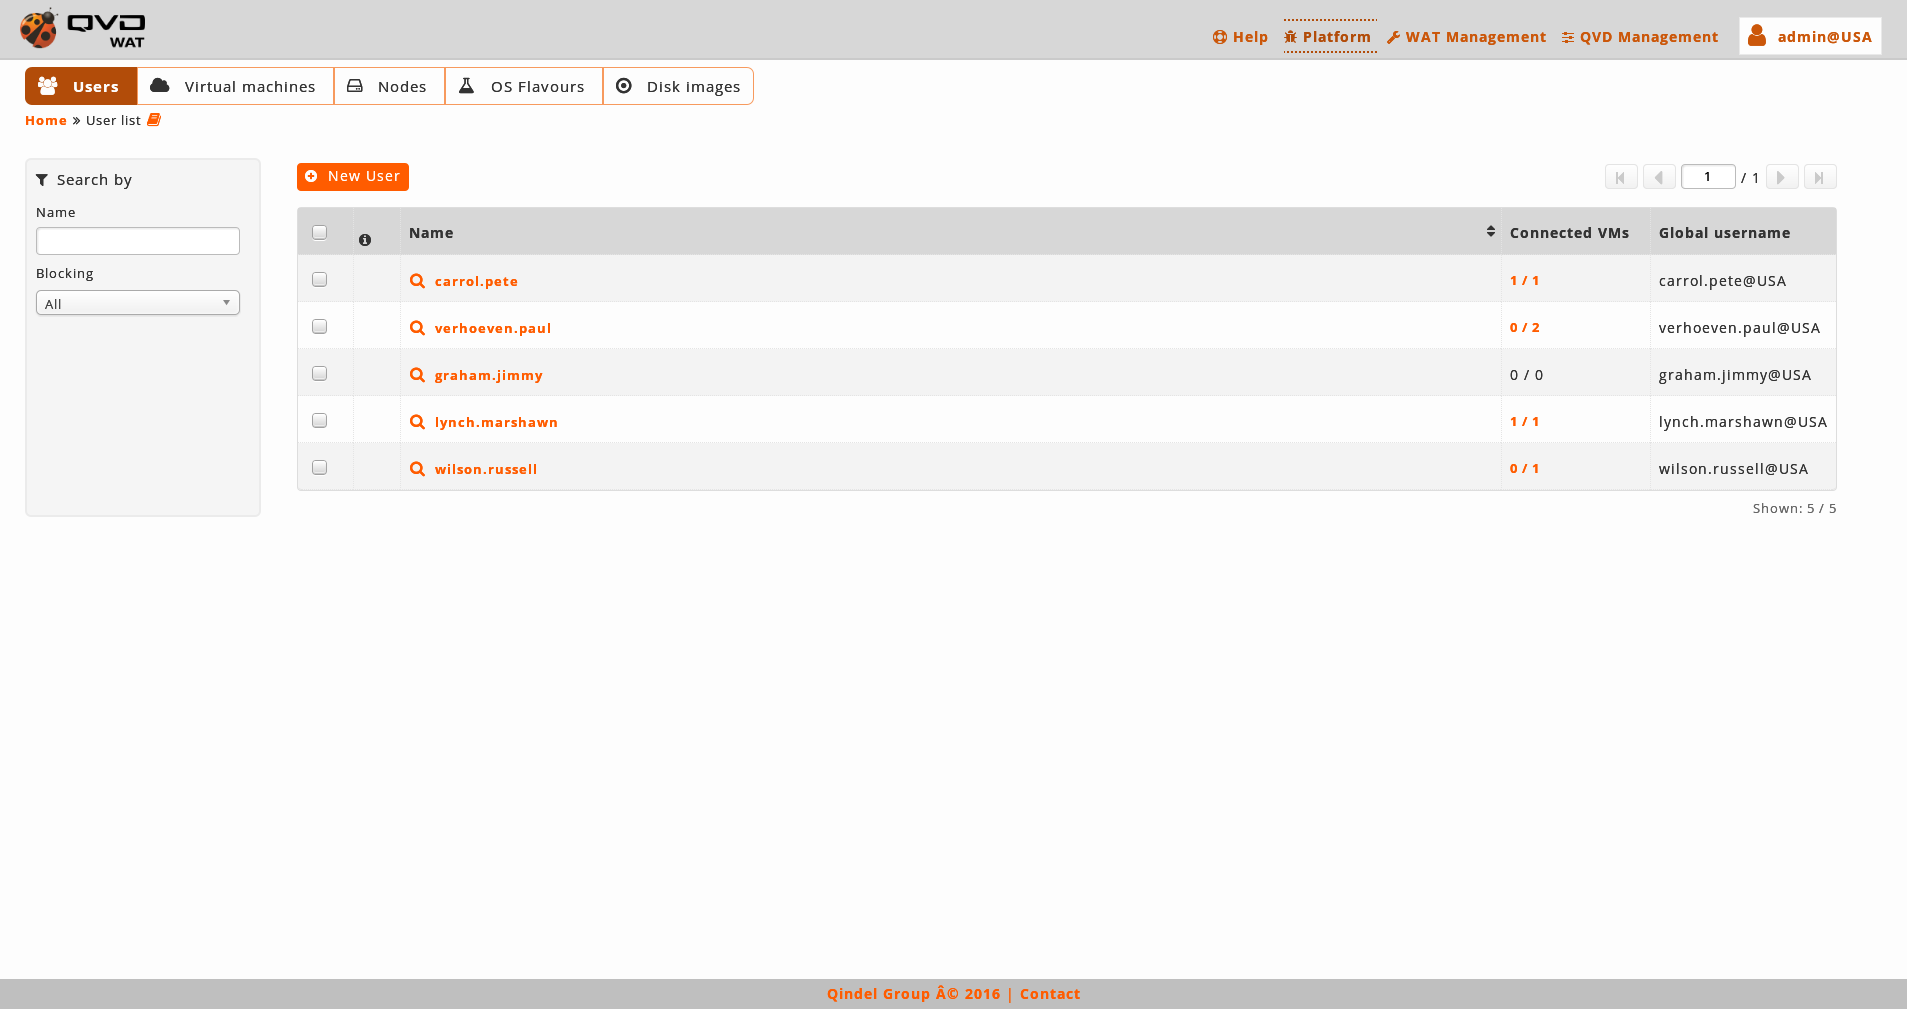
- Information column
-
The information column will indicate us:
-
The blocking state of the users:
-
Locked Lock icon.

A blocked user will not be able to log in to any of their virtual machines.
-
Unlocked If the lock icon does not appear.
-
-
- Massive actions
-
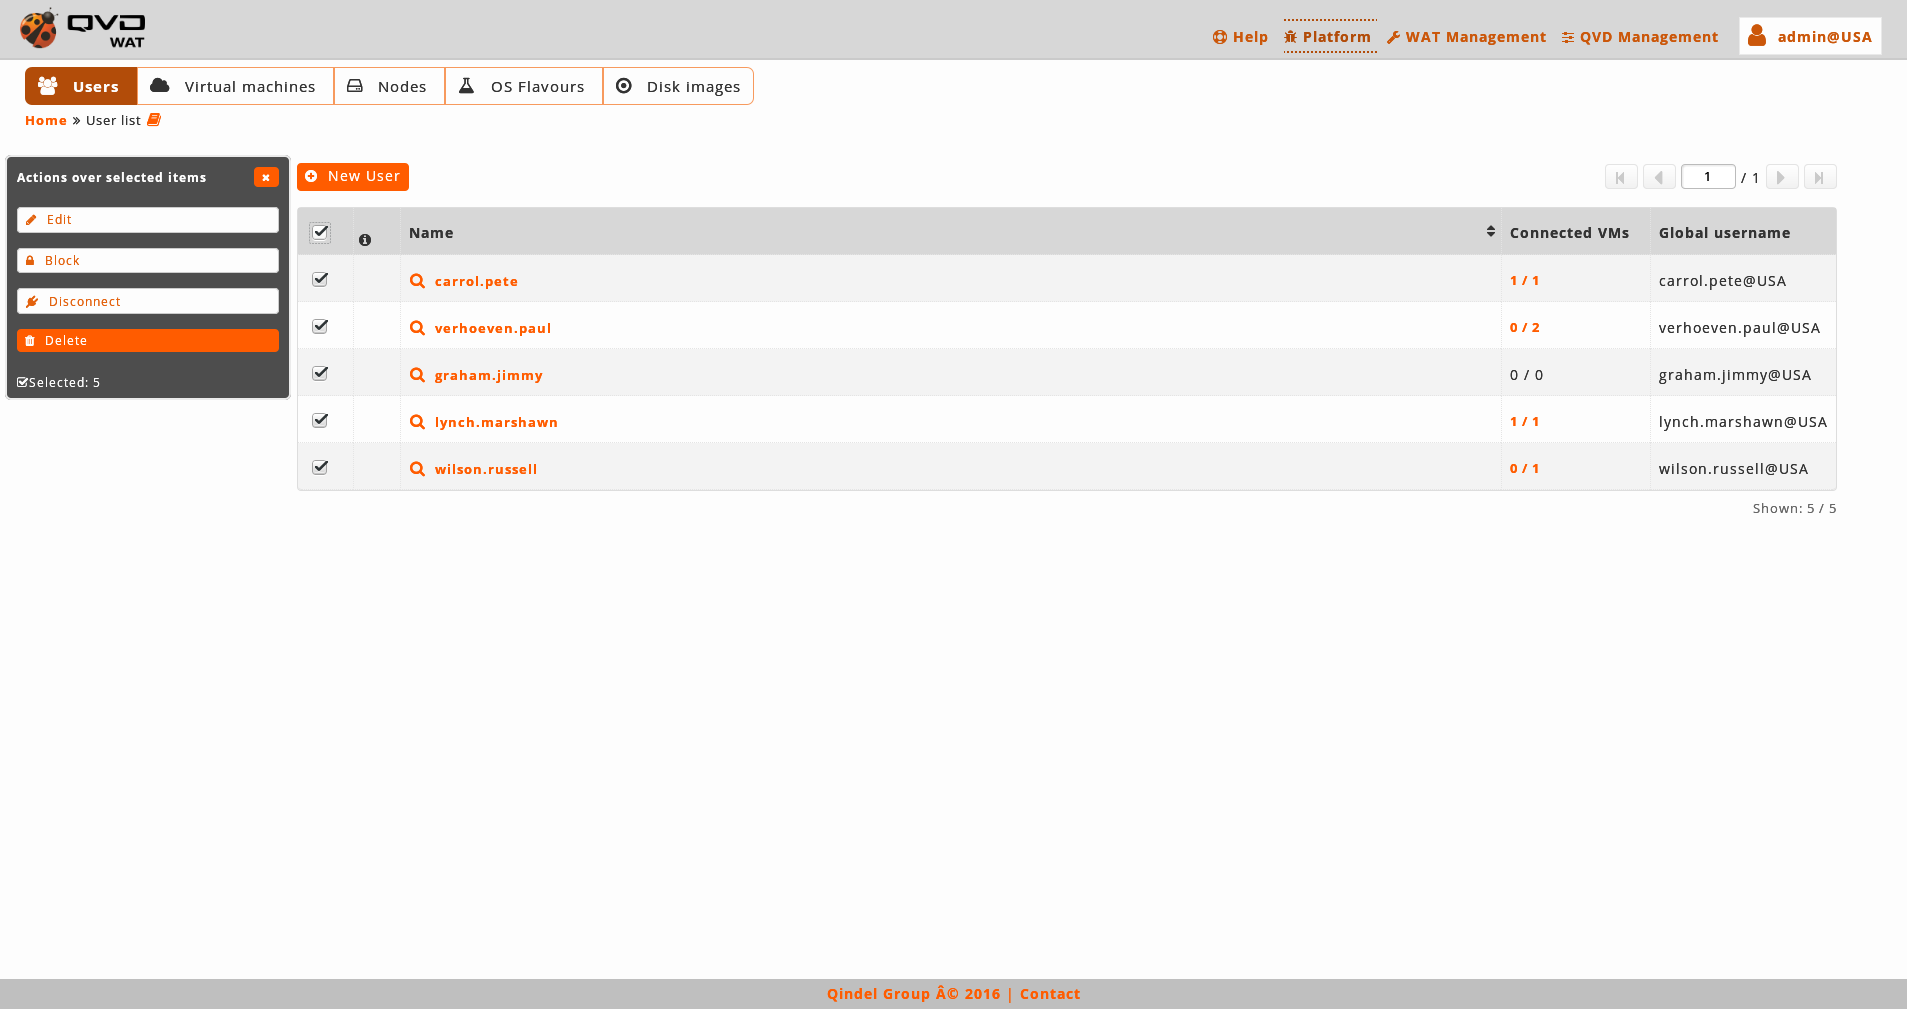
Ths massive actions give us the following options to do on the selected users:
*Lock users *Unlock users *Disconnect users of all the virtual machines where they are connected *Delete users *Edit users: The password of the users will not appear in the massive editor. To change the password it will be needed to be done one by one from the detail view.

If only one element is selected, in the case of the edition we can edit the same fields that with the normal edition of an element in the detail view. - Massive editor
-
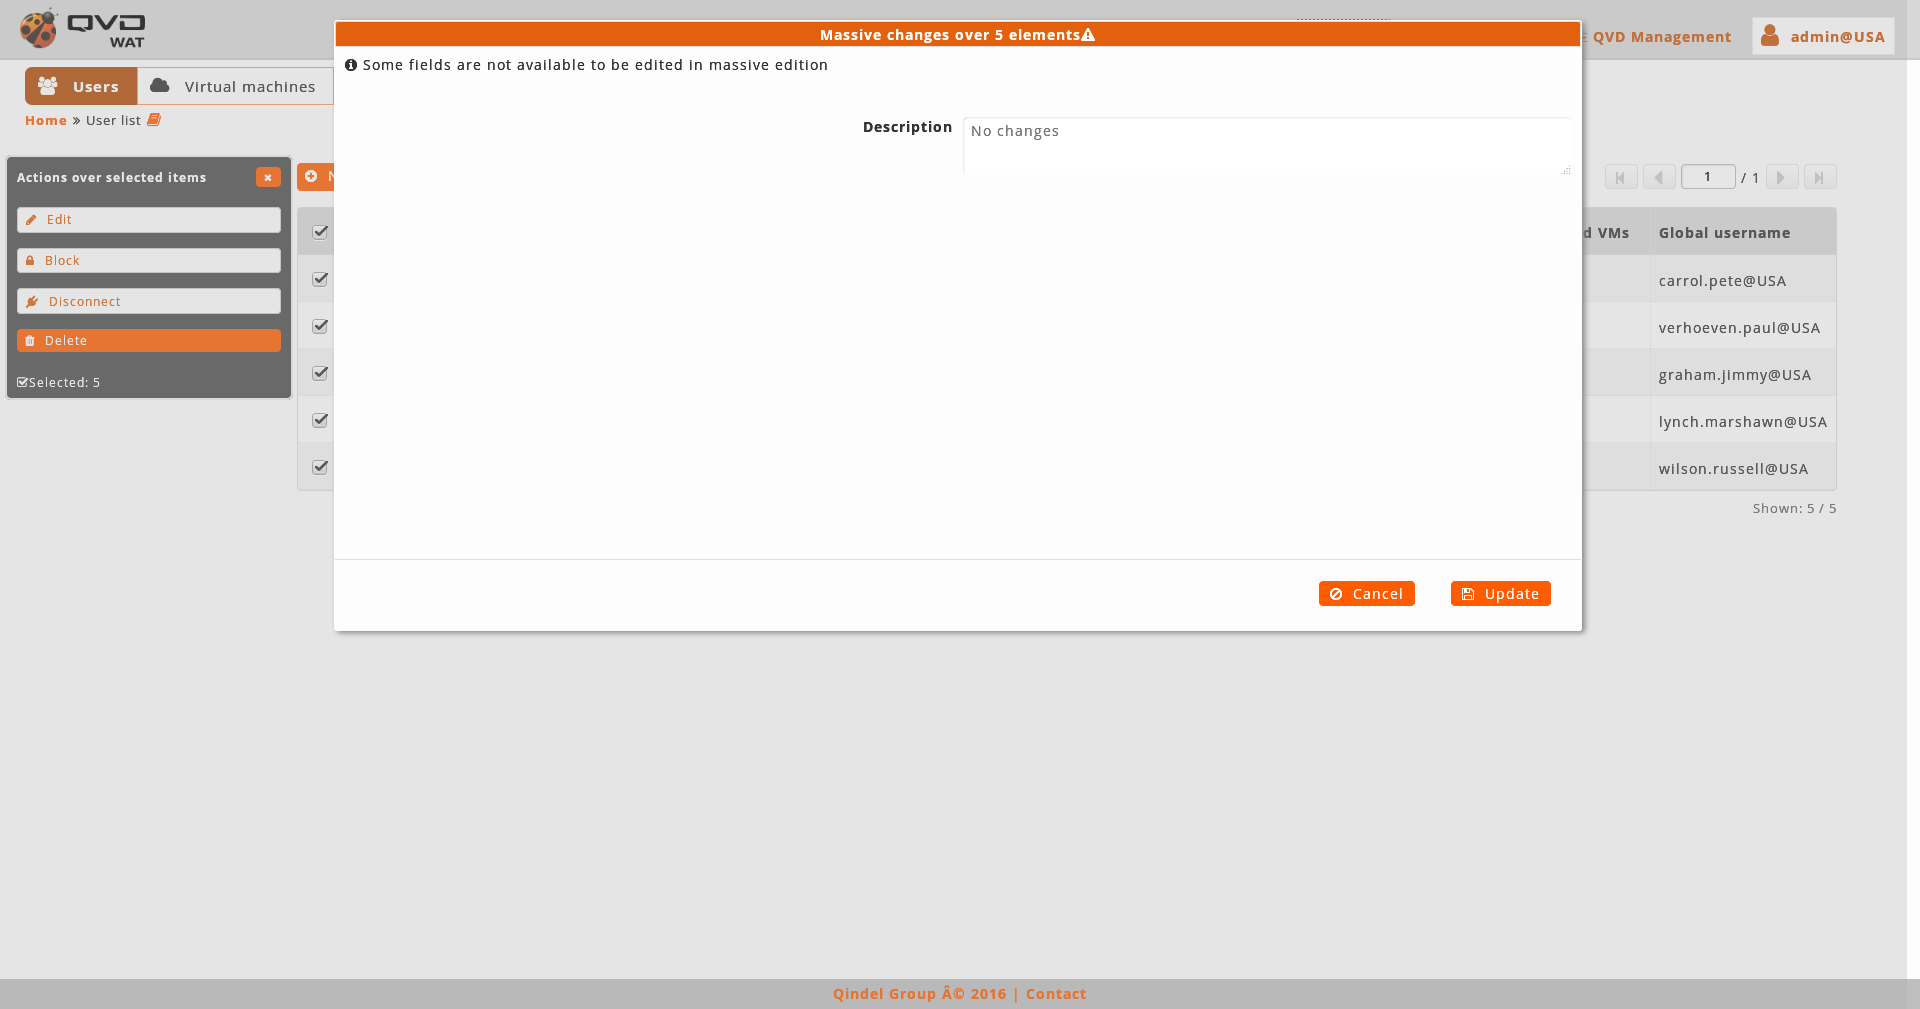
The massive editor of the users only let us modify the custom properties.
As any other massive editor, the value which will be defined, it would rewrite the one that could exist in all the edited elements unless "No changes" option were selected.
If custom properties do not exist in the users the massive edition will not be authorised.
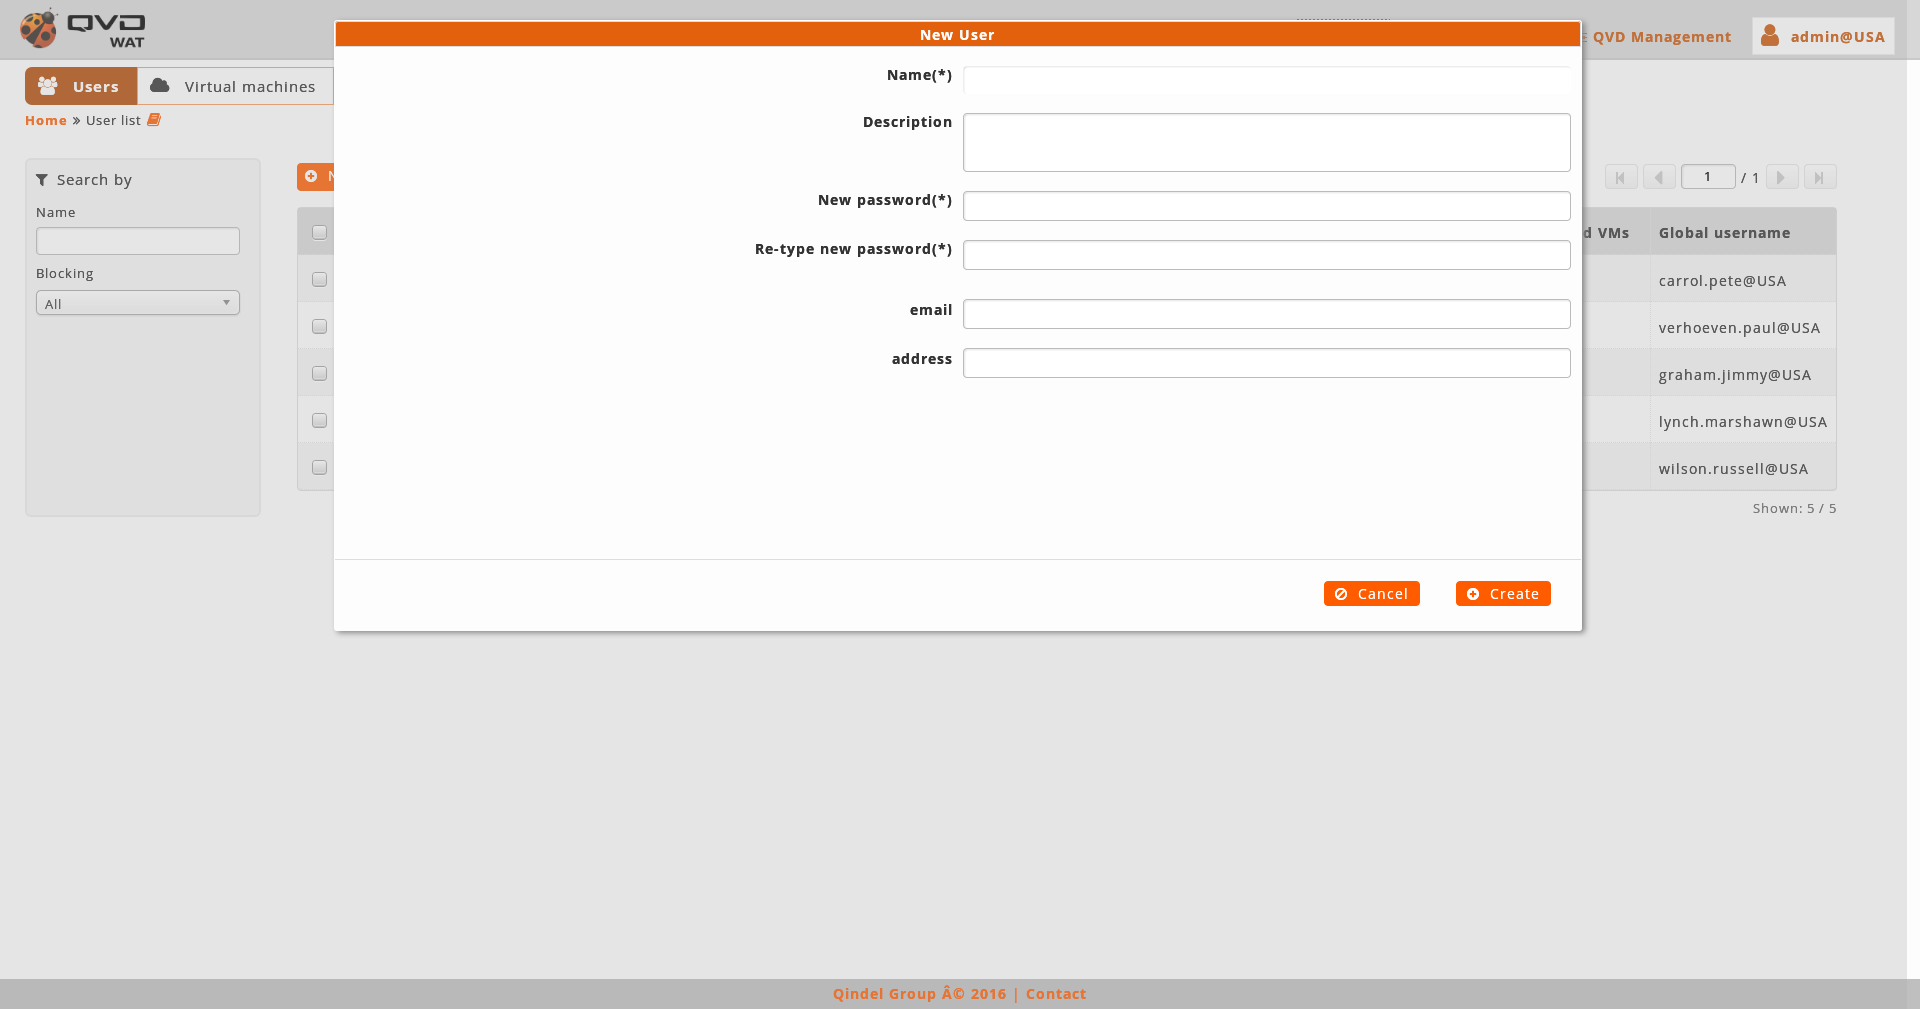
- Creation
-
When creating a user we will establish its name, password and properties.
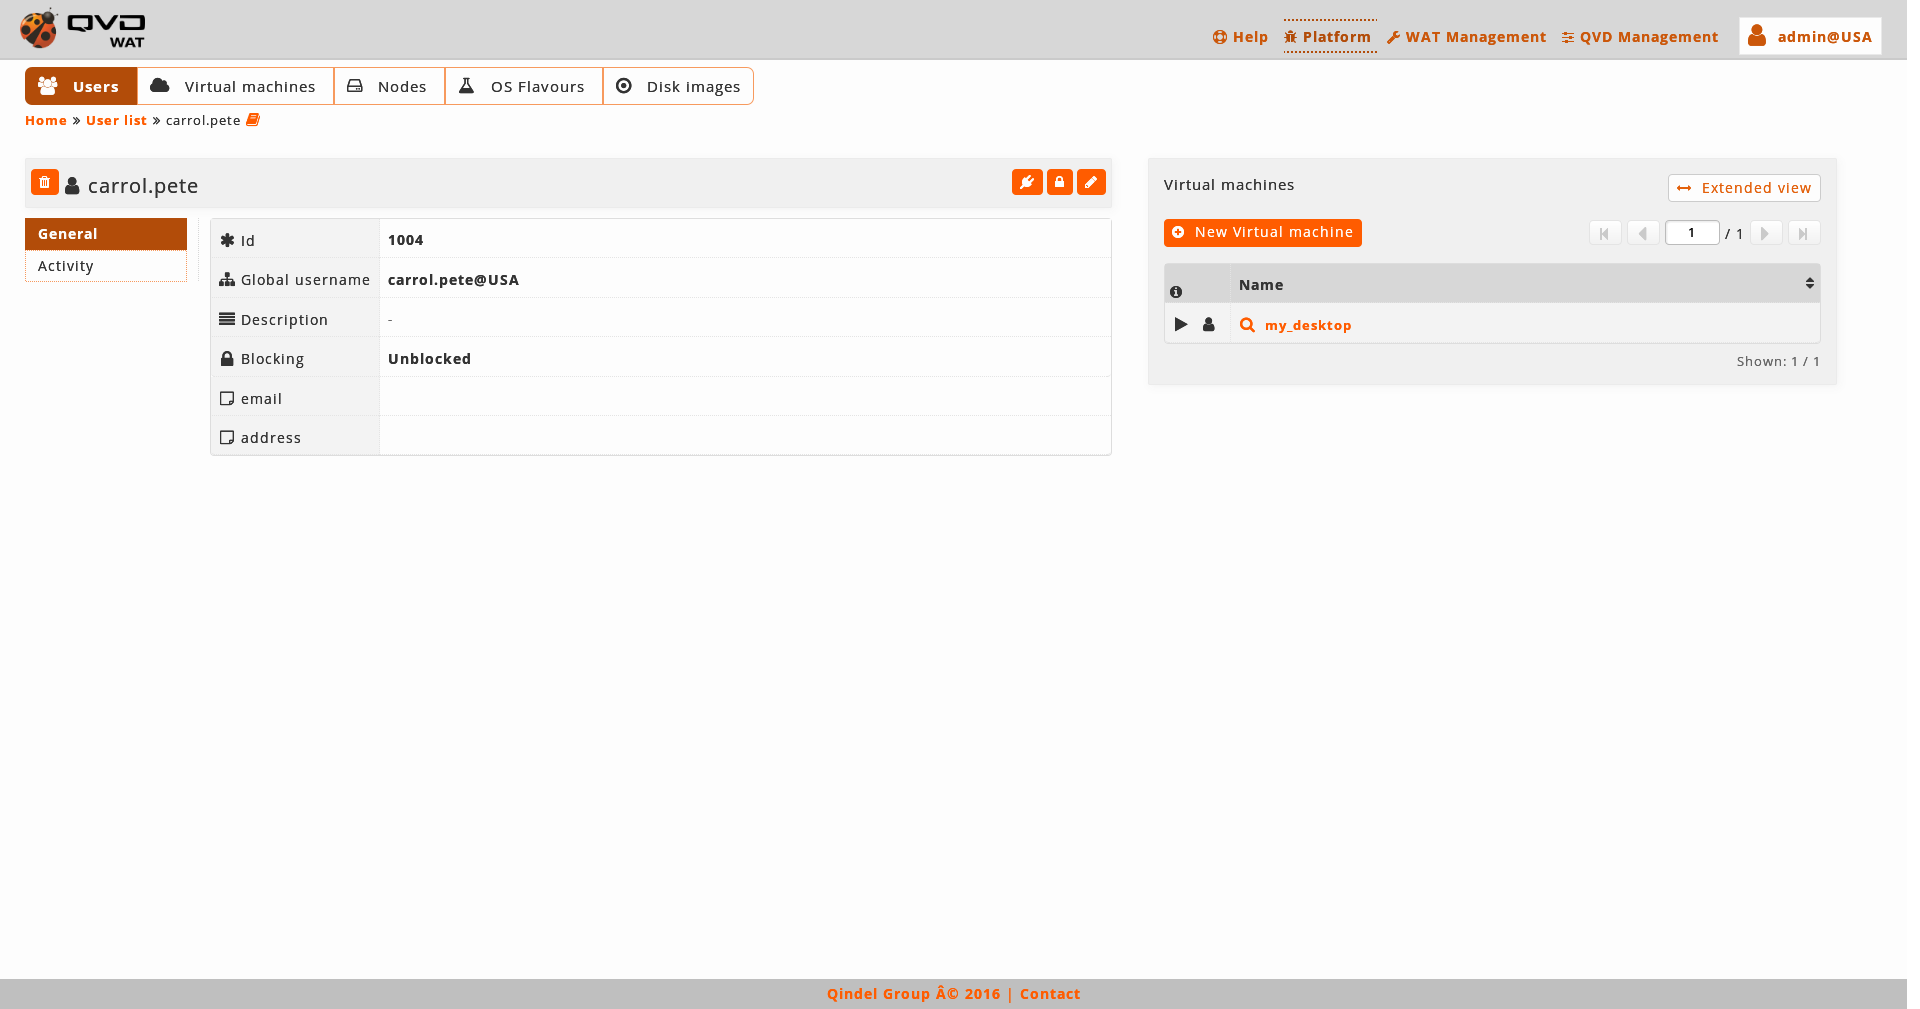
- Detail view
-
We observe a small head top next to the username where the buttom to delete it and the action buttoms are.
The available buttoms in the detail view of the user are:
*Locking/Unlocking the user *Editing the user
Below this head top there is a table with the attributes of the user including the properties, if there were.
And on the right part we find:
-
The virtual machines asociated to this user
If we want more actions on them with the extended view buttom we go to the list of the virtual machines filtered by this user.
In this case, which is different from other detail views, we also have a buttom to create a virtual machine asociated to the current user, where the same creation form of the virtual machines, except the user, will appear to which the machine will be asociated, that is implicit since it is created from here.
-
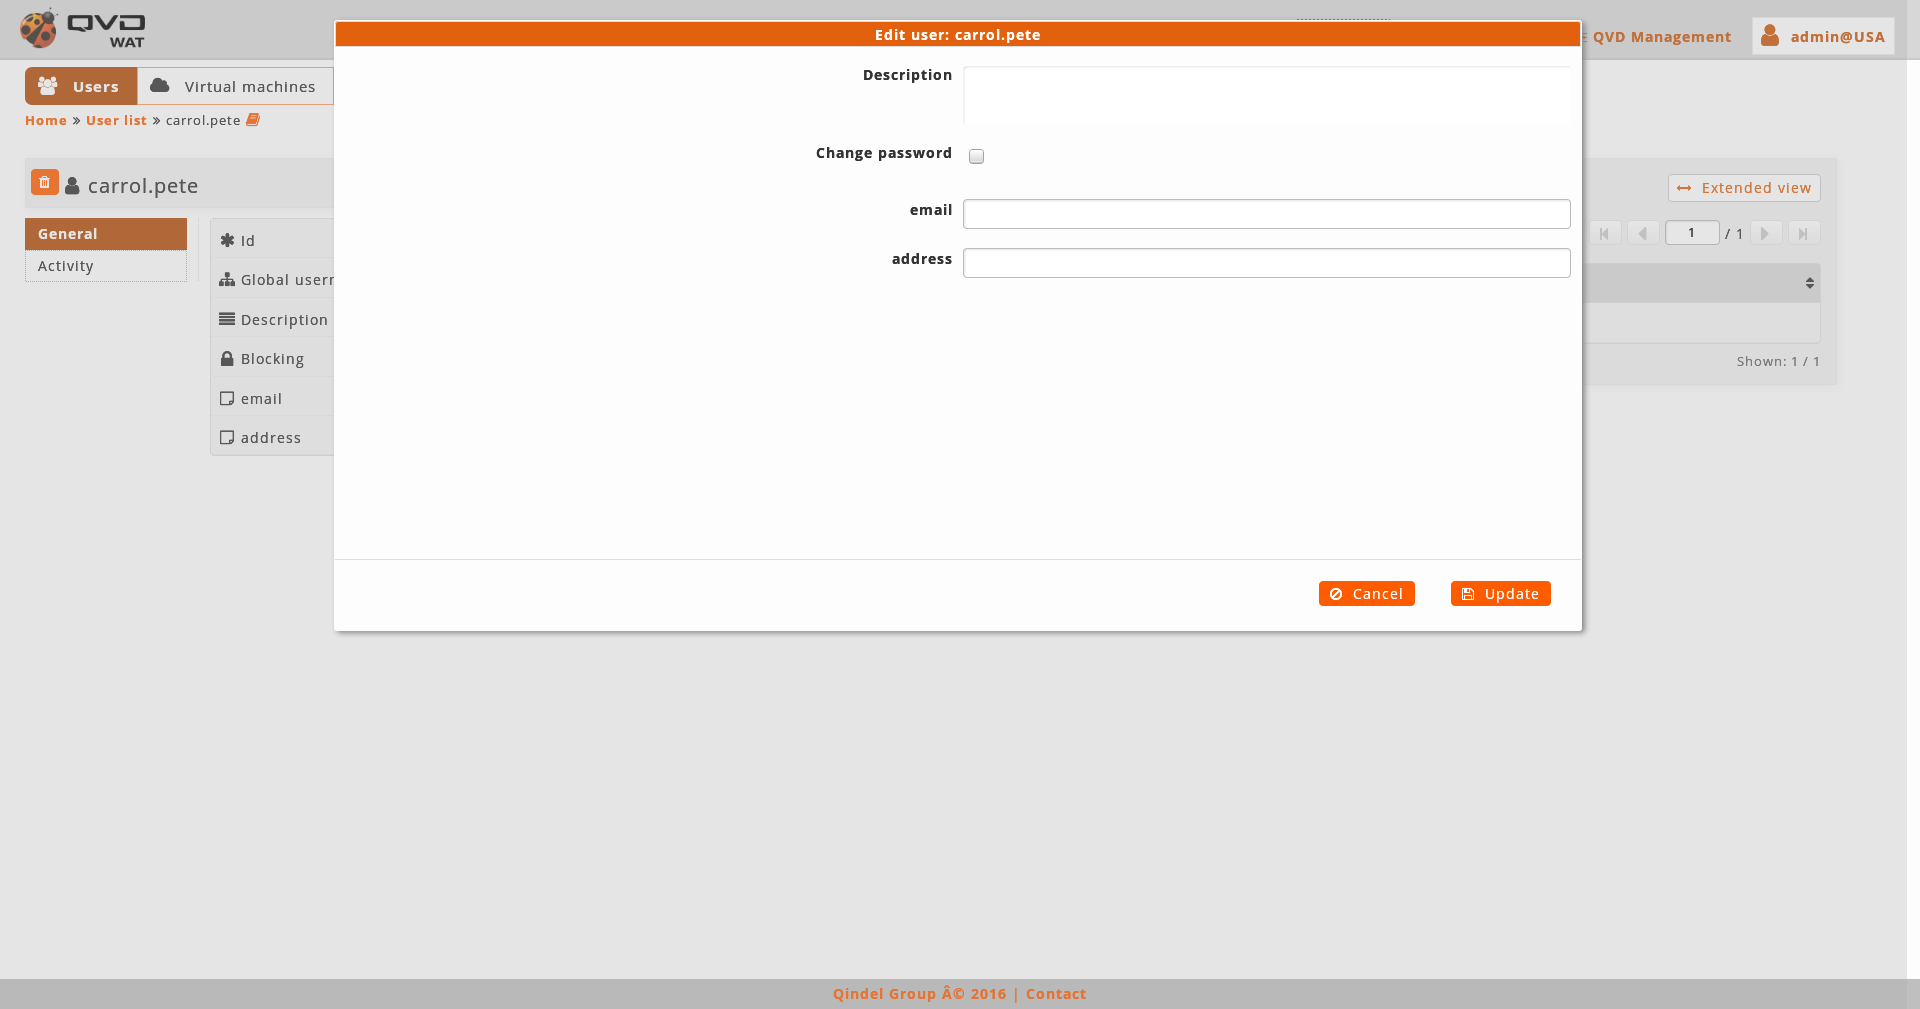
- Edition
-
When editing a new user we can choose among changing the password (if we do not select the check box, it will remain unchanged) and editing properties.
We can also access to the edition of the element from the list view with the massive actions only if we select one element.
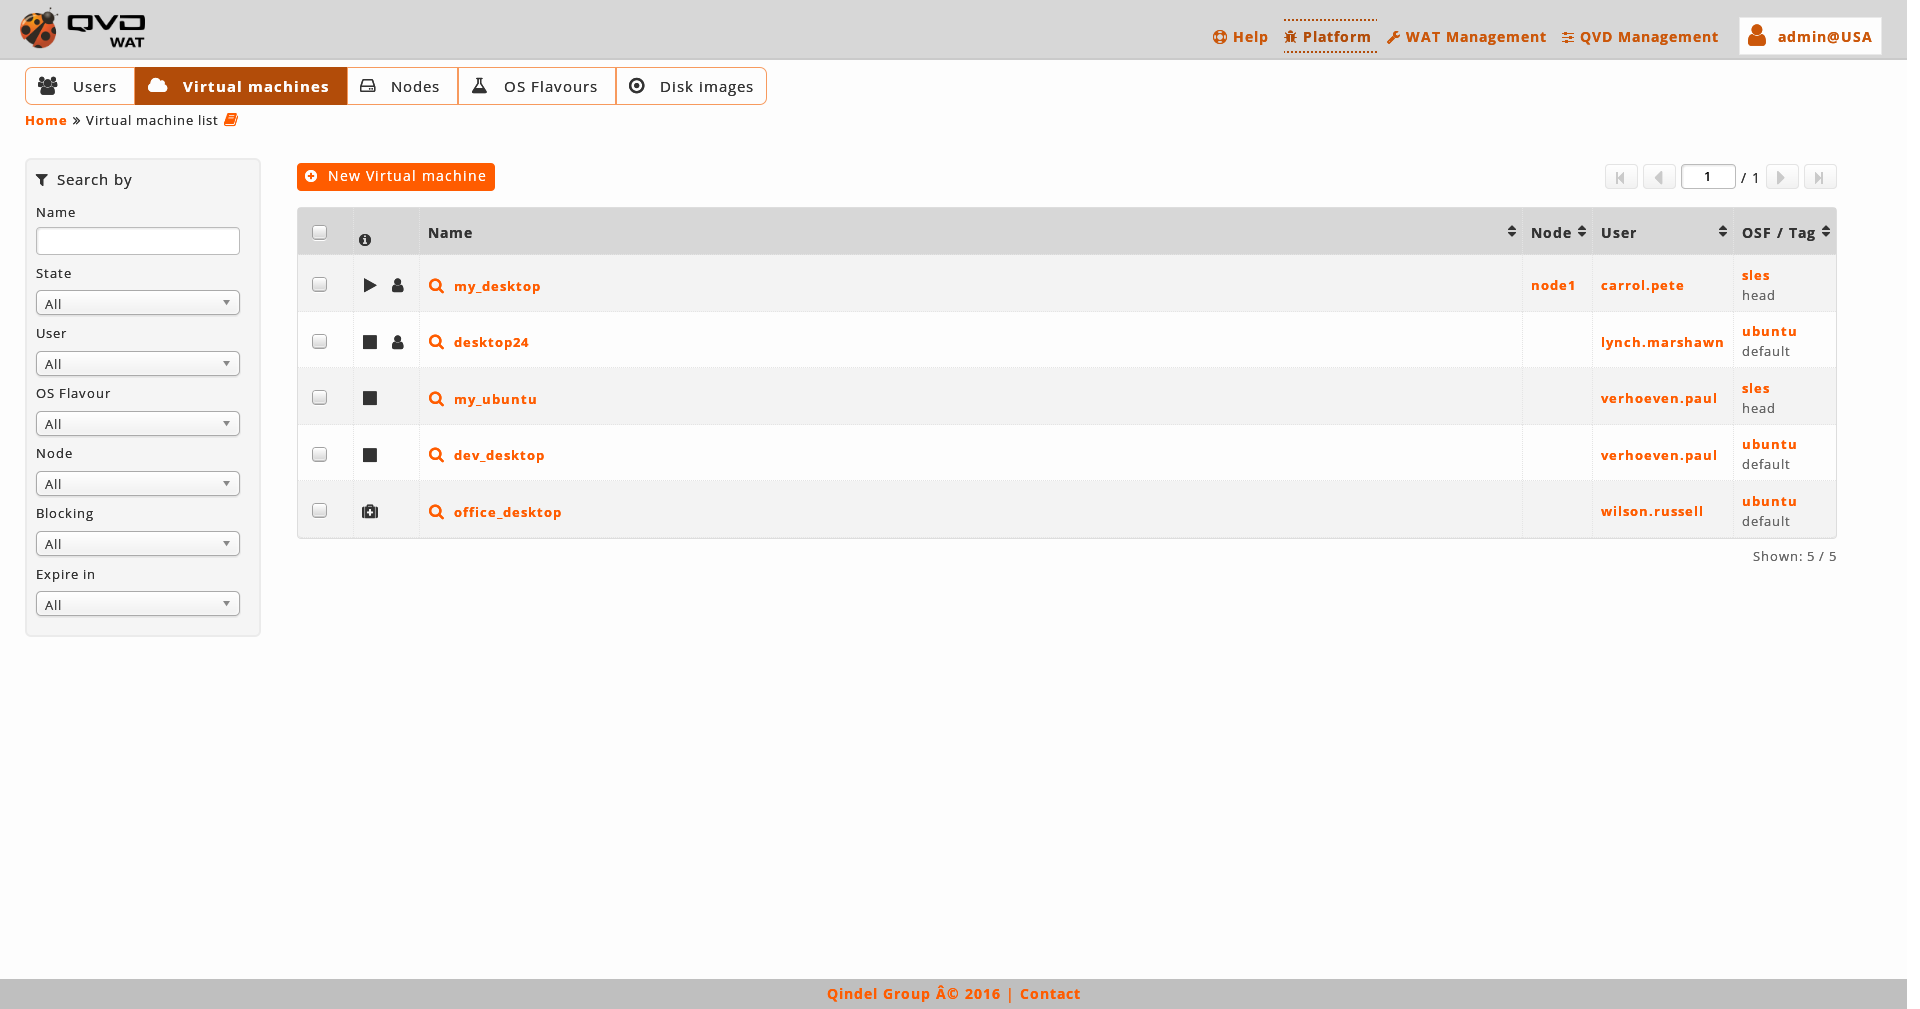
2.4.2. Virtual Machines
In this part the virtual machines of QVD including the image that they execute are managed.
- List view
-
The main view is a list with the virtual machines of QVD.
- Information column
-
The information column will indicate us:
-
The blocking stauts of the virtual machines:
-
Locked. Lock icon
A blocked virtual machine will not be able to start.
-
Unlocked If the lock icon does not appear.
-
-
If the virtual machines have defined an expiration date
-
With expiration date Clock icon.

This icon shows that there is an expiration stablished, whether it is soft or hard.
-
Without expiration date. If the clock icon does not appear.
-
-
Executing State of the virtual machines.
-
Stopped. Stop icon.

-
Stopping. Blinking stop icon.
-
Running. Play icon.

-
Starting. Blinking play icon.
-
-
Connection status of the user of the virtual machines
-
User connected. User icon.

-
User not connected. If the user icon does not appear.
-
-
- Massive actions
-
The massive actions give us the following options to do on the selected virtual machines:
-
Start virtual machines
-
Stop virtual machines
-
Locki virtual machines
-
Unlock virtual machines
-
Disconnect the user of the virtual machines
-
Delete user session
-
Edit virtual machines: the name of the virtual machines will not appear in the massive editor. To change the name it will be needed to do it one by one from the detail view.
If only one element is selected, in the case of the edition we can edit the same fields that with the normal edition of an element in the detail view. -
- Massive editor
-
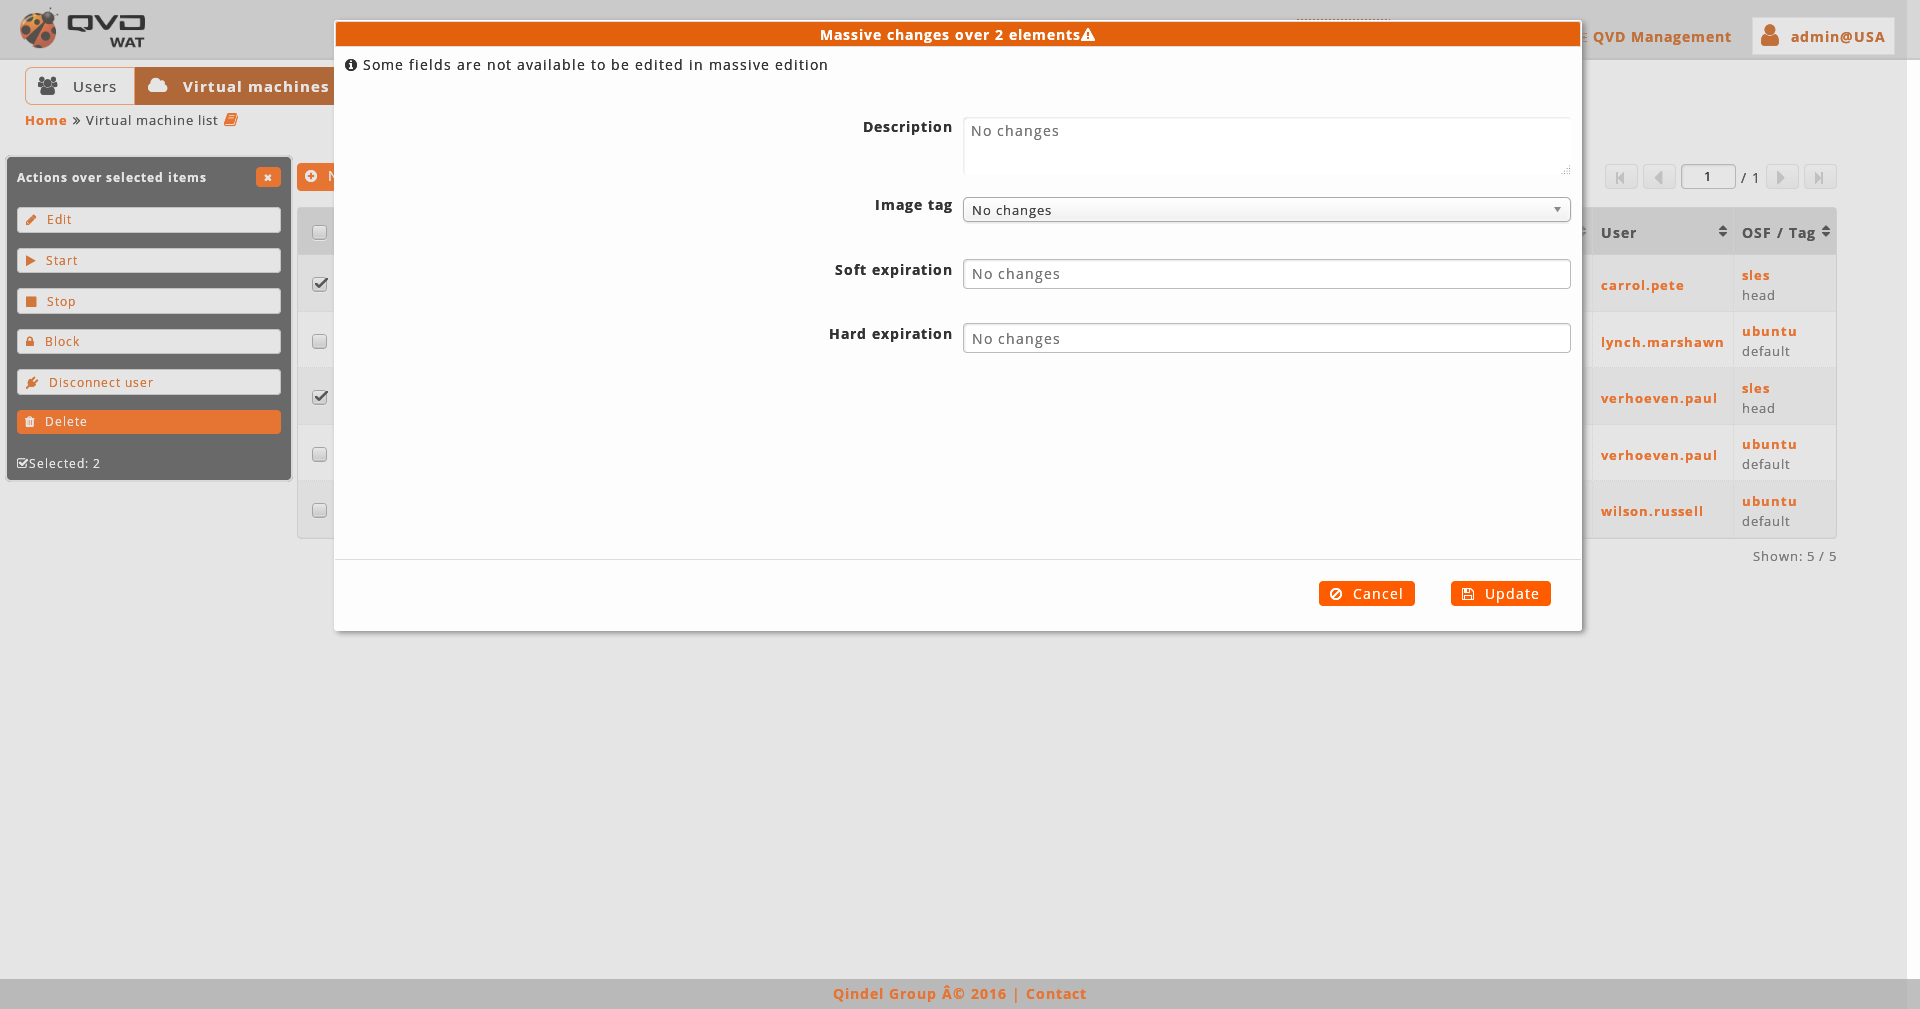
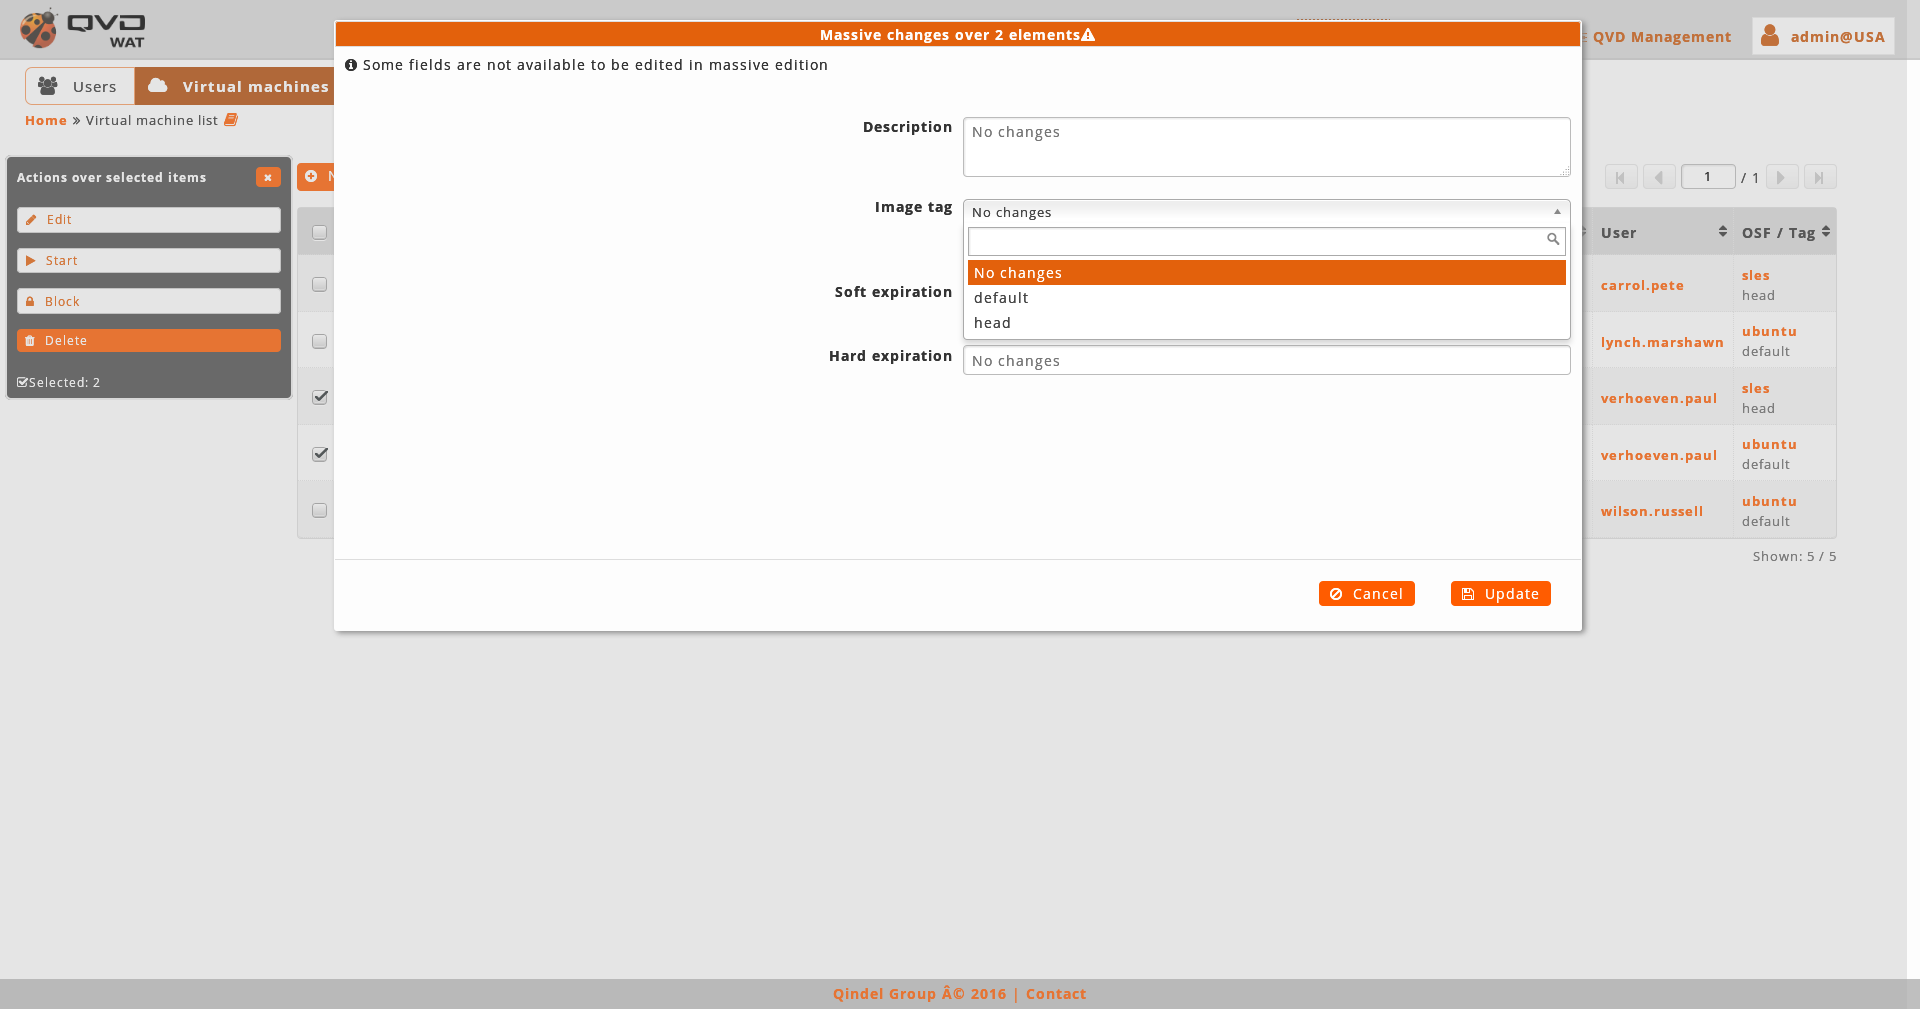
The massive editor of the virtual machines let us change the tag of the image used, assign an expiration date and modify custom properties.
As any other massive editor, the value which will be defined, it would rewrite the one that could exist in all the edited elements unless "No changes" option were selected.
The expiration control will be seen in the part of the Edition of the virtual machines.
Regarding the tag of the image, when we edit massively virtual machines we have two posibilities:
-
The virtual machines having assigned the same OSF: In this case the tag selector of an image will show all the tags of the images of the assigned OSF as well as the special tags default and head to use the default stablished image or the last created one respectively.
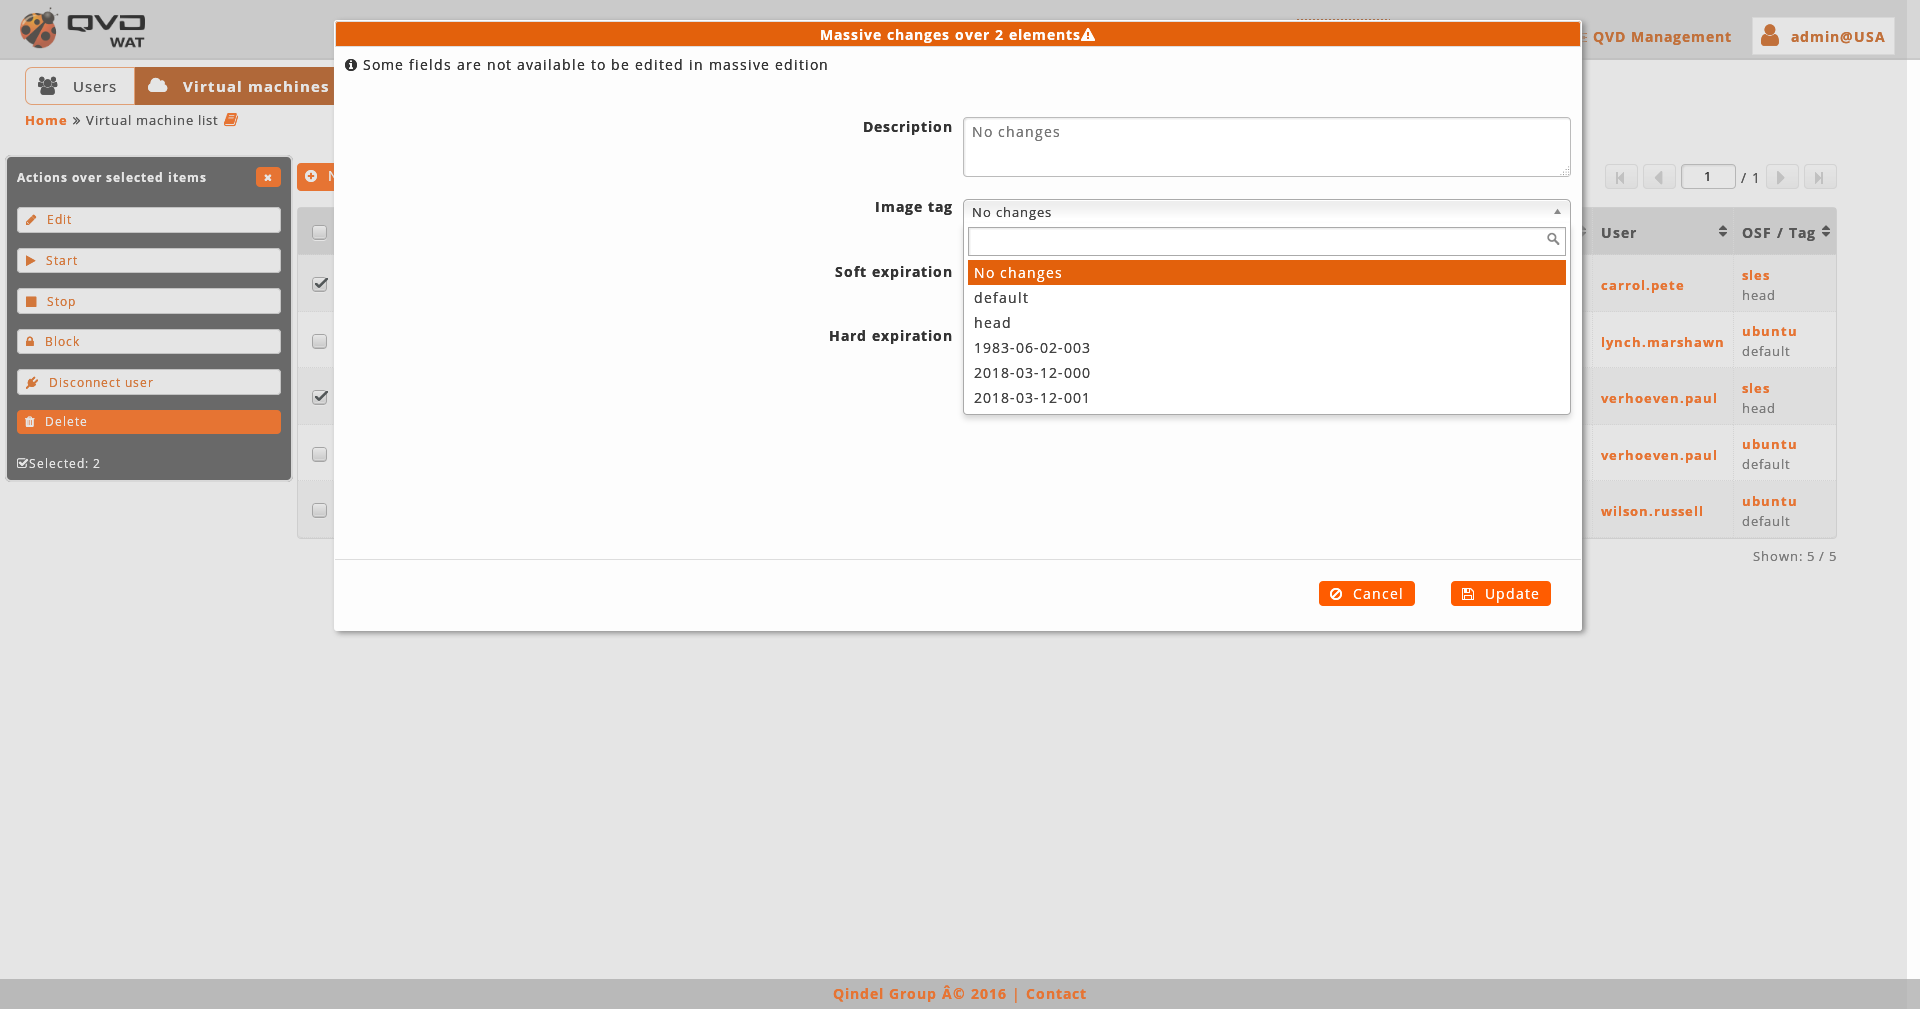
-
The vitual machines having assigned different OSFs. In this case a warning will be shown.
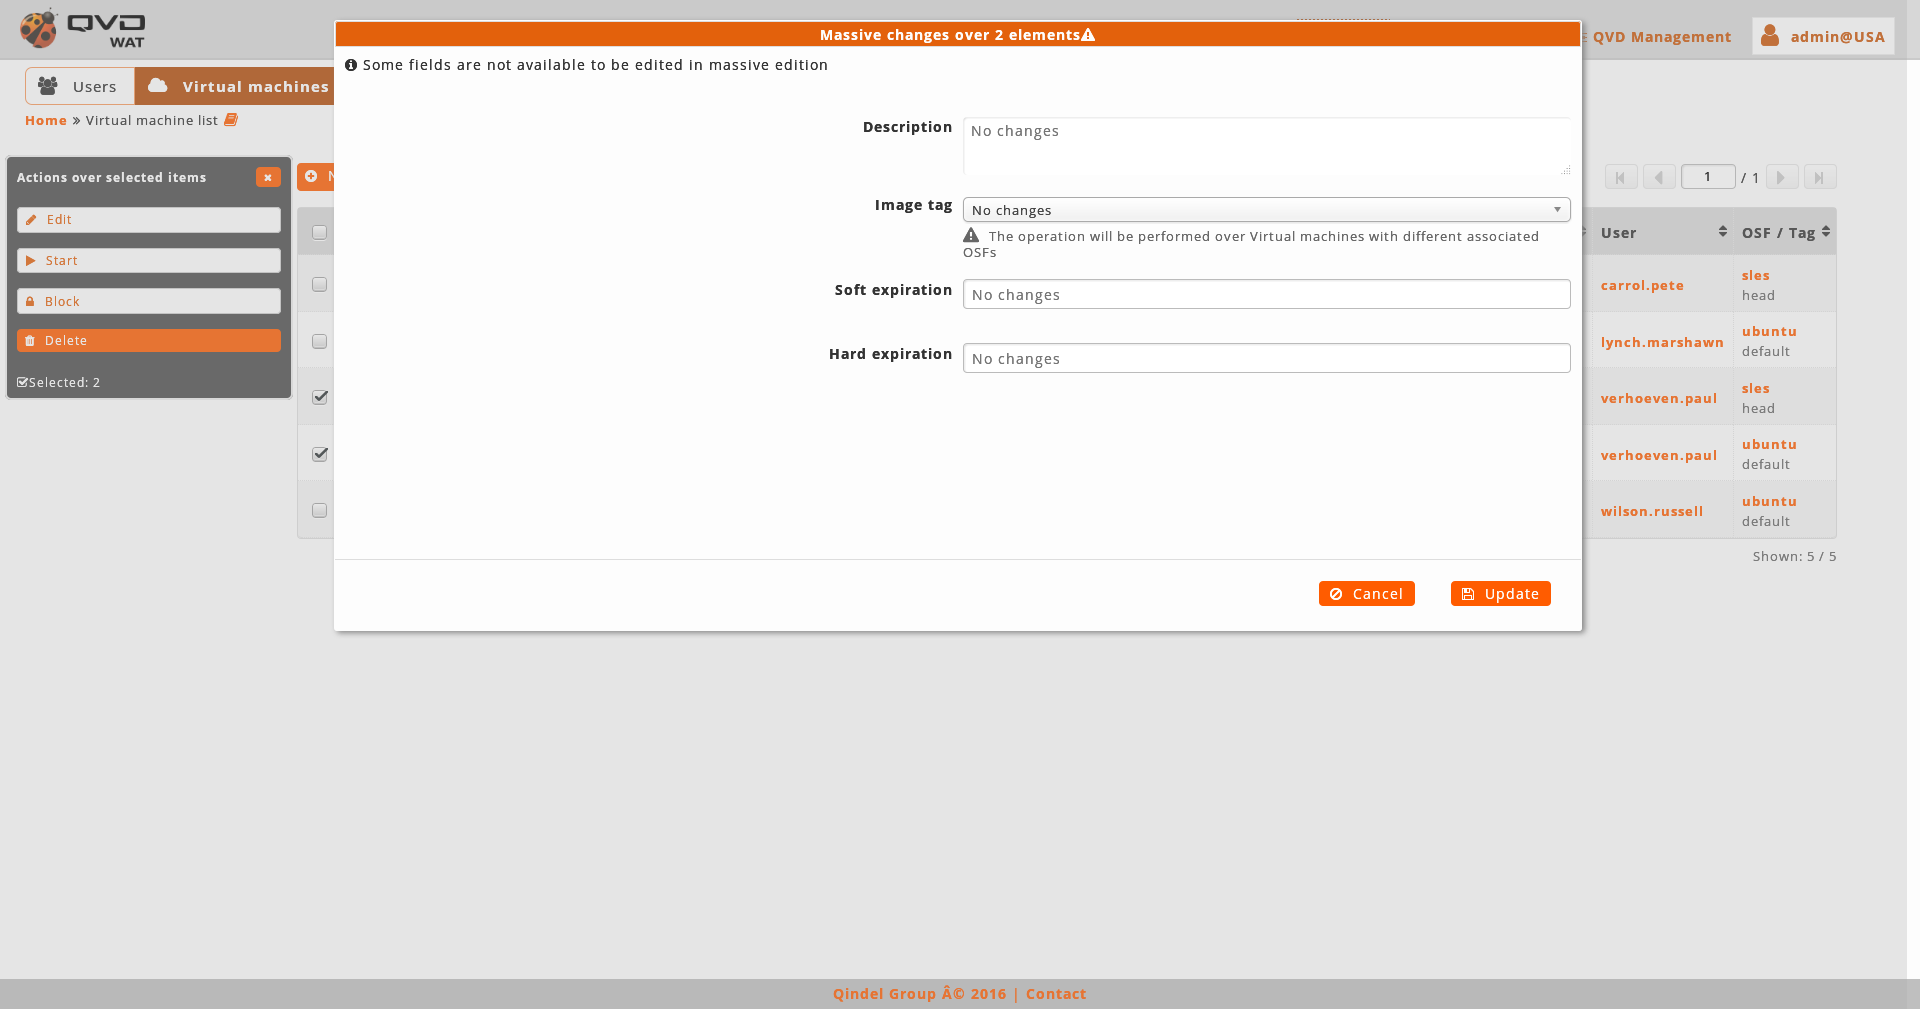
As we can not obtain a real list of tags for all the selected virtual machines, we can only choose between default and head.
-
- Creation
-
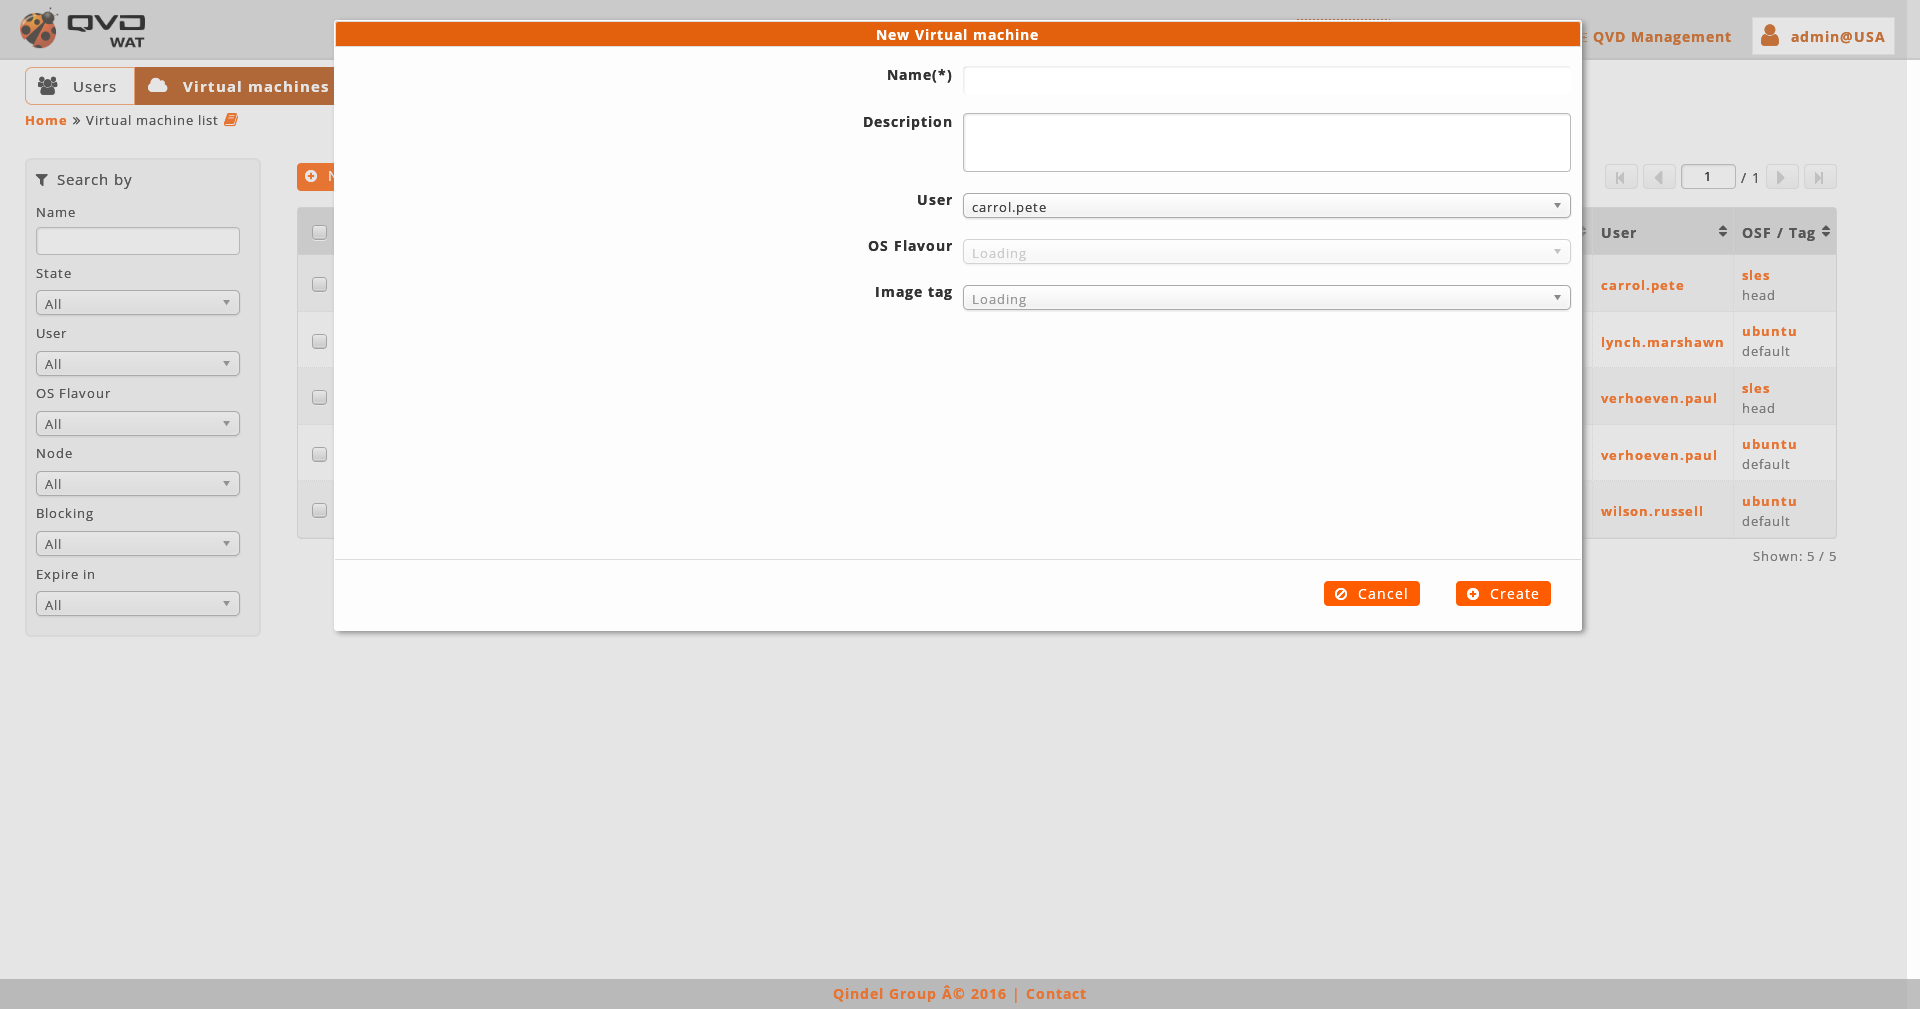
When creating a virtual machine we will establish its name, the user that it belongs to (except if we create it from the user detail view) and the image it will use.
We will select the image by choosing an OSF and the image tag wanted. When selecting the OSF, the tags of the images asociated to thar OSF will be charged in the following combo, where you can choose one of them as well as the special tags default and head, with which the default image or the last created image in the OSF respectively will be charged.
OSF is the only datum that we will not be able to edit later in a virtual machine.
- Detail view
-

We observe a small head top next to the name of the virtual machine where the buttom to delete it and the action buttoms are.
The available buttoms in the detail view of the virtual machine are: * Disconnecting the user from the virtual machine. This buttom will only be available if the user in connected. * Spy the user session. This buttom will only be available if the virtual machine is running. * Locking/Unlocking the virtual machine * Editing the virtual machine
Below this head top there is a table with the attributes of the virtual machine including the properties, if there were.
On the right part we finde:
-
Execution state of the virtual machine
-
- Expiration dates
-
According or not to the definition of expiration or the state of the same, different things will be shown in the field Expiration of the attributes:
-
Without expiration: The machine that will not expire is the only that will be shown.

-
With expiration that is not over: Soft, hard or both expirations will be shown together with the time that is left for them to occur. When the expiration moment is approaching they will be shown in different colors (green, yellow or red).

-
With a hard expiration that is over: If the machine has definetively expired, it will be only shown that it has expired.

-
- Execution status
-
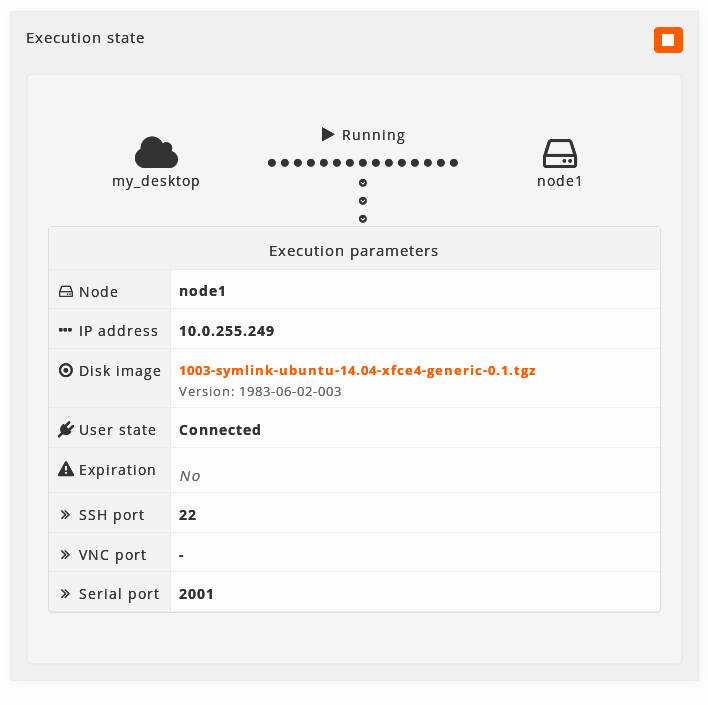
On the right part of the detail view there is a chart with the execution state of the virtual machine. If the machine is running, we will be able to see the execution parameters.
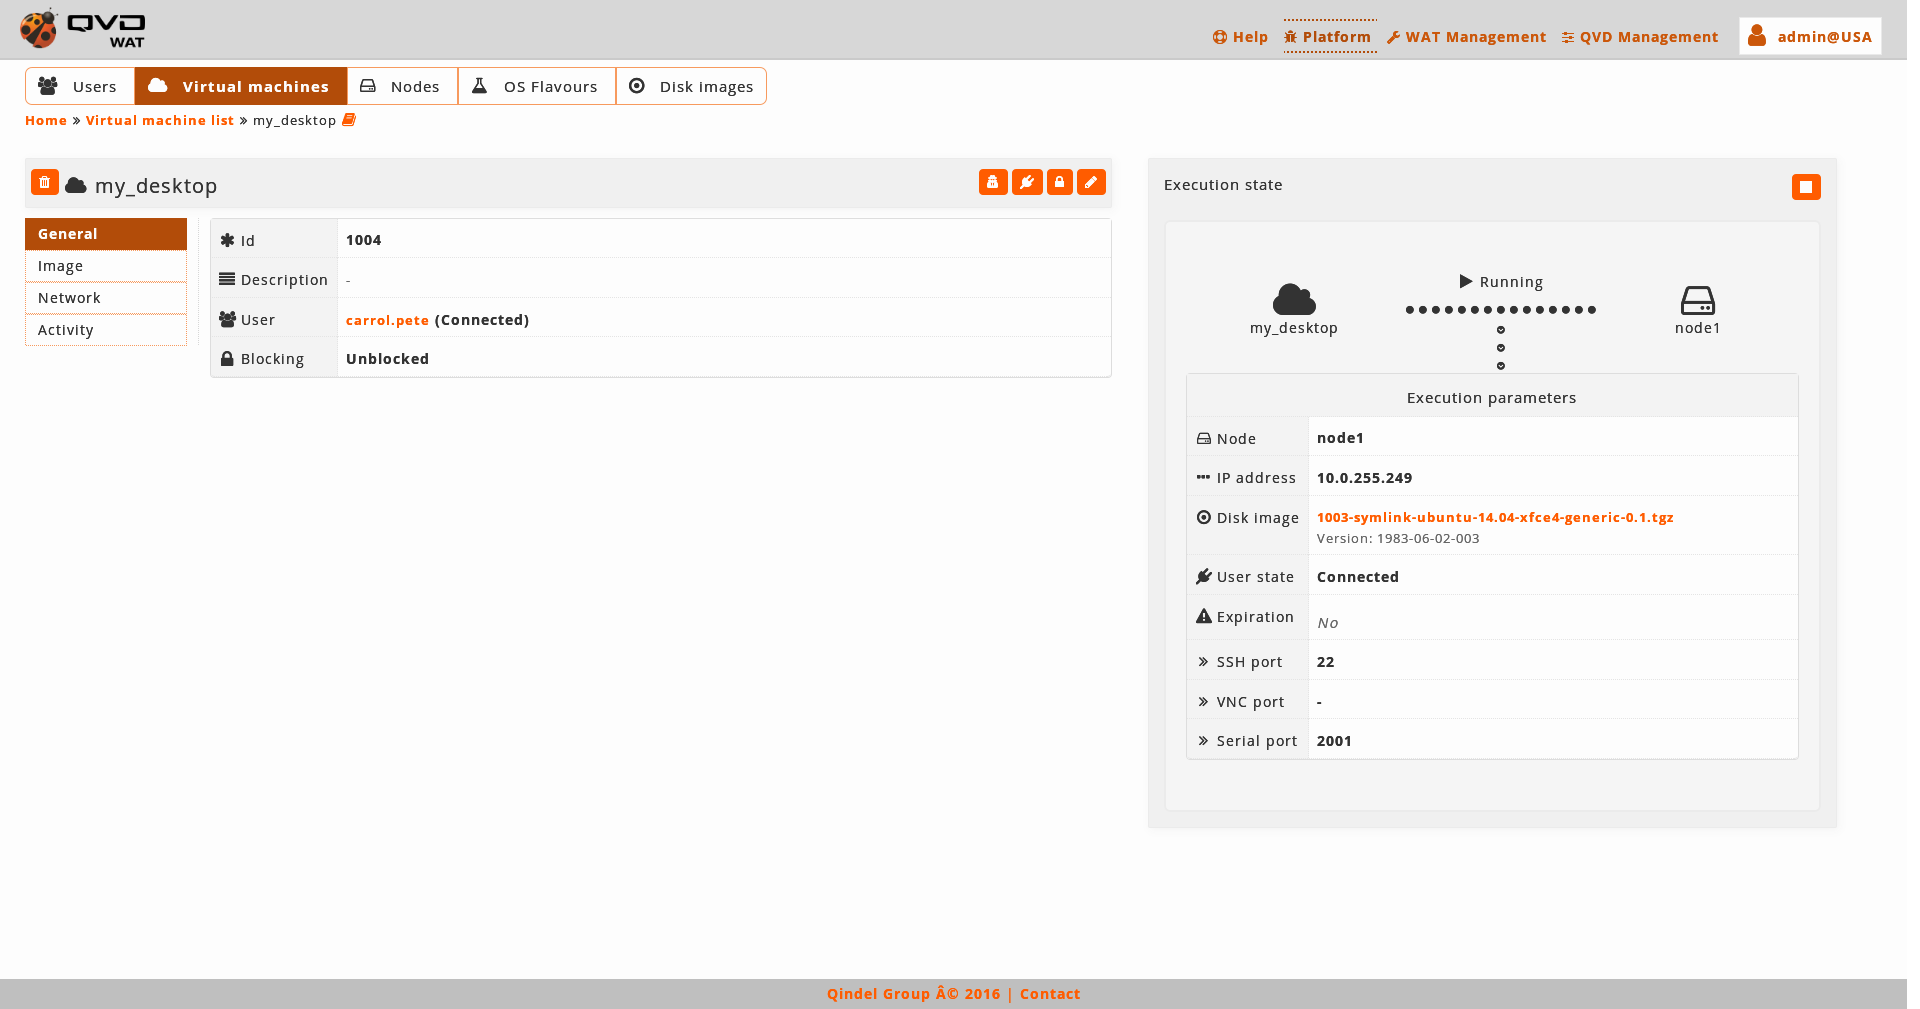
These parameters can change from one execution to another and they do not need to coincide with the current attributes of the machine.
For exaple, in the snapshot, we observe that the default tag is set, so the machine is executing the image that the OSF has set as a default. If the default image of the OSF changes, we observe that in the attributes another disk image appears, but in the execution parameters the previous one still appears, since it is the one that is being executed.

In this case a warning will appear to make us realise that an execution parameter is different to the current ones, and if we want it to change we will have to restart the virtual machine.
The chart with the execution state also has a control to start/stop the virtual machine.
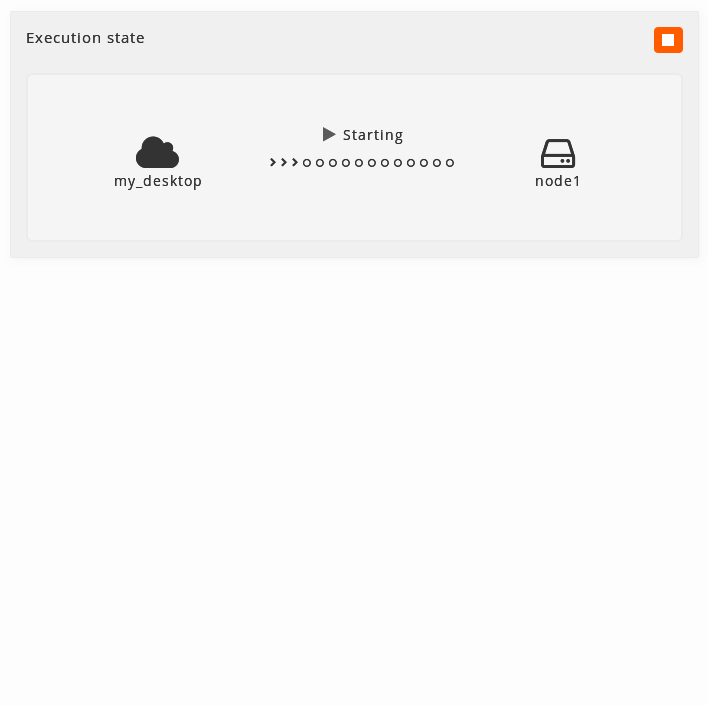
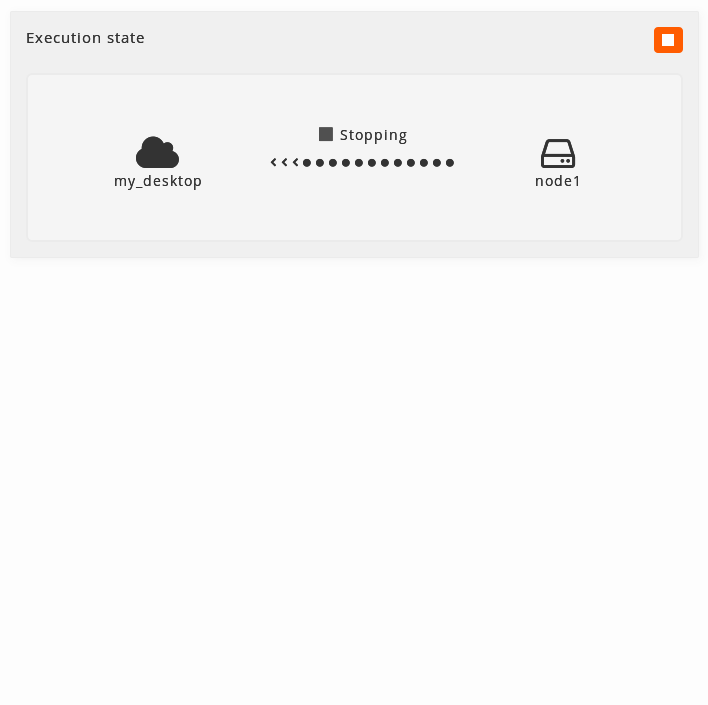
Depending on the moment, the virtual machine can go through 4 different states:
-
Running: A simple version will appear with a buttom to show the execution parameters. The buttom to stop the machine will be available
-
Stopped: When the machine is stopped, it will be shown like this and the buttom to start it will be available.

-
Starting When the virtual machine is starting an icon in movement will be shown. There will not be neccessary to refresh the page, and the status will change to Running when the proccess is over.
-
Stopping: When the virtual machine is stapping an icon in movement will be shown. There will not be neccessary to refresh the page, and the status will change to Stopped when the proccess is over.
-
- Edition
-
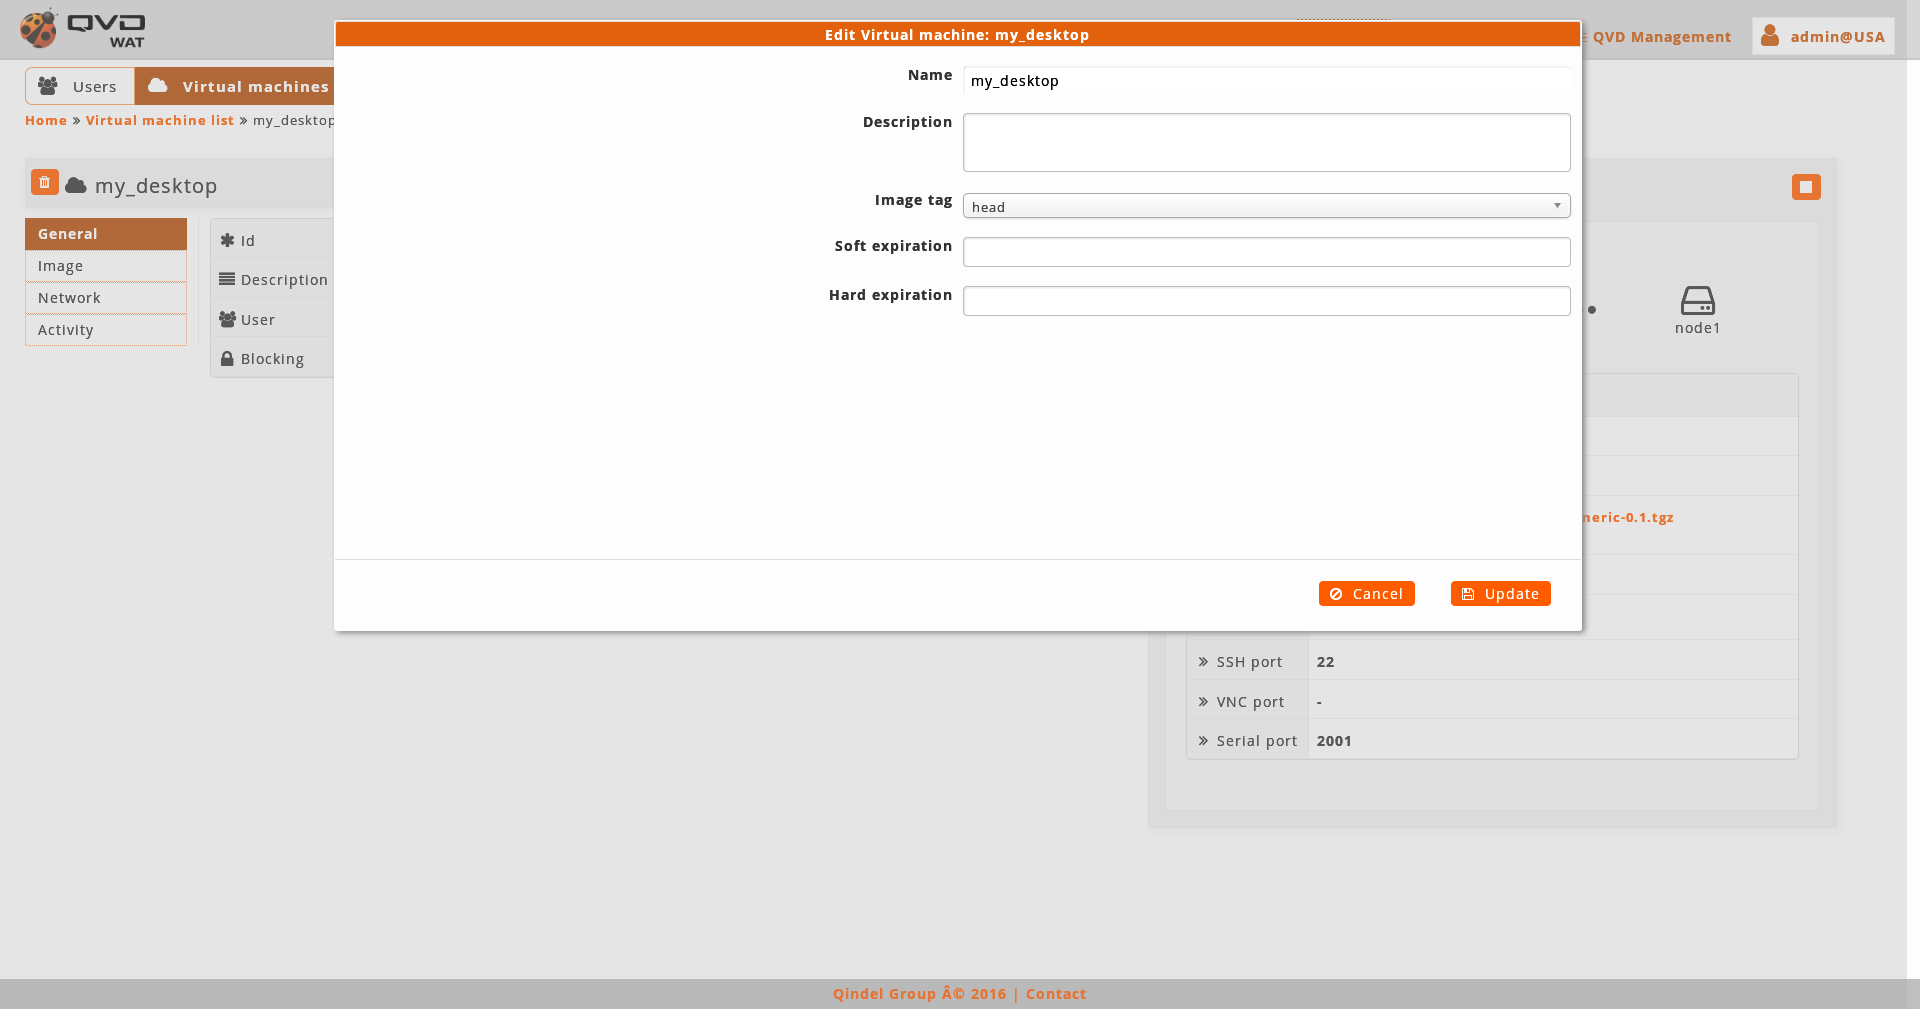
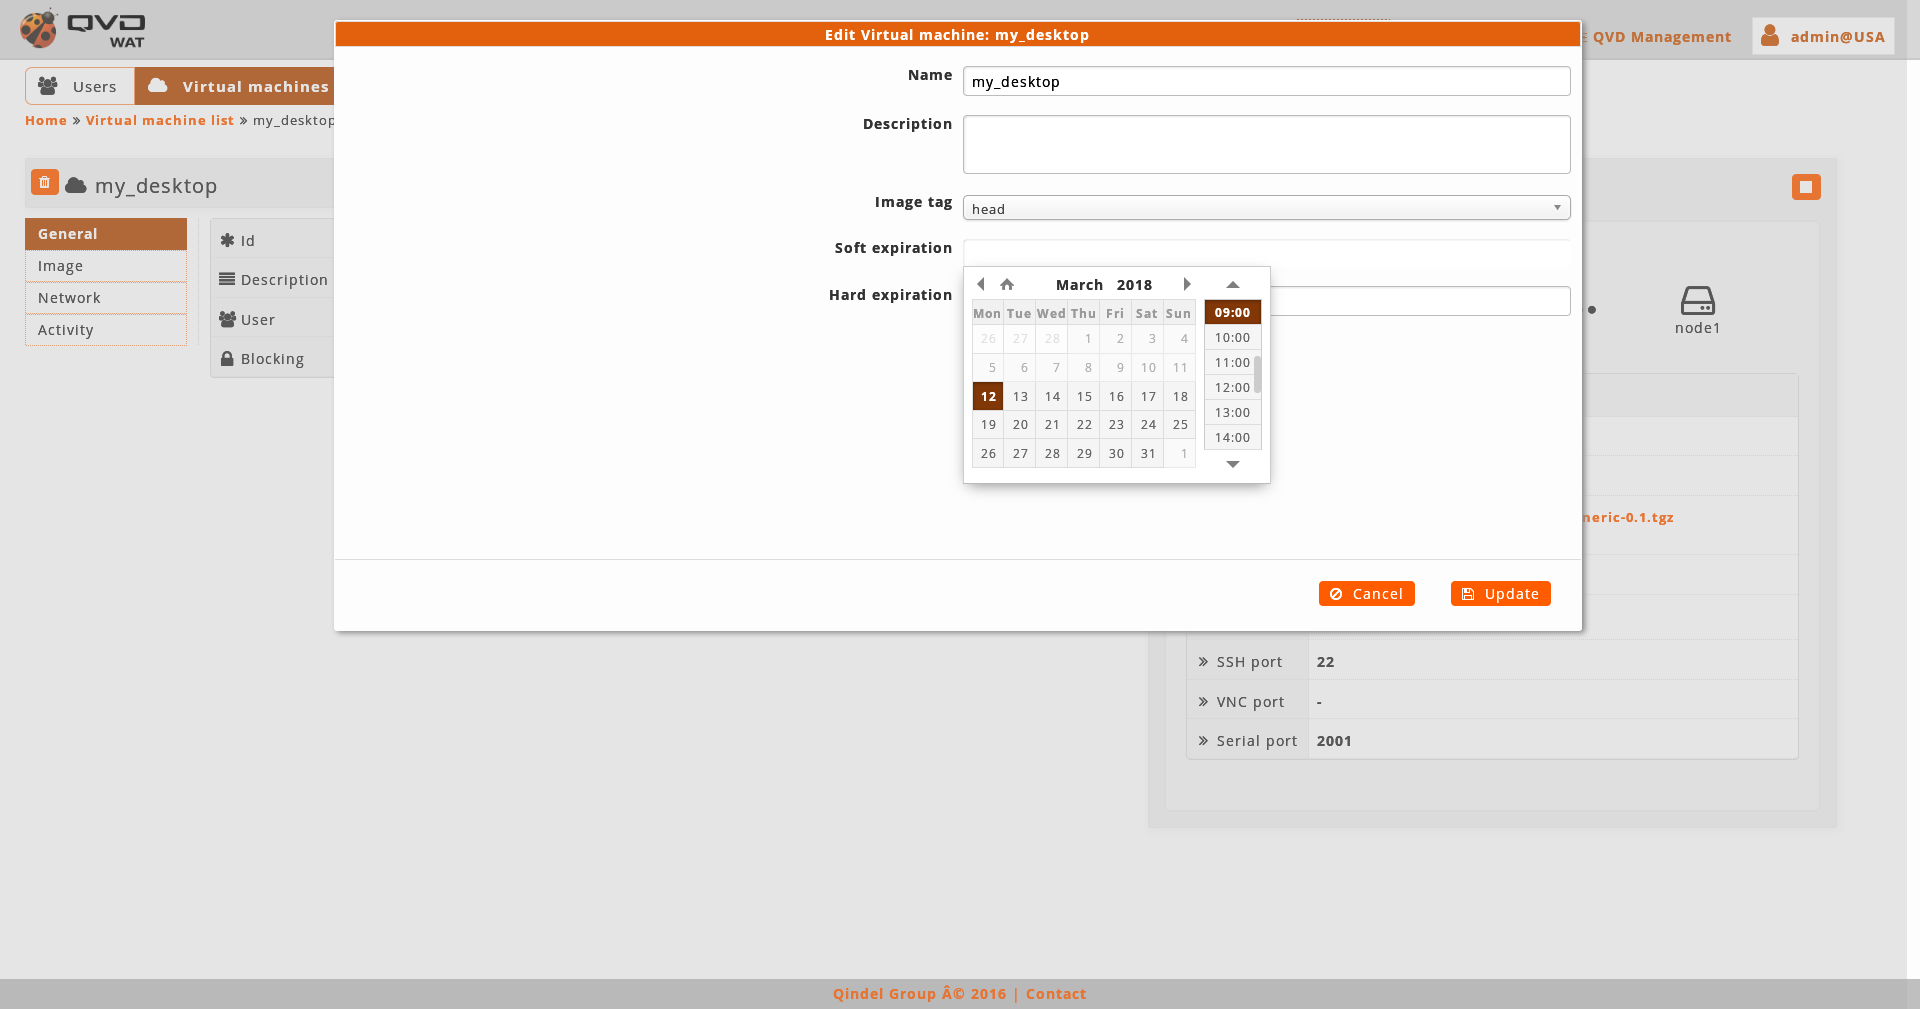
When editing the virtual machine we can change the name, the tag of the image, the expiration dates and edit properties.
Two expiration dates can be configured:
-
Soft: it will only warn the user that the machine is going to expire. This warning is done through some scripts designed to them. See documents.
-
Hard: It will not let the user get connected to the virtual machine.
To edit the dates of expiration a control of calendar exists.
We can also access to the edition of the element from the list view with the massive actions only if we select one element. -
2.4.3. Nodes
In this section, QVD nodes are managed.
- List view
-
The main view is a list with QVD nodes.
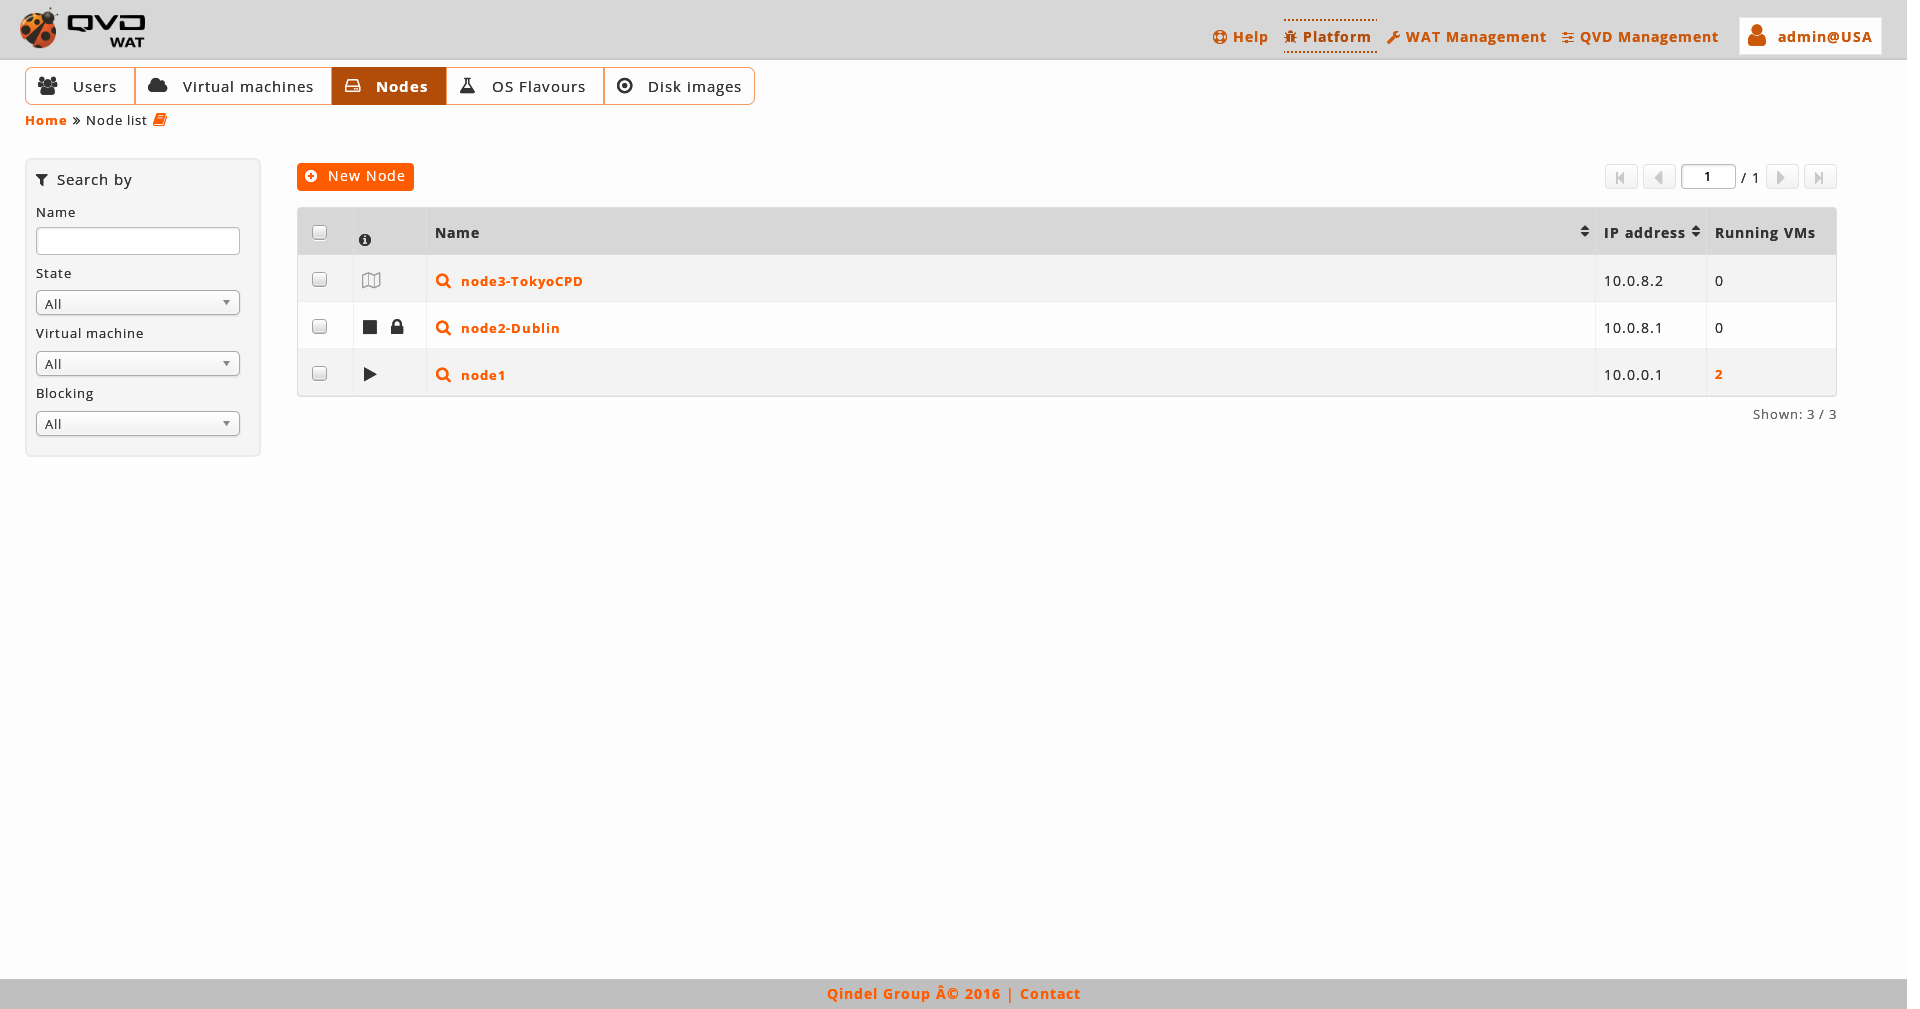
- Information column
-
The information column will indicate us about:
-
*Executing State*of the nodes.
-
Stopped. Stop icon
-
Running. Play icon.
The execution status of a node does not depend on the WAT. It can not be started nor stopped. The WAT only knows the IP address of the node and receives its state.
-
The *Locking Status*of the nodes:
-
-
Locked Lock icon.
In a blocked node, virtual machines will not run.
-
Unlocked. If the lock icon does not appear.
-
- Massive actions
-
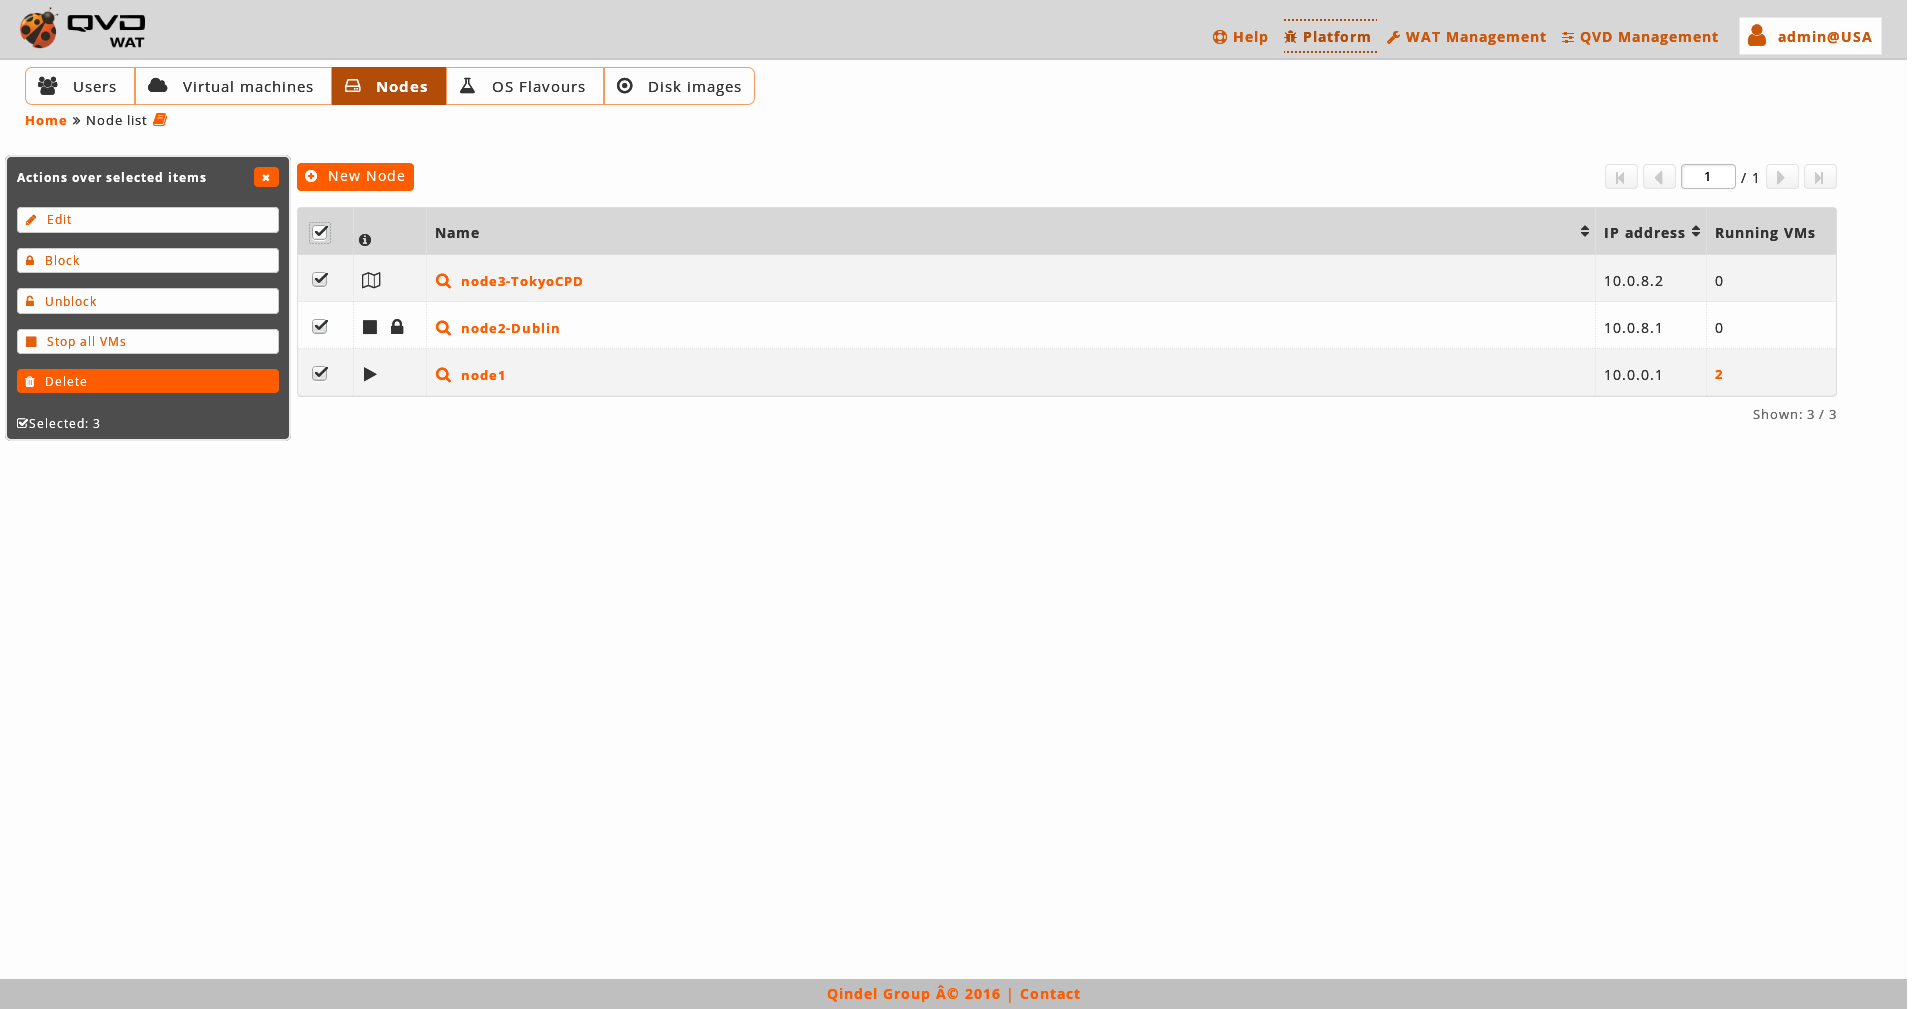
Massive actions give us the following options to do on the selected nodes:
-
Lock nodes
-
Unlock nodes
-
Stop all the virtual machines running in the nodes
-
Delete nodes
-
Edit nodes: neither the name nor the IP address of the nodes will appear in the massive editor. To change the name and the IP address, it will be needed to do it one by one from the detail view.
If only one element is selected, in the case of the edition we can edit the same fields that with the normal edition of an element in the detail view. -
- Massive editor
-
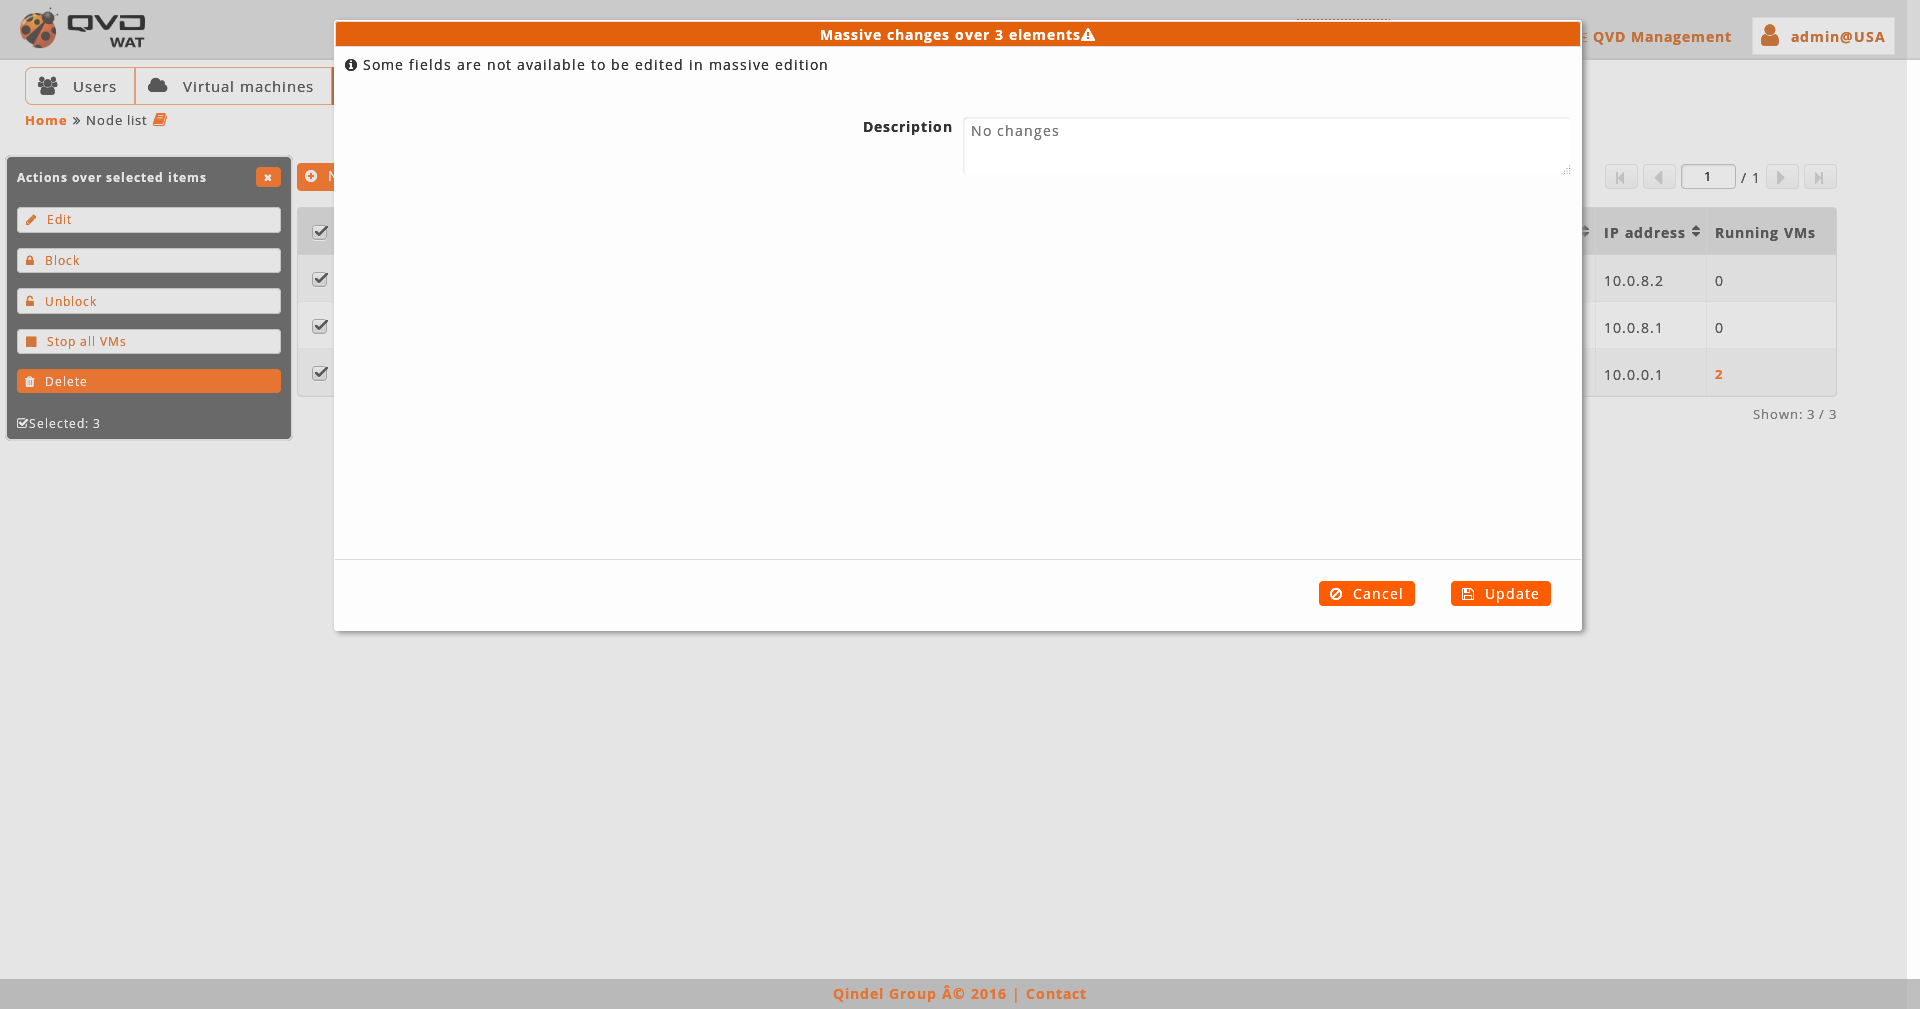
The massive editor of nodes only let us modify custom properties.
As any other massive editor, the value which will be defined, it would rewrite the one that could exist in all the edited elements unless "No changes" option were selected.
If custom properties do not exist in the nodes the massive edition will not be authorised.
- Creation
-
When creating a node we will establish its name, IP address and properties.
- Detail view
-
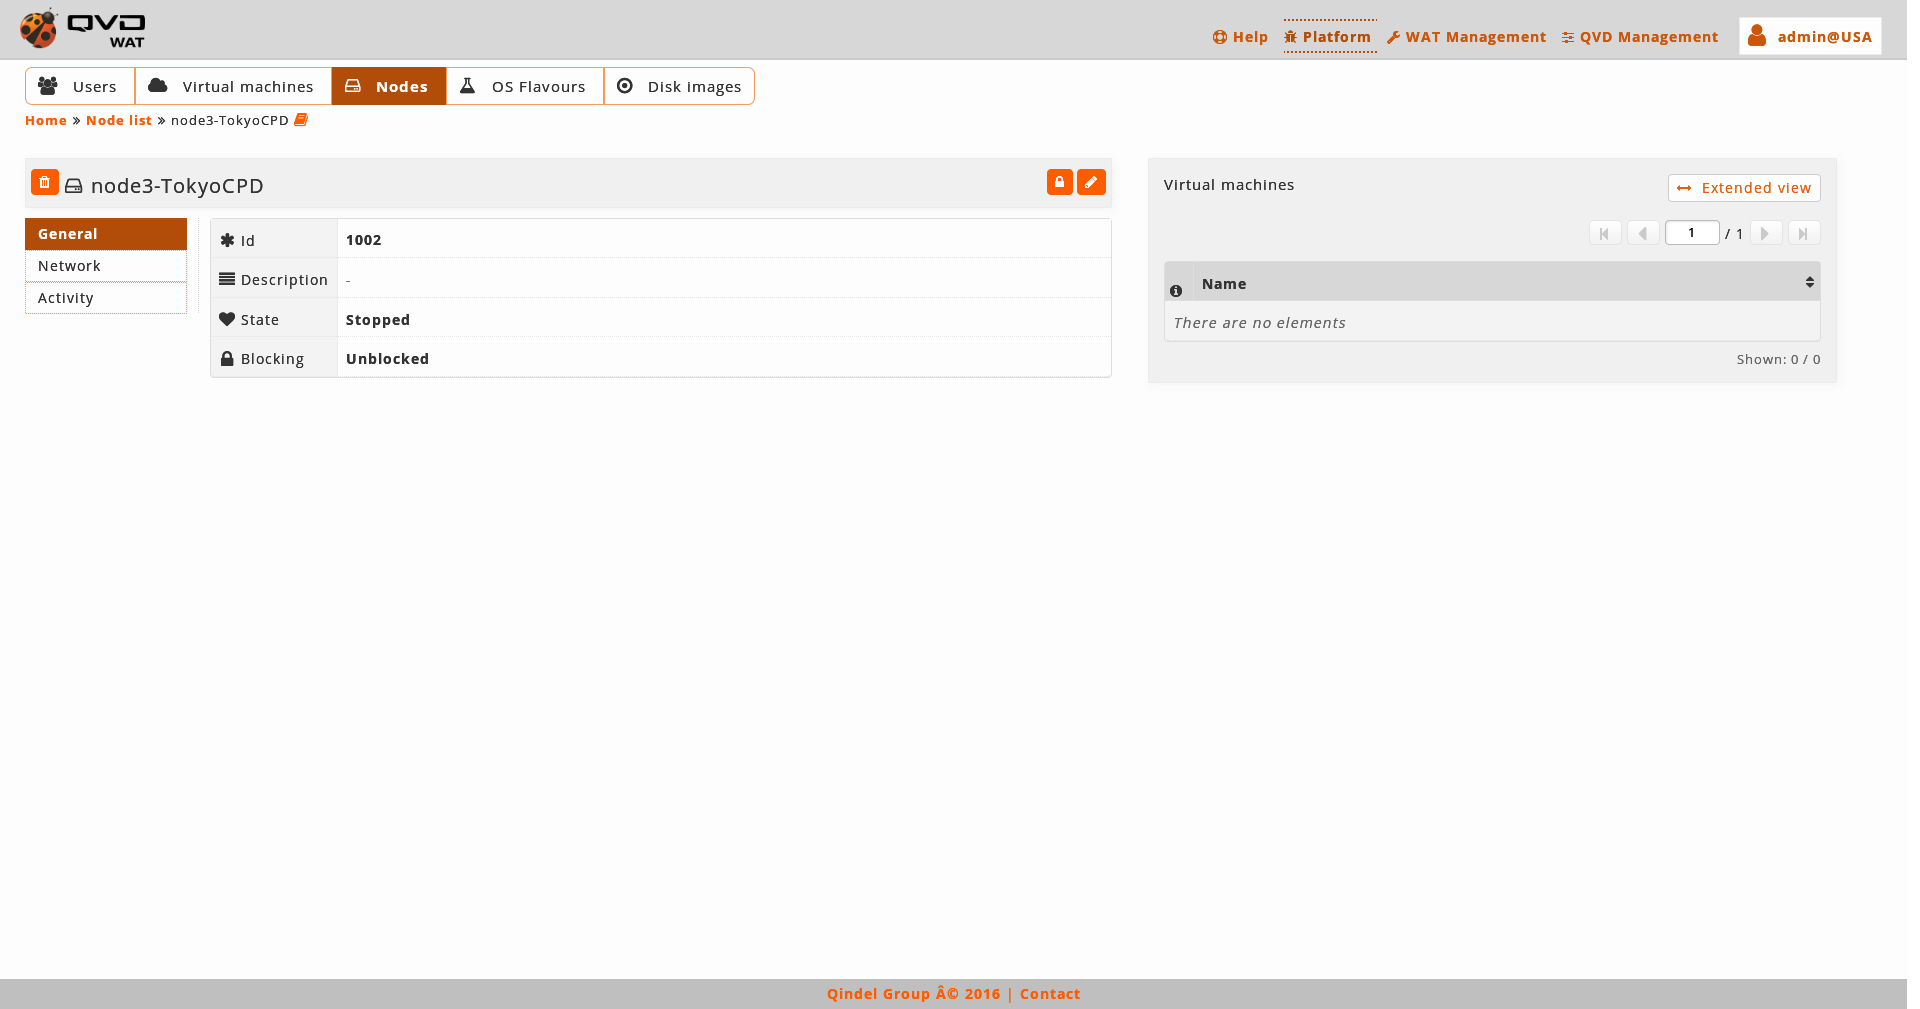
We observe a small head top next to the name of the node where the buttom to delete it and the action buttoms are.
The available buttoms in the detail view of the user are:
-
Locking/Unlocking the node
-
Editing the node
Below this head top there is a table with the attributes of the nodes including the properties, if there were.
On the right part we find:
-
The virtual machines running in the nodes
If we want more actions on them with the extended view buttom we go to the list of the virtual machines filtered by this node.
-
- Edition
-
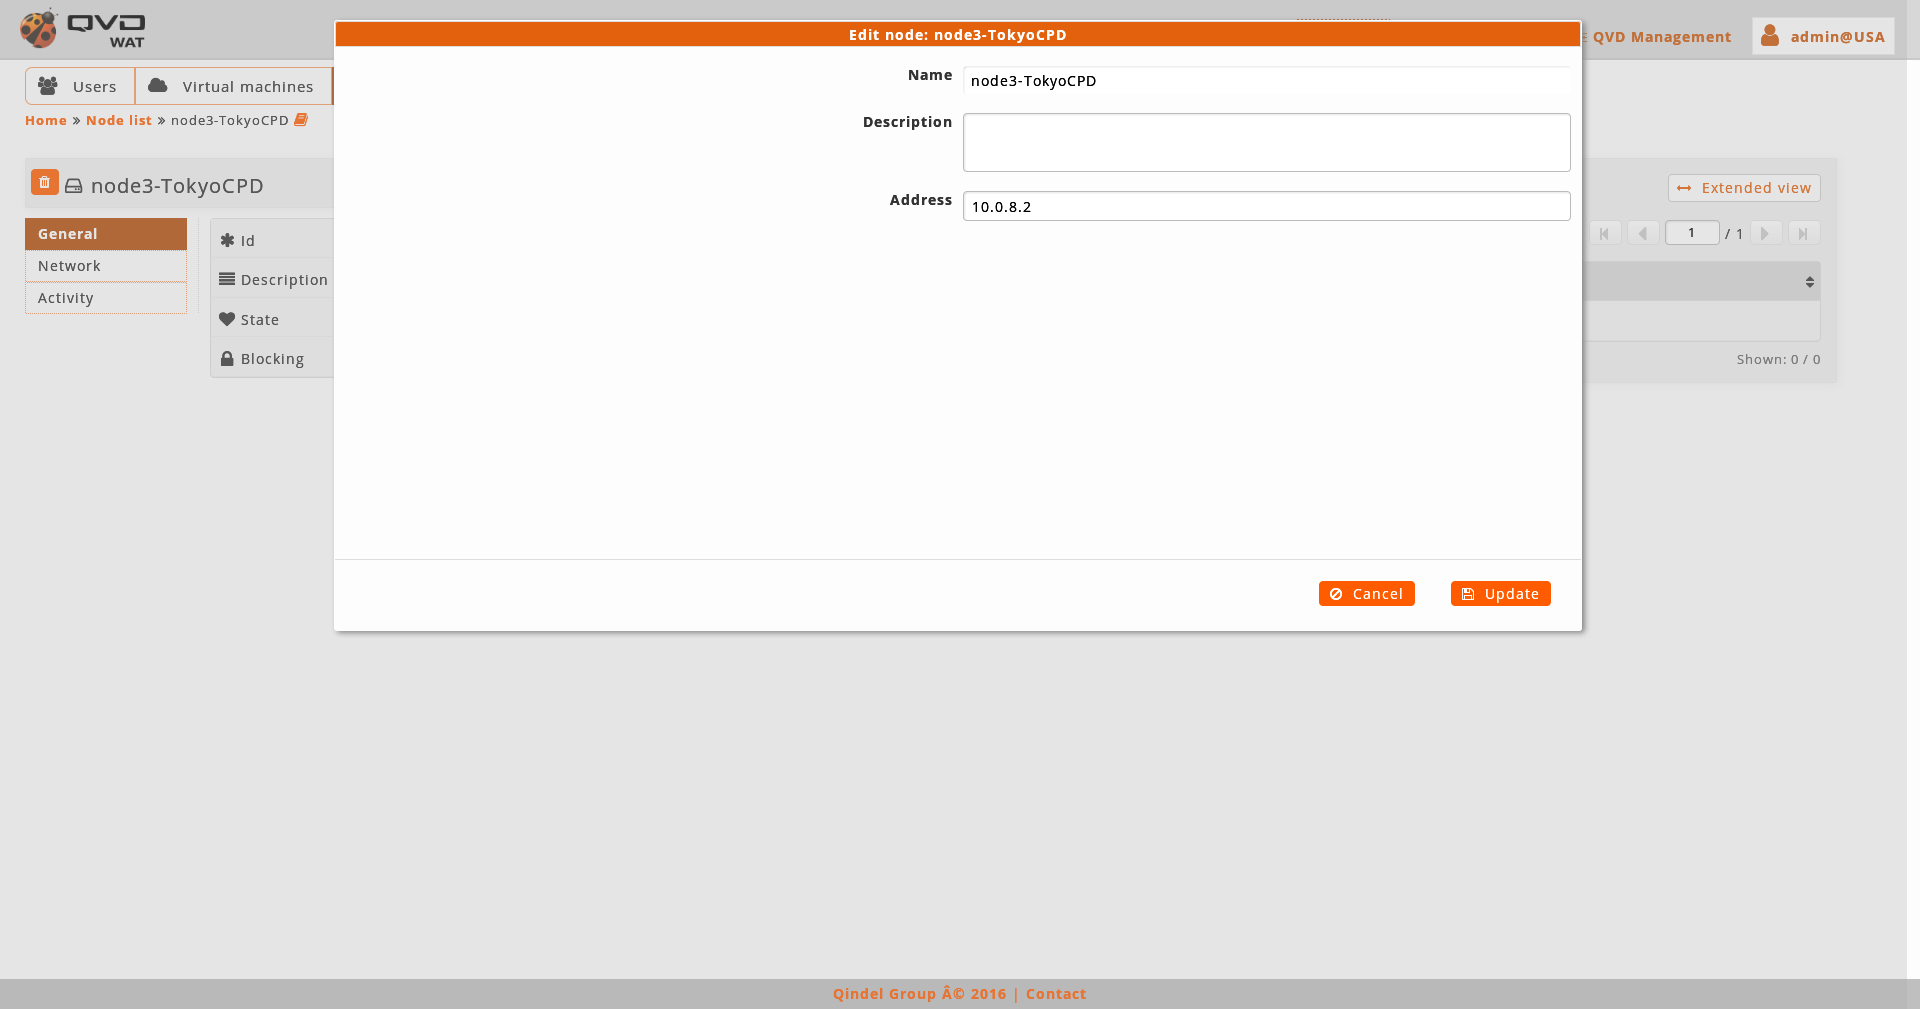
When editing a node we will be able to edit its name, IP address or edit properties.
We can also access to the edition of the element from the list view with the massive actions only if we select one element.
2.4.4. OS Flavours
In this part OSFs of QVD are managed, in which the images of the disc are grouped.
- List view
-
The main view is a list with the OSFs of QVD.
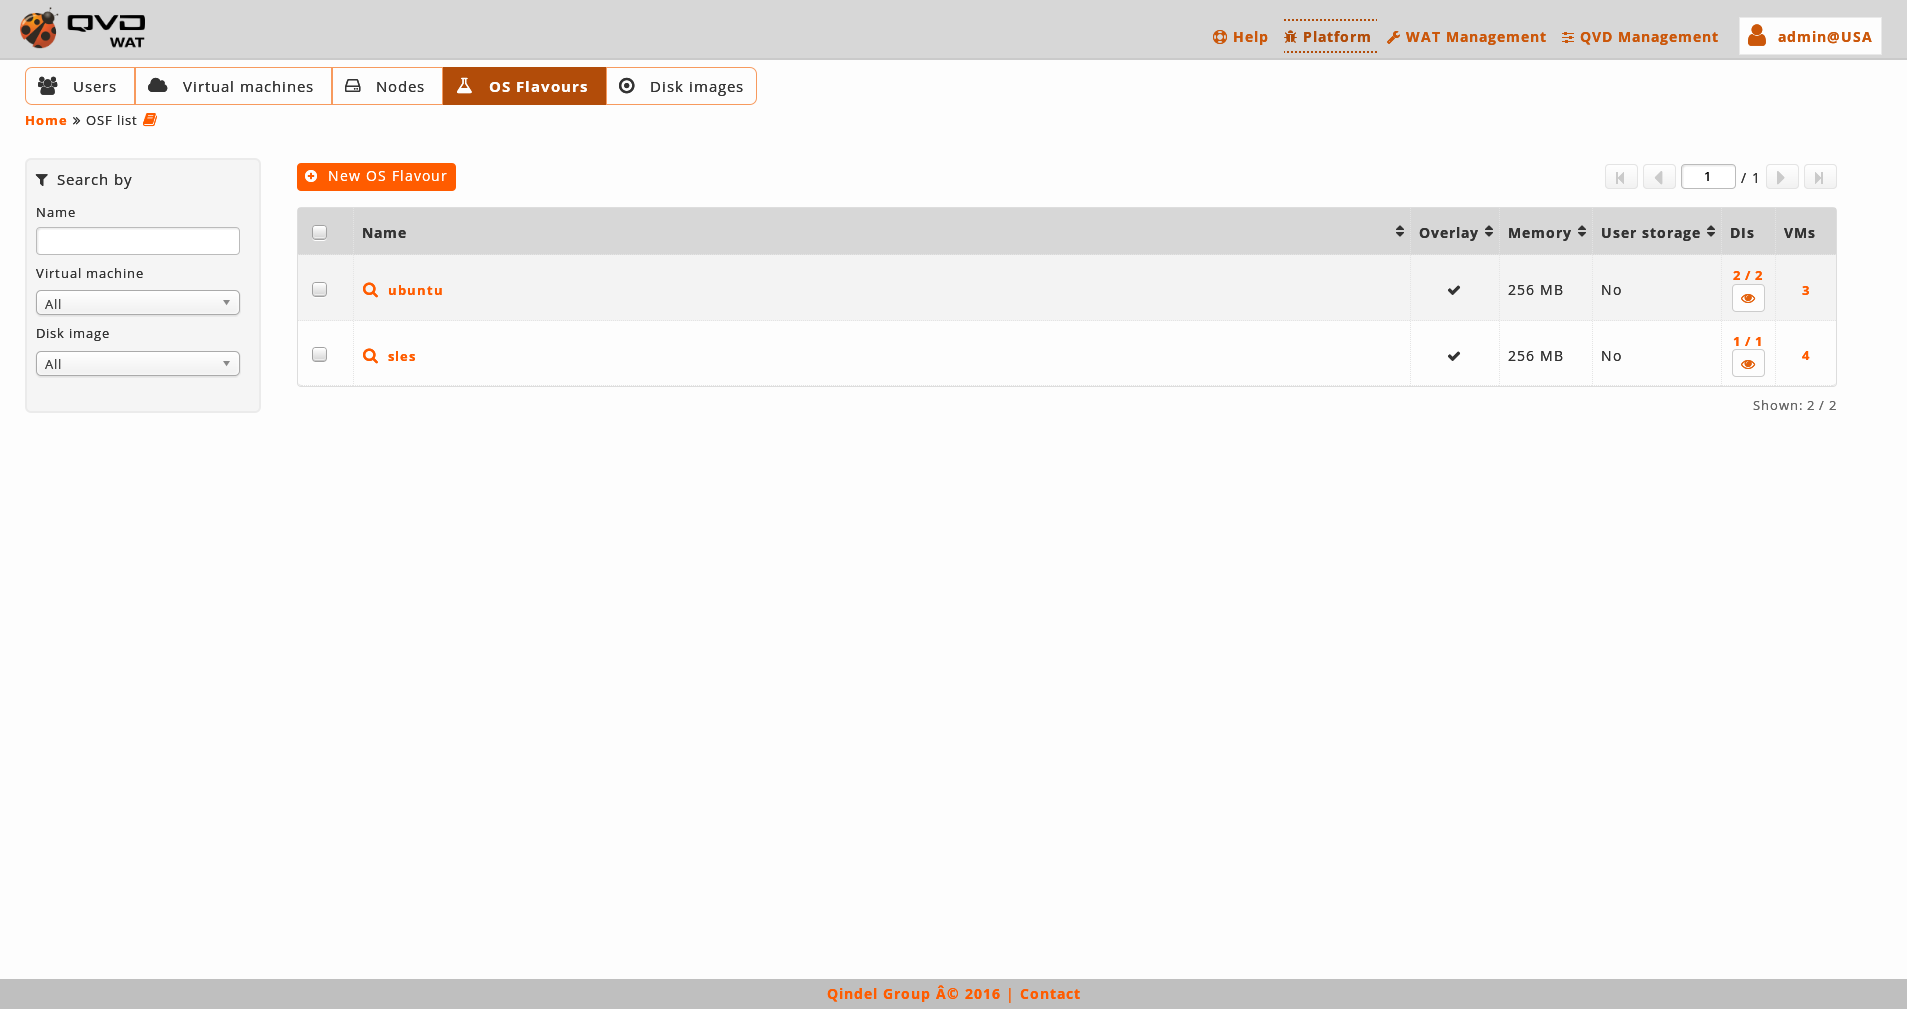
- Information column
-
In the OSFs there is not an information column, they are not lockable elements and they do not have any other interesting attribute for this column.
- Massive actions
-
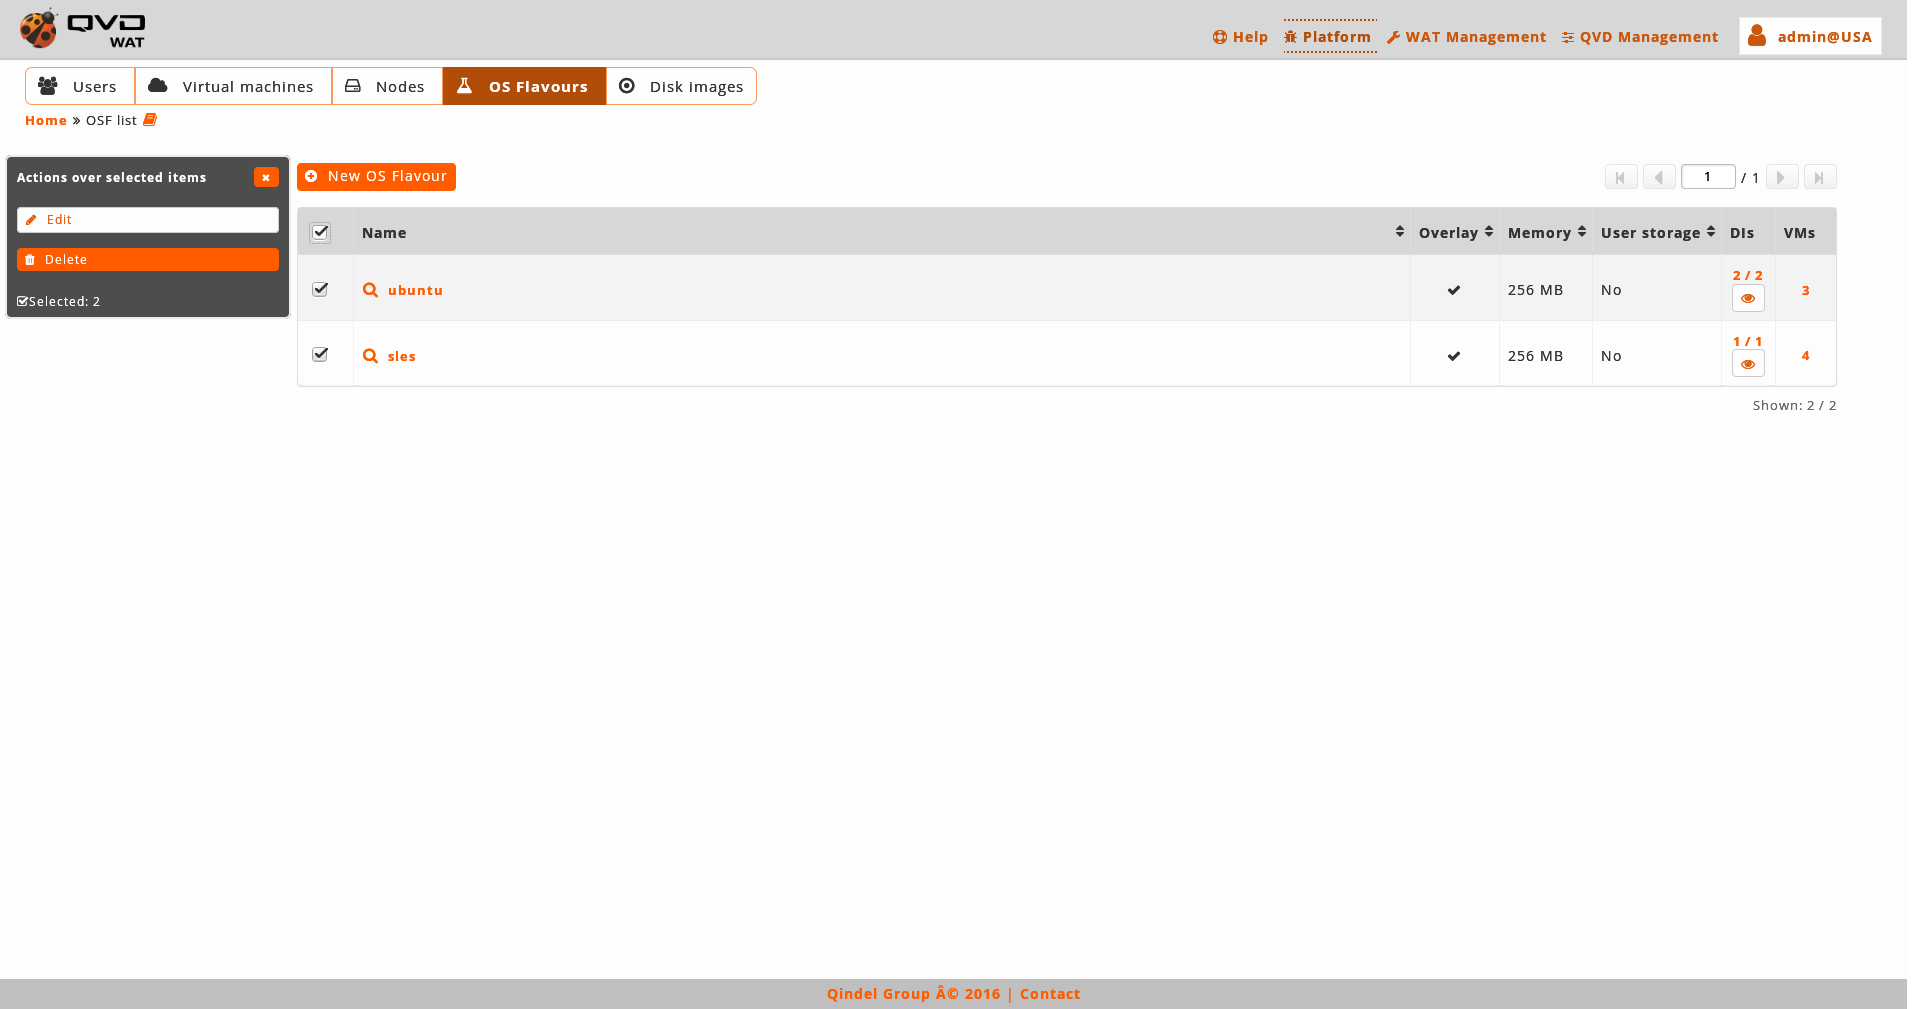
The massive actions give us the following options to do on the selected OSFs.
-
Delete OSFs
-
Edit OSFs: the name will not appear in the massive editor. To change it, it will be needed to do it one by one from the detail view.
If only one element is selected, in the case of the edition we can edit the same fields that with the normal edition of an element in the detail view. -
- Massive editor
-
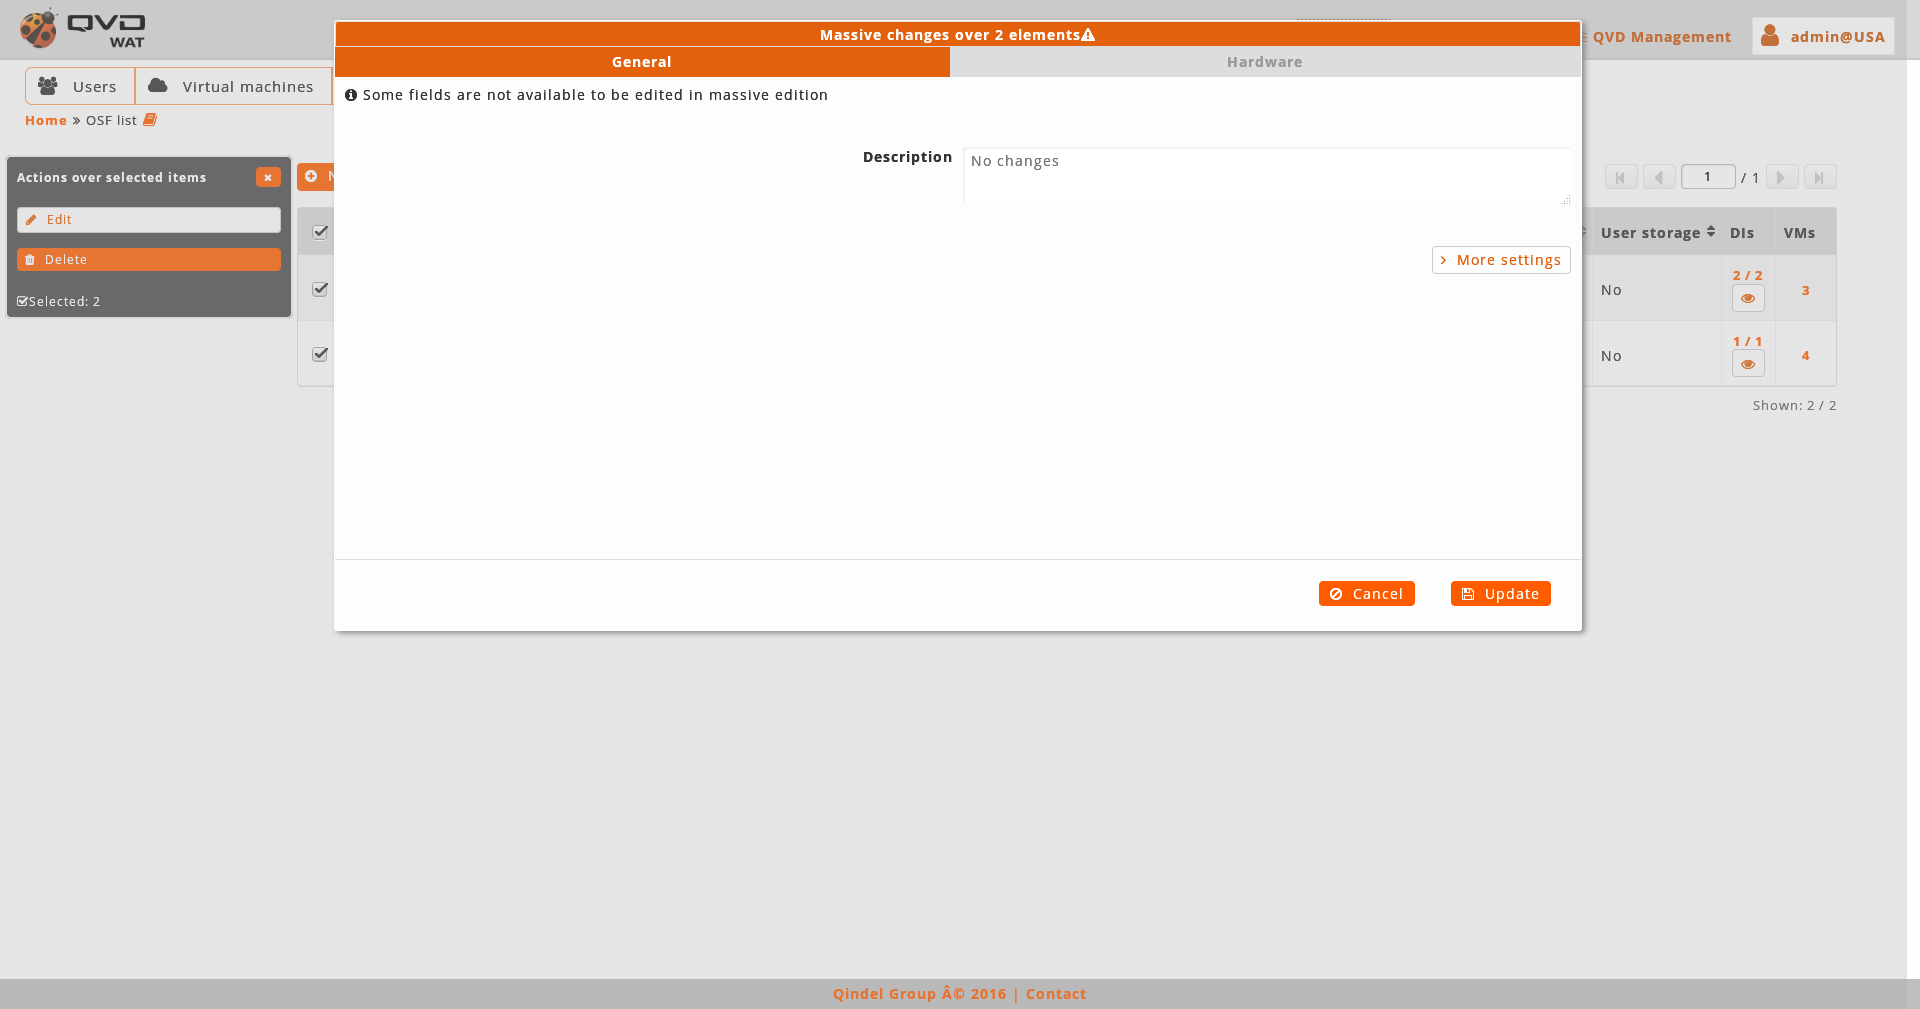
The massive editor of OSFs let us modify the memory, the user storage and the custom properties.
*If we leave the memory box and the user storage in blank they will not be modified.
As any other massive editor, the value which will be defined, it would rewrite the one that could exist in all the edited elements unless "No changes" option were selected.
- Creation
-
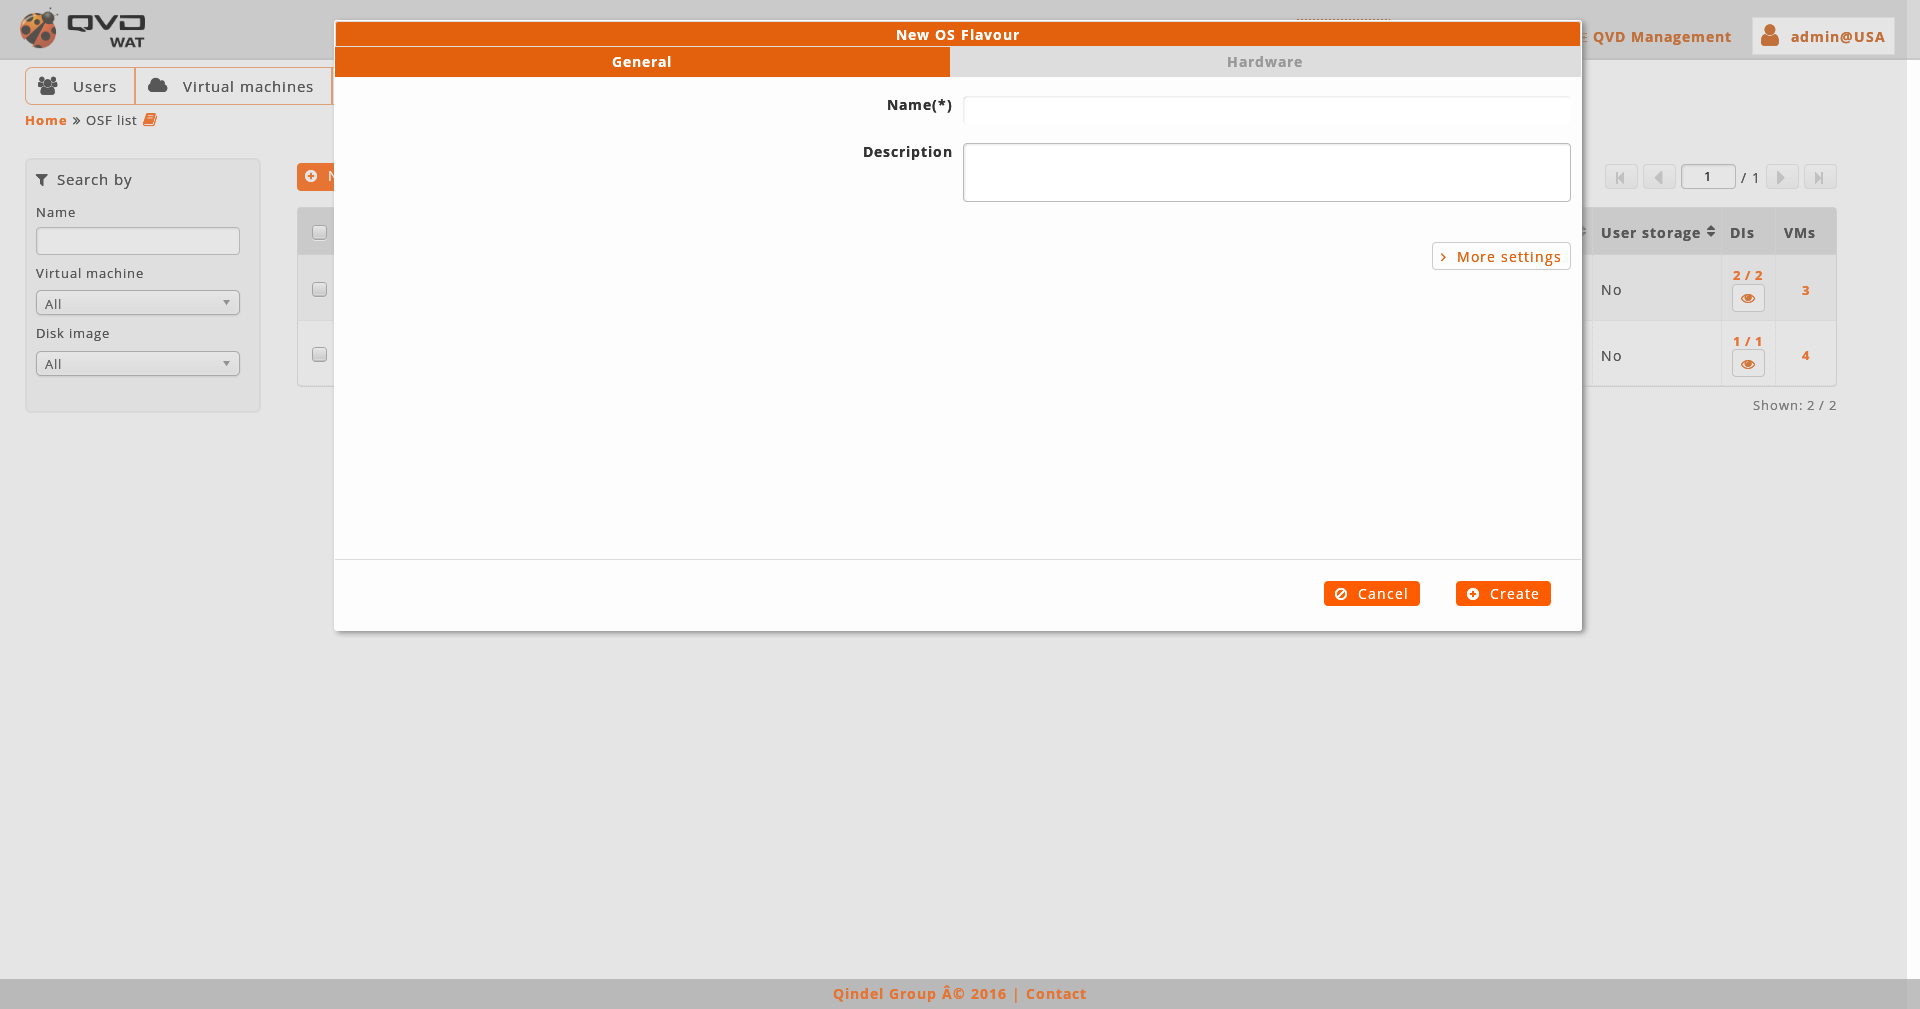
When creating an OSFs we will establish its name, memory, user storage and properties.
- Detail view
-
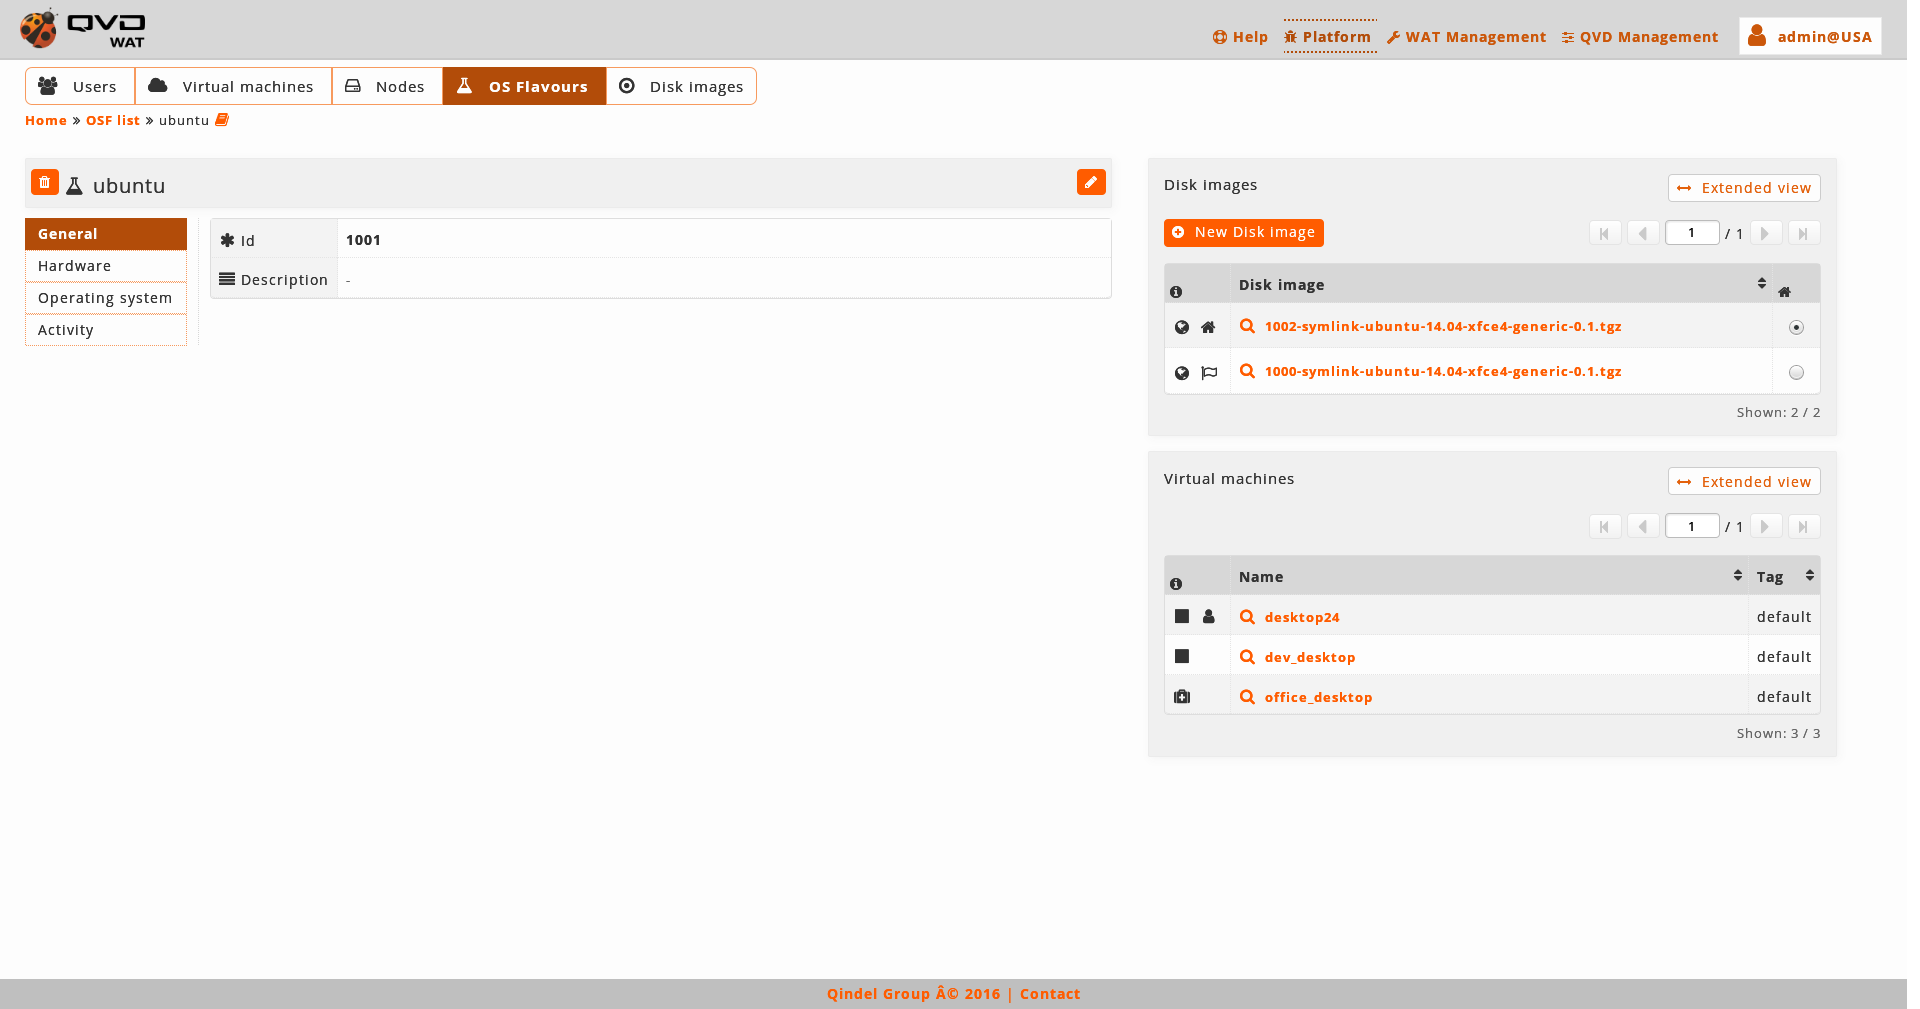
We observe a small head top next to the name of the OSFs where the buttoms to delete it and edit it are.
Below this head top there is a table with the attributes of the OSF including the properties, if there were.
On the right part, in this case, we find-
-
The images of this OSF.
In this case, apart from seeing the names of the images and their information column, we will be able to change the defined image as the default image marking the square of the last column.
Furthermore, as in the case of the virtual machines from the users view, we also have a buttom to create a disk image asociated to the current OSF where the same creation form of the disk images, except OSF, will appear to which the image will be asociated, that is implicit since it is created from here.
-
The virtual machines that are using an image of this OSF, only as an information mode. If we want more actions over them with the extended view buttom we go to the list of the virtual machines filtered by this OSF.
-
- Edition
-
When editing an OSF we will be able to edit its name, memory, user storage and edit properties.
We can also access to the edition of the element from the list view with the massive actions only if we select one element.
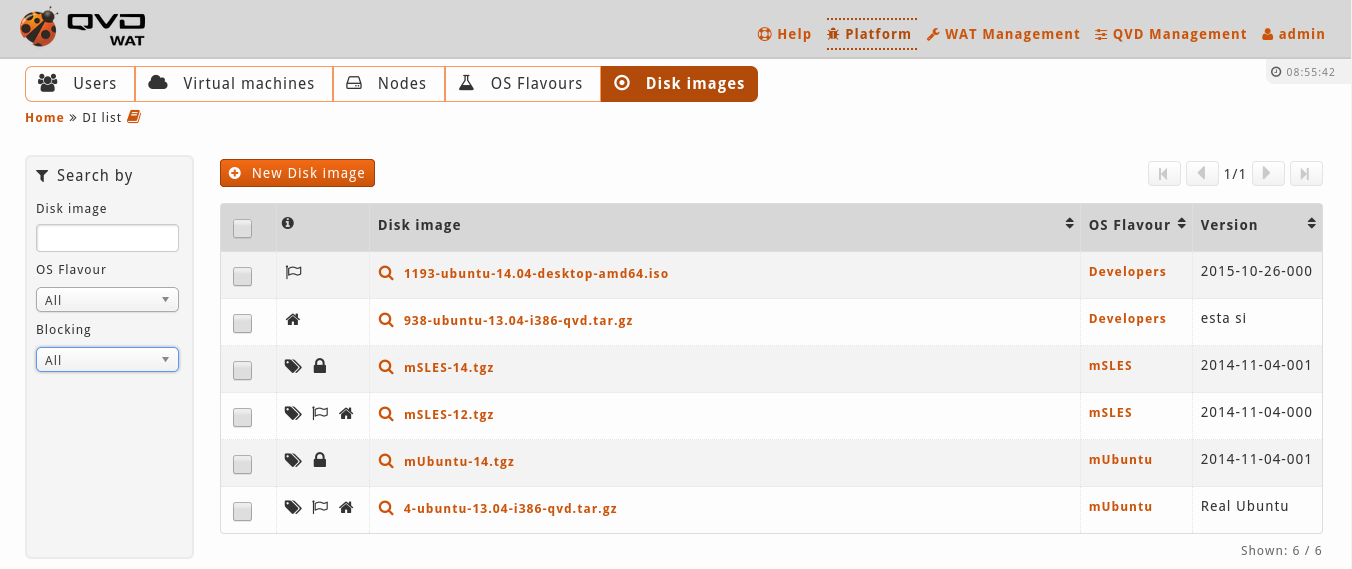
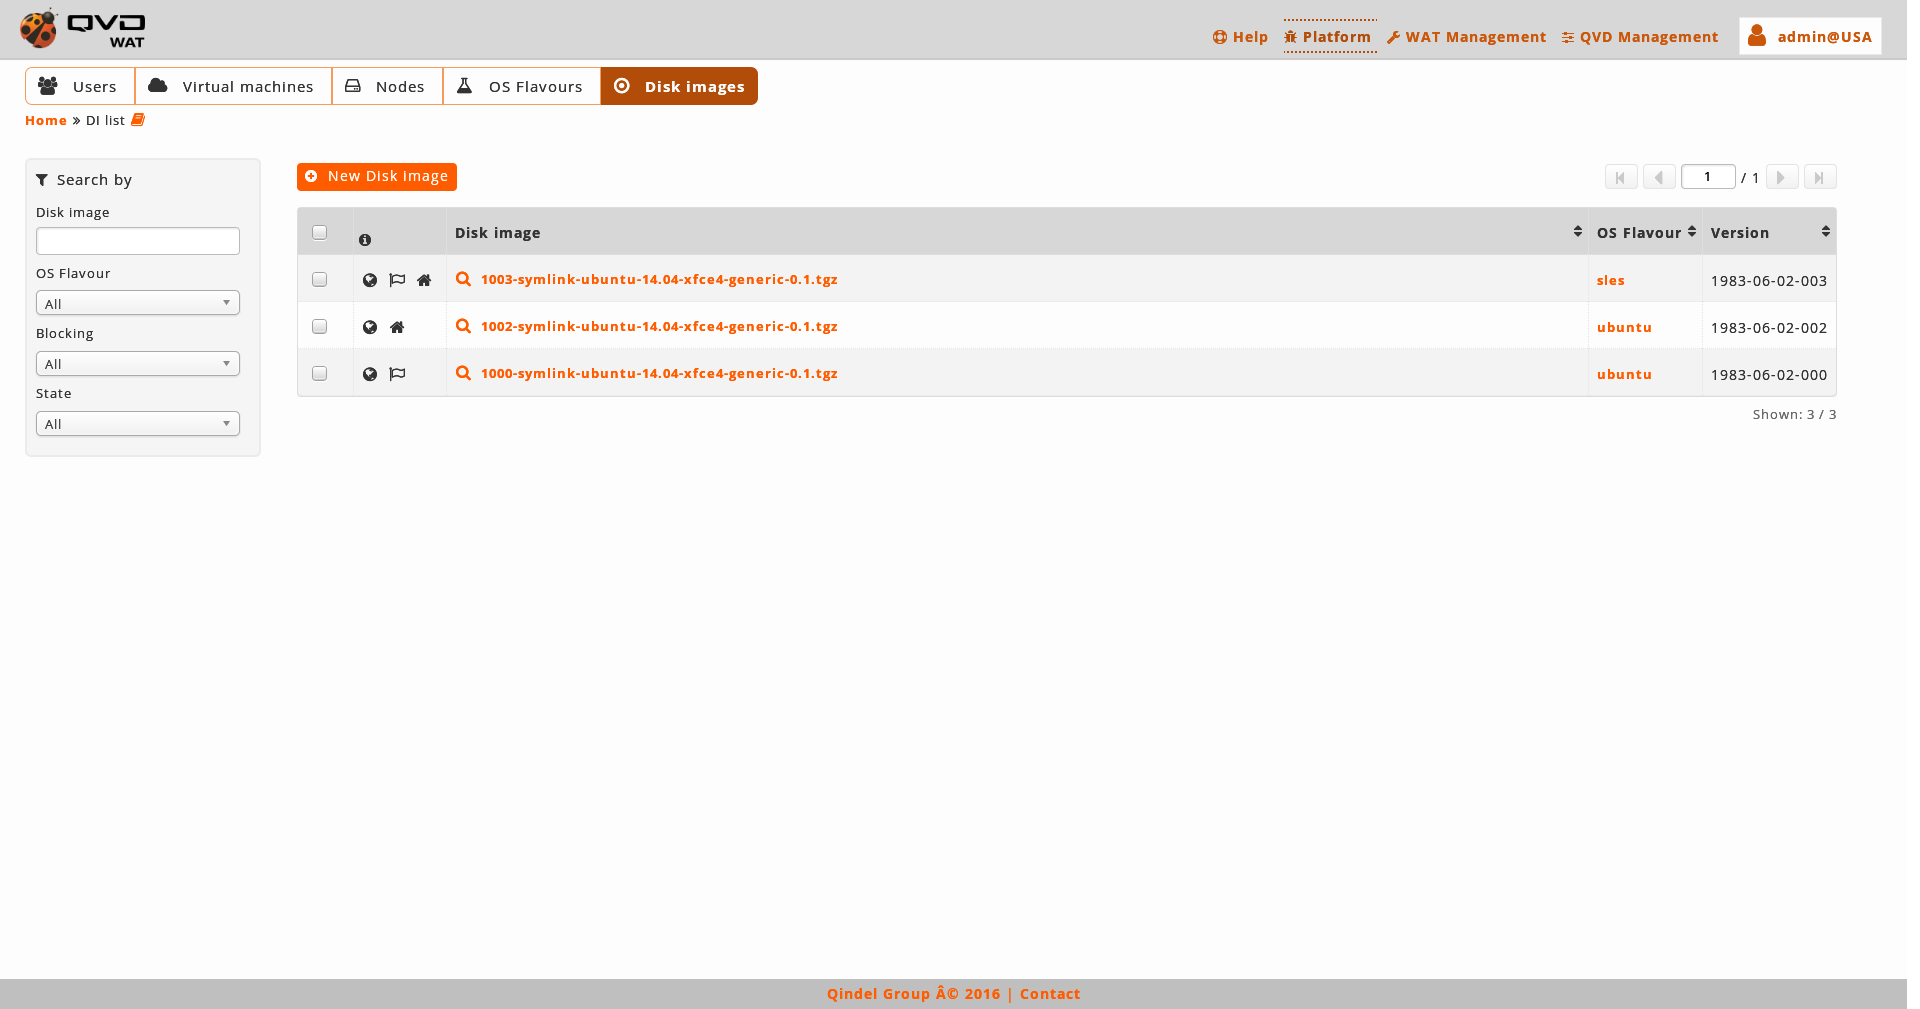
2.4.5. Disk images
In this section, QVD disk images are managed including versions and tags.
- List view
-
The main view is a list with QVD disk images.
- Information column
-
The information column will show:
-
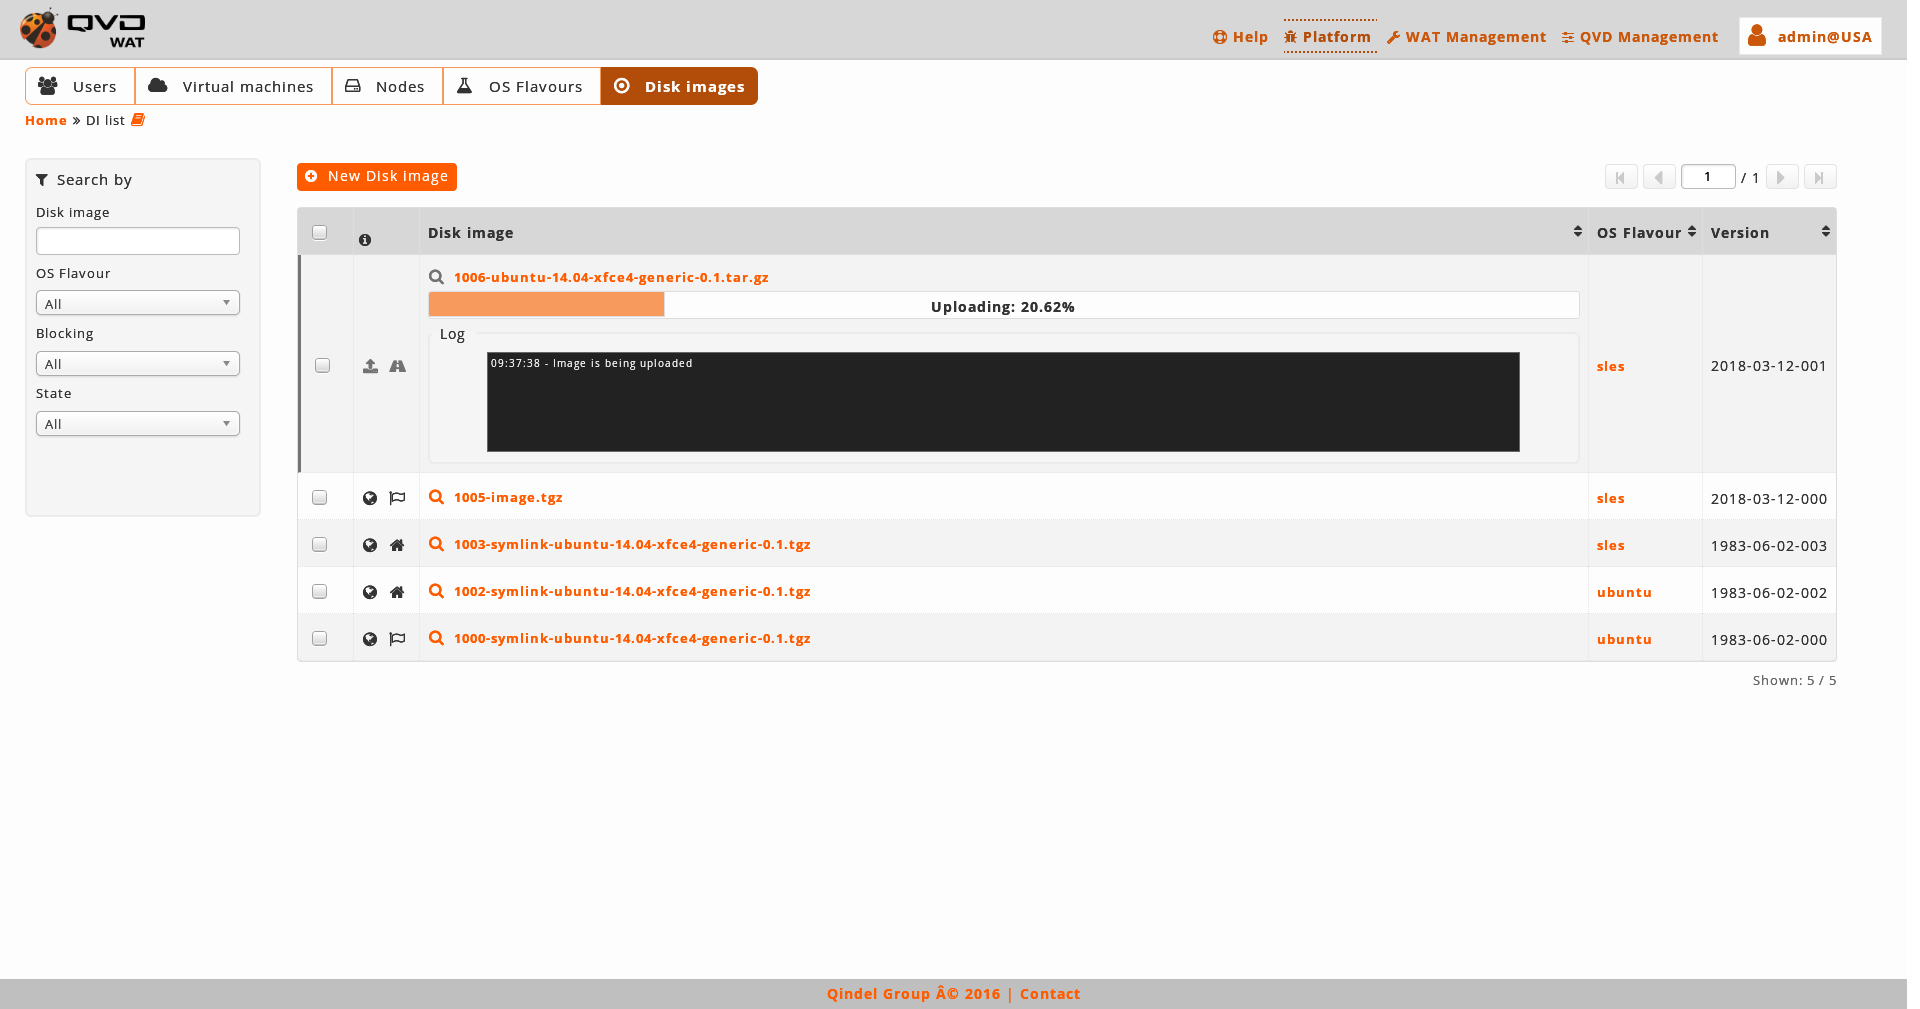
The images blocking status:
-
Locked: Lock icon.
An image which is locked cannot be used, so the virtual machines which use them could not be started.
-
Unlocked: If the lock icon is not shown.
-
-
The tags combined with the images: if an image has some tags, it will show a tag icon when we go over it and it will show those tags.

If an image does not have tags, this icon will not show.
-
If an image is the OSF default image. Home icon

In some view we can find this feature as the special tag default.
-
If an image is the last one created in its OSF. Flag icon.

In some view we can find this feature as the special tag head.
-
- Massive actions
-
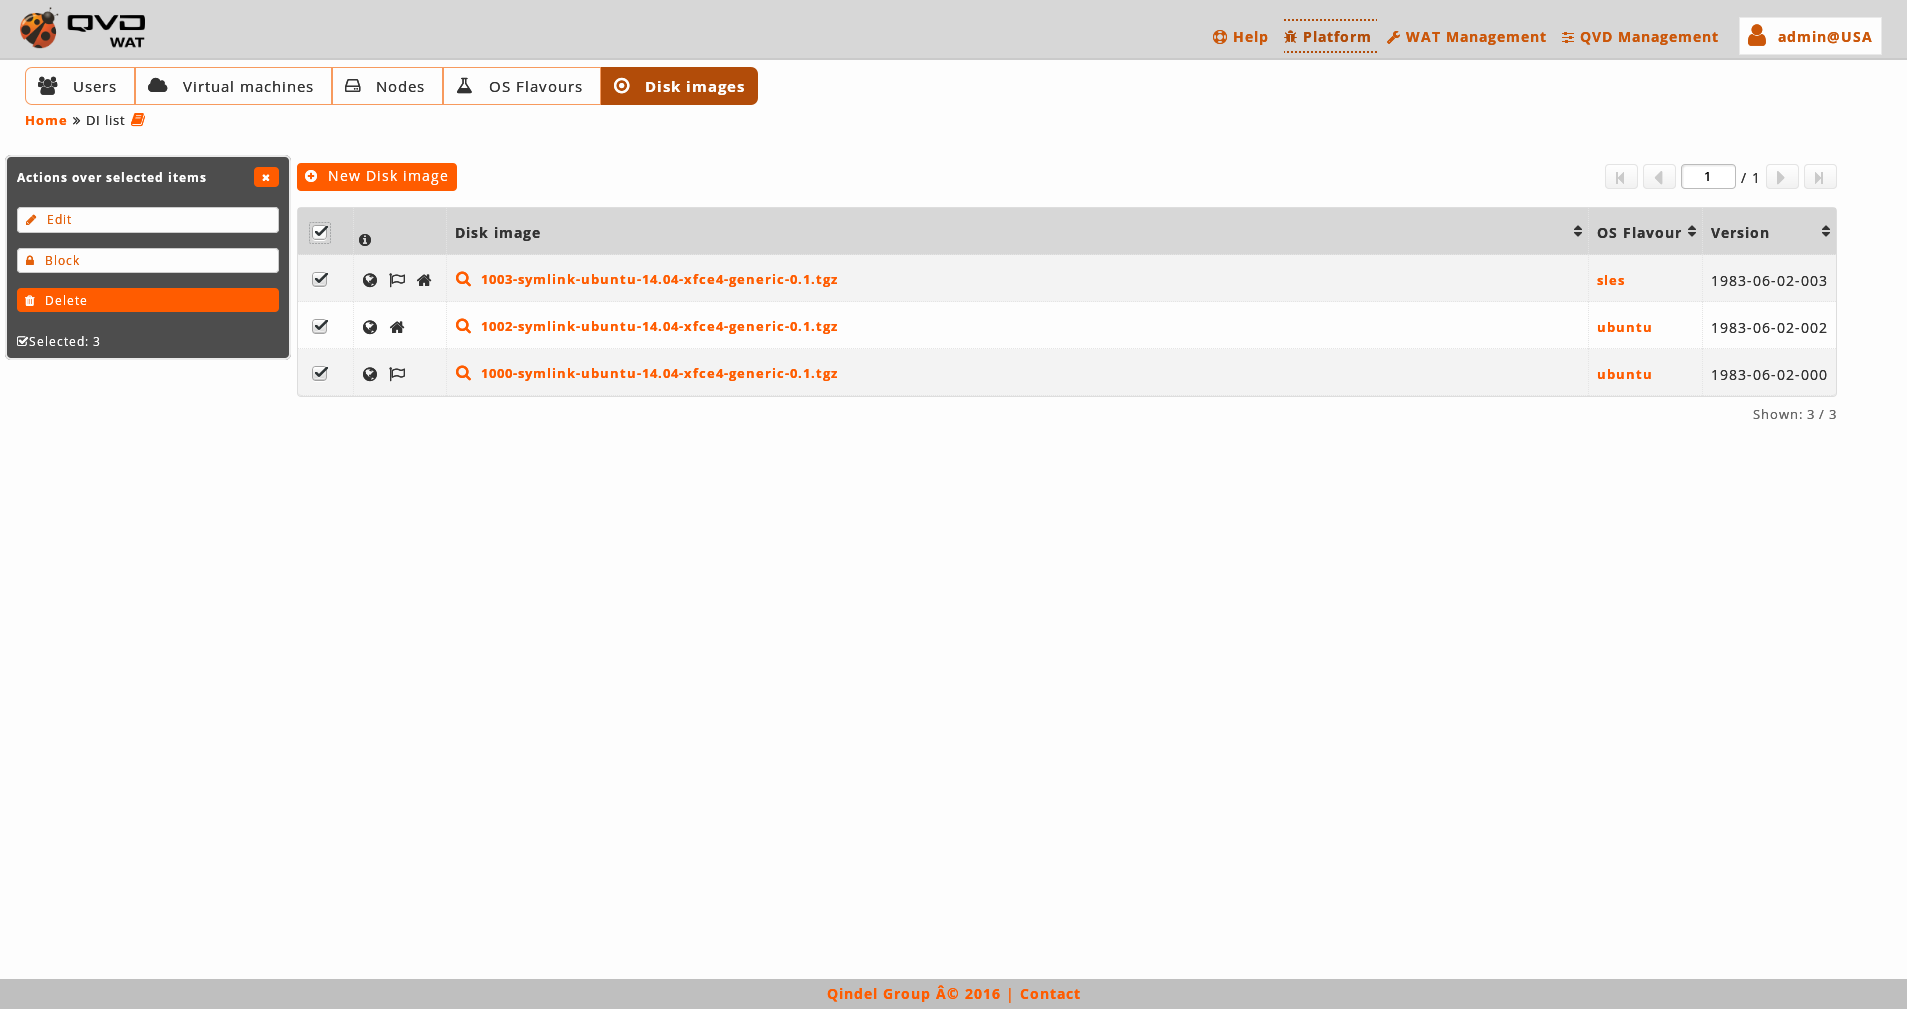
Massive actions provide us with the following options to carry out on the selected disk images:
-
Lock images
-
Unlock images
-
Delete images
-
Edit images: Tags edition will not appear in the massive editor. In order to manage an image tags, we must do it one by one from the detail view.
If only one element is selected, in the case of the edition, we can edit the same fields that with the normal edition of an element in the detail view. -
- Massive editor
-
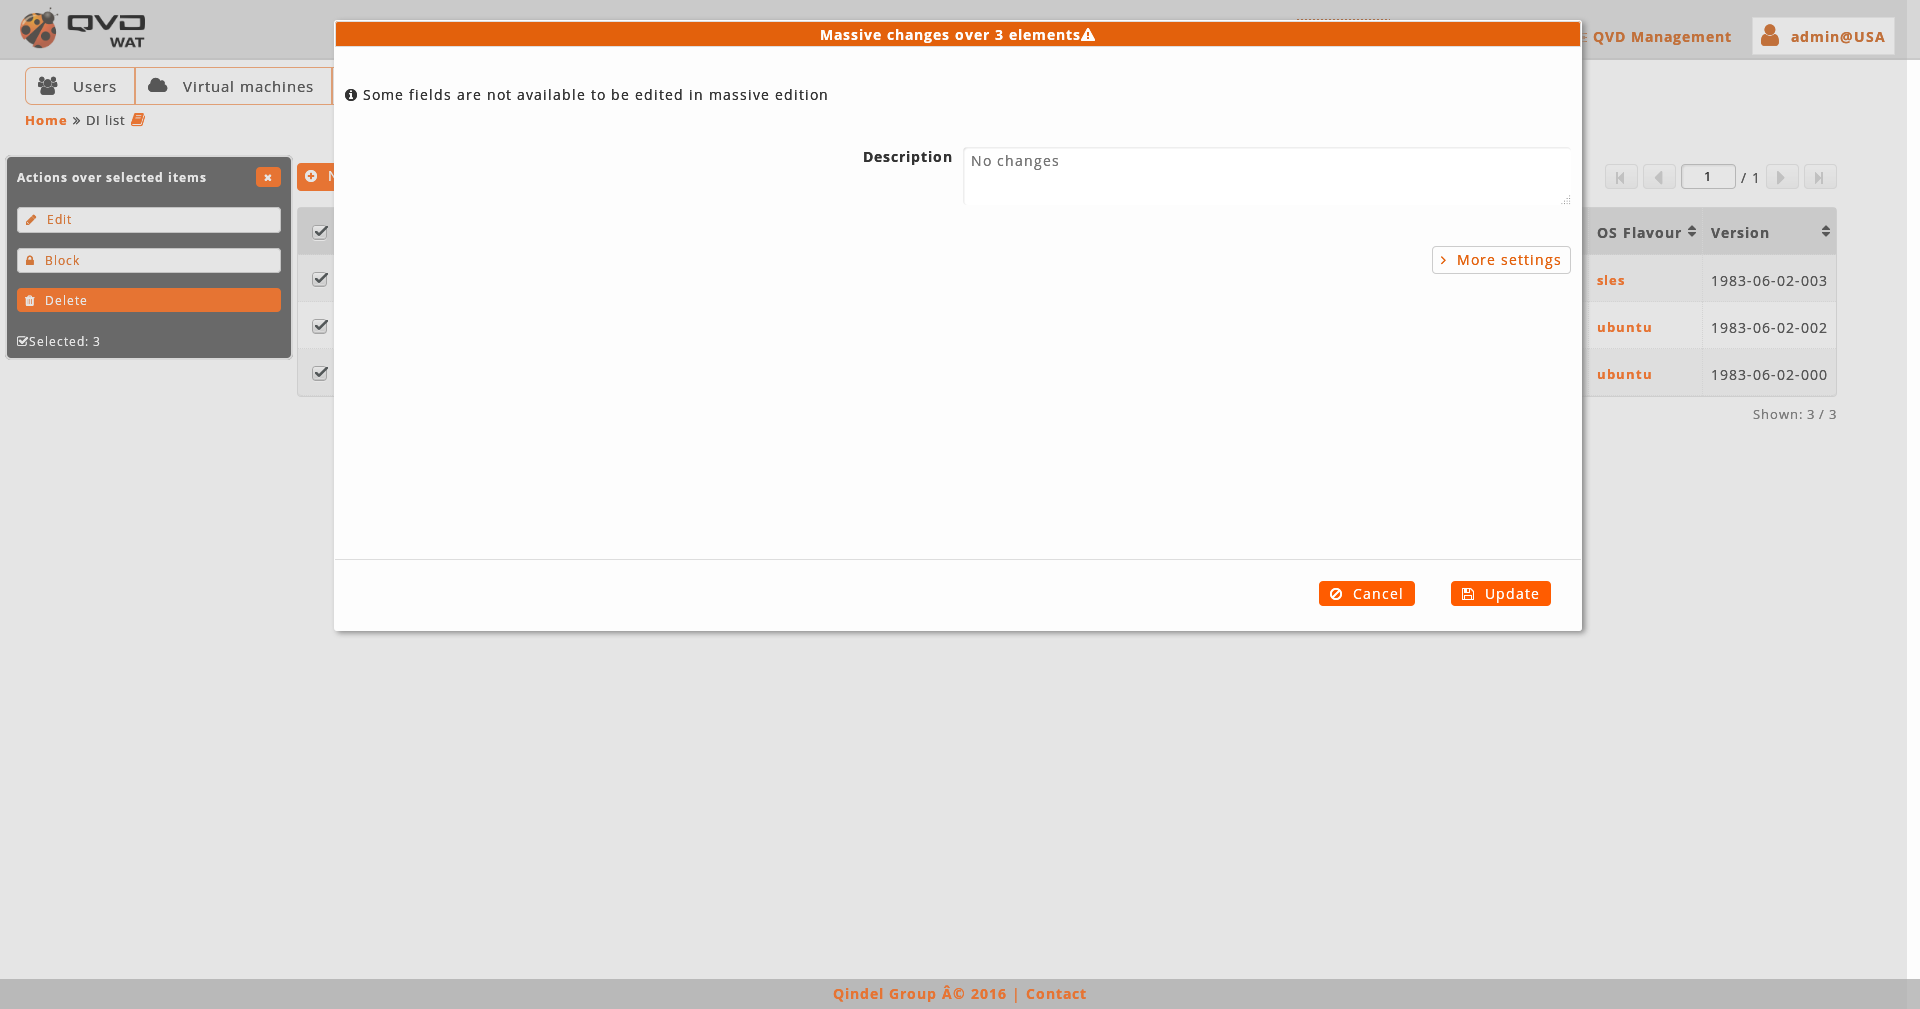
The massive editor of disk images only allows us to modify custom properties.
As any other massive editor, the value which will be defined, it would rewrite the one that could exist in all the edited elements unless "No changes" option were selected.
If there are not custom properties in the disk images, the massive edition will not be enabled.
- Creation
-
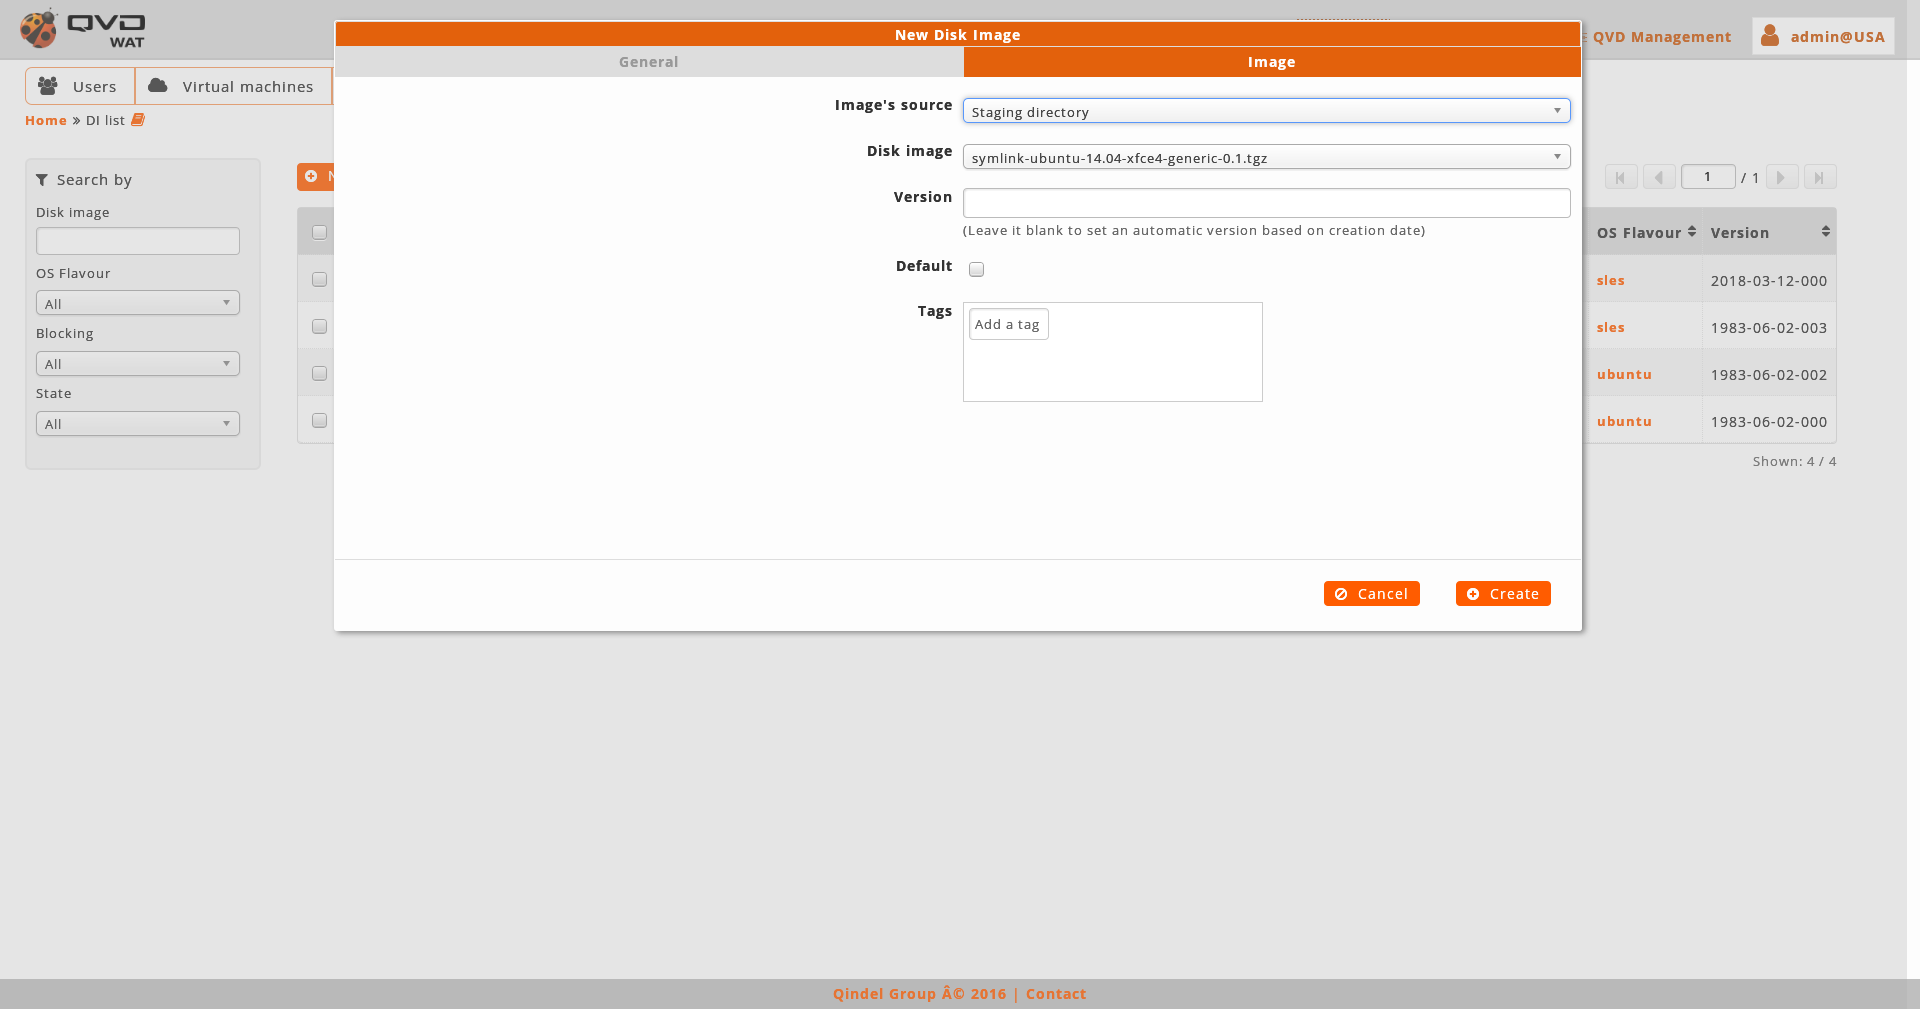
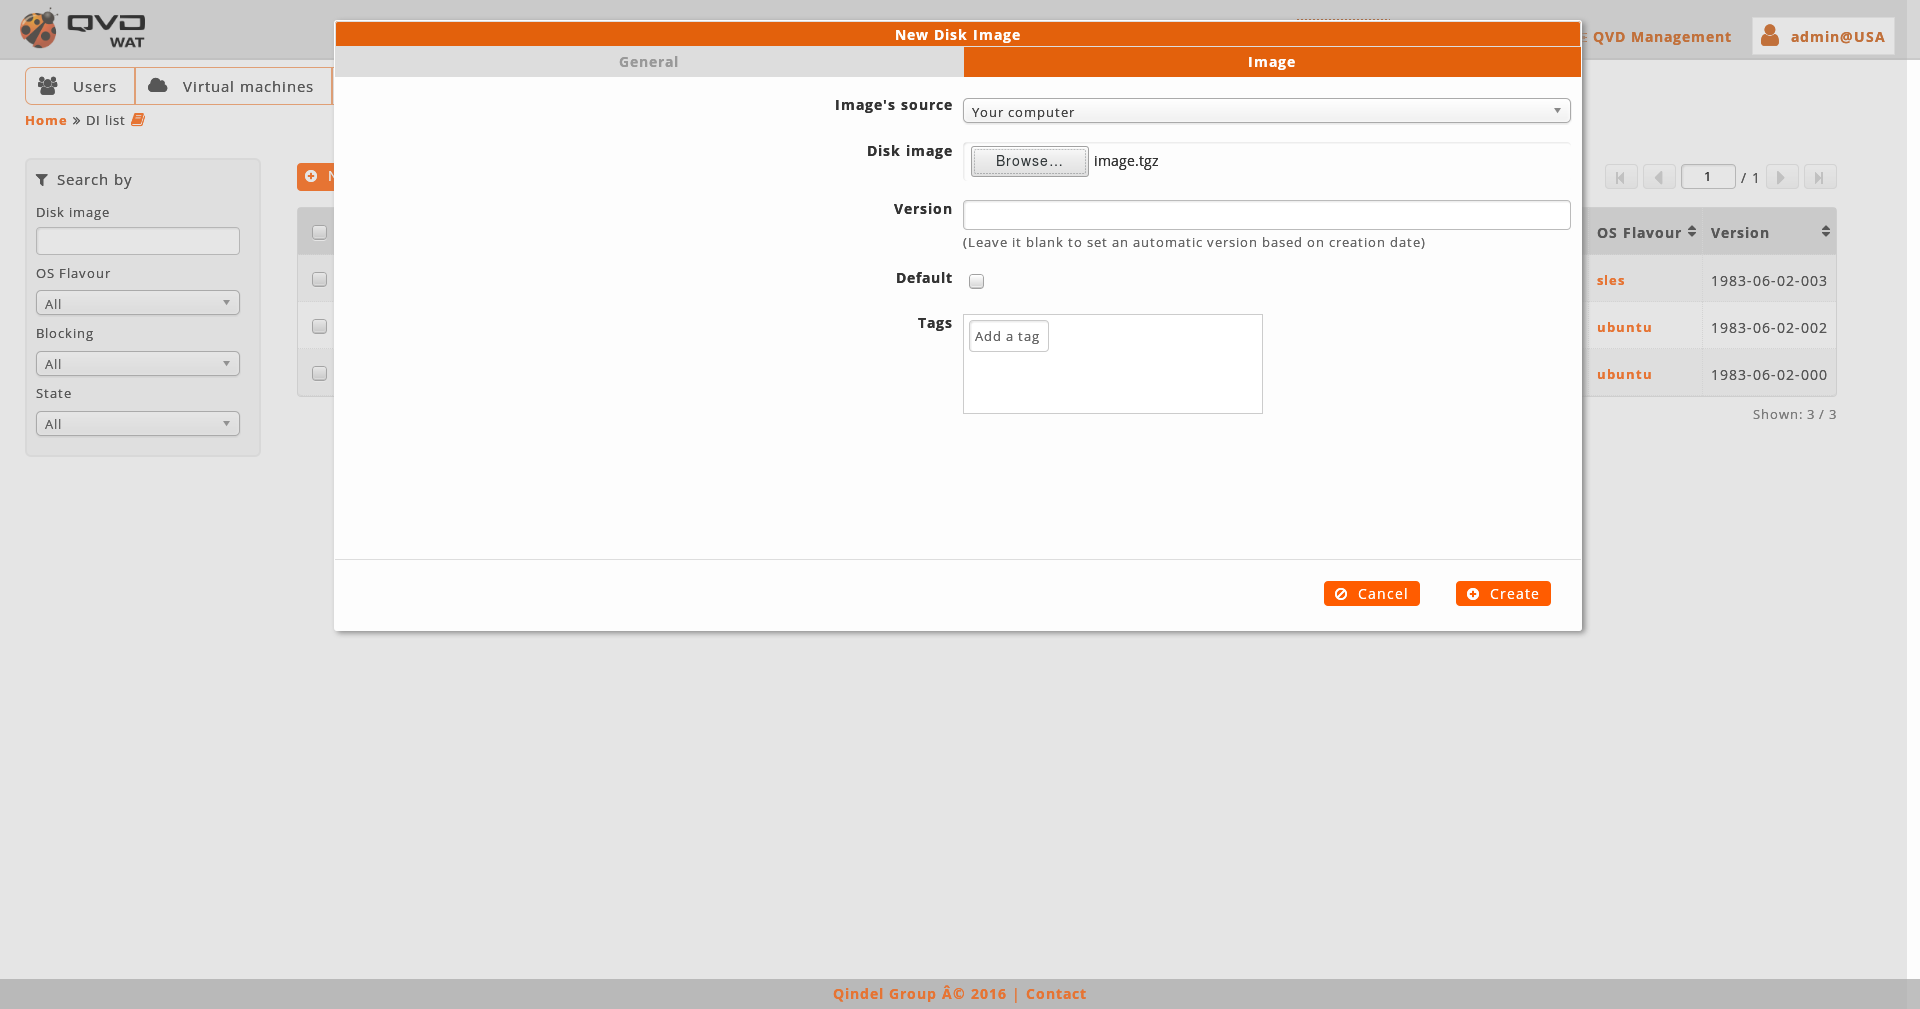
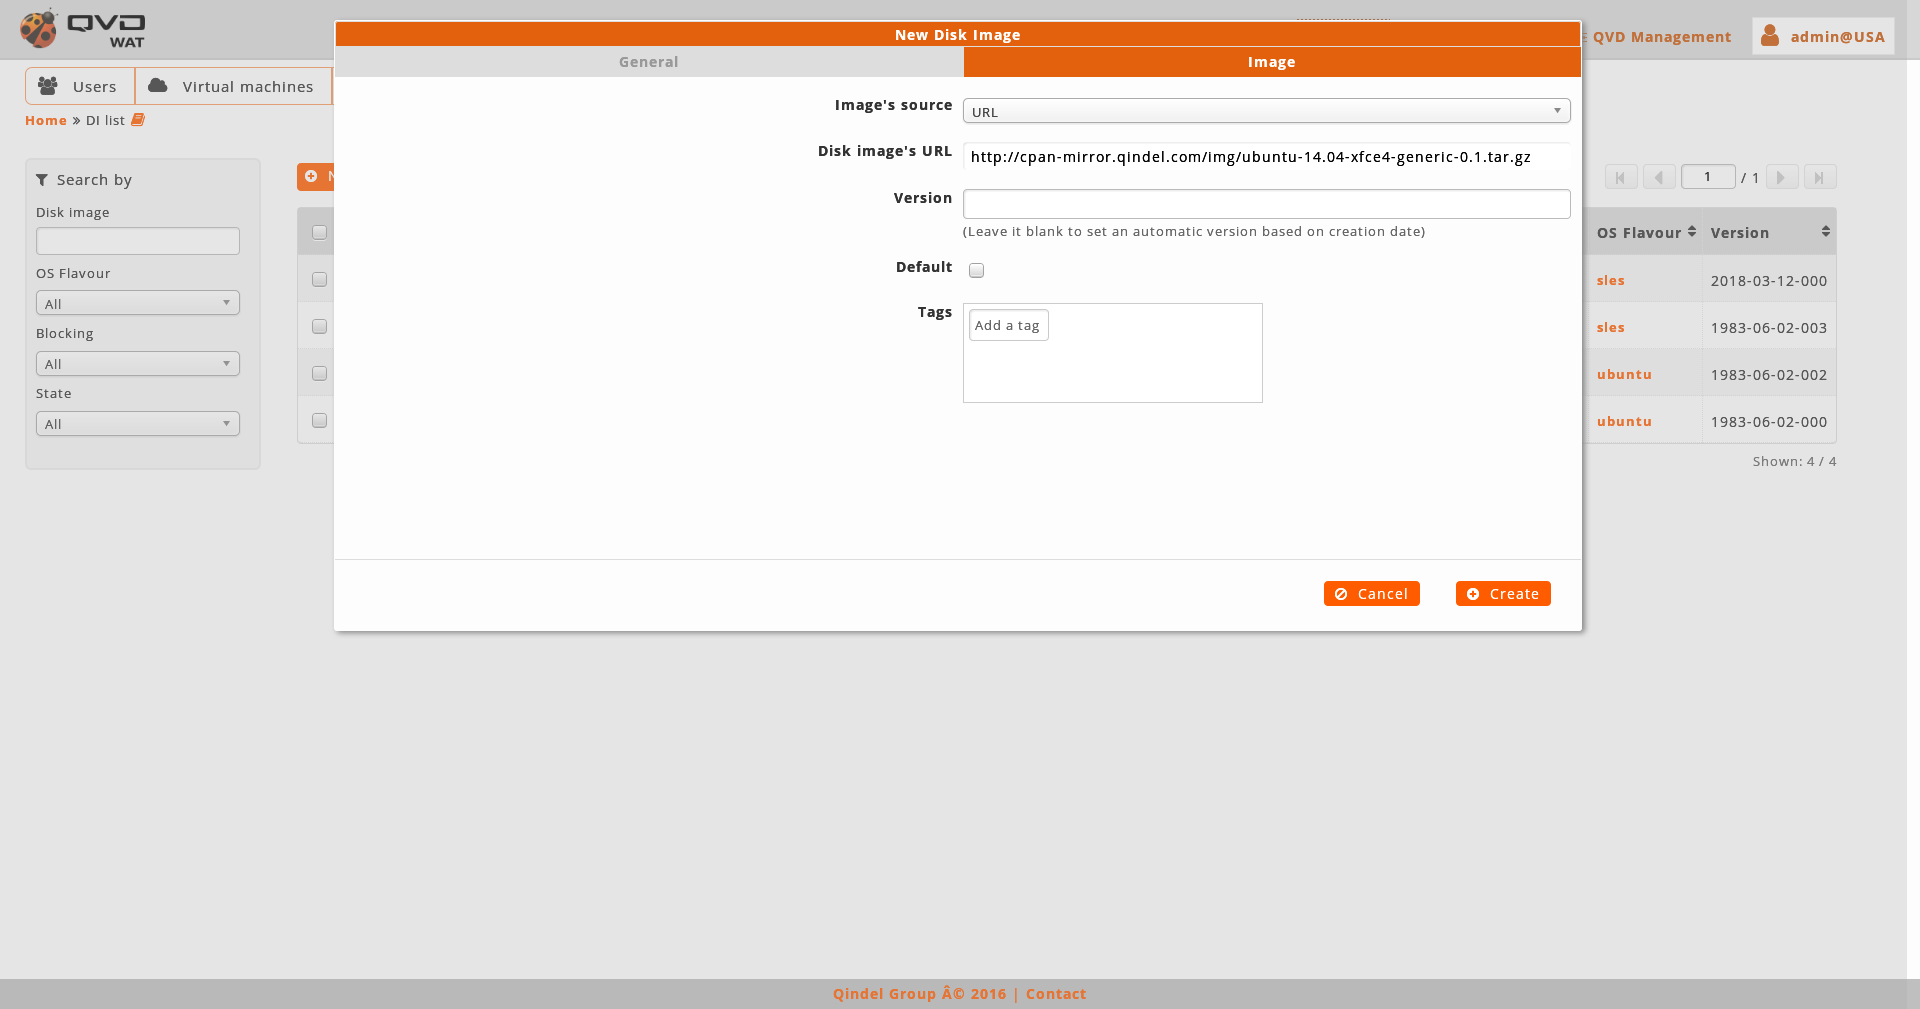
When we create an image we will choose the image file, the version (if we leave a blank, an automatic version will be set based on the date of creation) and the OSF where we want to associate the image. Optionally, we can select it as the image by default for its OSF, add tags and create properties.
The image file can be set up in three ways:
-
By selecting an image among the ones available in the staging directory in the server.
-
By uploading an image from our computer:
-
By providing an image URL which will be downloaded and hosted on the server:
Unlike the creation of the rest of the elements, disk images need more time as they are the physical copy of large files.
Depending on the way of the image creation, the process is different:
-
From the staging directory or URL:
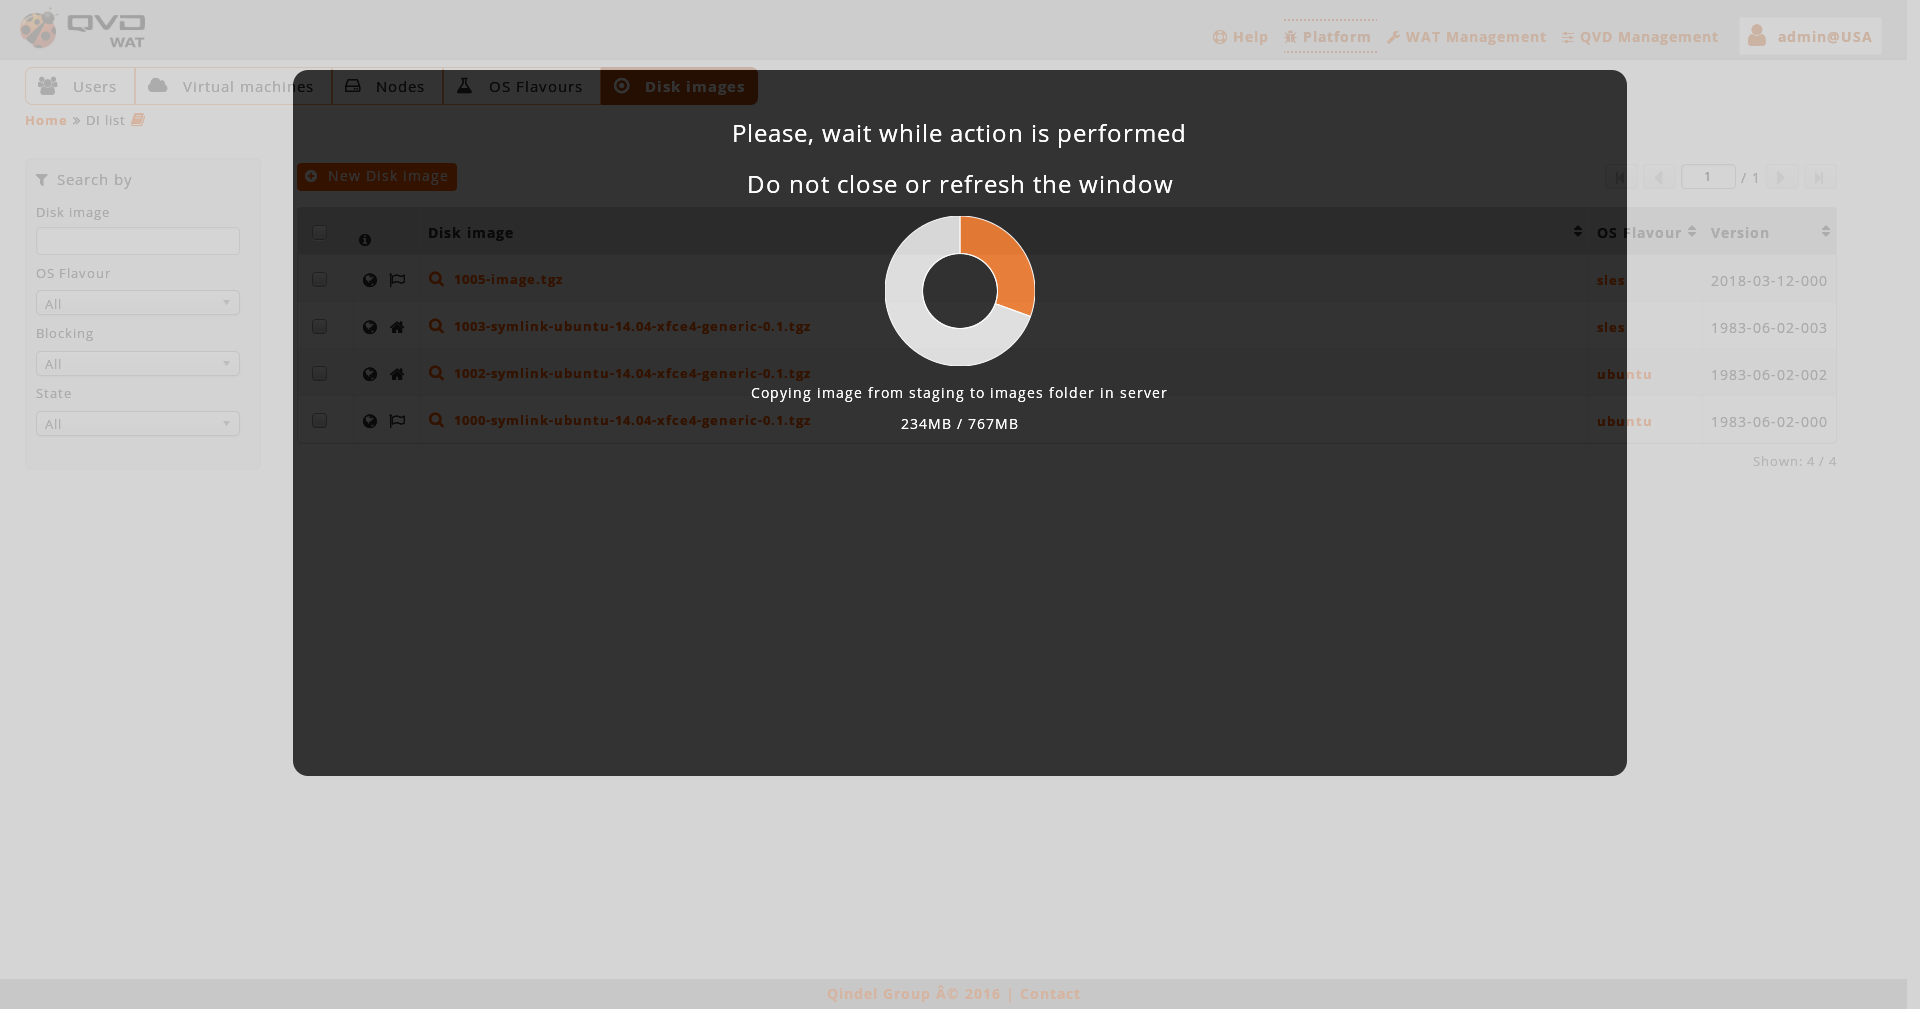
When we create a disk image from the server or from an external URL, the image in creation will appear on the list with a progress bar. Until the end of this progress, it won’t be able to be used, but the interface will not be blocked. Will be possible still working in other sections and even close the administration panel while the image is in creation.
-
From our computer:
When we create a disk image uploading the disk image from our computer, an upload screen will show with a creating progress chart and the interface will be blocked until it finish.
-
- Detail view
-
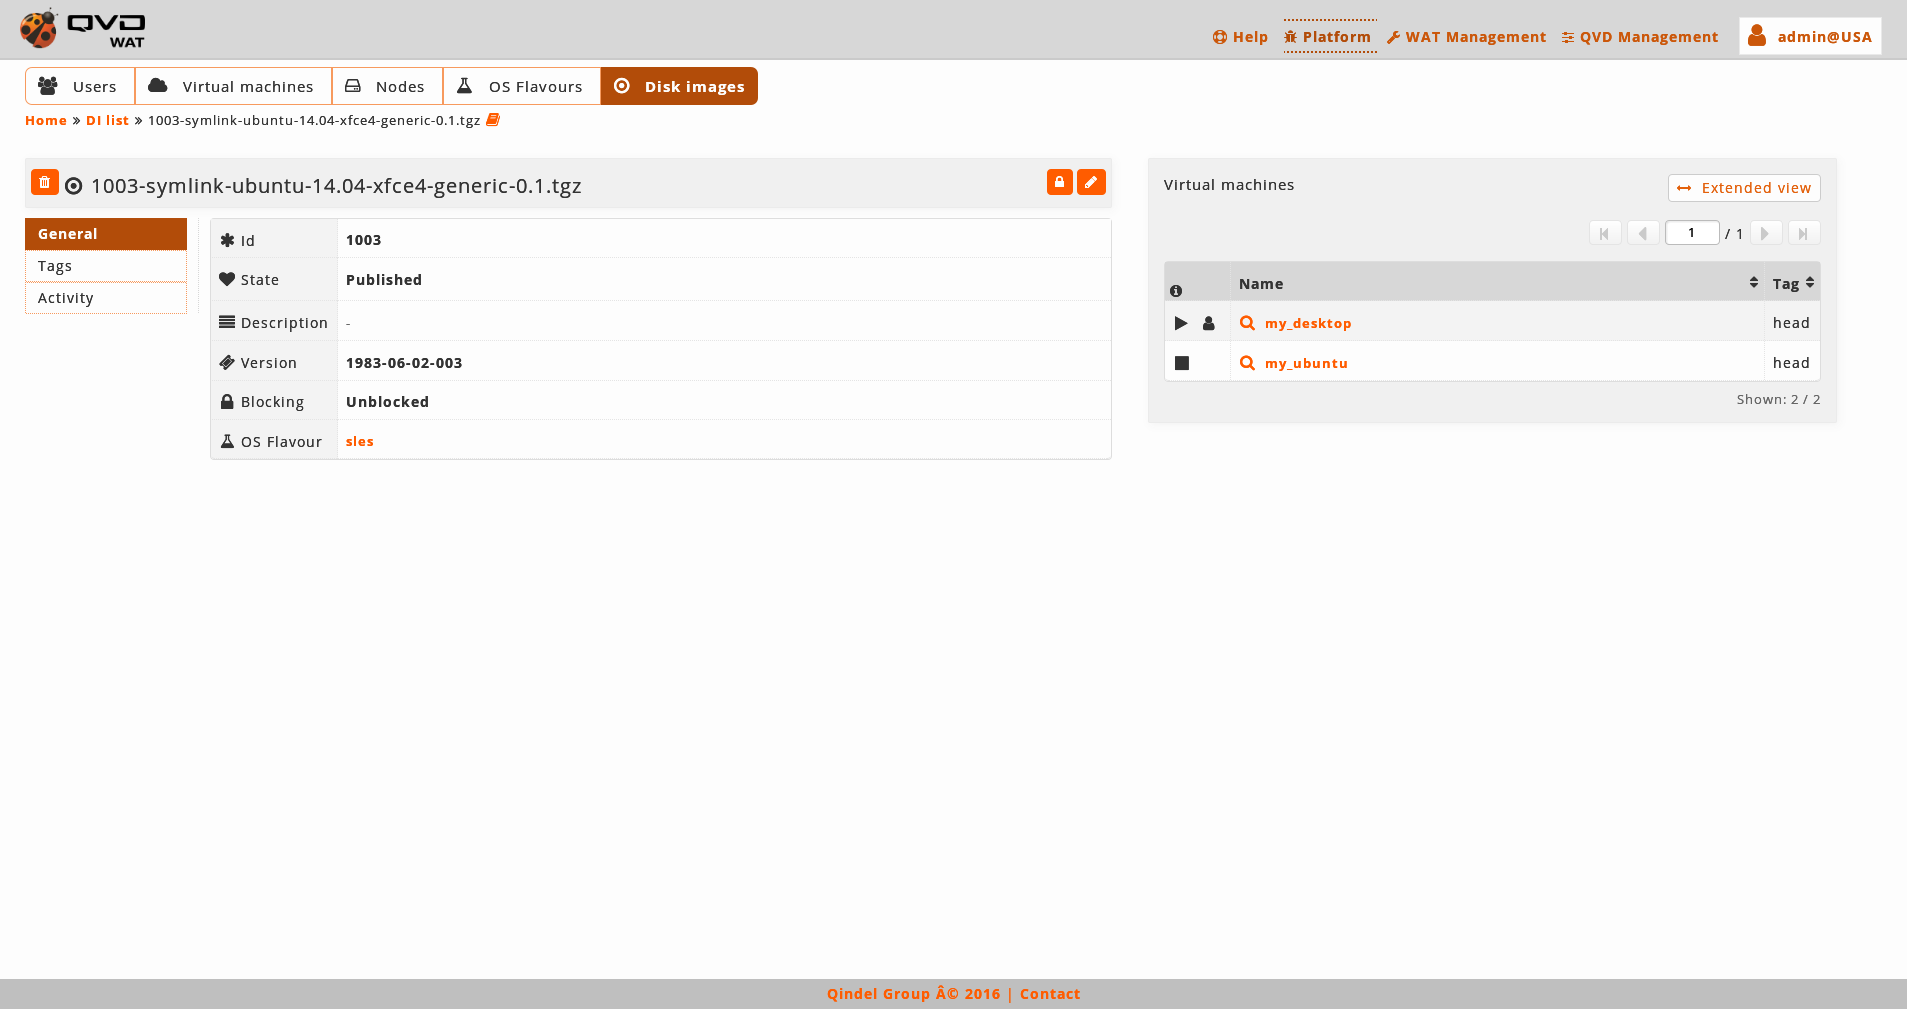
We notice a small head top where next to the image name there are the button to delete it and the action buttons.
The available buttons in the detail view are:
-
Establishing the image as the default one in its OSF. This button will only be available for the images which are not its OSF own default image.
-
Locking/unlocking image
-
Editing image
Below this head top there is a chart with image attributes, including the properties, in case there are some:
Two fields in this table will be to point if it is the default image or the last one created by its OSF (default and head). These lines will only appear if these premises are fulfilled.
On the right we can find:
-
The virtual machines which use this image.
If we want more actions on them, we will go to the list view of the virtual machines filtered by image with the extended view button.
-
- Edition
-
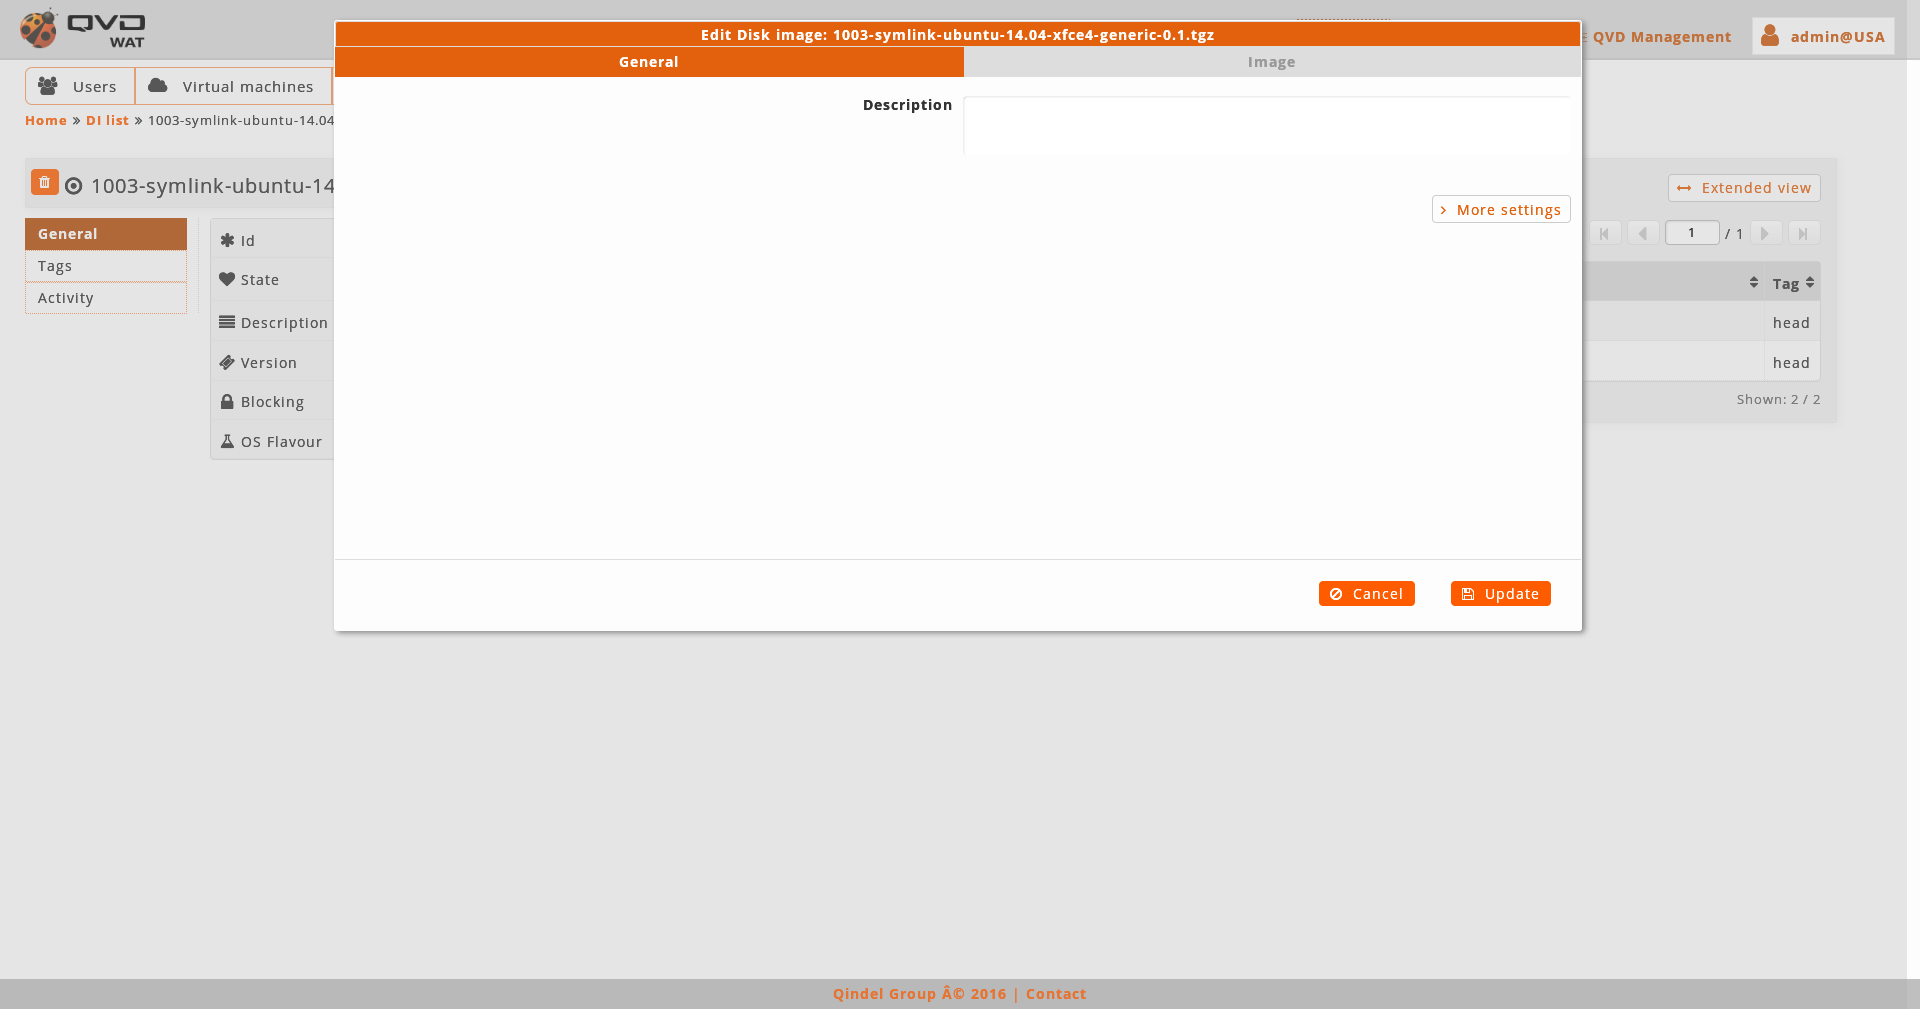
When we edit an image we will be able to manage its tags and edit properties. Moreover, we can establish it as its OSF default image, in case it is not so yet. If it already is, a warning will appear.
A disc Image tags can not be repeated in the same OSF. If we add a tag to a disc Image which already exists in other Image in the same OSF, the system will allow it, but what we will be doing, in fact, is to move the tag between the Images, it will disappear from the one it has it at the beginning, to establish itself in the Image we are editing.
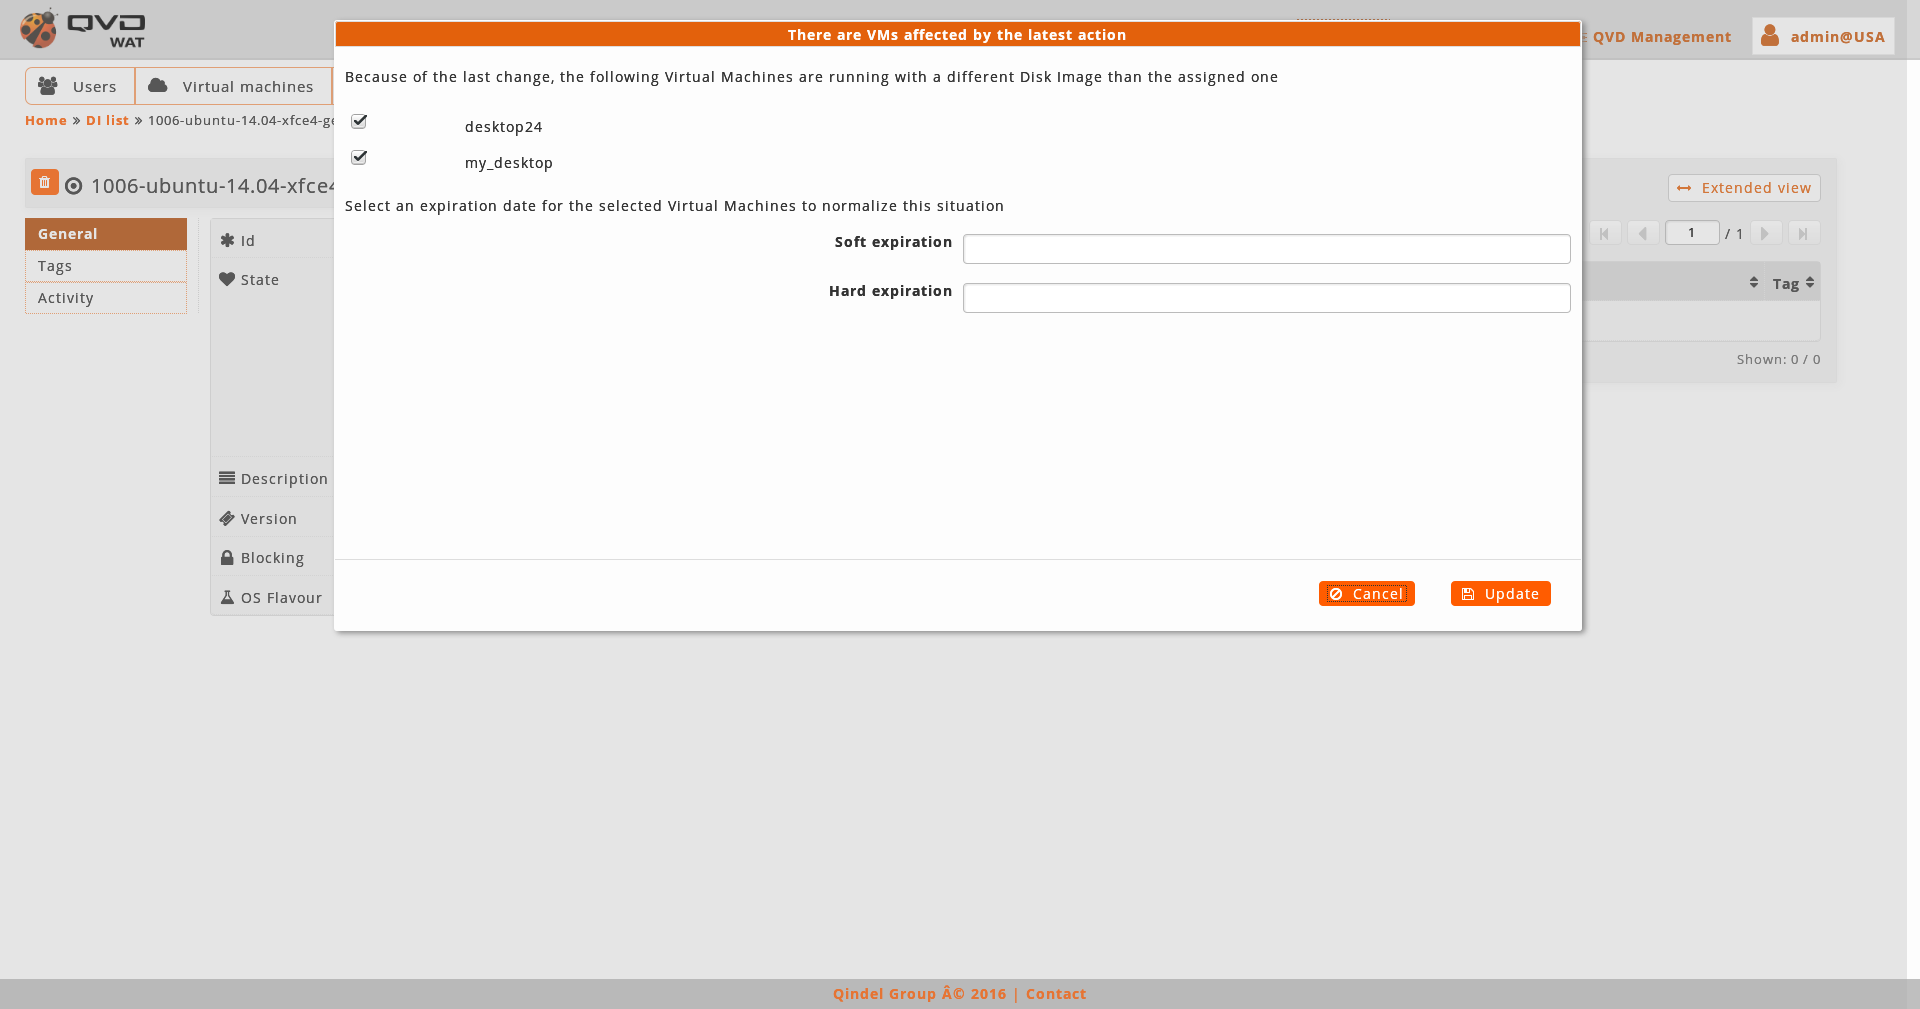
An element edition can also be accessed from the list view with the massive actions if we only select an element. - Consequences of Image changes
-
Sometimes, a change in a disc Image can have consequences in the virtual Machines in several ways.
This will happen in running virtual Machines which are linked to the same OSF as the modified disc Image.
A virtual Machine has assigned a tag among the tags of the linked disk images, in other words, the OSF disk images linked to the Machine. This include special tags, head and default, which refer to the last disk image created and the default disk image respectively.
Remember when we change a tag linked to a virtual Machine while it is running, we can get into a situation in which the linked disk image is different to the one we are using in the execution.
It is possible to get to the same situation when the tag, linked to the virtual Machine which is running, change from one image to another. This can happen in different situations:
-
When the tag is assigned to other disk image of the same OSF and so deleting the Image used in the virtual Machine execution.
-
When the linked tag is default and a new disk image is established as the OSF default image.
-
When the linked tag is head and a new disc Image is created.
When carrying out the action which sets off any of these situations, it can be assigned an expiration date for the virtual Machine or Machines affected. These actions are as follows:
-
Editing an Image by adding a tag which is in another, this being the one assigned to a running virtual Machine.
-
Establishing an image as the default one in its OSF, when there is already a virtual Machine assigned to the same OSF which has a default tag assigned
-
Creating an Image in a OSF when there is already a virtual machine assigned to the same OSF which has the head tag assigned
After any of these actions, a modal window will appear to warn us about the situation of the virtual Machines affected alongside the checkboxes and a form to assign an expiration date to those Machines in the list we want to.
-
2.5. WAT management
One part of WAT is devoted to its own management. Giving tools for the management of WAT general configuration, administrators and its permissions.
2.5.1. WAT Configuration
In this section we will define a series of general values that affect all the administrators of WAT. They are values that will be used as default settings, and that every administrator will set up according to his preferences.
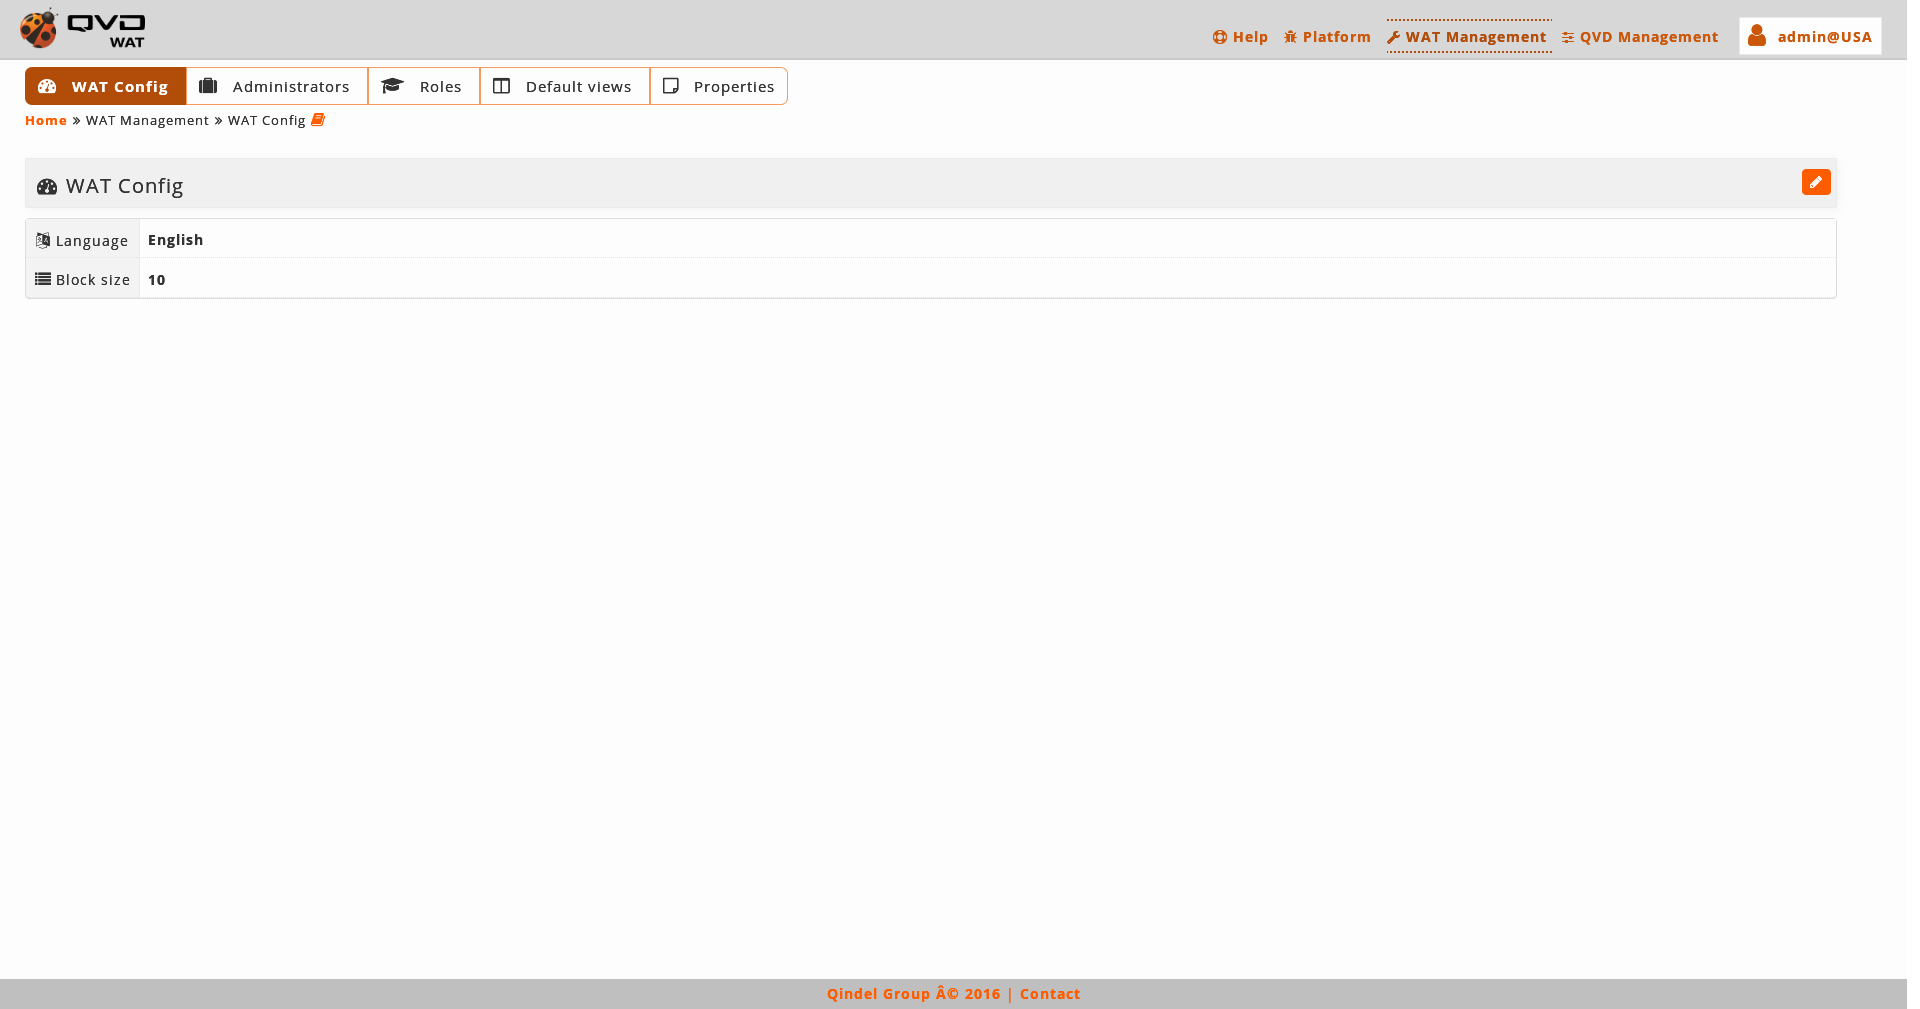
Find a table with the current values and on the right part the button of edition..
- Edition
-
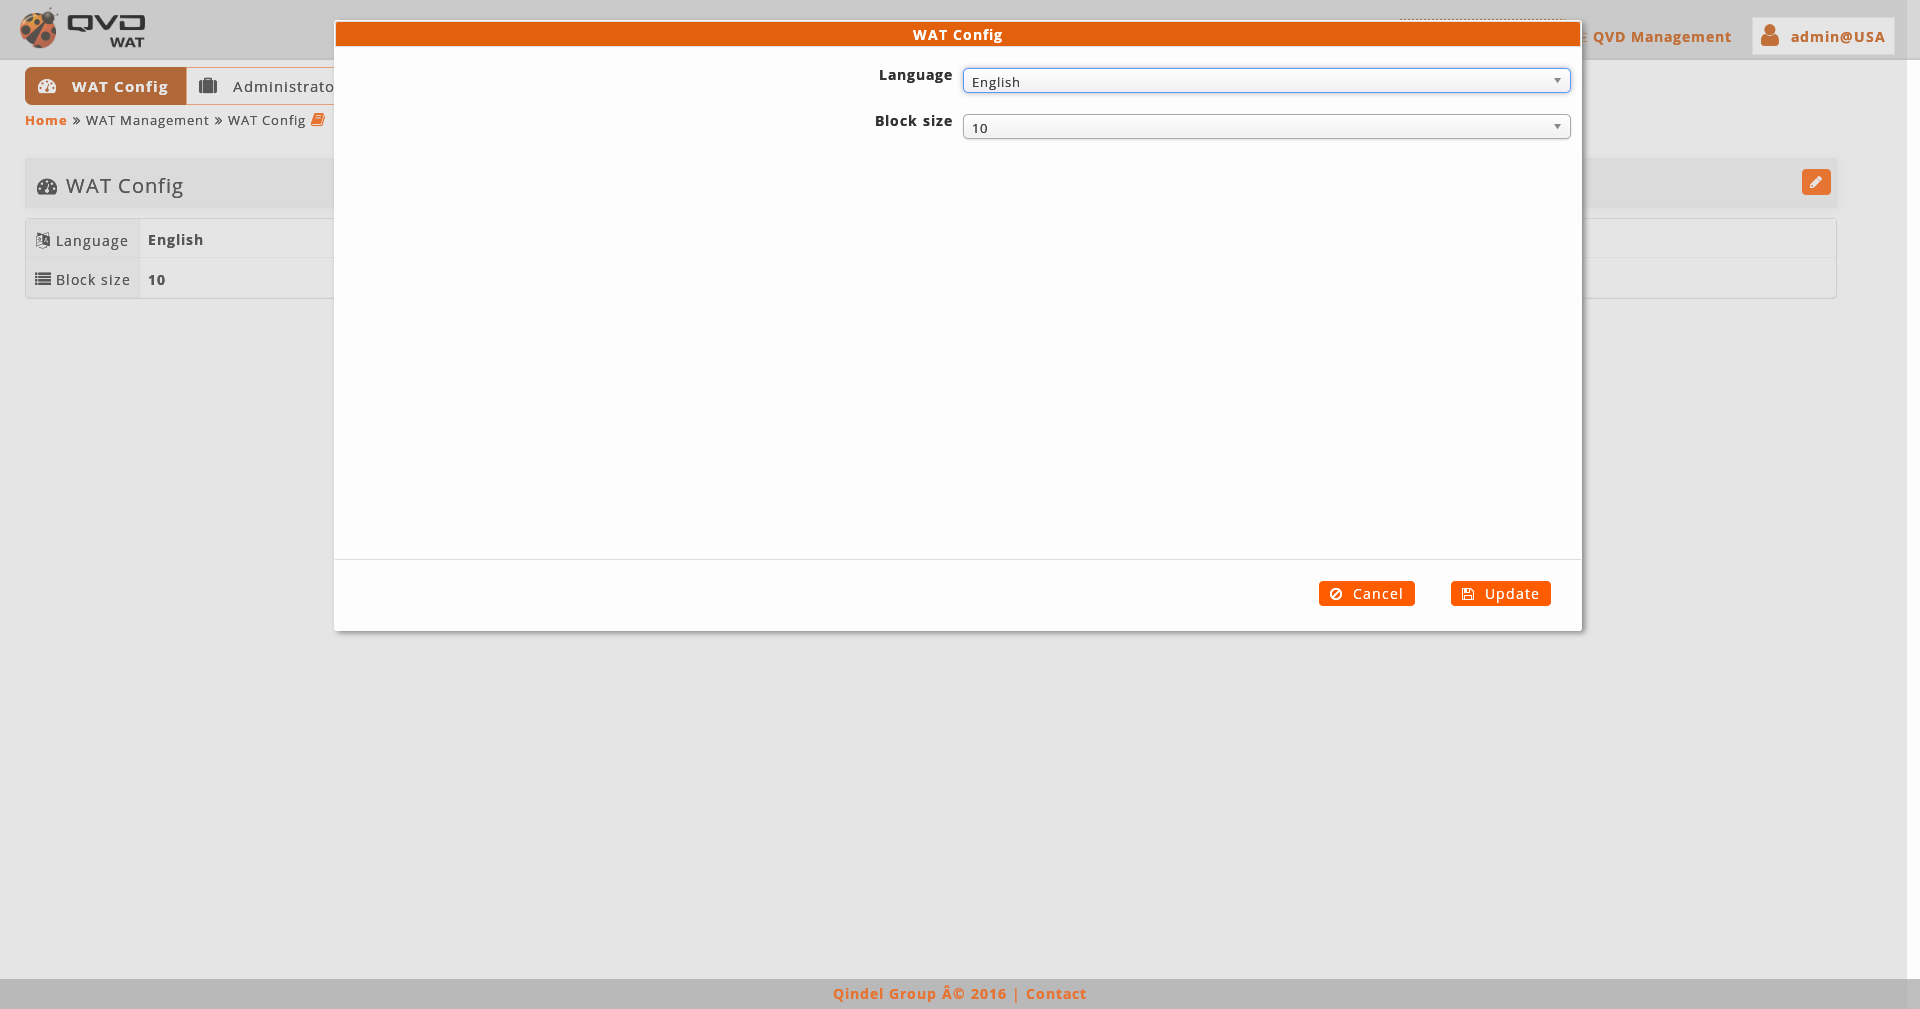
The parameters that can be configured are:
-
Language: It will be the WAT interface language which the administrators will have by default.
For these parameters two types of values can be set up:
-
Fixed Language: English, Spanish…
-
Automatic Language (auto): It will be used the browser language with which the WAT is being used. If the browser language is not available in the WAT, English by default will be used.
-
-
Block Size: It will be the number of items displayed in all the list views.
If the number of items exceeds the block size, the list will be paginated with the block size as the maximum number of items per page.
An exception to the block size is embedded lists in detail views, which will be fixed block size 5.
-
Tool of customization of styles: Activate or deactivate the tool of customization of styles of WAT.
With this activated tool, a tab will appear on the left side of the screen. When clicking on it, a side menu will come out with the options of customization of styles. To gain a thorough understanding of this tool, review section Tool of customization of styles in the user guide.
-
2.5.2. Administrators
In this part the administrators of WAT will be managed as well as its permissions.
- List view
-
The main view is a list with the administrators of WAT.
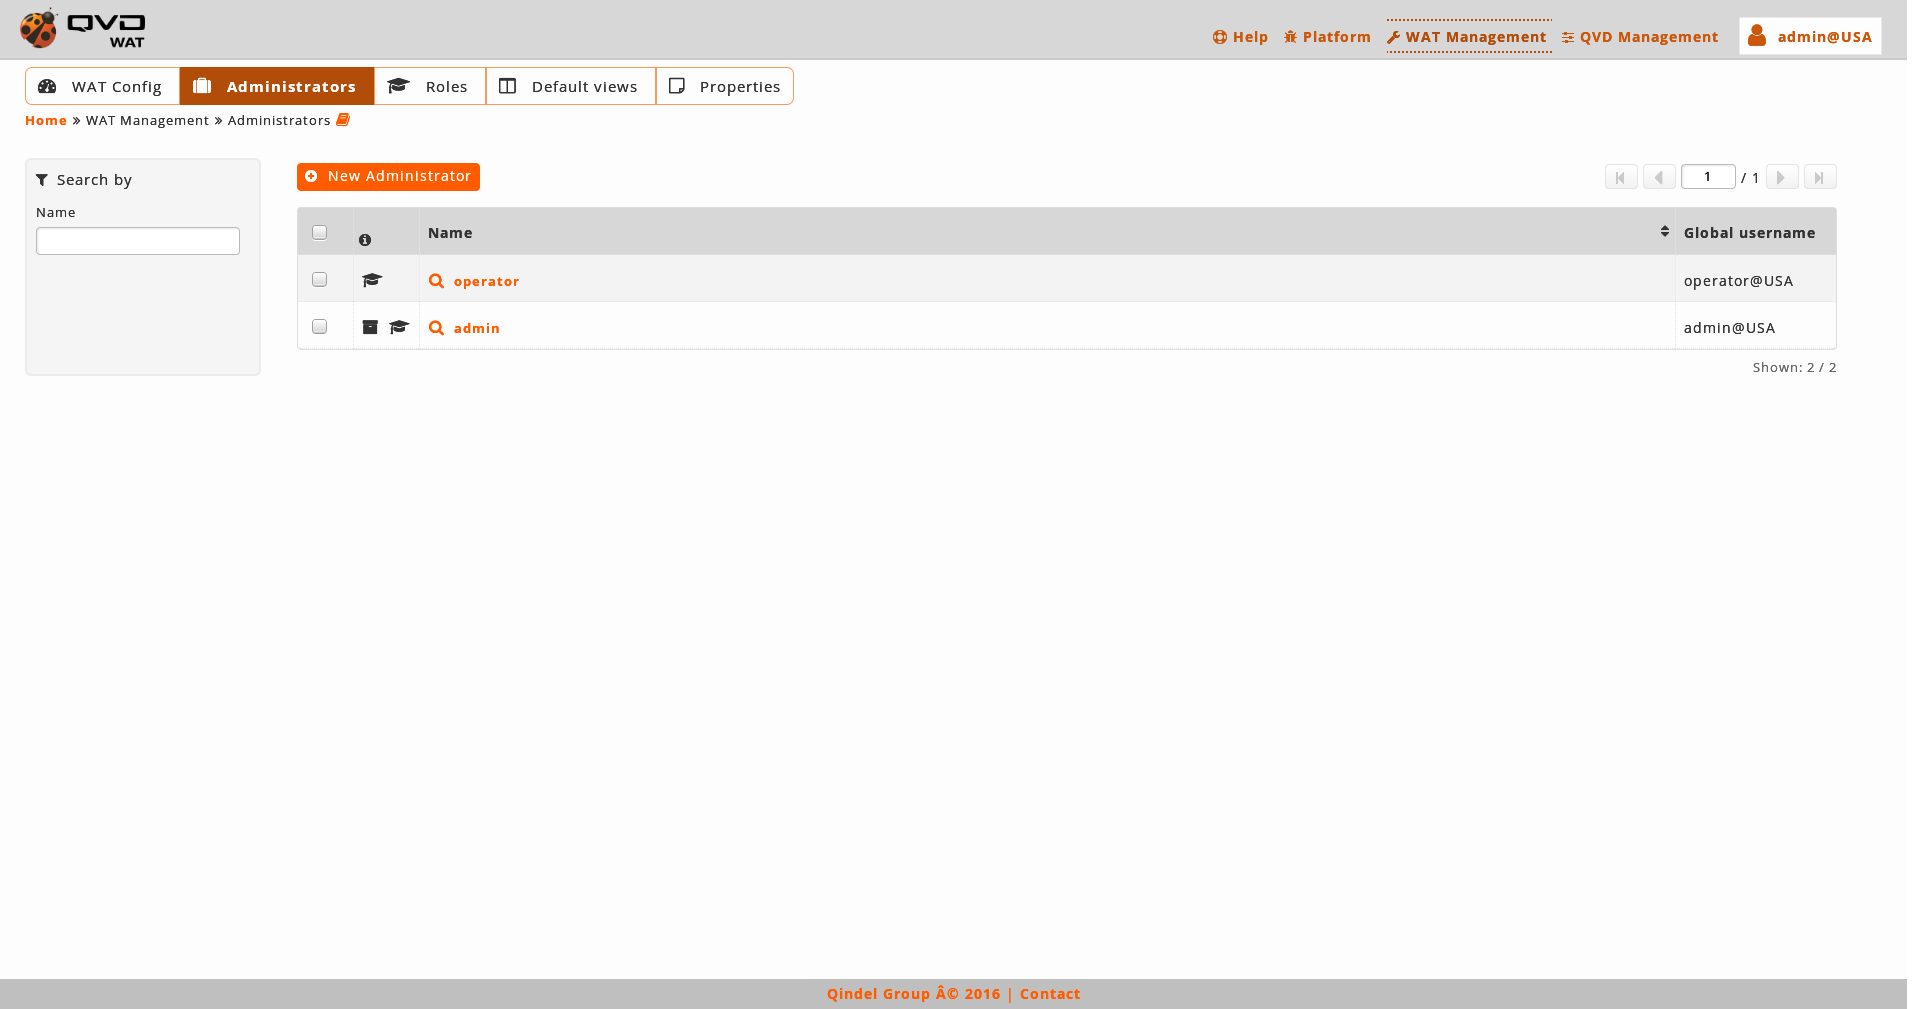
- Information column
-
The information column will indicate us:
-
The blocking status of the users:
-
With roles. Mortarboard icon.

I we go over with the mouse we can see the roles that the administrator has asociated.
-
Without roles: Warning icon.

If the administrator does not have asociated roles, a warning icon will appear since an administrator without roles does not make sense.
-
Logged administrator: Archiver icon.

If the administrator is the logged administrator, it will have this identifier with the warning This administrator is me.
-
-
- Massive actions
-
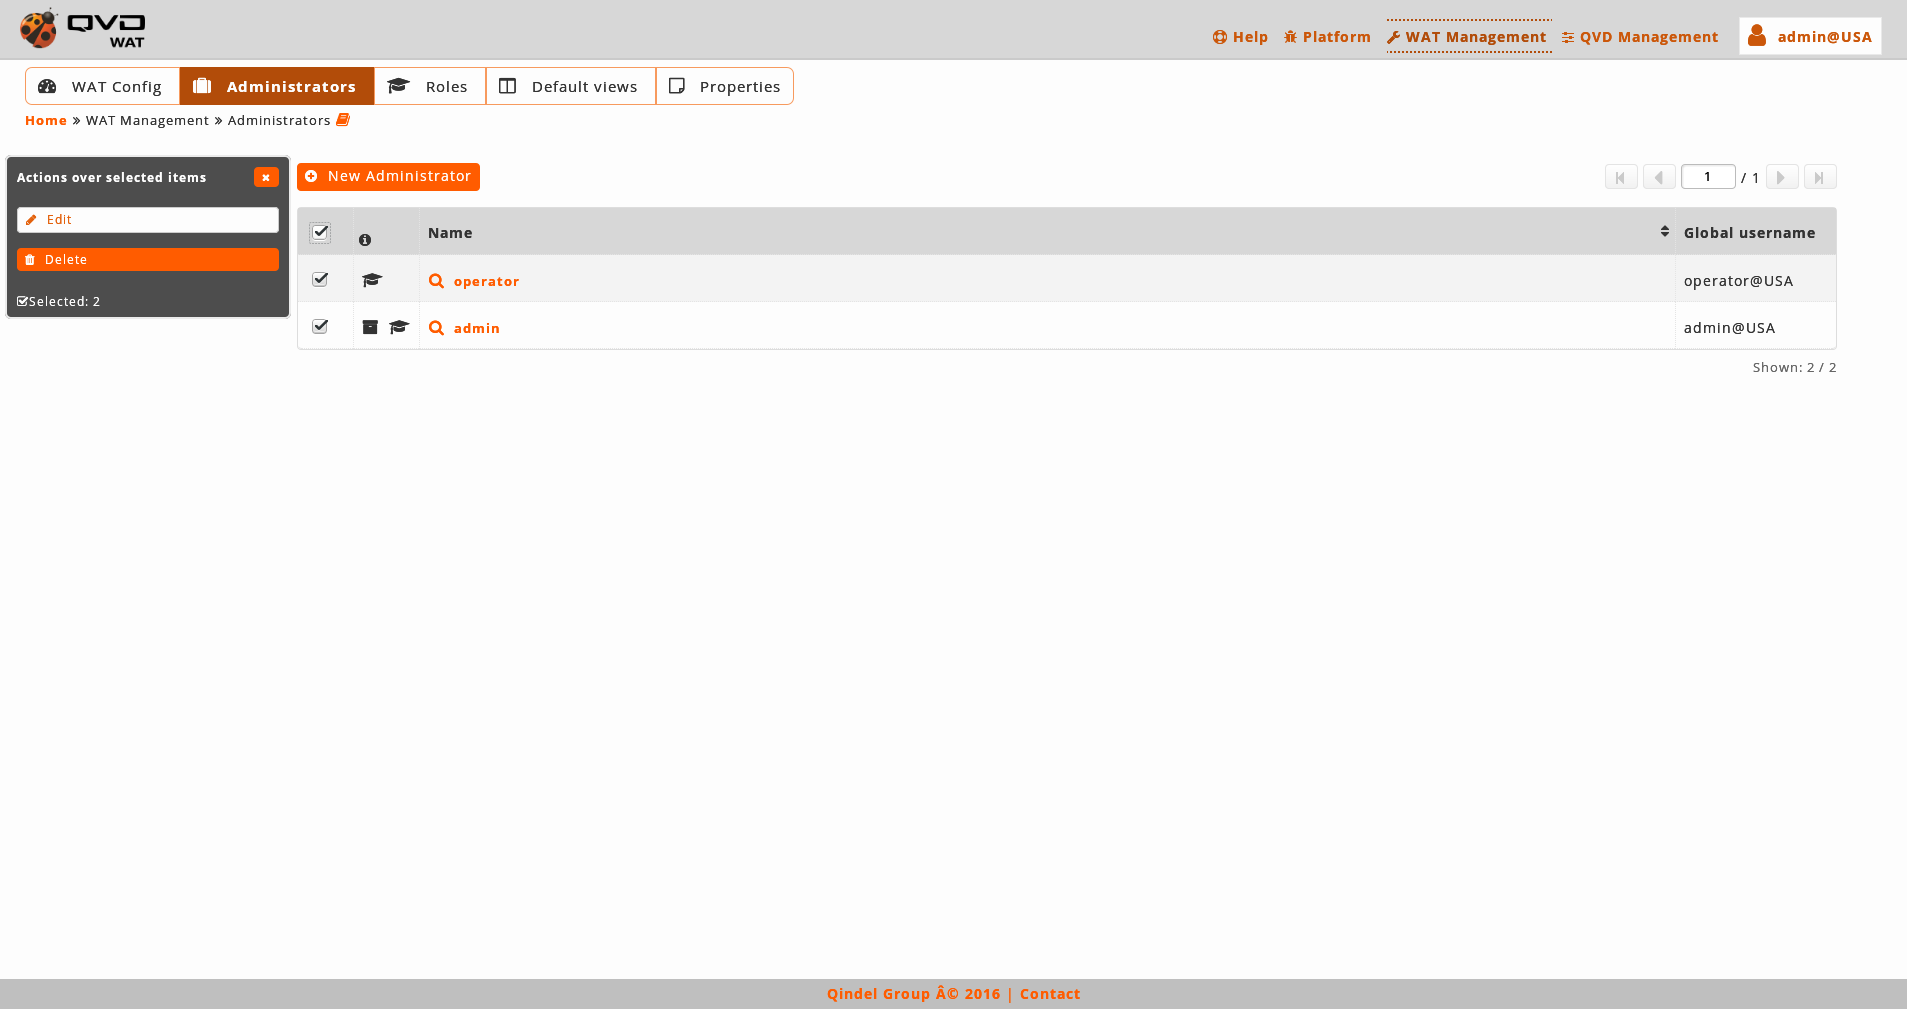
The massive actions give us the following options to do on the selected administrators:
-
Delete administrators
-
- Creation
-
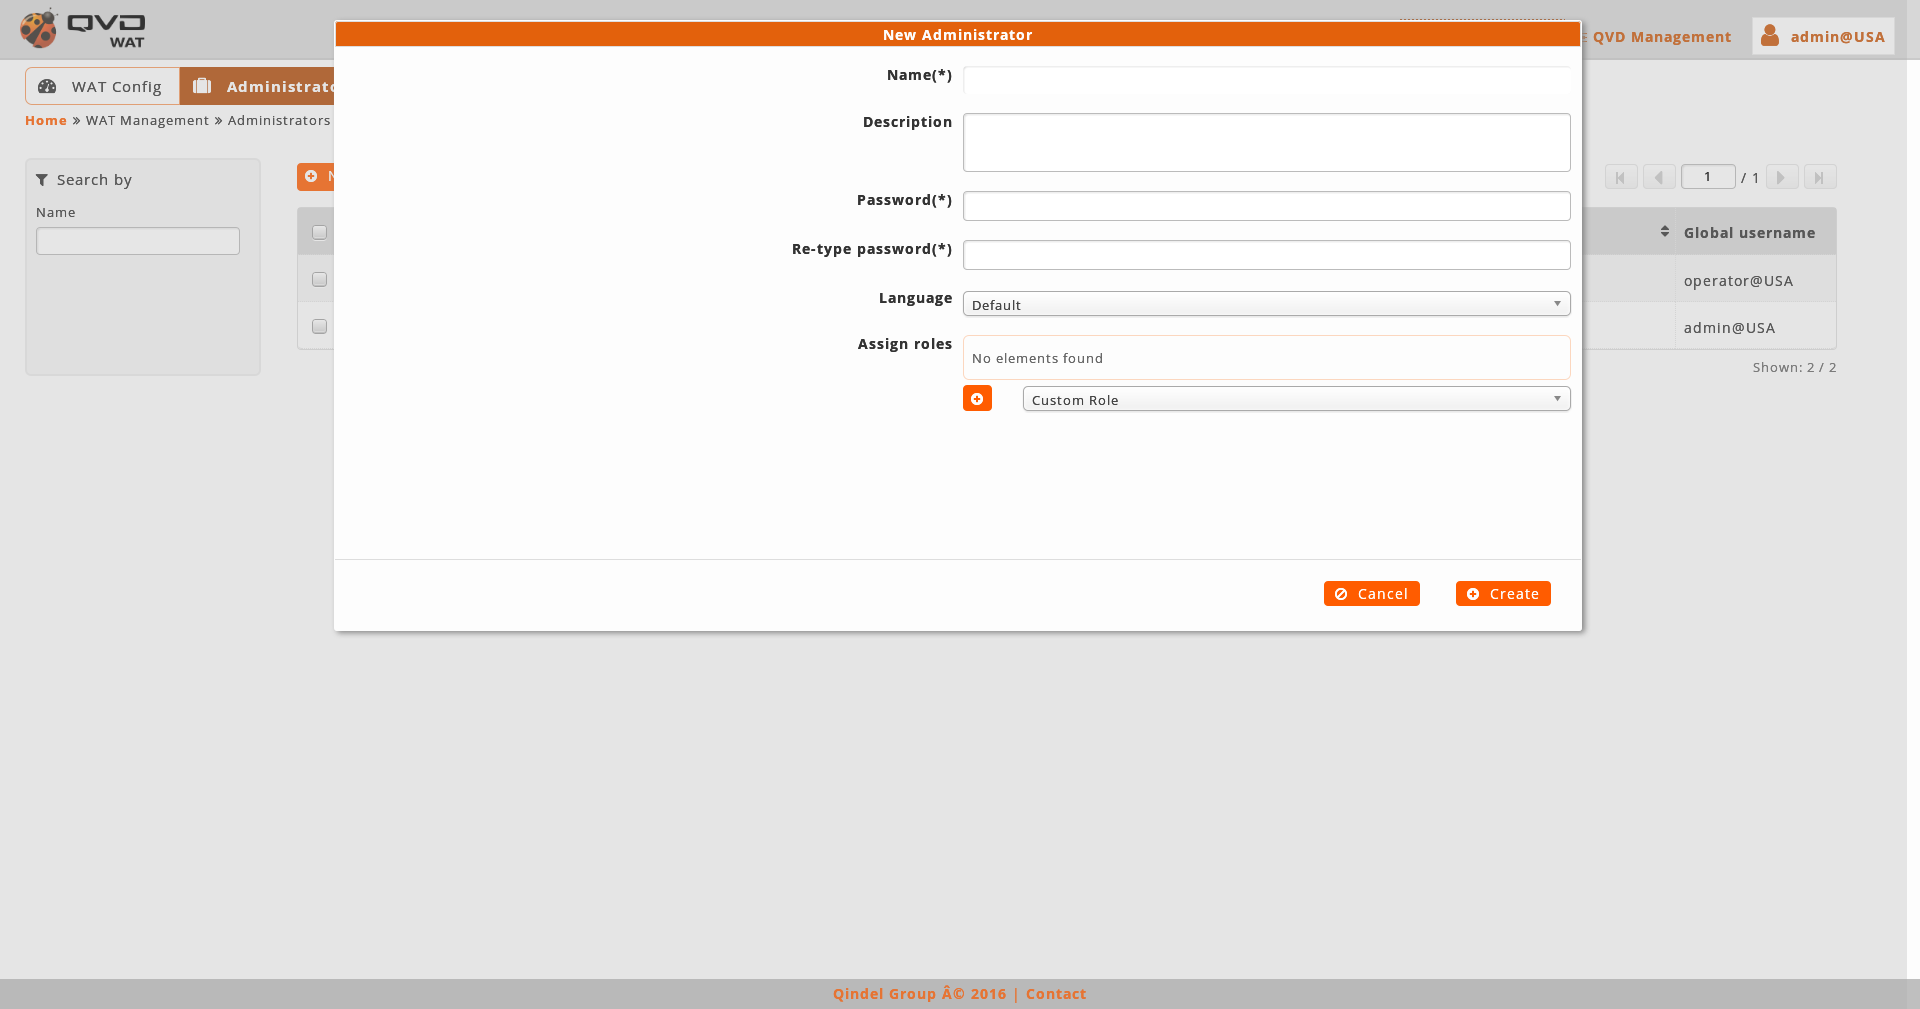
When creating an administrator we will stablish its name, password and its language. If we leave the default language, the administrator will have the general language of the system although it can be changed.
Besides, we can assign roles of privileges, depending on the permits we want that the administrator has. If we assign more than one role, the administrator will have the addition of the privileges of each role. If we do not assign any role, the administrator will not be able to enter in the Administration panel.
- Detail view
-
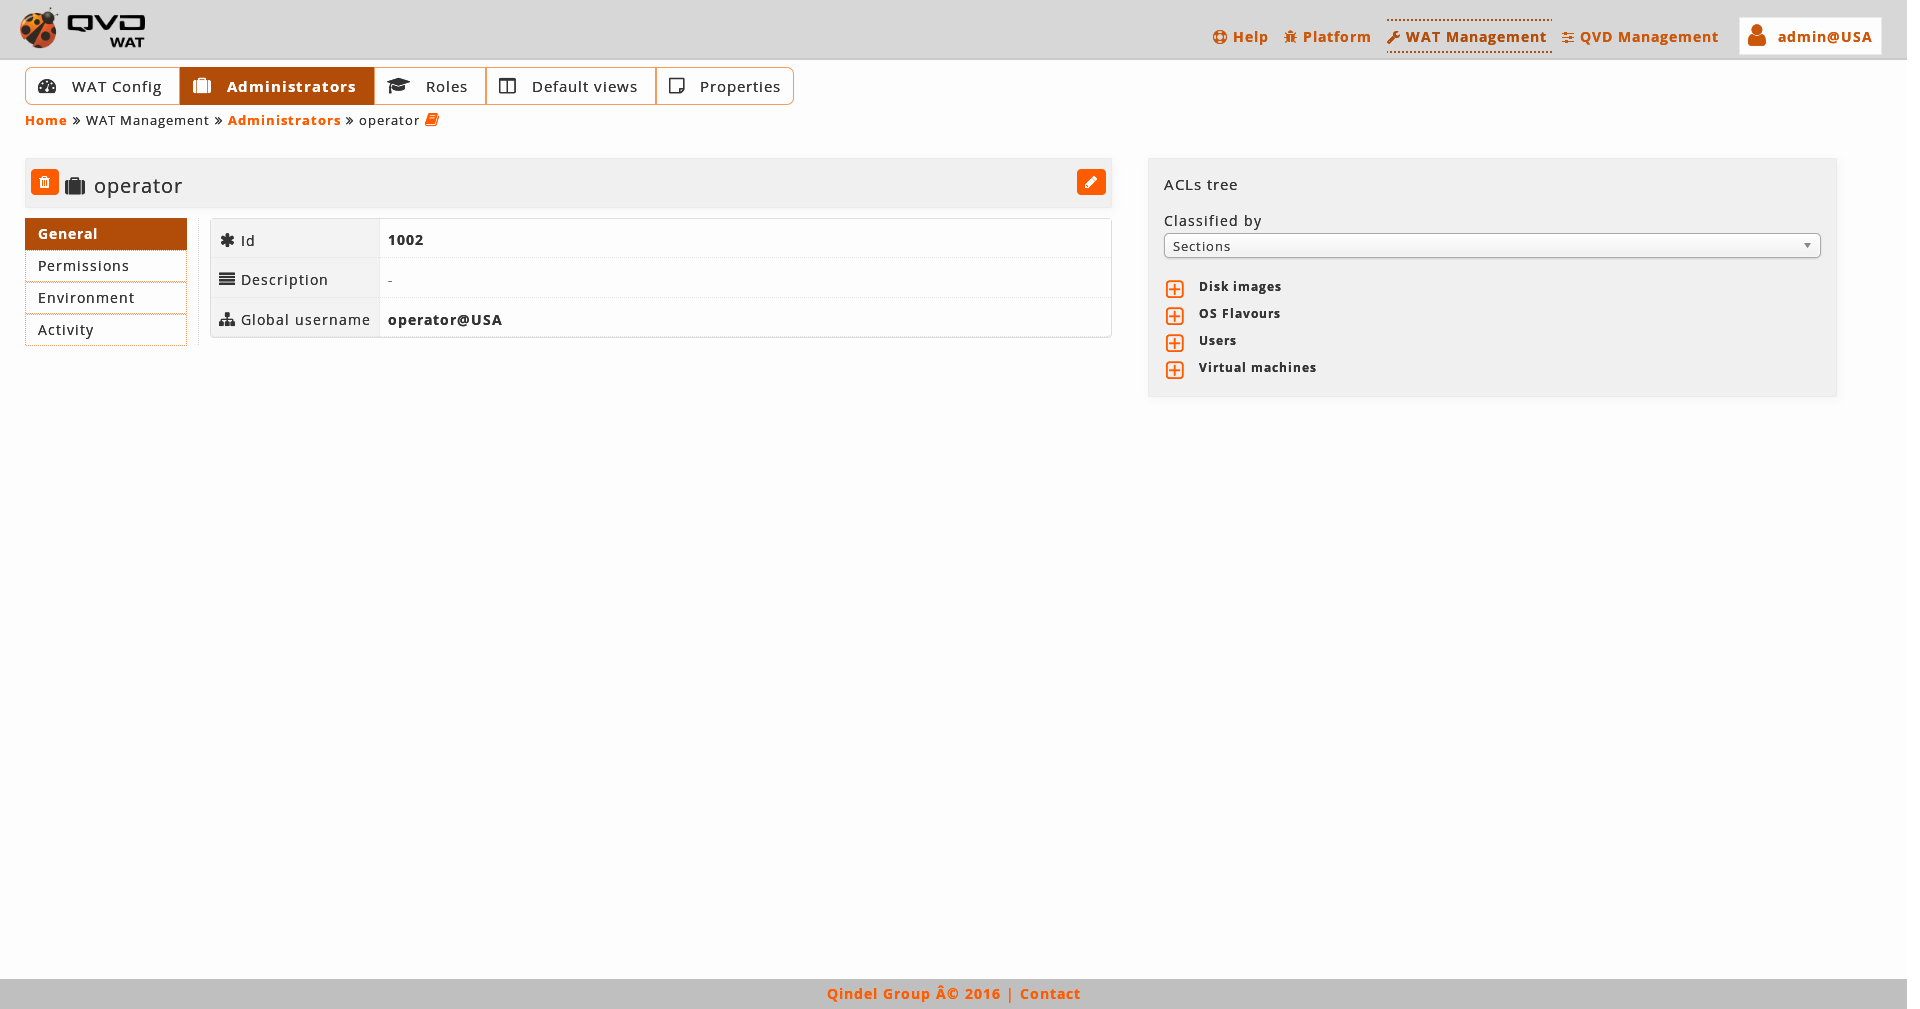
We observe a small head top next to the name of the administrator where the buttom to delete it and the action buttoms are.
Below this head top there is a table with the attributes of the administrator. Among them we can find the roles asociated to the administrator with a control to delete next to each of them. By clicking in one the names of the roles, we will go to the detail view of each role.
Under it, there is a panel with a selector to asigne any of the roles that are configurated in the system. This assignment gives the administrator the ACLs that the assigned roles have, no matter if they have common ACLs. In the ACLs tree we can see the ACLs computed of the assignation.
On the right part we find_
-
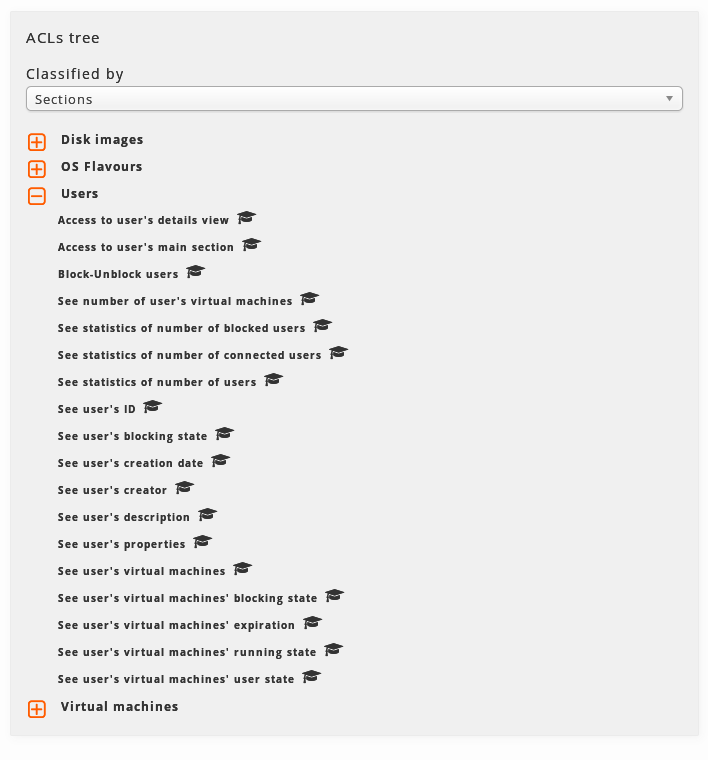
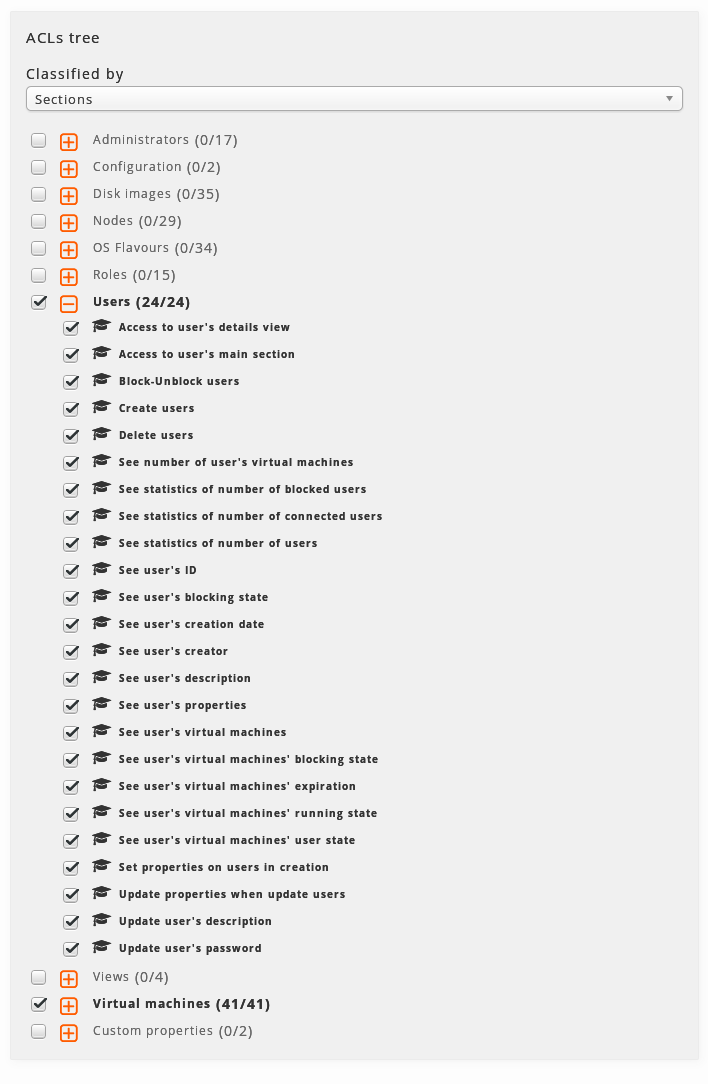
The administrator’s ACLs tree. The branches appear closed at the beginning. By clicking on the icon next to each branch we can open them and see its contents.
The tree has two clasification modes:
-
By sections of WAT:
The ACLs are clasified by the section where they are used or the type of element that they affect to.
For example, in the Configuration section the configuration part of WAT as well as the configuration of QVD are found.
-
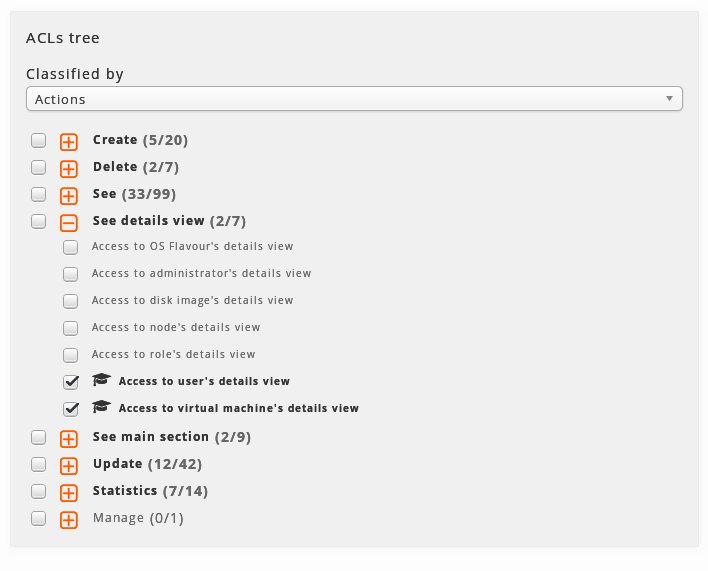
By type of image:
In this clasification the same ACLs are found but clasified by the type of action that they let.
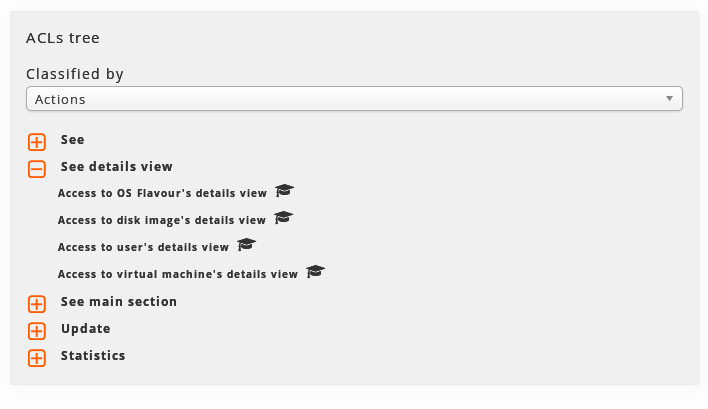
In both cases, the asociated ACLs will the only ones shown to the administrator through the assigned roles.
Each ACL in the tree has a mortarboard icon that if we go over it with the mouse, it will indicate us the role or roles that it comes from. This is useful if we have asociated some roles to the adminitrator and we want to know the origin of the ACLs, since the roles can have ACLs in common.
-
- Edition
-
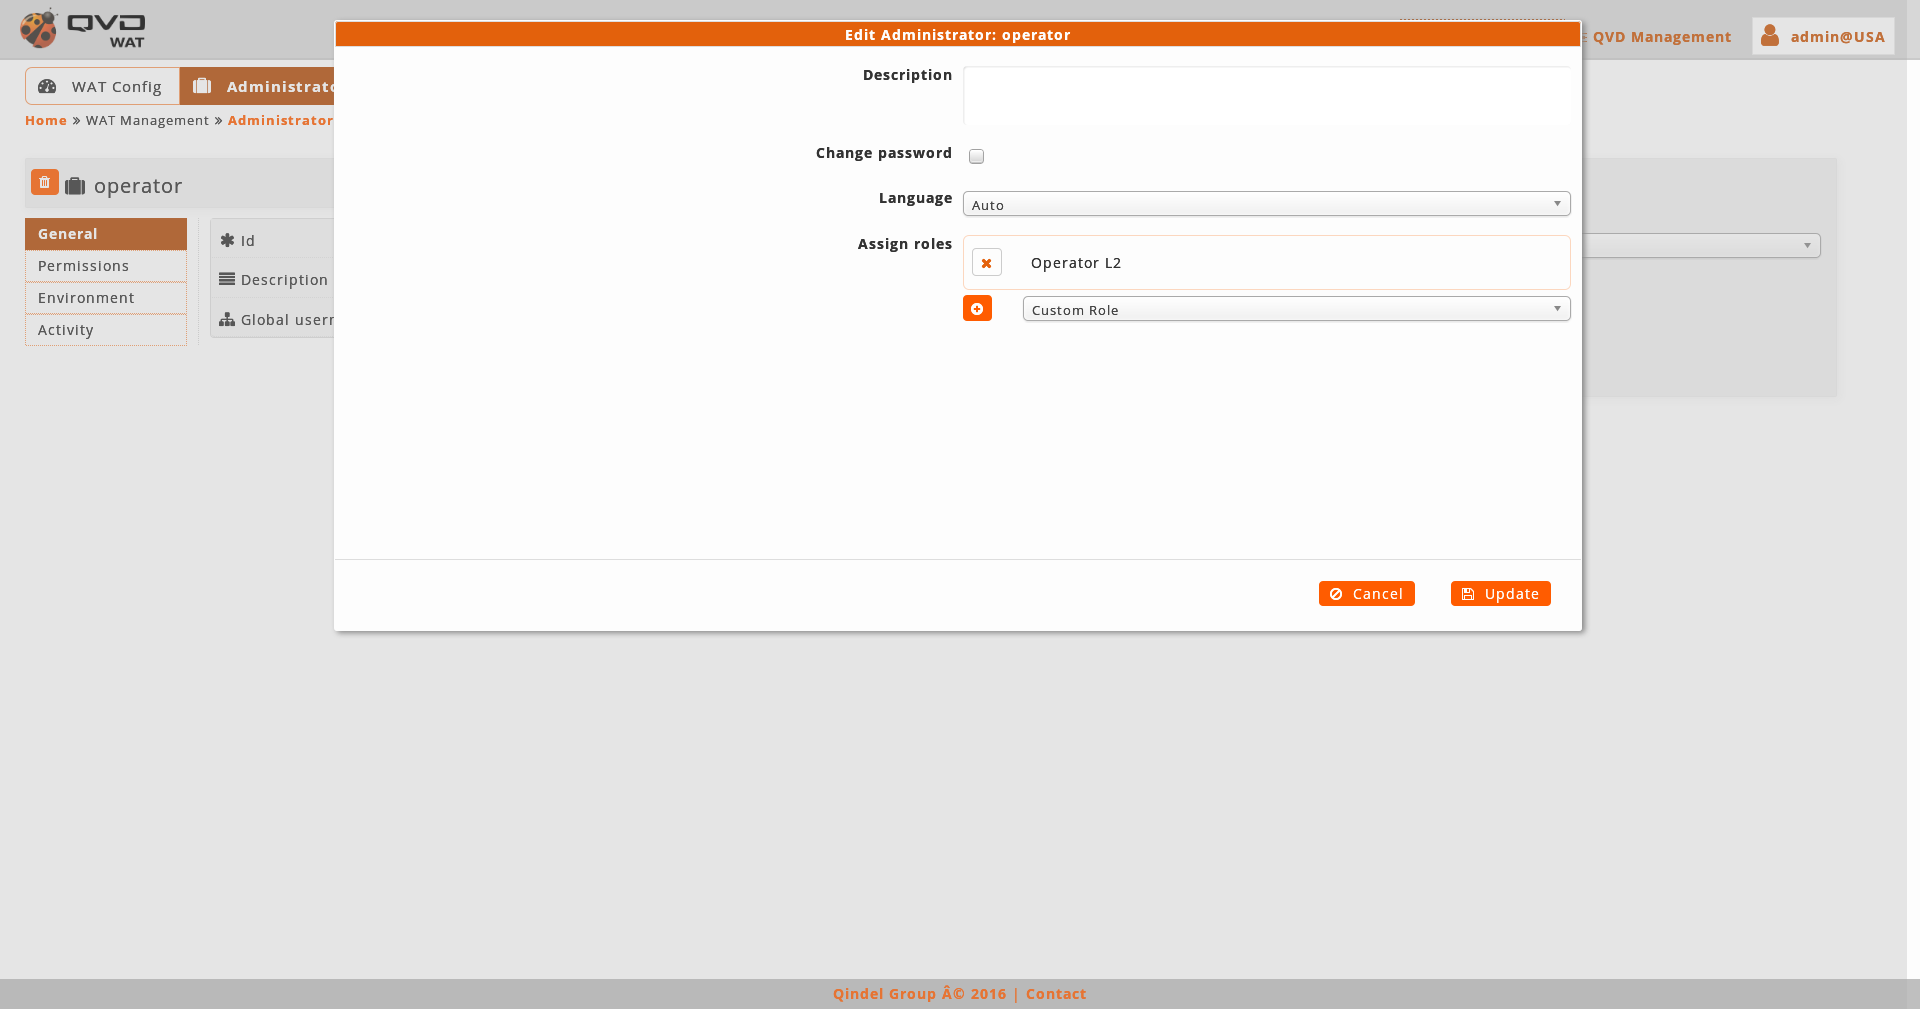
When editing an administrator, we can choose if changing the password (if we do not click on the check-box, it will remain the same) and the language, remembering that they are values that the administrator itself can change.
In addition, we can assign/unasign roles of privileges.
2.5.3. Roles
In this section the roles of WAT will be managed as well as its associated ACLs.
- List view
-
The main view is a list with the roles of WAT.
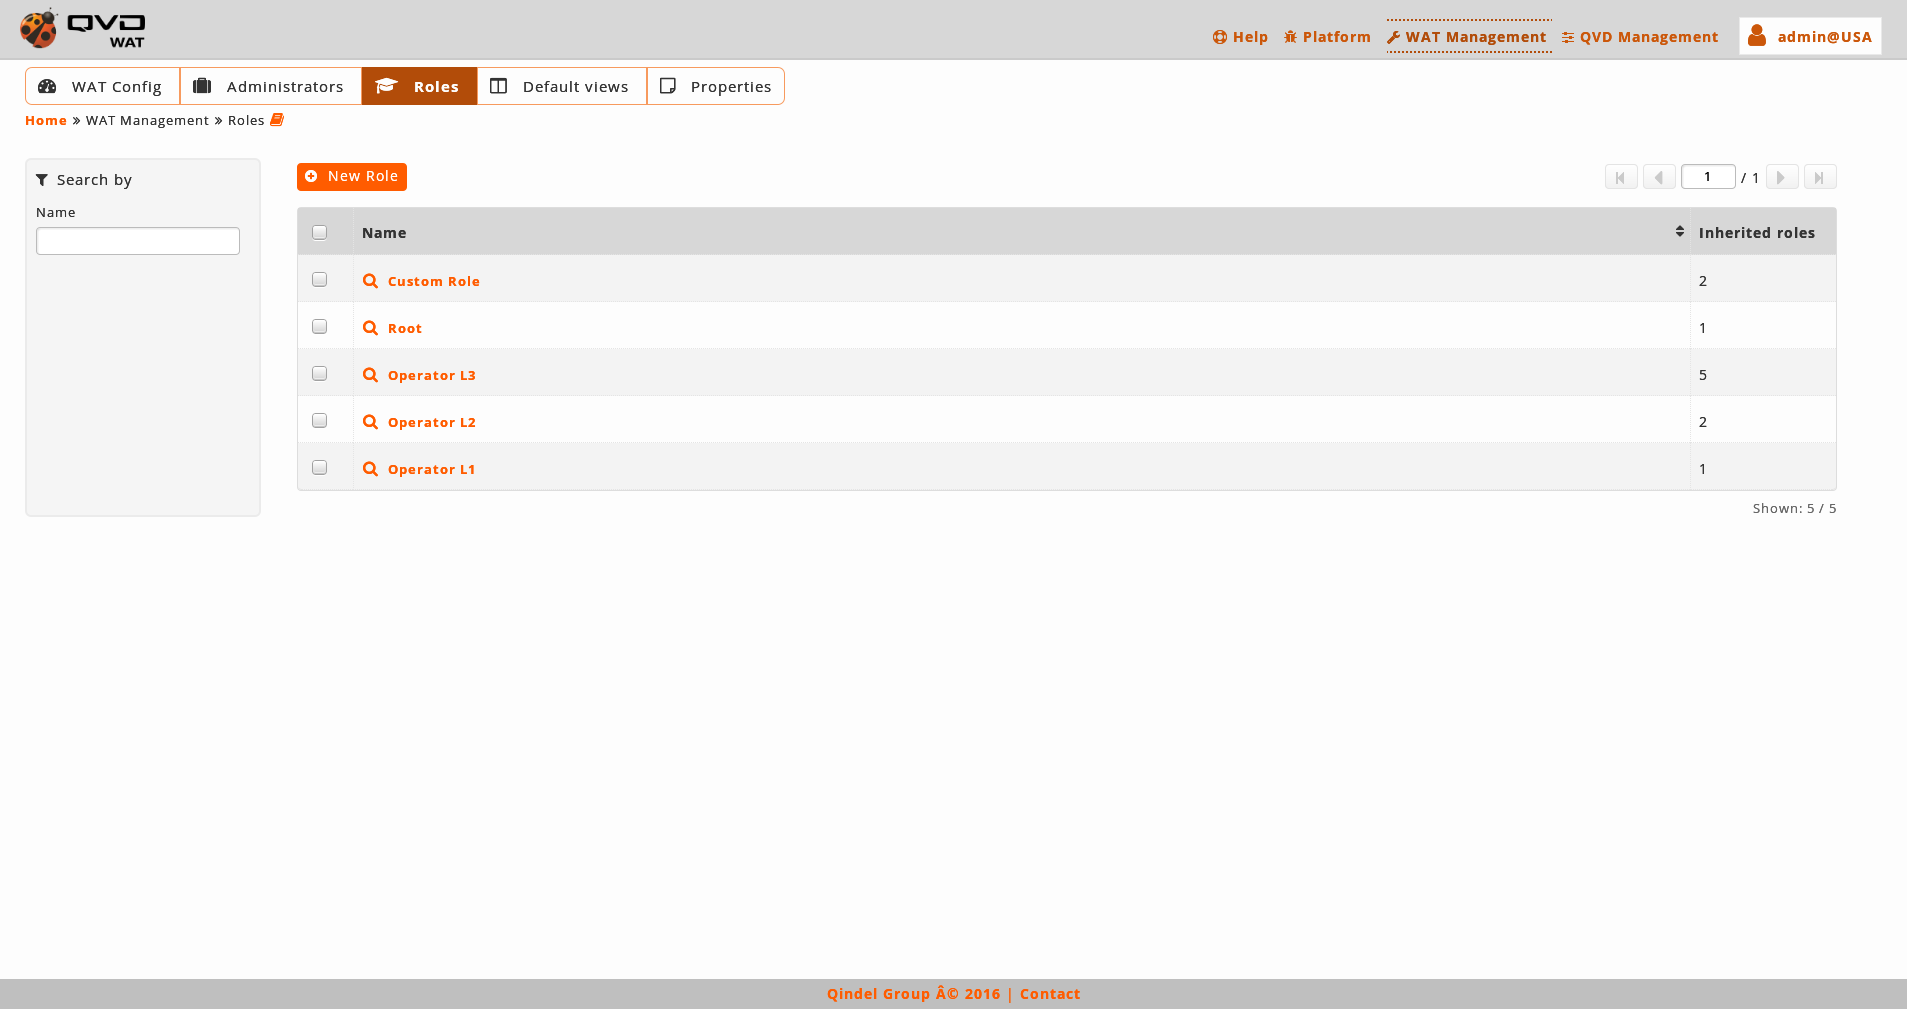
- Information column
-
In the roles there is no information column.
- Massive actions
-
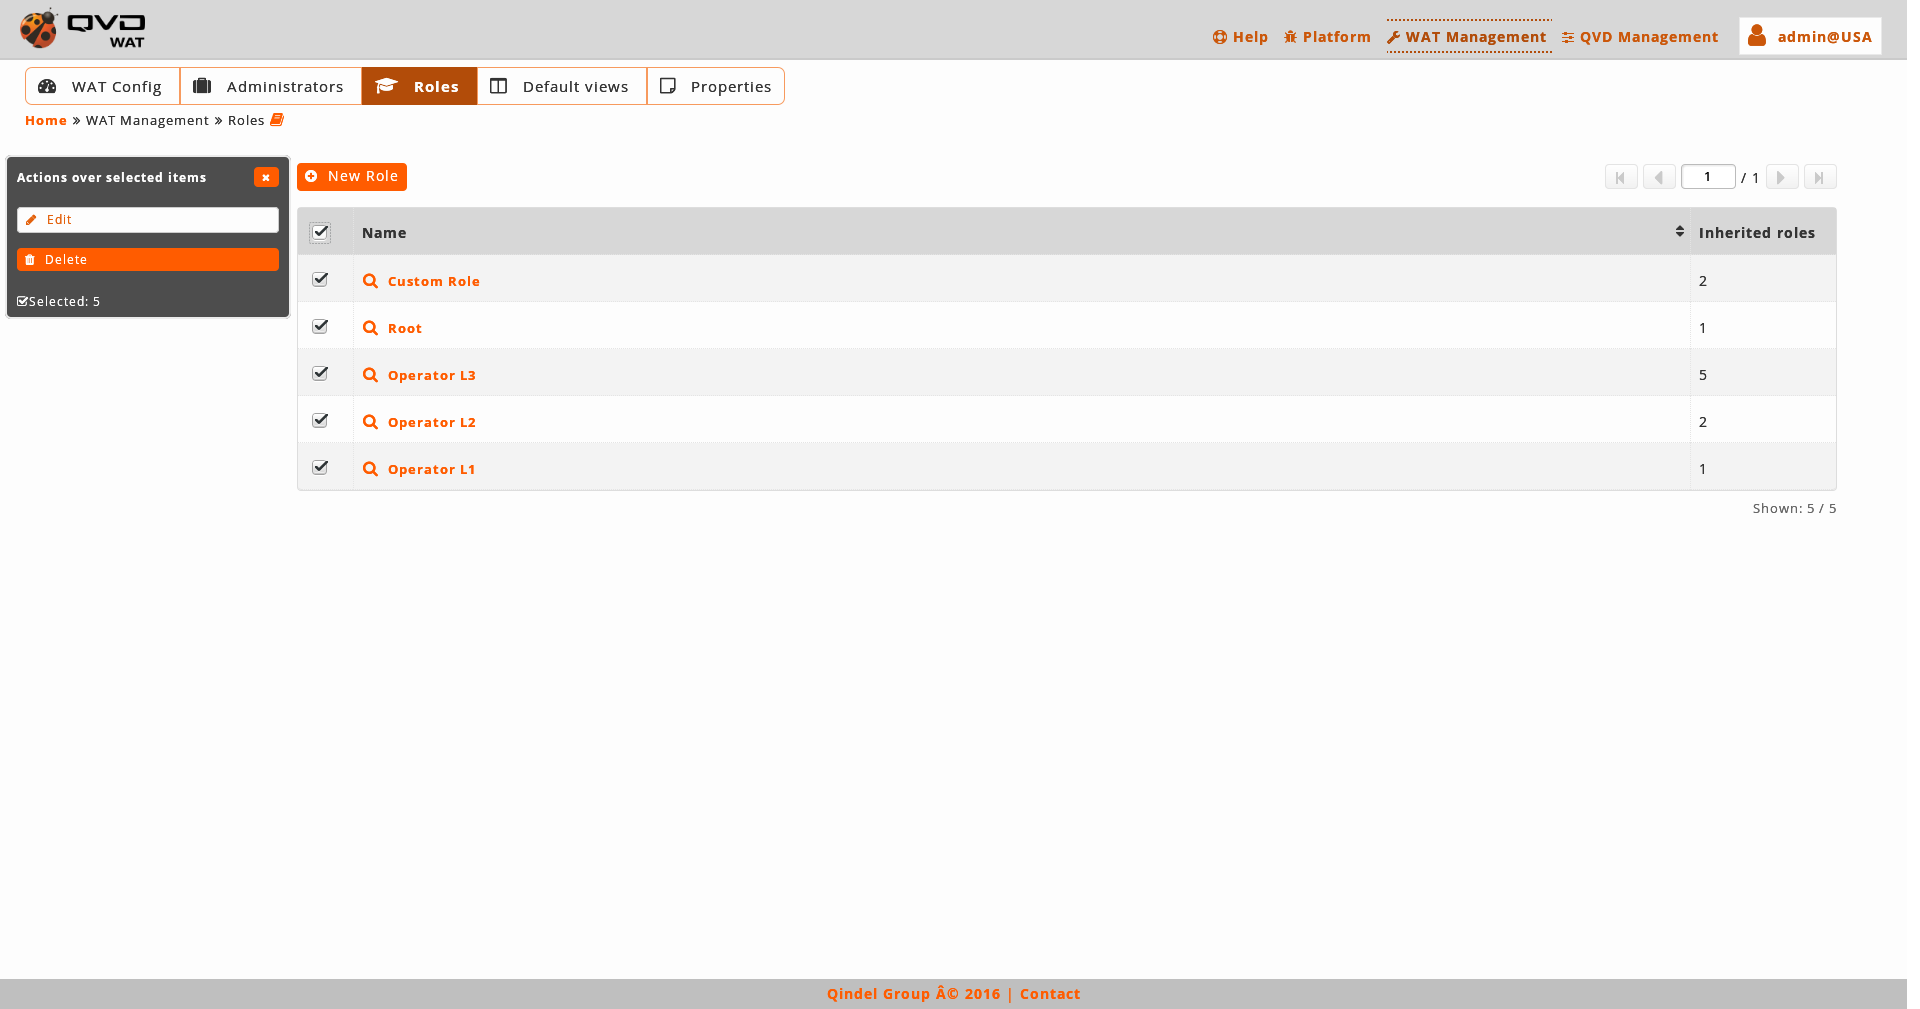
Massive actions will give us the following options to be done on the selected roles:
-
Edit roles
-
Remove roles
-
- Creation
-
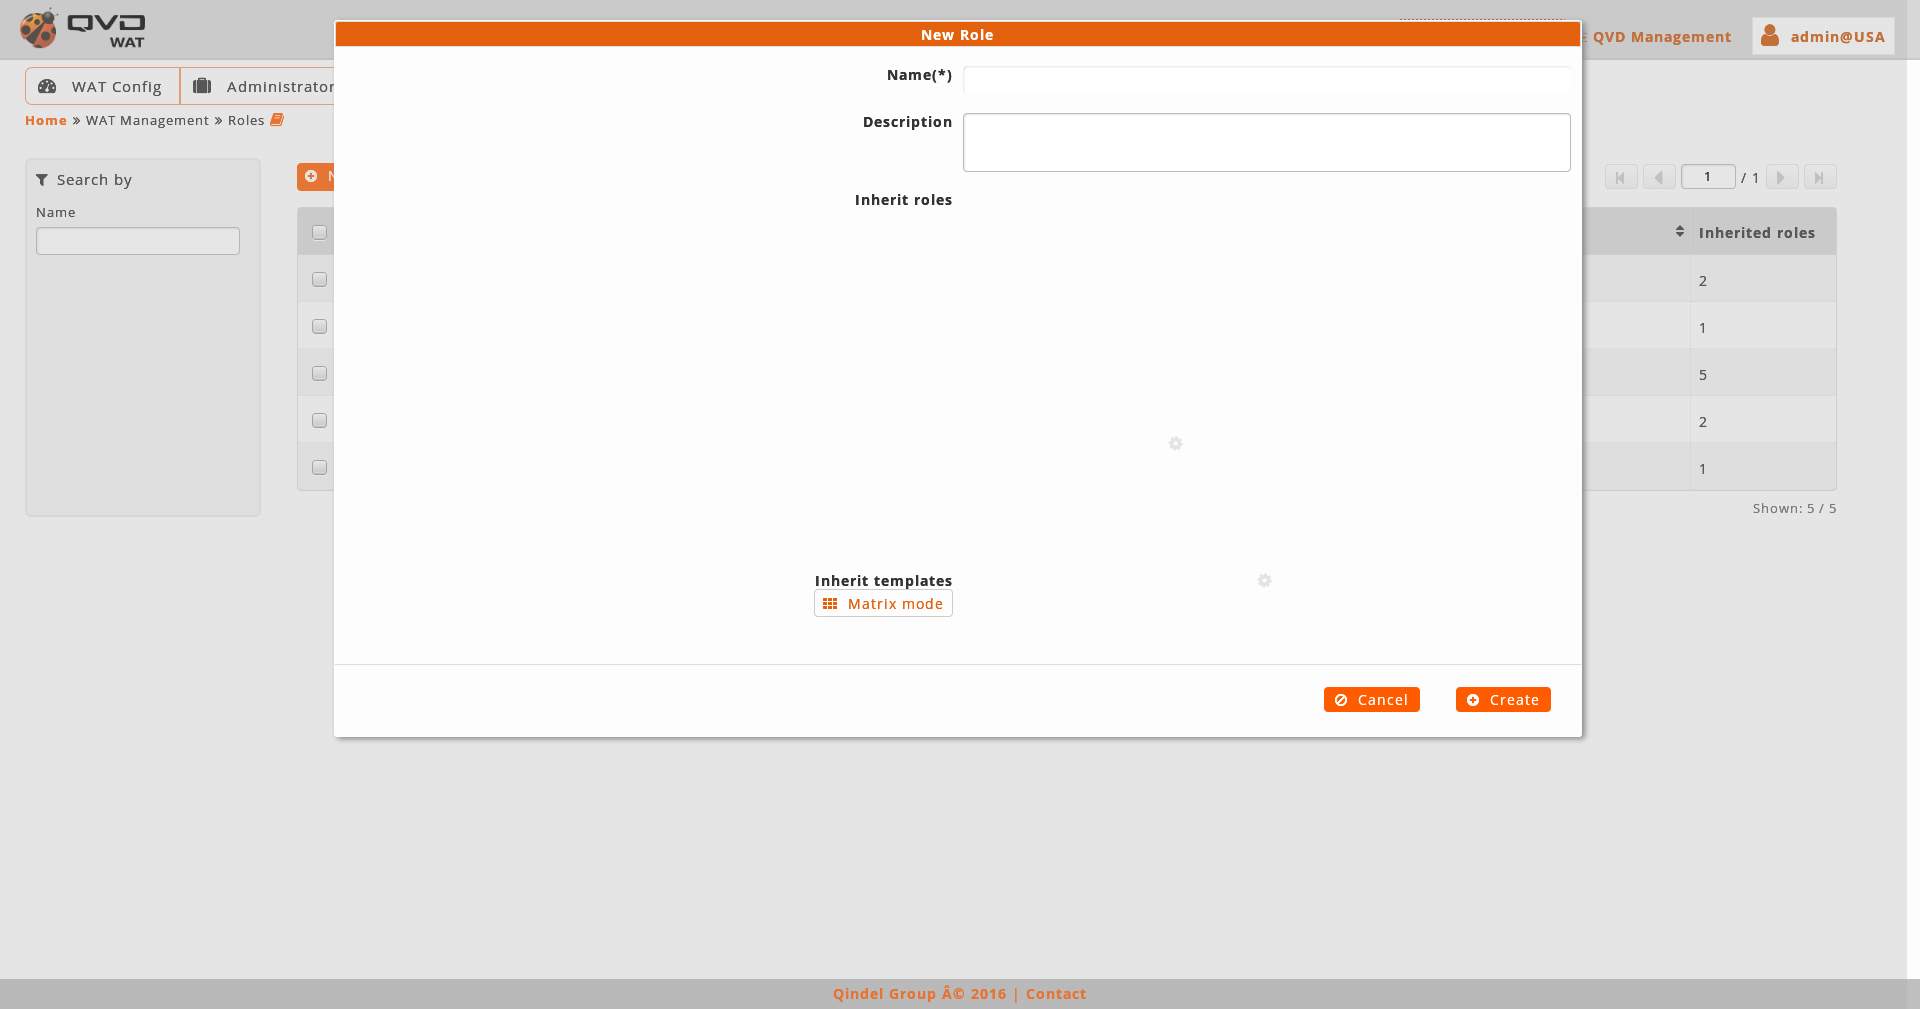
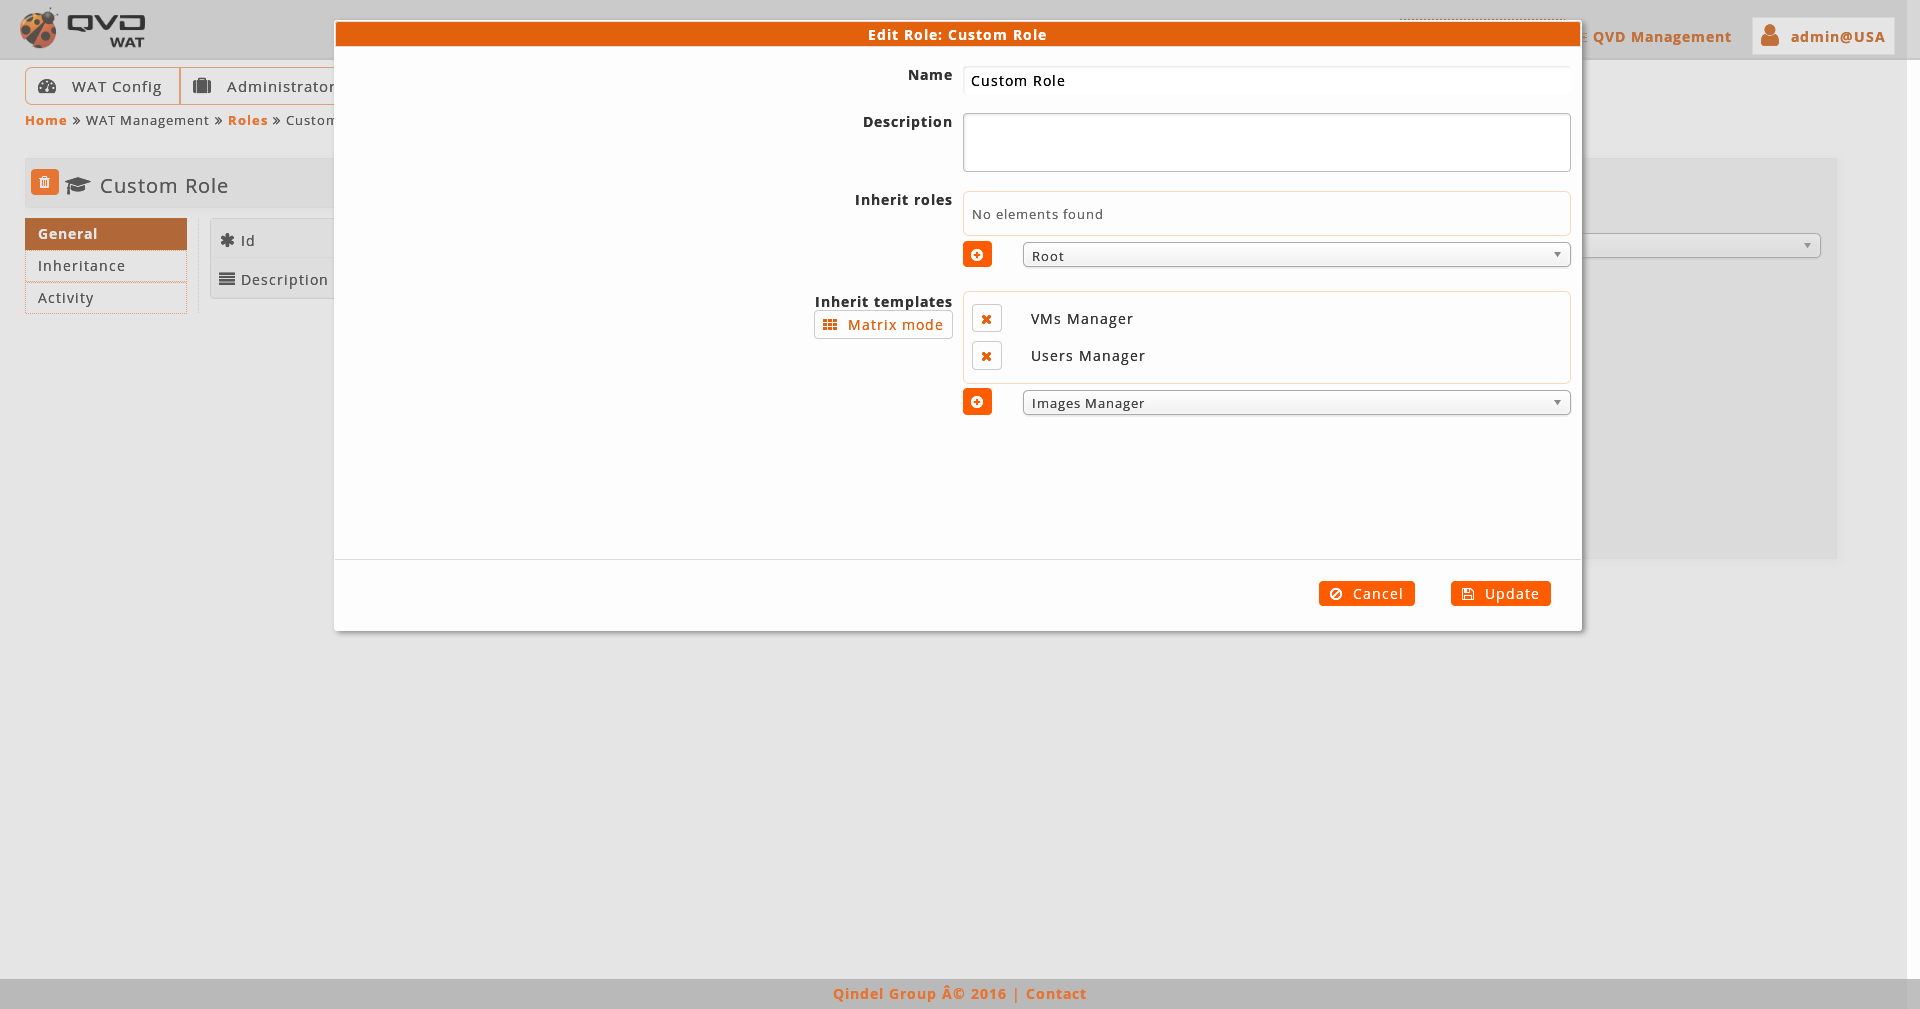
When creating a role we will set its name, description and will assign licenses inheriting ACLs.
The inheritance of ACLs has got two modes:
-
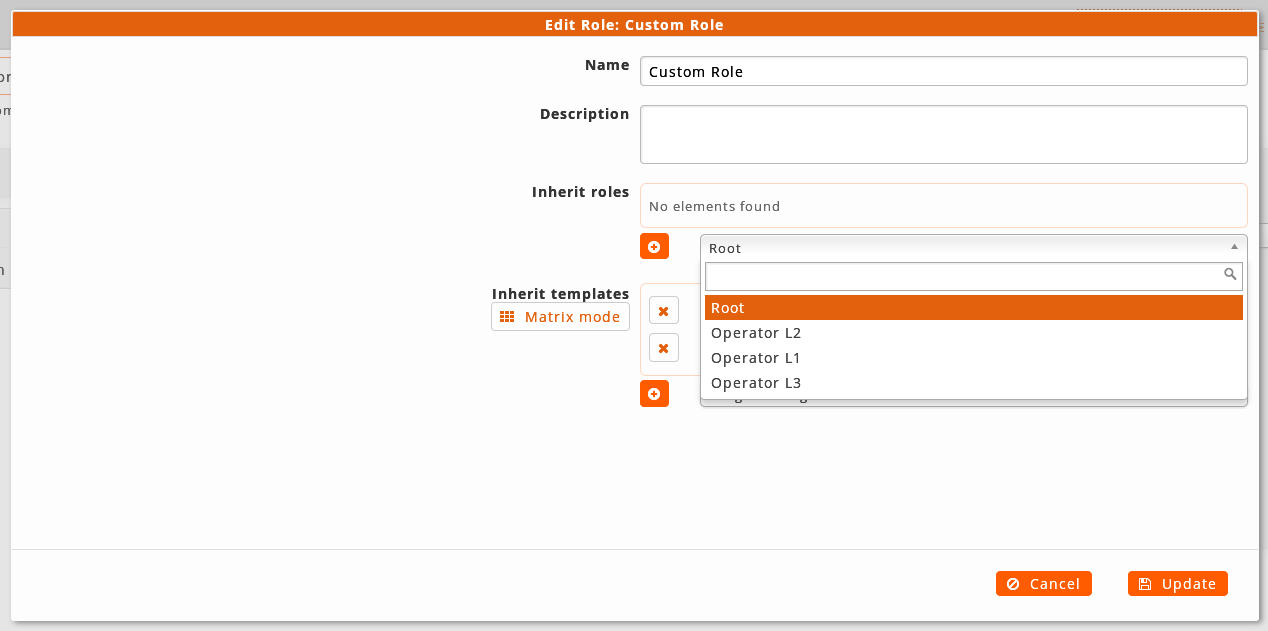
Inherit ACLs from other roles: In this mode, it is chosen the role which you want to inherit with a roles selector. Once the role is inherited, it will disappear from this selector. Likewise if it is removed from the list of inherited roles, it will appear among the available inherited roles.
-
Inherit ACLs from the templates: In this mode the templates are chosen from which you want to inherit the ACLs. Is possible select the templates from a selector like roles or use a matrix of buttons where the different templates are distributed according to the objects or level of privileges of each one. For example, the template with the update ACLs of a Node will be in the intersection of Nodes rows and the Up-to-date column.
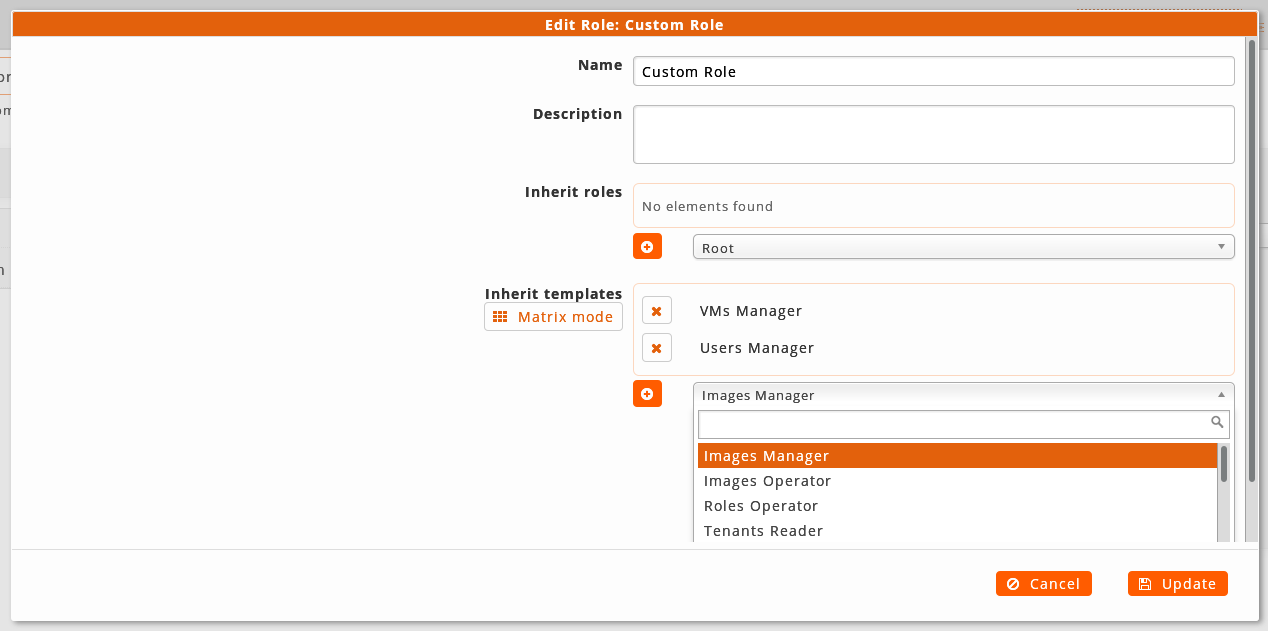

If it is inherited from one or more roles/templates, it will be inherited the sum of its ACLs regardless the common ACLs. After this inheritance, you can remove or add single ACLs manually from the Tree of ACLs to customize the references obtained by them according to the needs of the administrator. In this way, if we are interested in all the ACLs of a role or template except one, it will be as easy as inheriting the role/template and remove manually the remaining ACL. For a more specific customization we will can add or remove ACLs from details view.
-
- Detail view
-
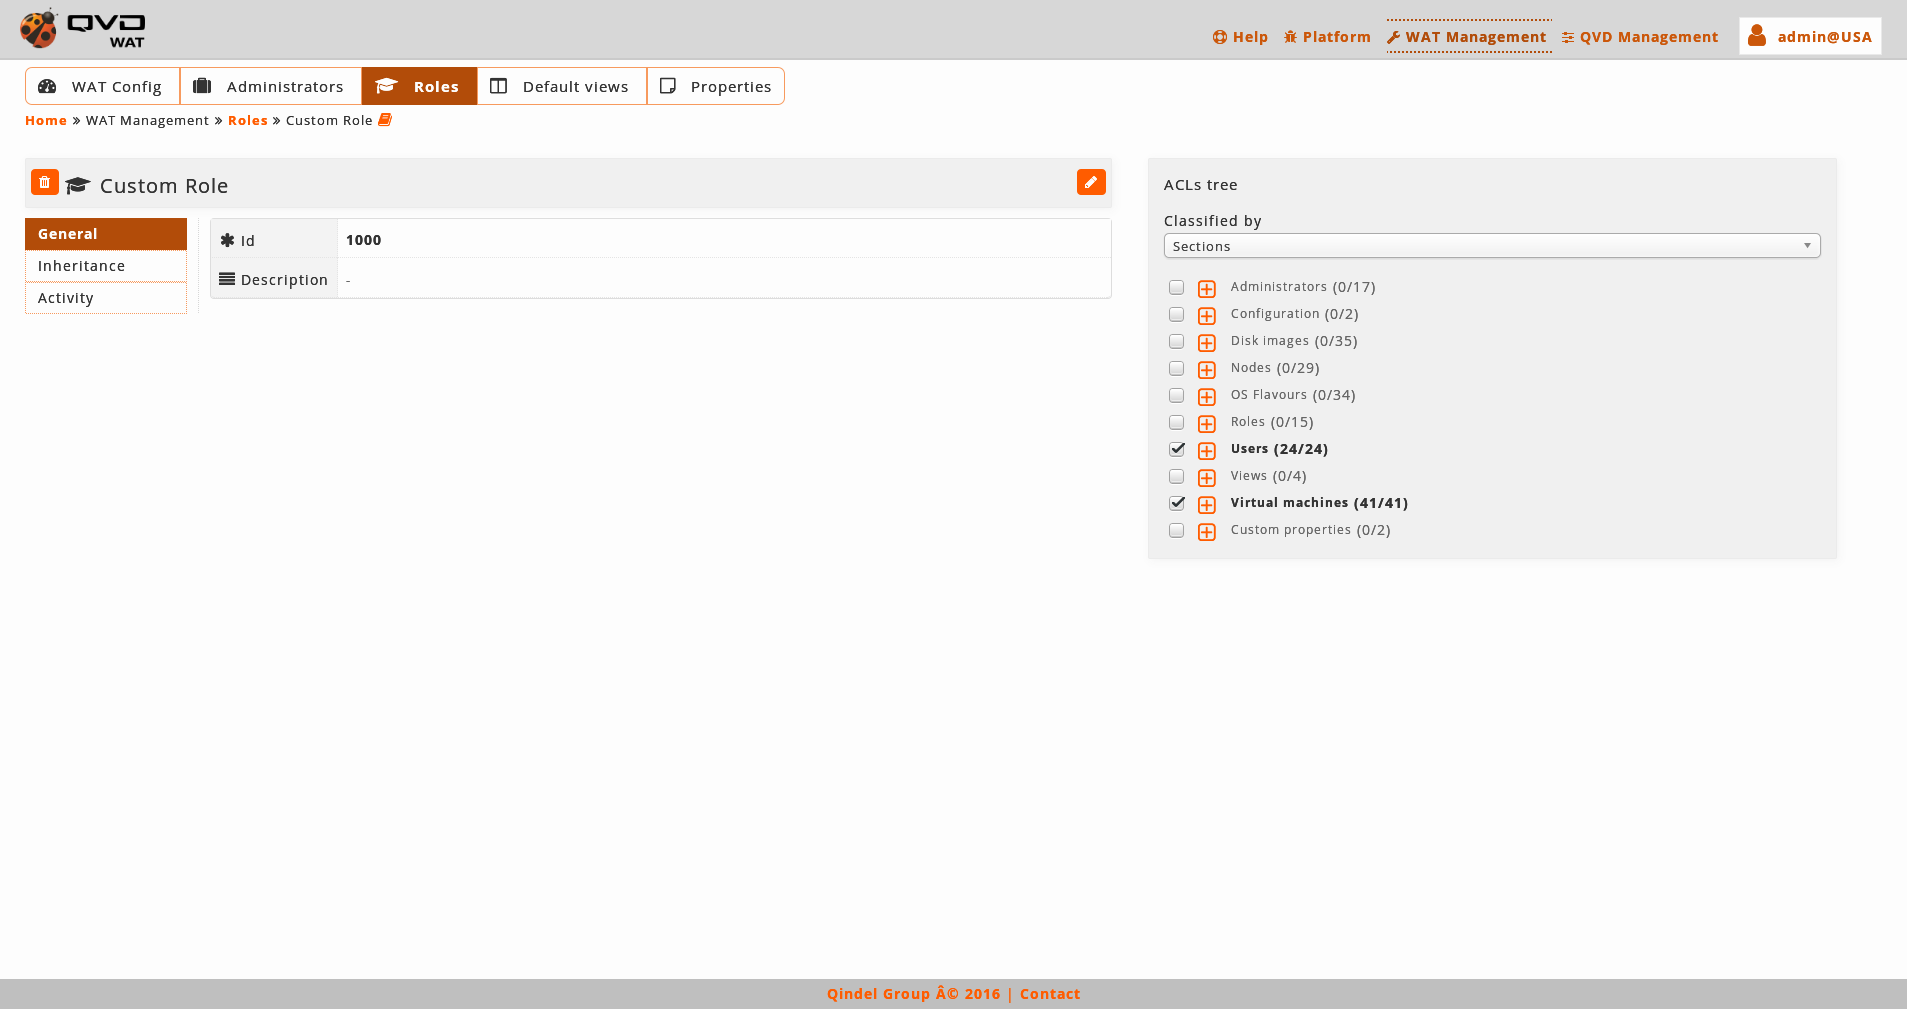
In this view which is very similar to that of administrators, we can see a small header where next to the role name is button to delete it, and the button of edition.
Under this header there is a table with role attributes. Among the attributes we can find the list of inheritance roles and templates.
-
Role: It is a role from the ones defined in the system. The name of this role will be the link to its detail view.
-
Template: It is a set of predefined ACLs to help build roles. There are templates for the different levels of access in the QVD elements.
For example:
-
Access read-only in Users
-
Access operation in Disk Images (operations are the actions such as block/unblock, disconnect users, start a virtual machine…)
-
Access update in Virtual machines
-
Access Users removal
-
…
Other templates are the composition of different levels of access:
-
Management: Include Read, Operation, Creation, Update, Deletion
-
QVD templates: QVD templates cover the templates of the same level of access of Users, Virtual Machines, OSFs and images. For example: QVD Updater.
-
WAT templates: WAT templates cover the templates of the same level of access of Administrators, Roles and Views.
-
Master: This template covers the templates of Management of WAT and Management of QVD.
-
Total Master: This template covers the Master template, Management of Tenants and Management of Nodes.
-
On the right side we find:
-
The Tree of ACLs. The branches are initially closed. By clicking on the icon next to every branch we will be able to open it and to see its content. Unlike ACLs tree of the detail view of administrators, in the roles the tree contains all the ACLs of the system, and appear as active the ones which have the role associated.
The tree has, in the same way that in the tree of the detail view of administrators, two modes of classification:
-
By sections of WAT:
The ACLs are classified according to the section where they are applied or the type or element they affect.
The main ACL of every section, and necessary to have this section at least available in the menu, next to its main view is "Access to the main view of…", except in the sections of setting which are ruled by a single ACL "Management of setting WAT/QVD".
-
By types of actions:
In this classification there are the same ACLs, but classified according to the type of action they permit. For example in the branch "See main section " we can set up what sections to see.
If we want to apply certain permissions of a type (Delete, update, etc.) to several types of elements, this classification simplifies ACLs management.
Each branch has a checkbox. If it is activated, it means that all the ACLs of the branch are assigned, either directly or by inheritance of one o more roles or templates.
*If we activate the box of a branch *, we will include in the role all the ACLs of this branch. In the same way, *if we deactivate the box of a branch *, we will be removing its ACLs.
The branches, have also attached, between brackets, information of the ACLs included in the role as opposed to the total ACLs in the branch.
When opening a branch, we can see that each ACL has a checkbox with which it can be associated or disassociated from the role.
Some ACLs have an icono birrete, which indicates that this ACL comes from an inherited role. Going over it with the mouse, it will indicate us the role or roles from which it comes.
Thus, some ACLs inherited through a role can be deactivated using the checkbox and others that are not inherited can be added to the role.
-
- Edition
-
When editing a role we will be able to change name and description, in addition to configure the roles and ACL templates inheritance.
See Roles creation section for more details about roles and templates configuration.
2.5.4. Default views
As we have seen in the analysis of every section, the list view displays several columns with different data of the existing elements as well as some filter controls.
These columns and filters can be set up globally in the system, and then each administrator will be able to customize these values only for himself.
With a selection combo we can change between columns and filters.
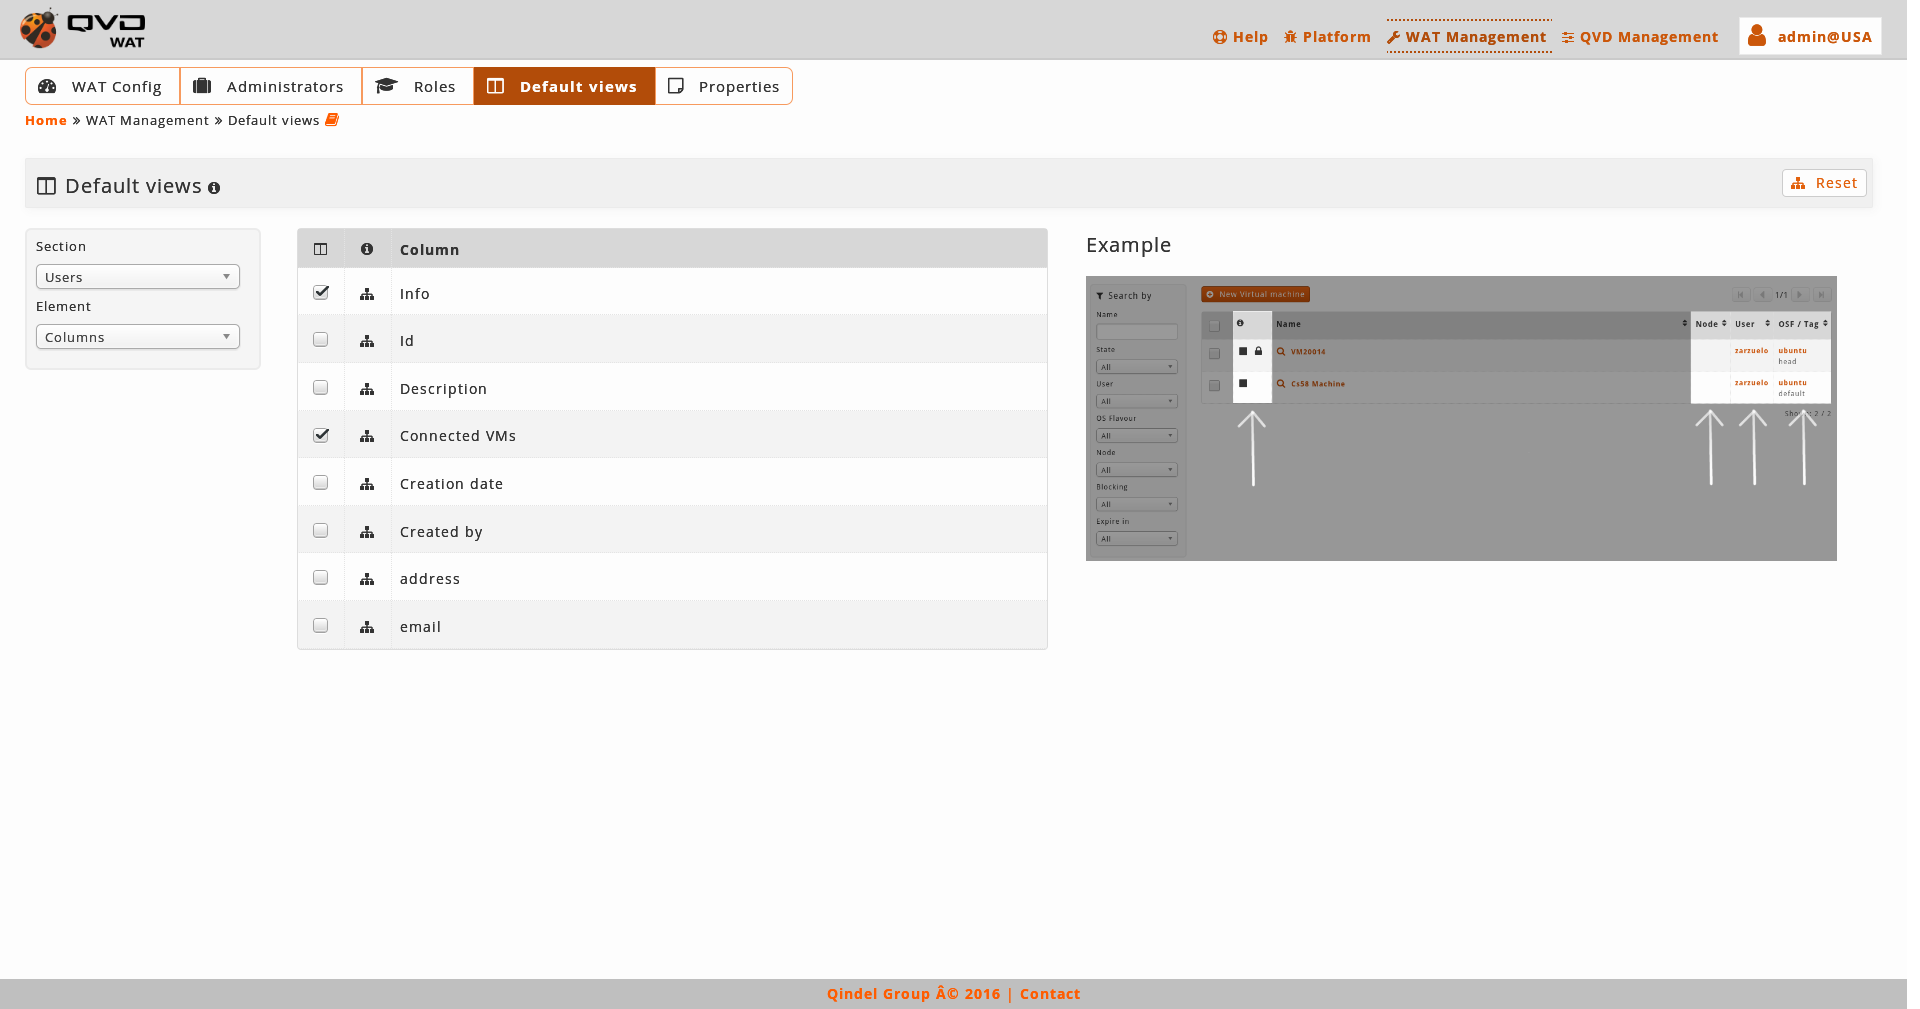
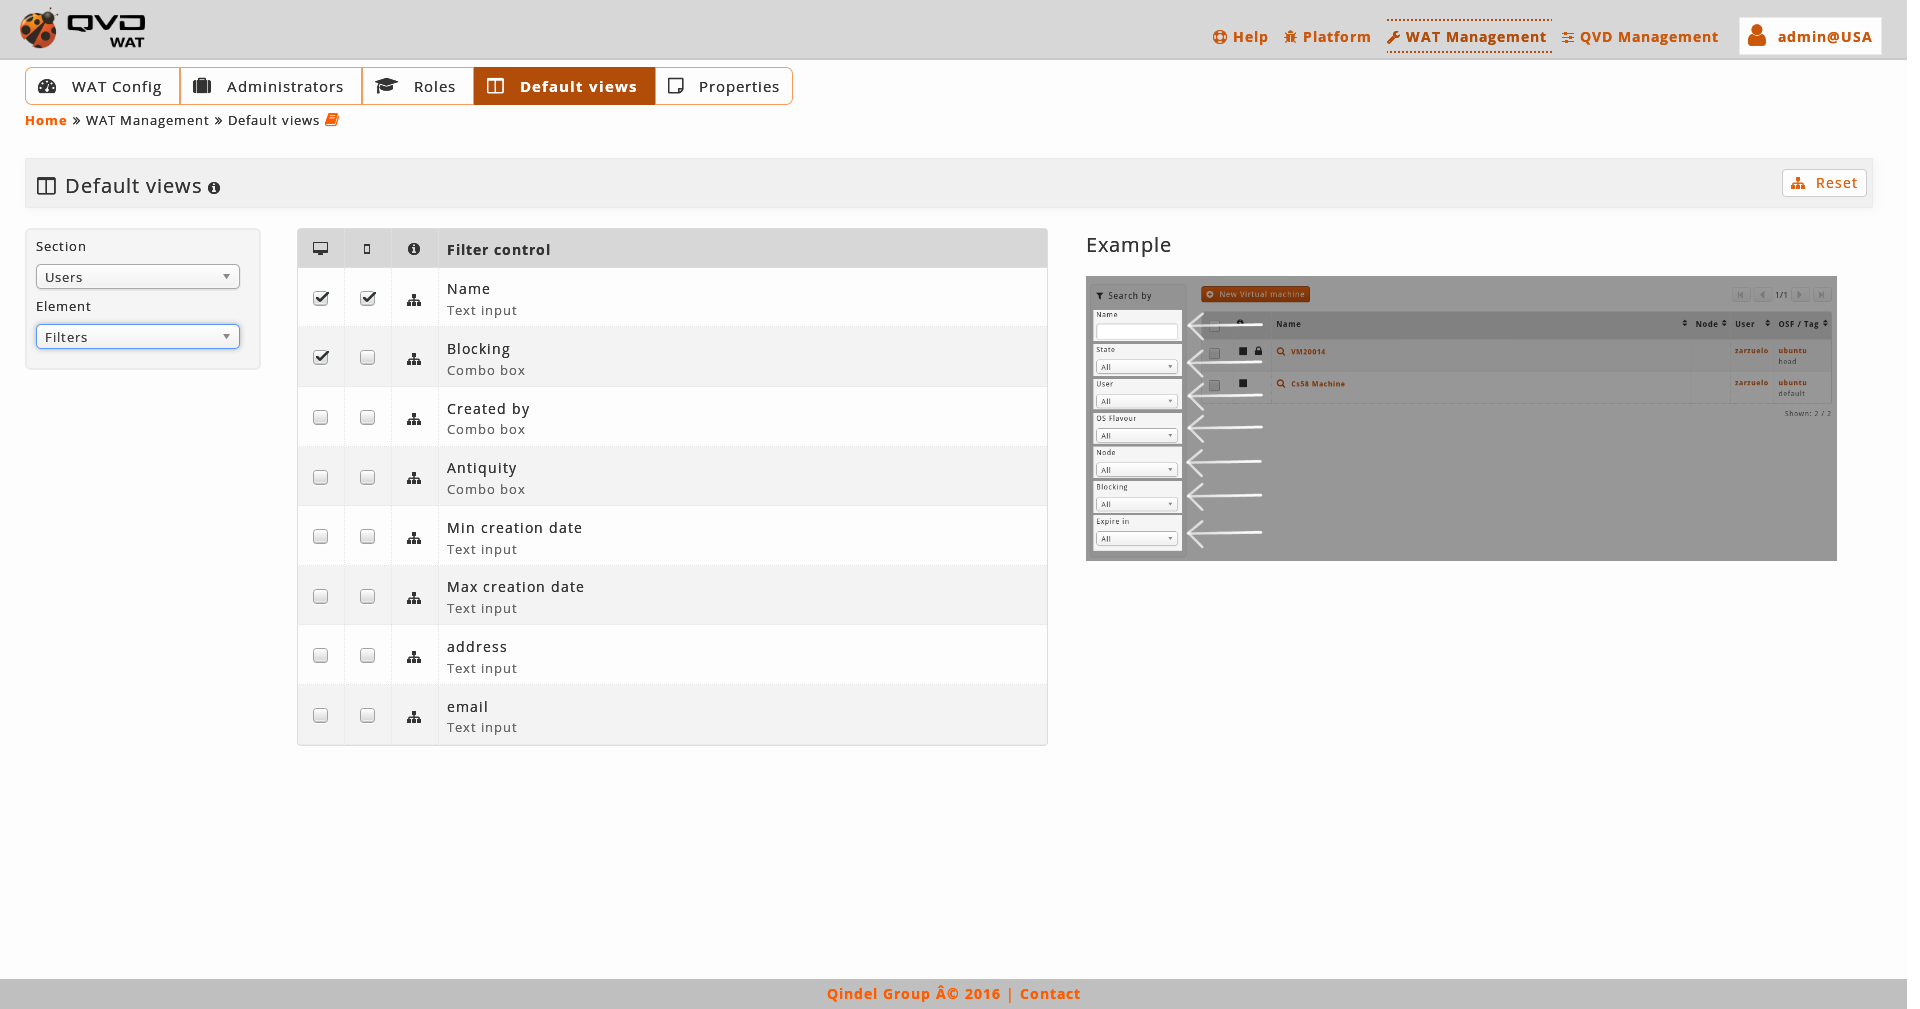
In this section the general configuration of these parameters will be done by ticking a series of checkboxes. In the first place, the displayed columns are set up and secondly the available filters.
With respect to the columns it is a valid configuration for the desktop version, since in the mobile version will always display a simplified version. On the other hand, the filters will be set up regardless if it is for desktop and mobile. This distinction is made in order to do the mobile version more or less simple according to our needs.
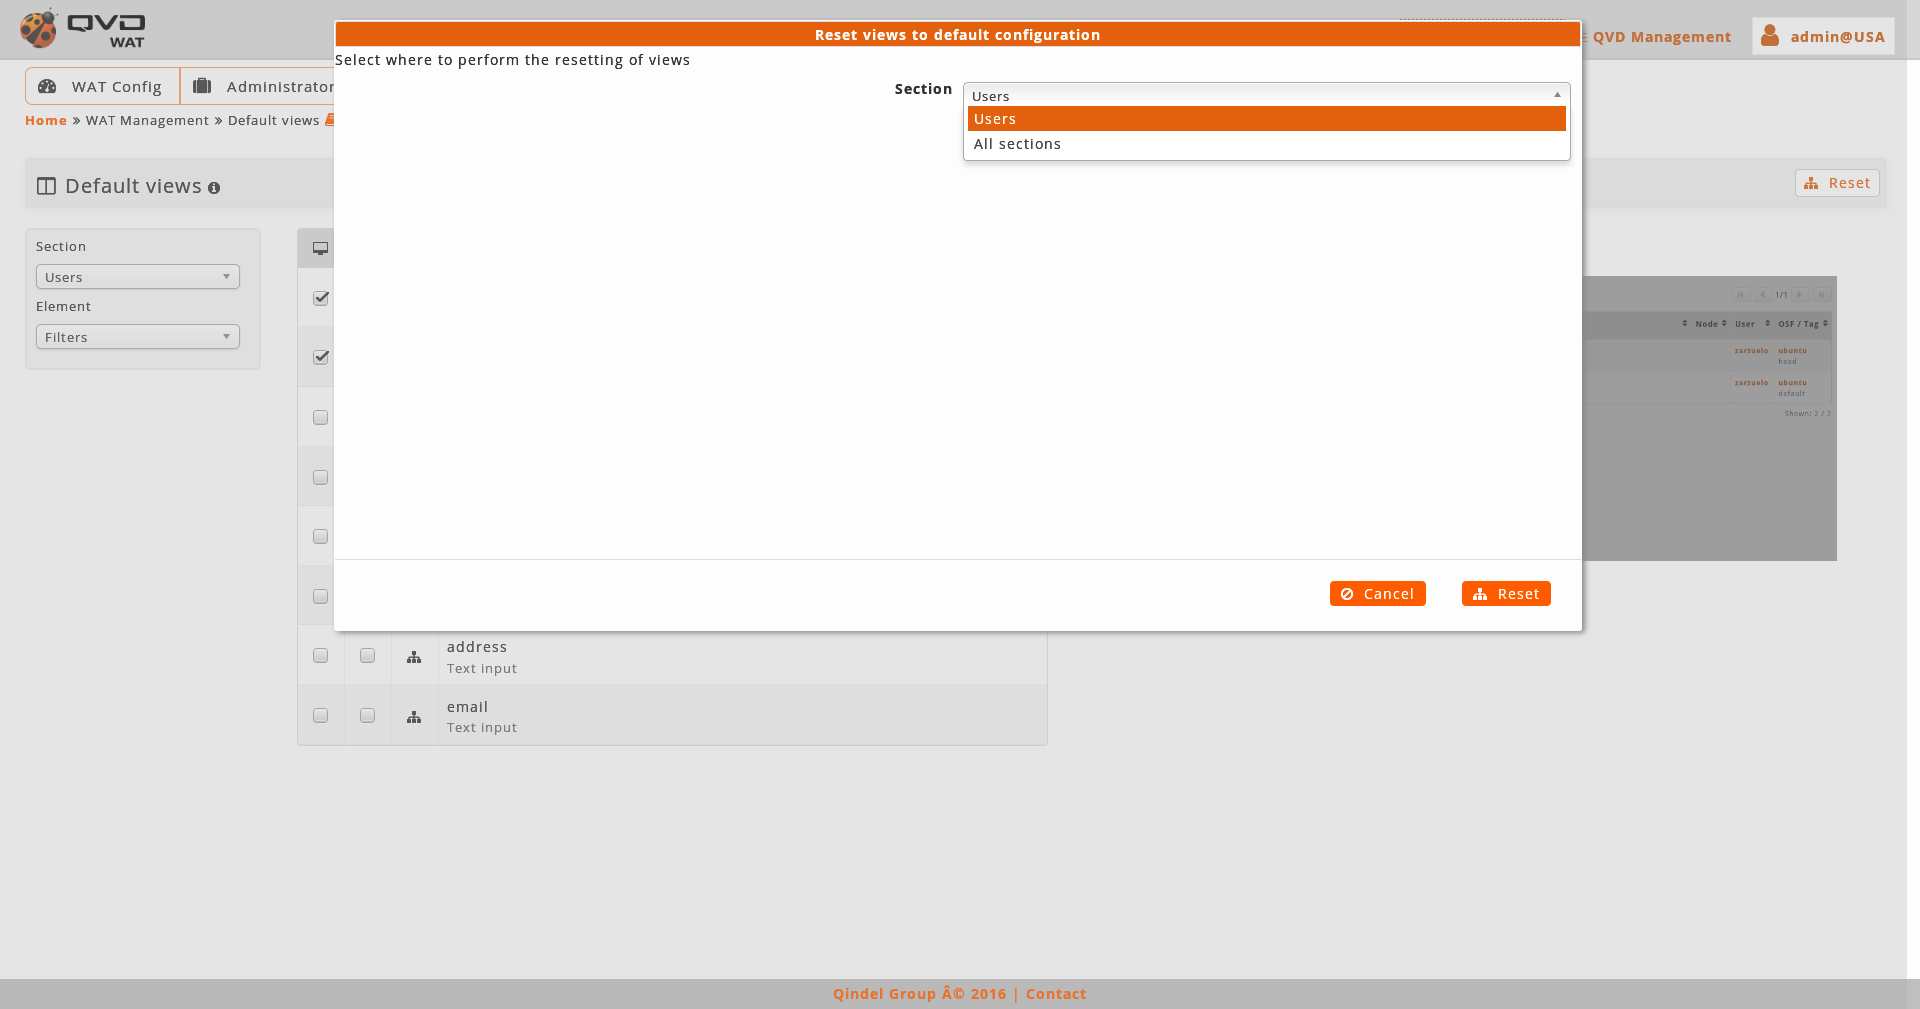
After an information notice we will see a drop-down menu with the section that we want to customize and a button to restore the views by default.
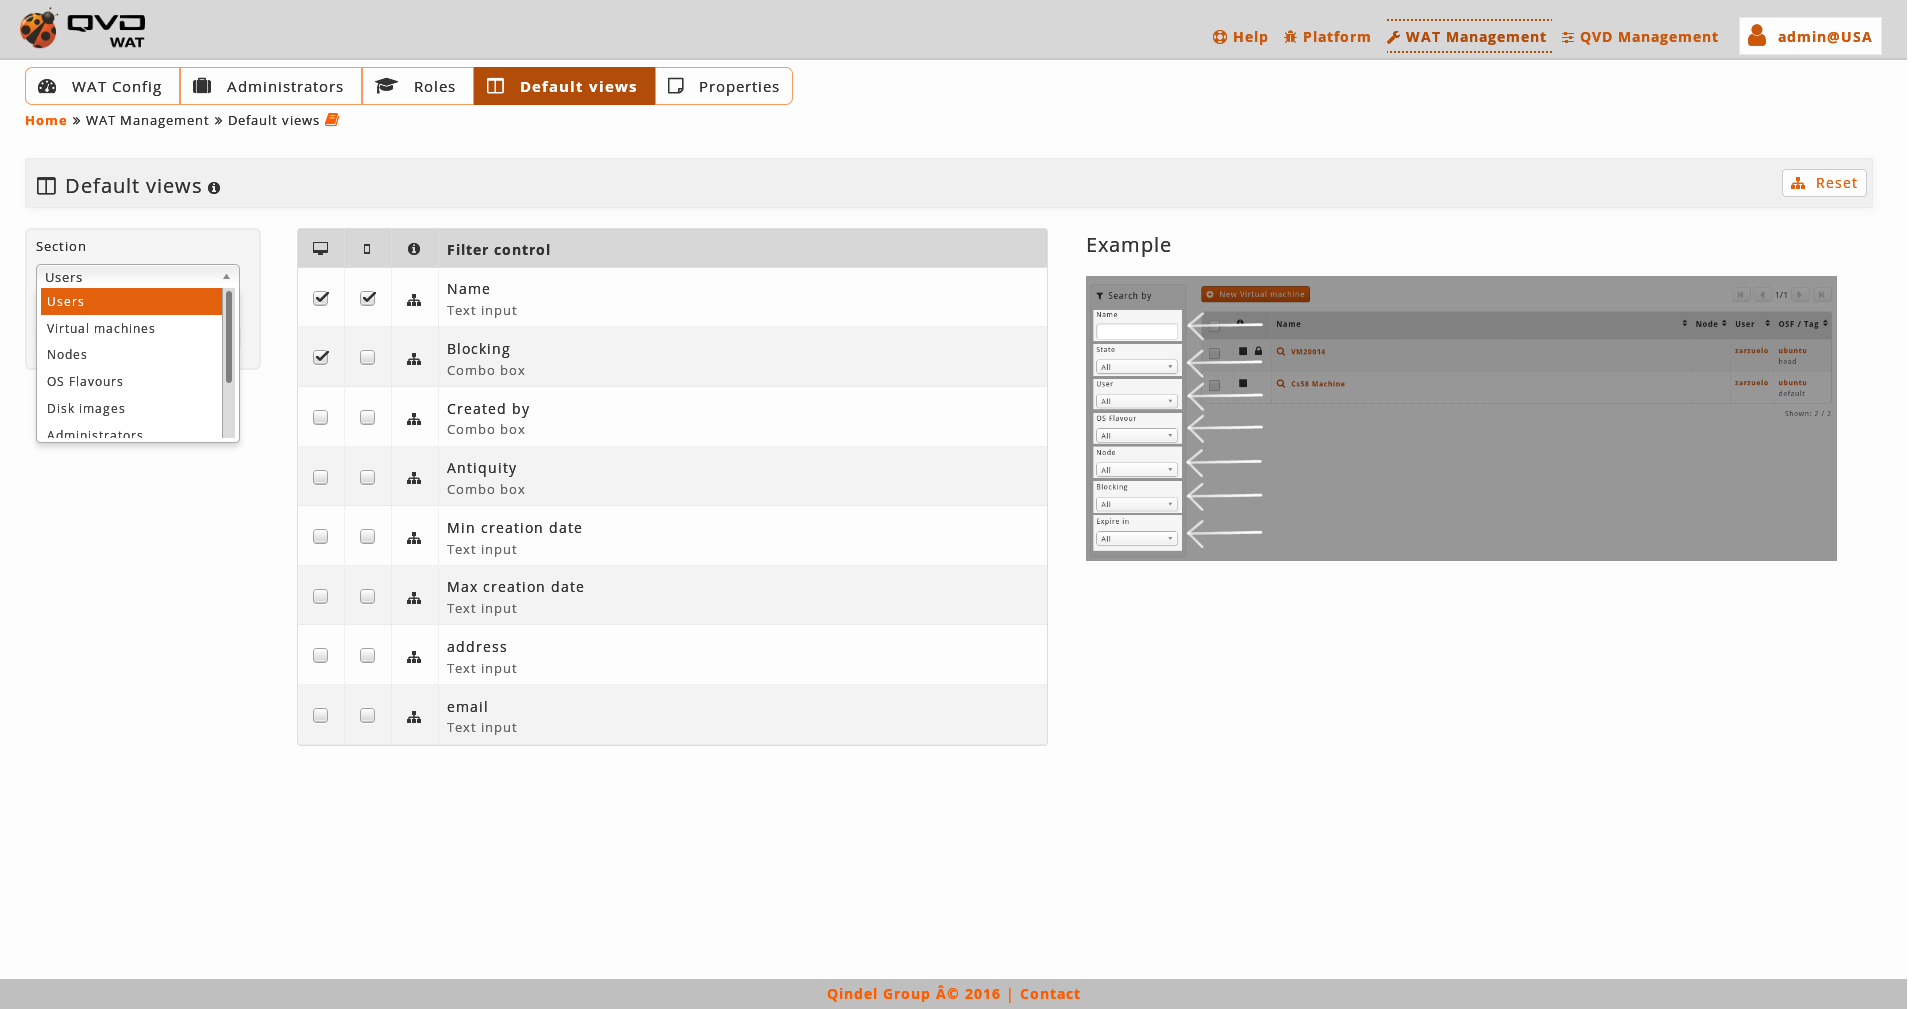
As we select one or another section, the columns and filters of the above mentioned section will be added. Only by clicking on the different checkboxes the change will be saved.
If we want to return to initial configuration we will use the button of restore views by default. This action can be done on the loaded section or on the whole system, choosing one or another option in the dialogue that appears before carrying out the restoration.
2.5.5. Properties
In this section we will manage the custom properties of every QVD element. In this way, we will be able to create extras properties for the elements that support this functionality: Users, Virtual Machines, OSFs and Disk Images.
A custom property in the Users, for example, will appear in all the users of the system as one more field. Not only in its detail view, but also in its forms of creation and edition. It might also appear in the list view as a column and/or specific filter if it was set up from the section of Views.
- Control of ACLs in block
-
Both the management and the visualization on the part of other administrators of the custom properties can be regulated by ACLs, but it will be done ' in block '. This means that the properties of a certain type of element can be displayed or not displayed (for example disk images) but it cannot be displayed some and hidden others.
- Contextual Help
-
Every property has an assigned description that will be in used as a contextual help in the places where the property appears, which might clarify possible doubts on its purpose or possible values.
- Interface
-
It might be common to establish the same property in different types of QVD elements, that is why the editor is displayed in matrix form, in which, in a single view the different properties of the system can be seen and put them or to remove them of certain QVD elements.
To facilitate the edition in environments with a lot of custom properties there is an available filter to show only the properties of a certain type of element (For example OSFs). This filter, by default, has the option "All" selected to give a global view of the properties.
In order to create a new property we will click on the button "New property" and we will establish the name, the (optional) description and the types of elements where it will appear.
In order to edit the name or the description of the properties we will click on the button of edition next to the name of the property. However, in order to manage in which type of elements an already created property will appear, we will do it with the checkboxes of the matrix as it appears in the main interface.
Take into account that if we have the properties filtered by a type of element (For example nodes), and we deactivate the checkbox that enables the above mentioned property in the nodes, it will disappear from the view, but changing the filter again to All we will be able to manage it again.
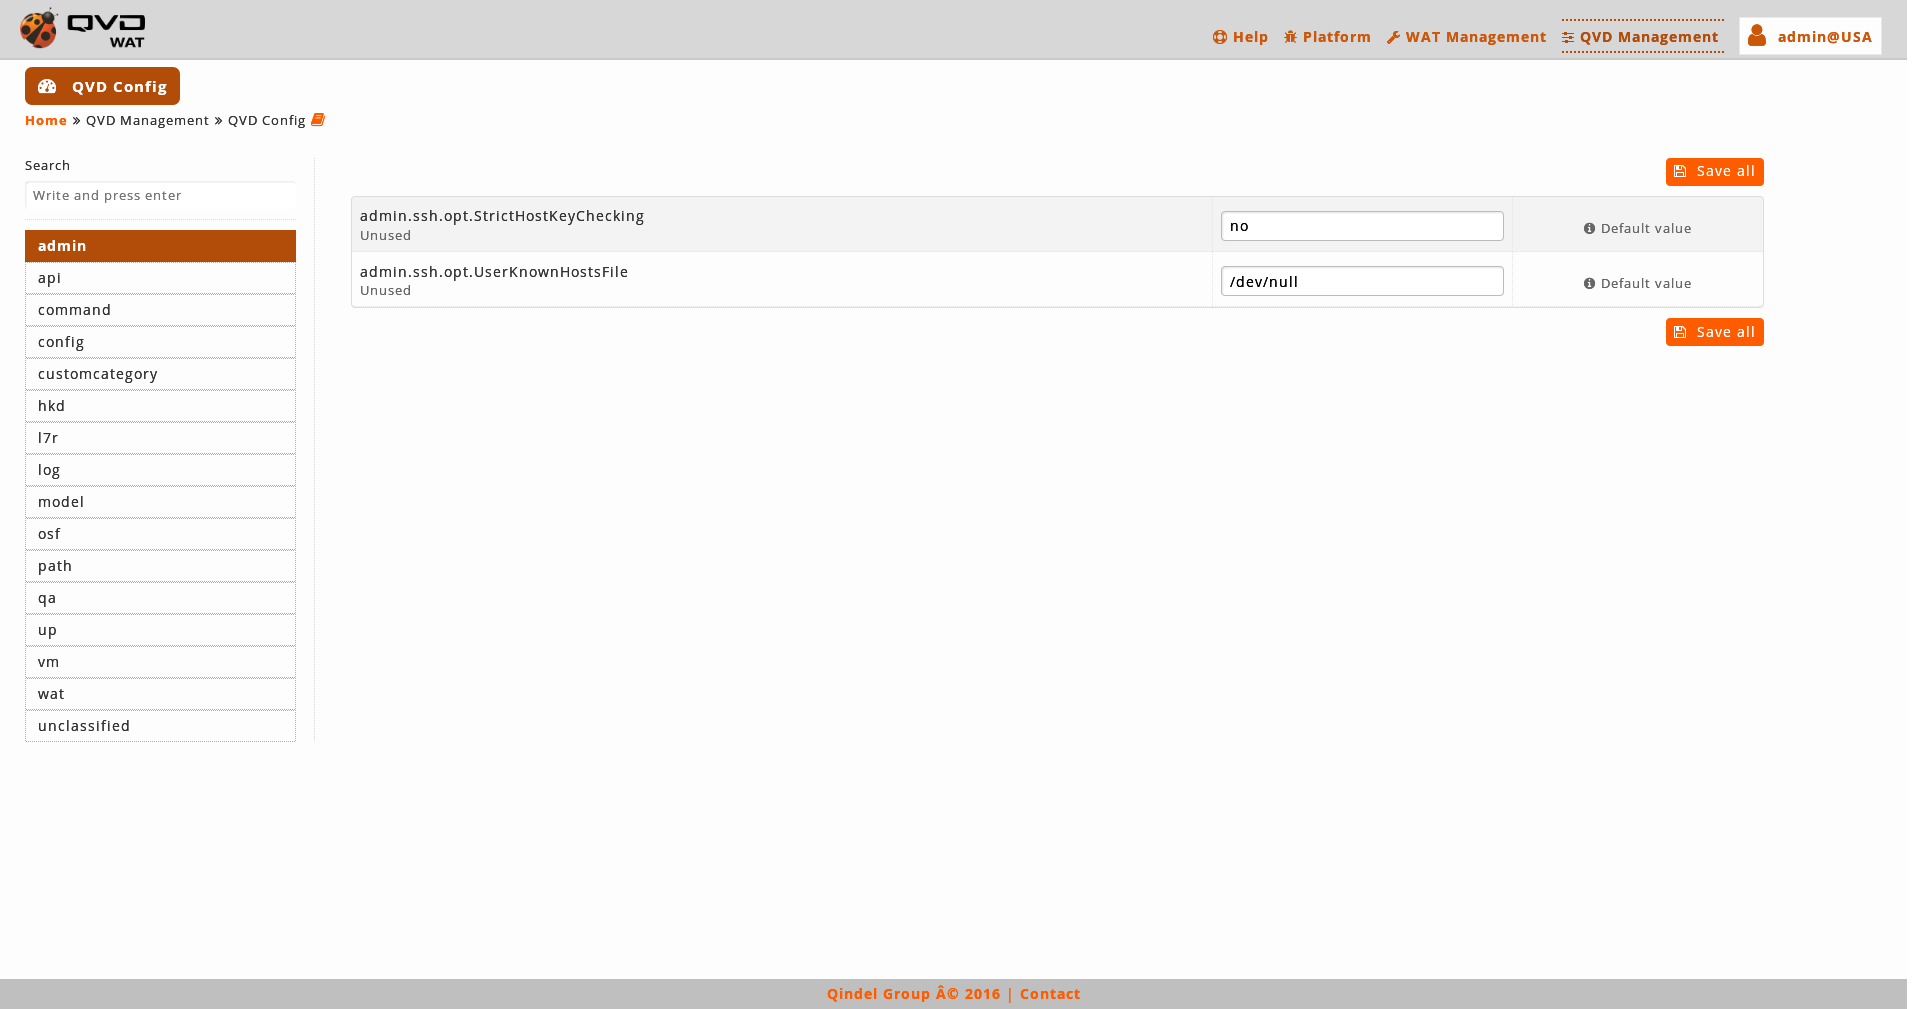
2.6. QVD Management

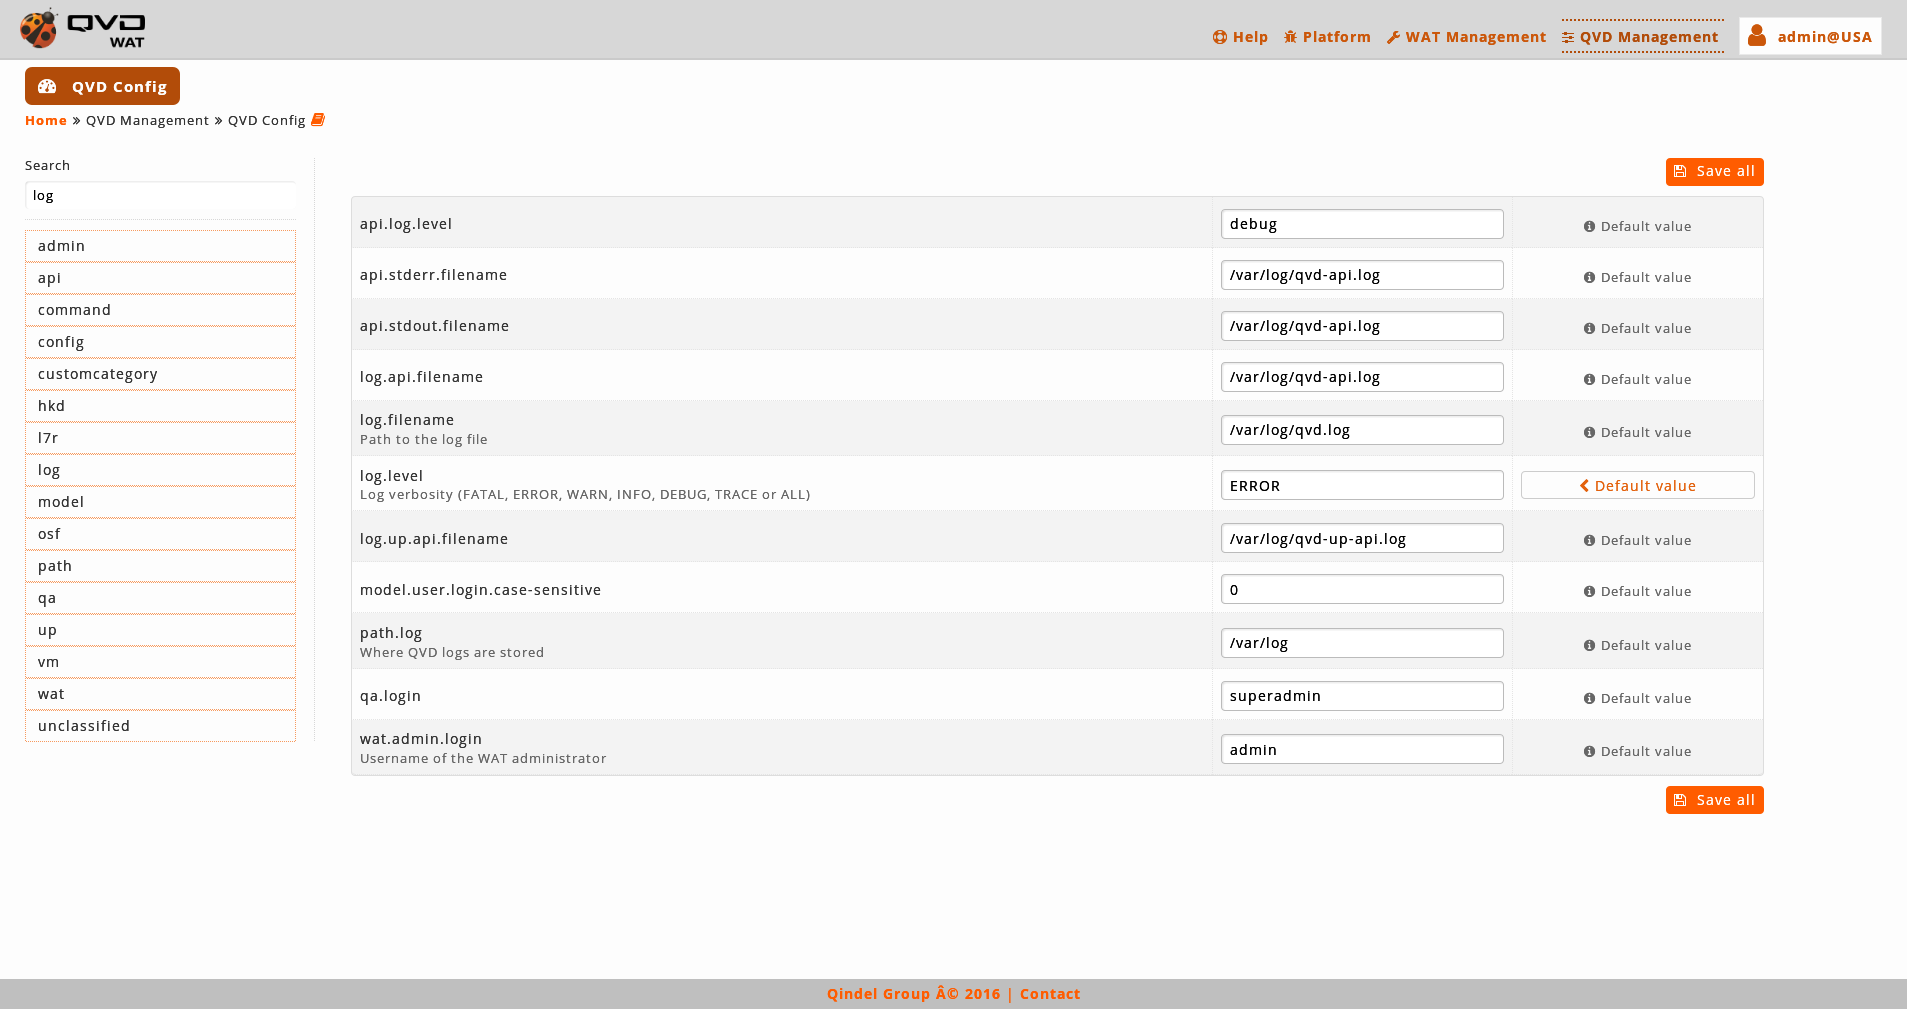
2.6.1. QVD configuration
The parameters of QVD are distributed in several configuration files and the database. From WAT these parameters are shown in a centrally way, where they can be edited easily regardless its backgrounds.
The parameters are clasified in categories. These categories correspond with the first segment of the name of the parameter, it means inmediately preceding the first dot.
For example, the parameters that start with "admin" will be included in the "admin" category, as we can see in the snapshot.
- Navigation and search
-
It is possible to navigate through the different categories to edit its parameters or to use the search control to find the parameters that contain a substring.

- Paremeters edition
-
The value of the parameters can be edited by writing in its text box.
When we change the value of a parameter, it will only be marked as changed and a button will appear below the text box to undo the change.
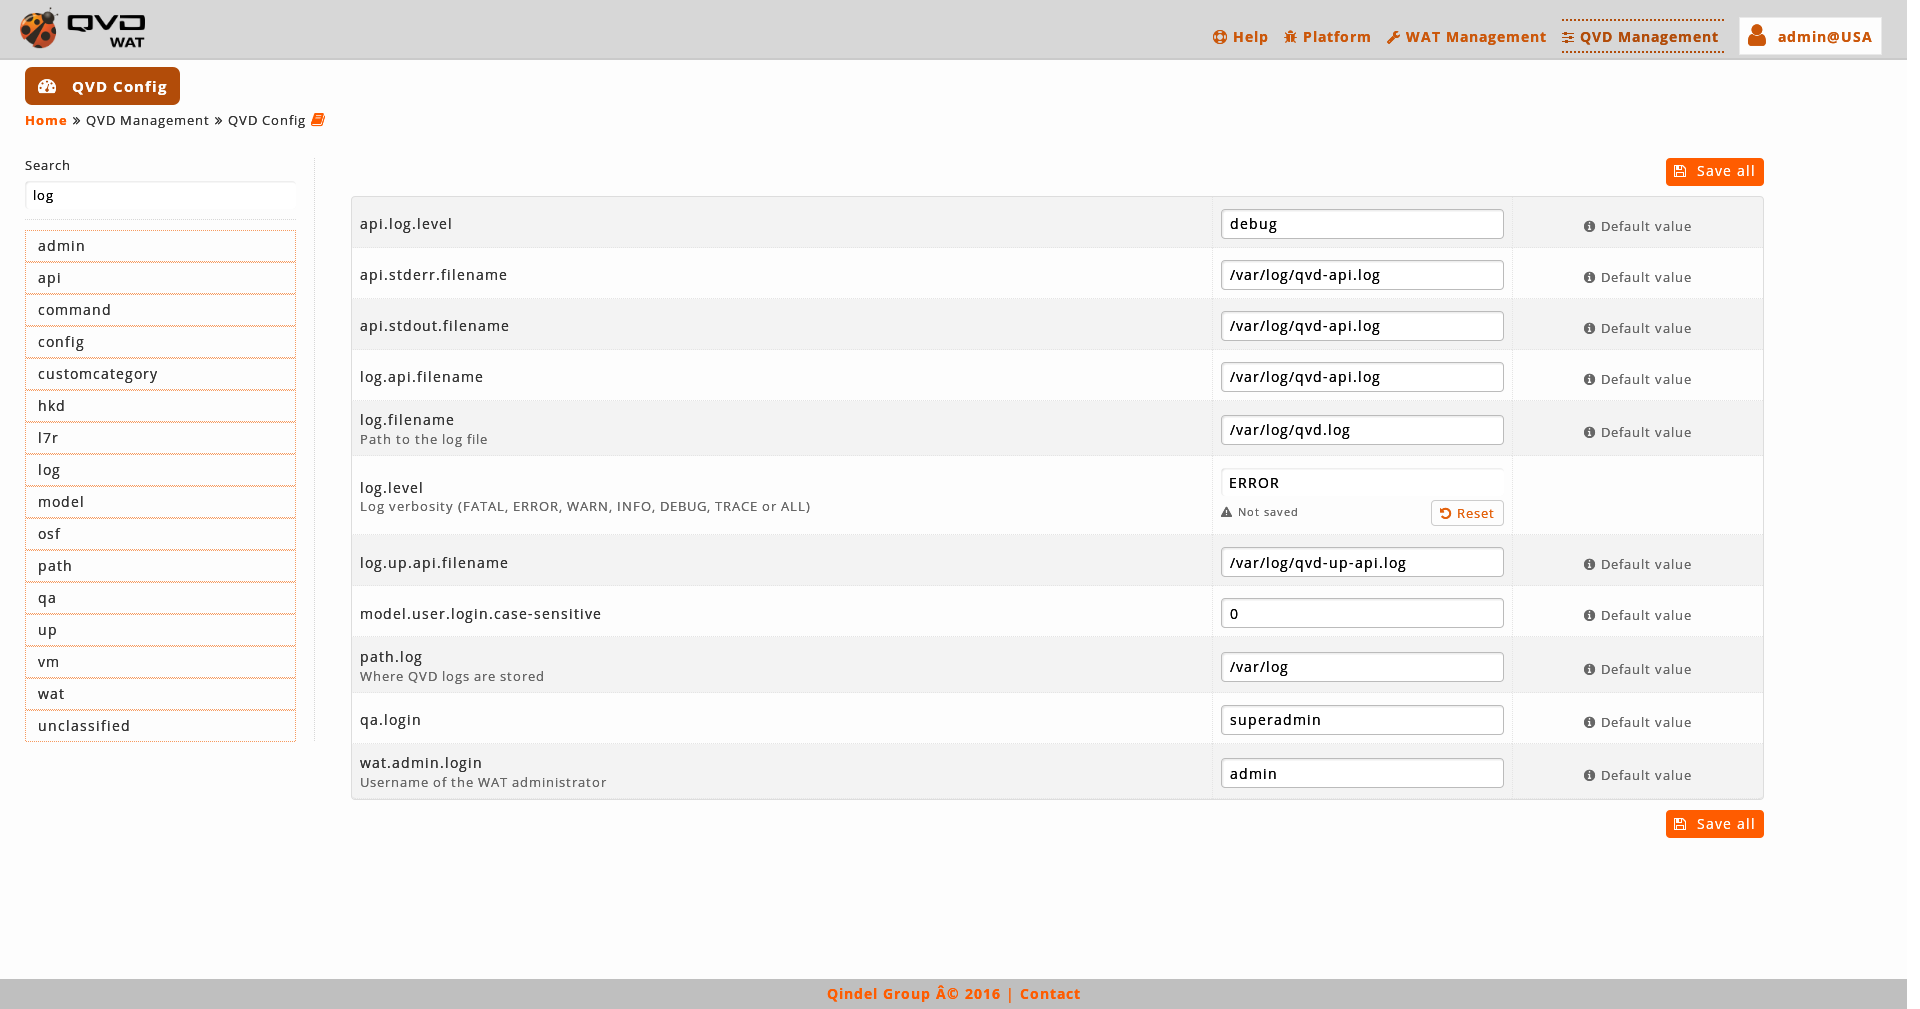
It is possible to modify more than one parameter and save all at once.
To solidify the changes we will click on the "Save all" button.
- Restoring parameters
-
The parameters that have been modified are distinguished by having a "Default value" button next to the text box. Clicking that button it’s possible back to the default value. As when you modify a parameter, this action can be undone before solidify the change with the "Save all" button.
2.7. User Area
2.7.1. Profile
This is the part where we can check and update the set-up of the logged administrator.
The WAT interface language can be set up as well as the block size, the one which corresponds to the number of elements shown in each page in the list views. Both parameters can be defined as by default thus adopting the WAT general set-up, or a fix value for the current administrator.
In addition, from this section is possible to access to the views configuration of the logged administrator in the section My views.
My views
As we saw in the part of the management of WAT, we can customize which columns or filters are shown in the different views of WAT. That is a global configuration of the system.
On the basis of this configuration, each administrator can customize his or her views in a very similar way, adapting them to his or her preferences.
|
|
If an administrator does not change the configuration of his or her views, these could vary if the global configuration were modified. On the other hand, if an administrator changes a parameter, it will be fixed in the stablished value, without being altered by the changes in the global configuration. |
With a selection combo we can change between columns and filters.
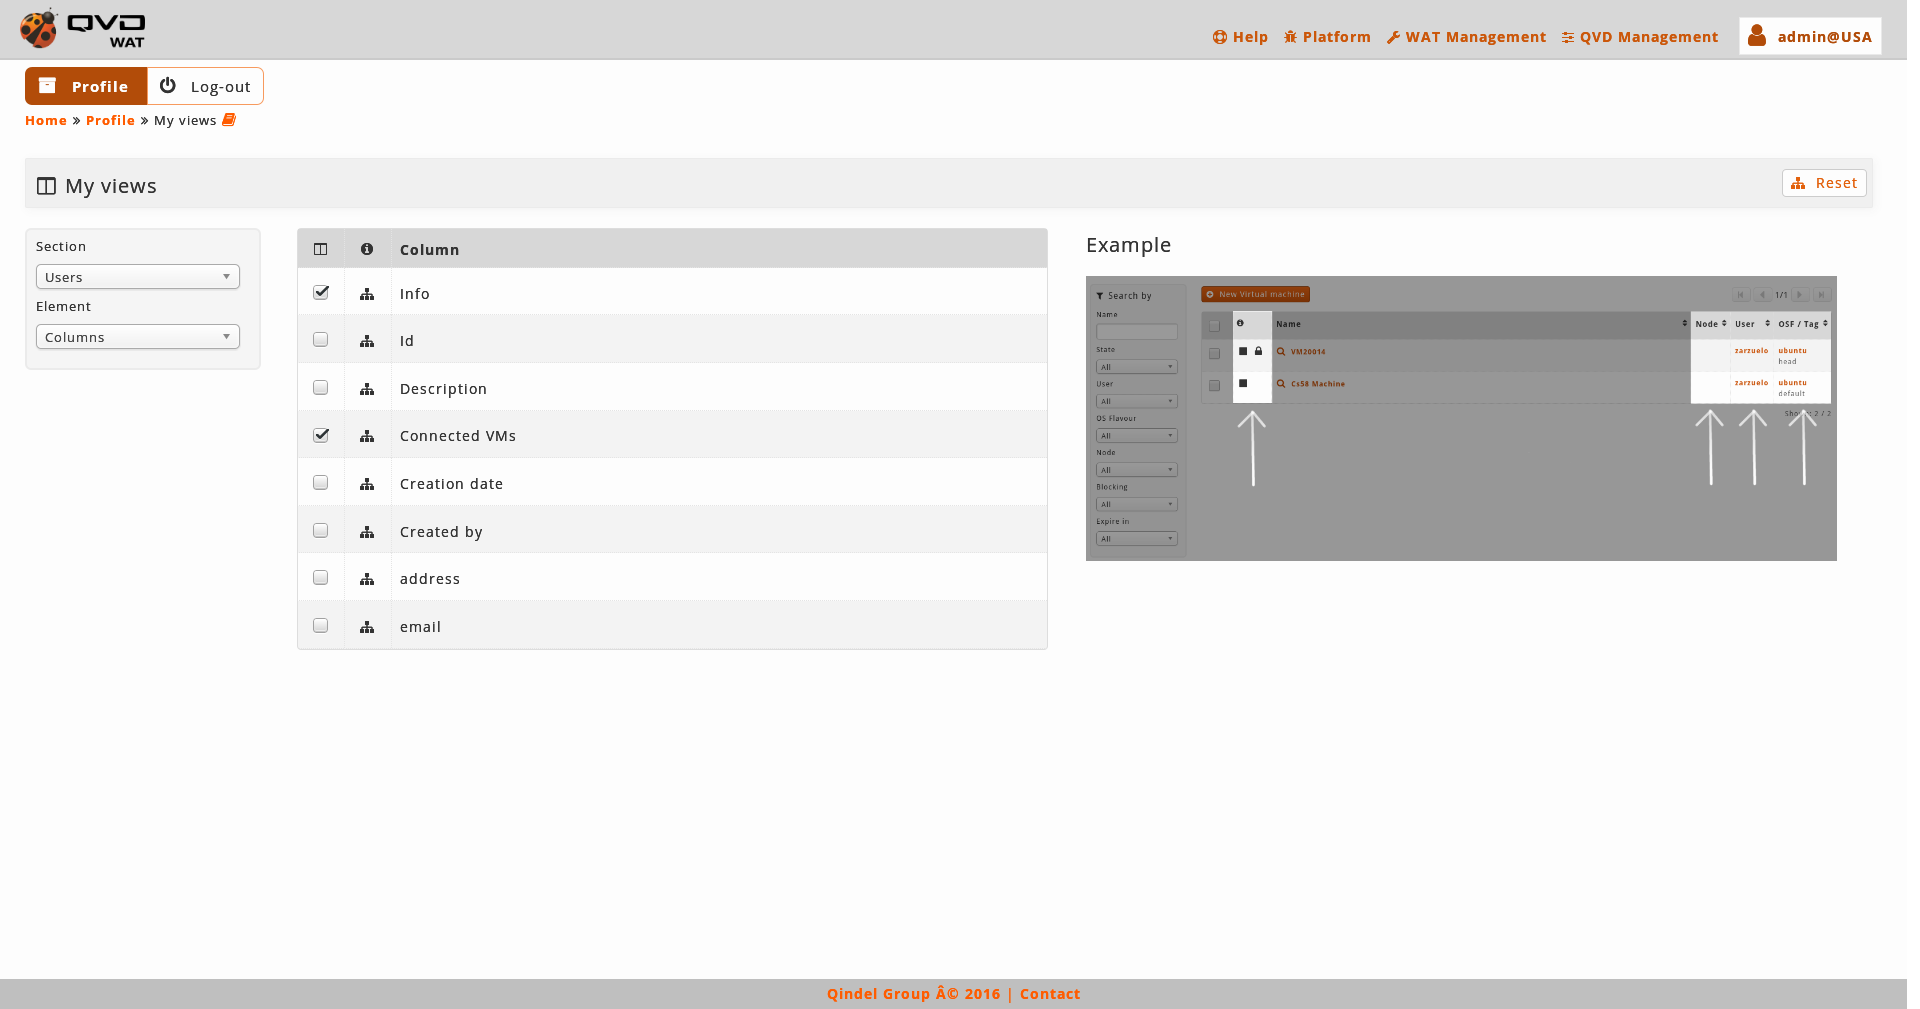
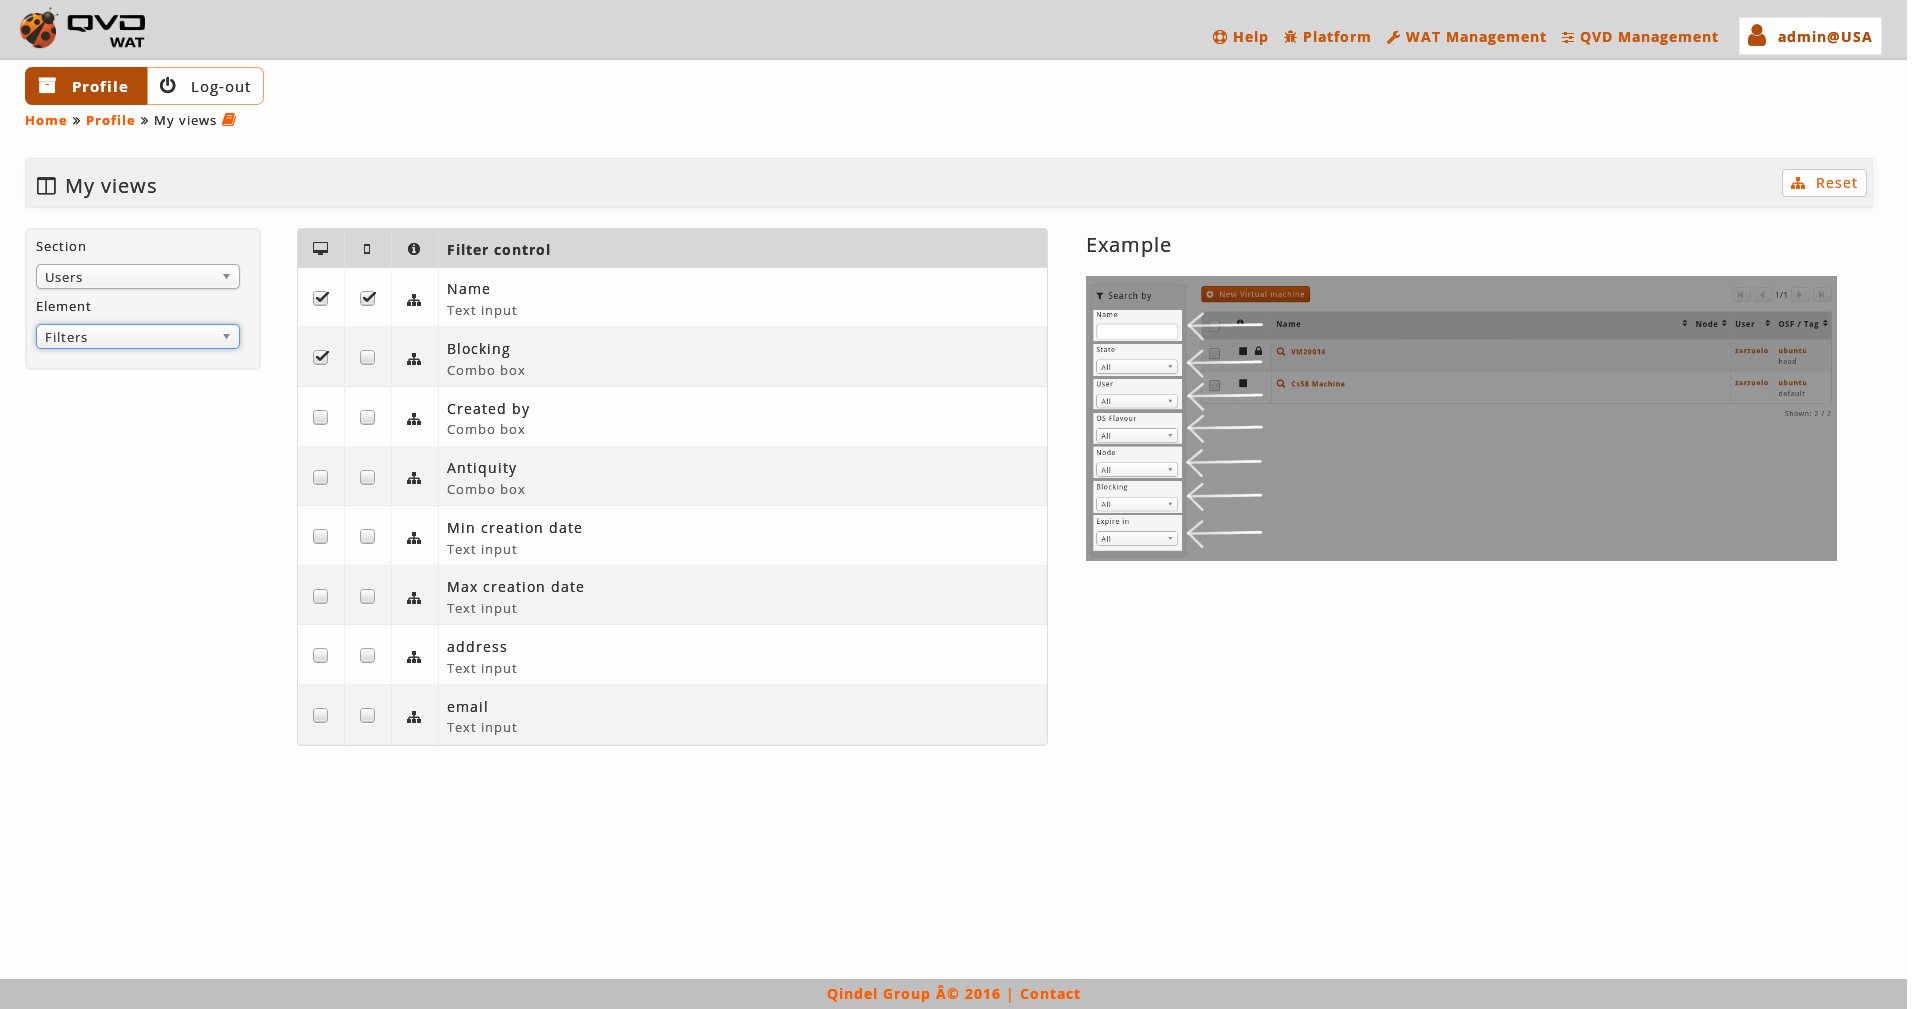
In this part it will be done a configuration for the current administrator of these parameters by ticking a series of check-boxes. On the one hand the shown columns are configured and on the other hand the available filters.
In the case of the columns, it is a valid configuration for the desktop version since in the mobile version, the version will always be simplified. On the other hand the filters are configured independently for the desktop and mobile This difference is made in order to do the mobile version more or less simple according to our neccesities.
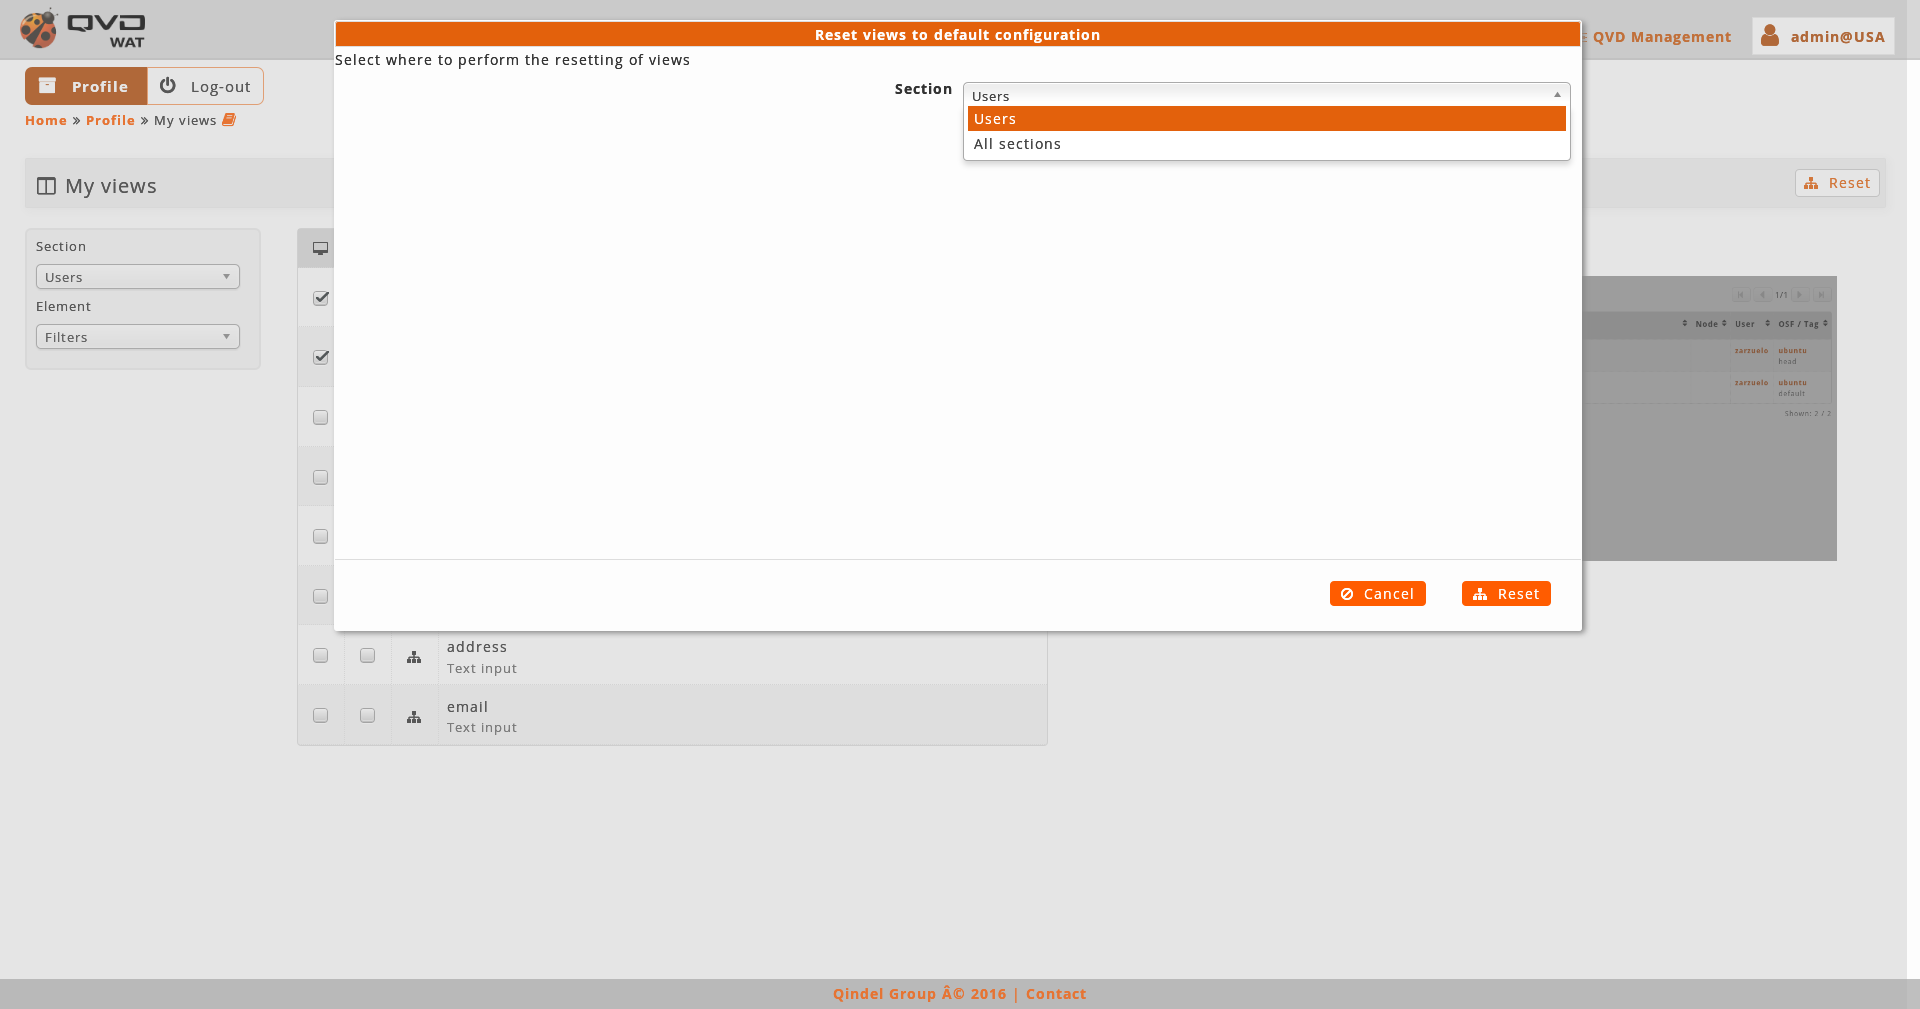
In the section we will find a drop down menu with the section that we want to customize and a buttom to restore the default views.
When we select one or another section, the columns and filters of that section will be charged. Only by clicking on the different check-boxes, the change will be saved.
If we want to revert to the system configuration we will use the buttom to restore the default views. This action can be done over the current loaded section or over all the system, choosing one or the other option in the dialogue that appears before doing the restoration.
|
|
The views that we reset to the system configuration will be again subject to the changes that the global configuration may suffer. |
3. User guide
3.1. First steps
After a clean installation of WAT an administrator with full access will have been created. His credentials are:
User: admin
Password: admin
|
|
If we are going to have a single WAT administrator admin will be enough. If, otherwise, we want to have different administrators we can create them with admin with the possibility of giving them different permissions. |
We will log in with the following credentials.
The first step to follow, for security, is changing the password of our administrator account.
3.1.1. Changing the password
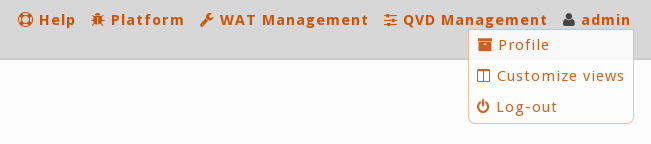
To change the password we will go to the administrator area, positioned in the main menu at the top right.
-
We will click in the option labeled as administrator ( in this case admin) or we will go over it with the mouse and from the drop down menu we will choose the option Profile.
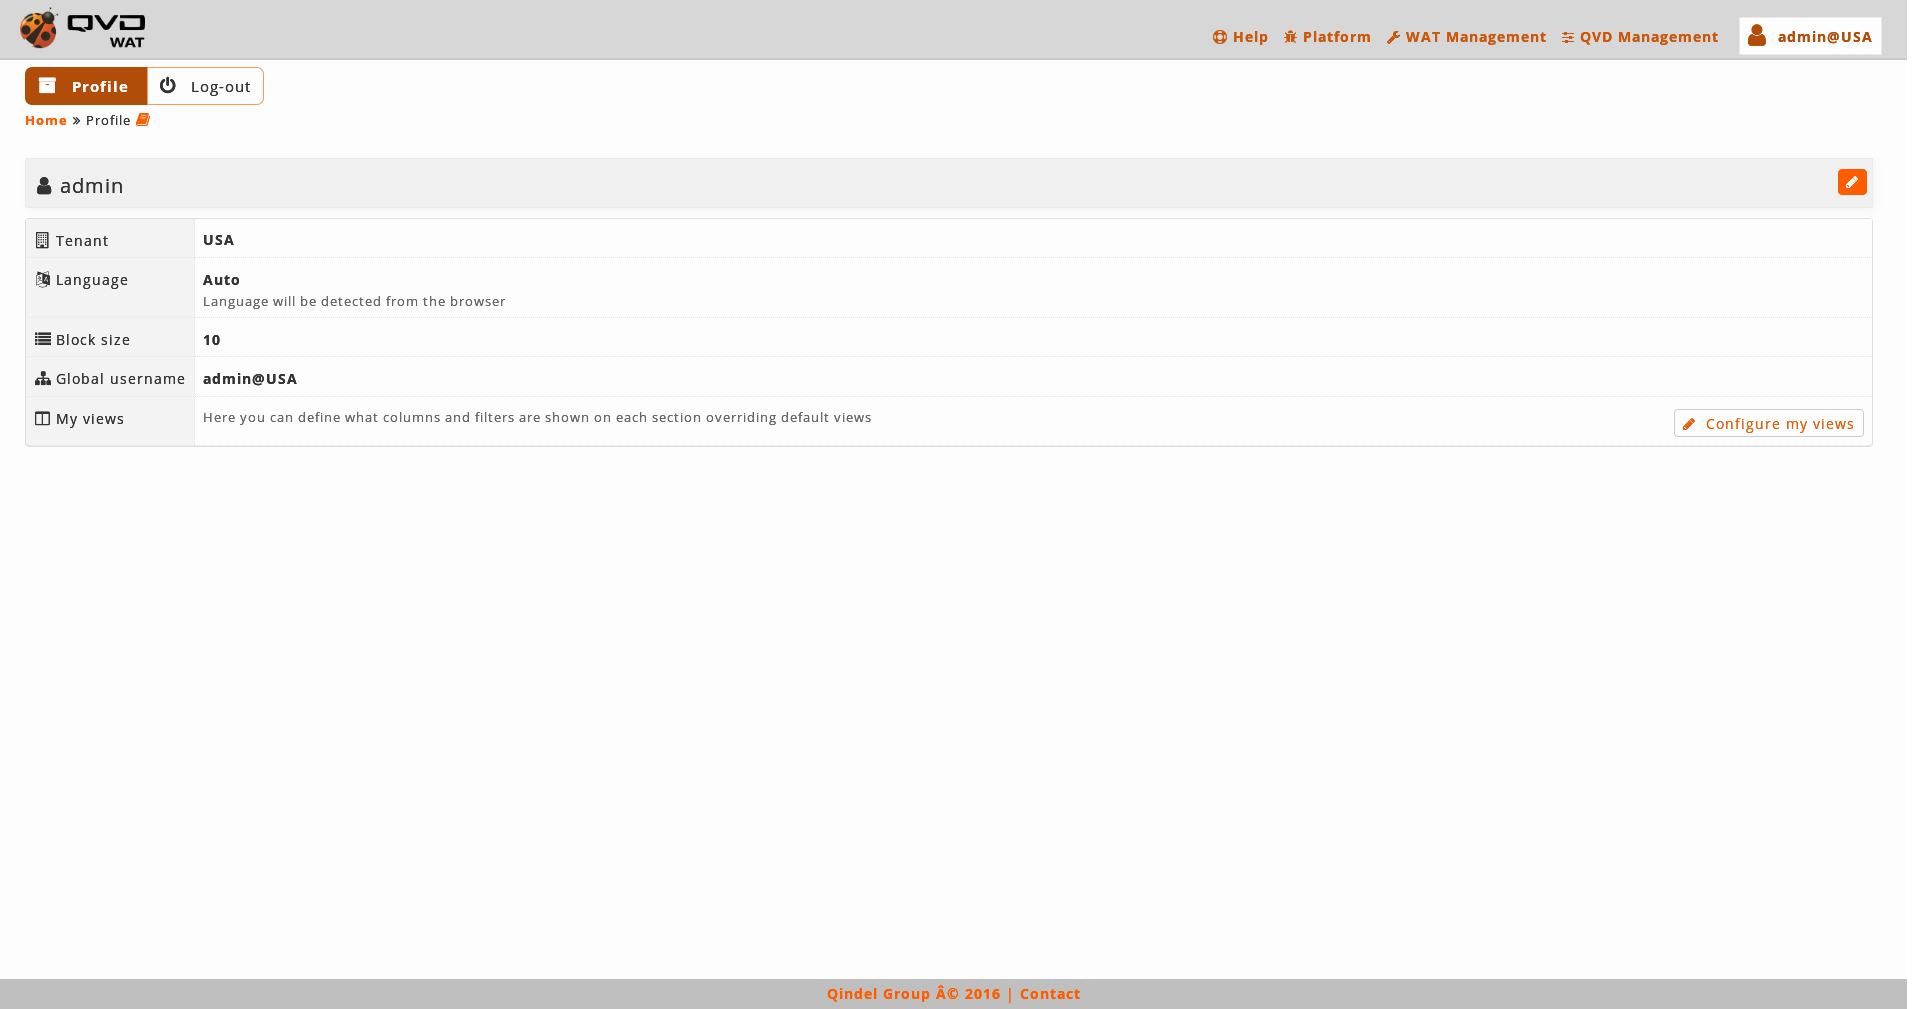
-
Inside our profile we could click on the edition button, located on the right of the heading, below the menu.
-
An editing form will open.
-
We will click on change password and we will choose our own password.
3.1.2. Initial environment
The first screen after logging in corresponds to a panel with graphics and statistics from the system. The first time, since it is a new system, all the indicators will appear empty.
The loaded menu by default will be the QVD Platform, which is the backbone of the QVD administration. The menu contains the sections: users, virtual machines, nodes, OSFs and disk images.
Navigating through the different sections of the platform we will see that there is nothing in each of them. Every list will appear empty.
From the general menu (top right) we could access other WAT parts that we could discover.
The managing part of WAT will contain things though, since to make an administrator able to connect WAT, a serie of elements are essential, like the administrator account or at least a role with permissions.
In the different guides we wil go through these sections for different purposes, therefore it is convinient to get familiar with the environment.
Other aspect we should know is the dependance between other elements we can create in order not to waste time when trying to create some elements without having the ones that are necessary, etc.
3.1.3. Dependencies between the QVD elements
Some QVD elements depend on other elements:
-
A disk image belongs to an OSF.
-
Virtual machines are linked to a user.
-
Virtual machines use a disk image.
-
Virtual machines will start in a node.
Therefore, we will have to follow a logic sequence to create elements.
We will see it in the next dependencies tree where each element has a son and other necessary elements to exist.
-
Virtual machine
-
Node(*)
-
User
-
Disk image
-
OSF
-
-
(*) Having less than a Node is not necessary to create a virtual machine but it is to start it.
3.2. Creating a virtual machine from the beginning
We will learn the steps to perform the complete process of the creation of a virtual machine and getting it ready to be used.
Virtual machines use other elements, which we will have to create beforehand in a certain order. To know more about this order we will see the manual section Dependencies between QVD elements.
Regarding this we will follow the next steps, in an order that can be slightly altered as long as we respect the dependencies.
-
Node creation
-
OSF creation
-
Disk image creation
-
User creation
-
Virtual Machine creation
|
|
The sections used in this chapter describe in detail the section Platform in the guide WAT step by step. |
|
|
The administrator account we use in WAT to carry out the next actions must have the required permissions. If there are any permissions lacking, some options or sections might become unavailable. |
3.2.1. Creation of a node
A node in WAT corresponds to a QVD server, so we will need a running QVD server correctly set up.
It must be accessible, and we must know its IP address.
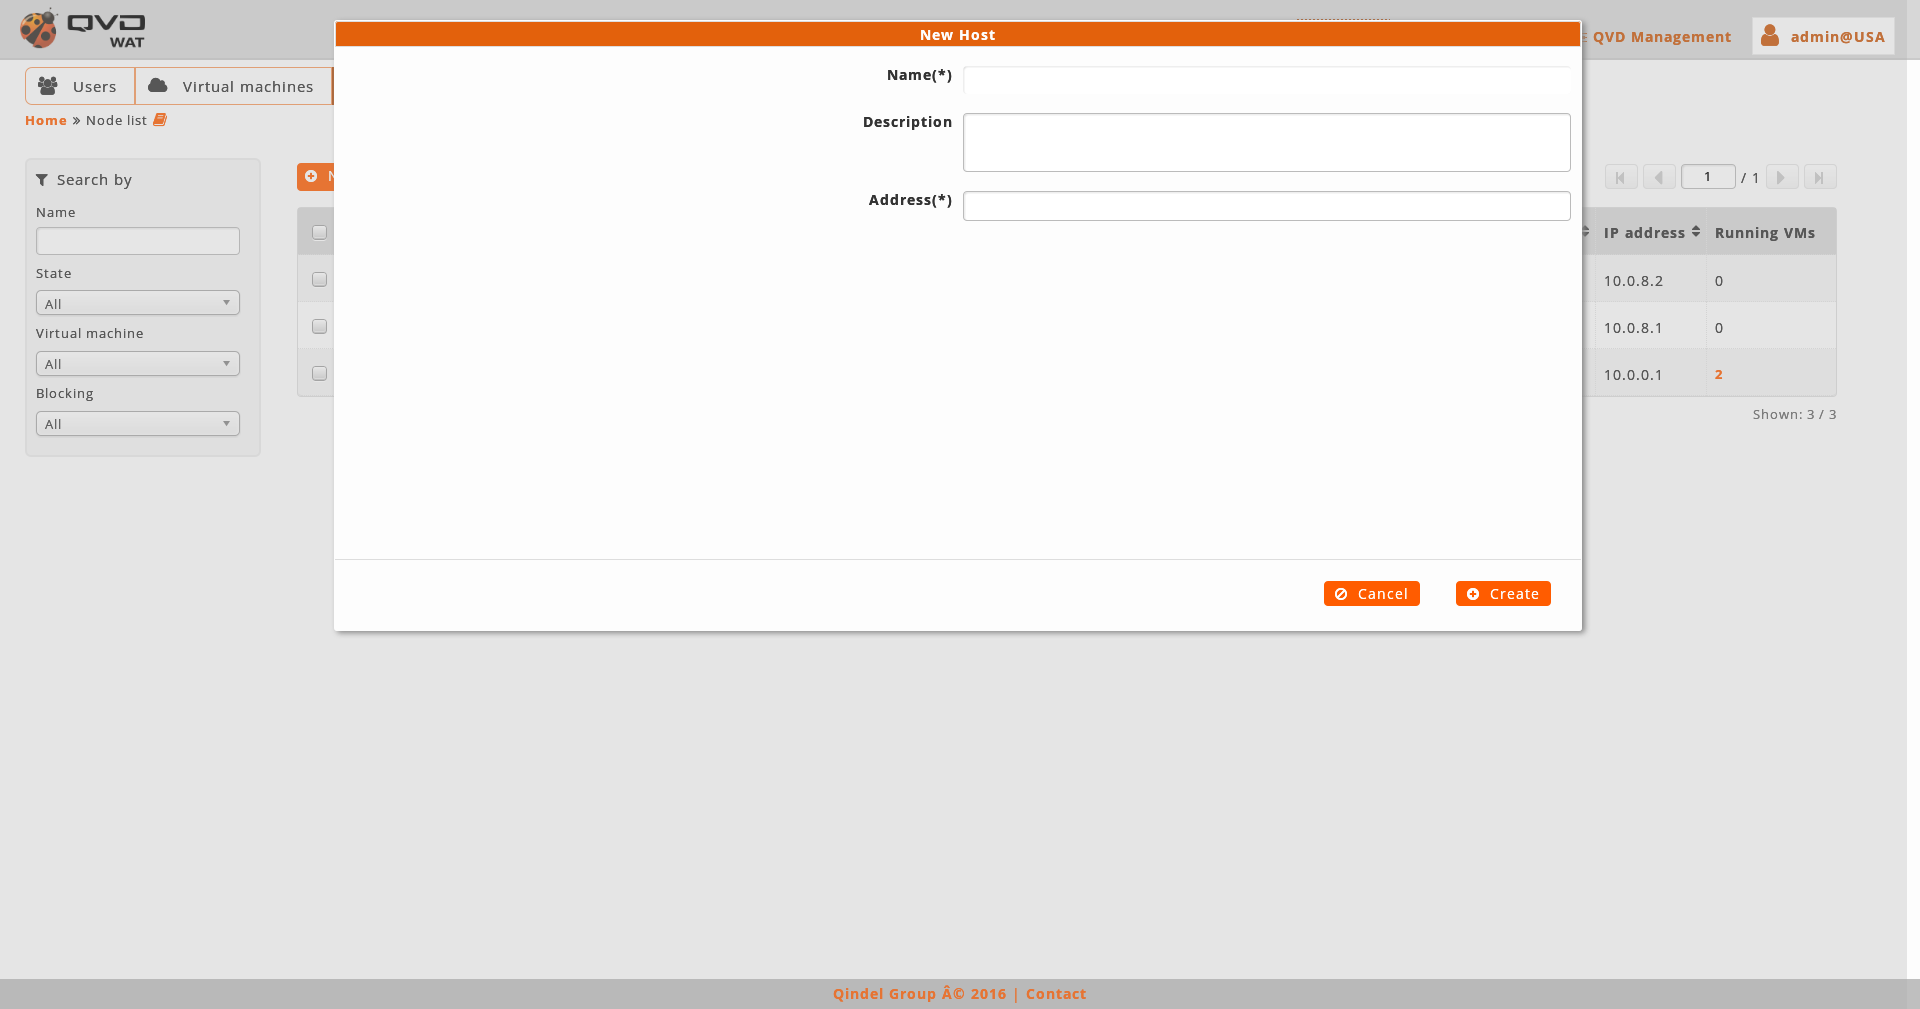
To create a node we will follow the next steps:
-
We will go to Platform setion. This is the active section by default after logging in.
-
We access the menu Nodes section.
-
We click on the button New node.
-
We fill in the creation form.
-
Name the node.
-
We associate IP address of the QVD server.
-
Optionally we could create other properties in the node for internal management of our scripts or simply for adding information.
-
-
We will check the node has been correctly created when we see it appears in the list view.
-
Once created, we must check the node is in the state running.
-
From the list view: A play icon will appear in the information column.
-
From the detail view clicking on the node name on the list view: Among its atributes appears the node state.
-
3.2.2. Creation of an OSF
OSFs are the way to group the disk images in QVD.
Because of this, at least we will need one to create a disk image.
Apart from grouping them they define certain parameters when executing, like memory or the user storage.
To create an OSF we will follow the next steps:
-
Go to Platform section. This is the active section by default after logging in
-
Access to OS Flavours section in the menu.
-
Click on the button New OS Flavour.
-
Fill in the creation form.
-
Assign a name to the OSF.
-
We will define the memory that the images associated with this OSF will have. It is recommended to allocate at least 2GB so that the user experience within the session is fluid. It is worth mentioning that this memory allocation is performed dynamically, that is, it only uses the required memory concurrently, being able to reach, in this case, a limit of 2GB. If we leave this field blank, 256 MB will be assigned by default
-
We will set a limit for the user storage for the associated images of this OSF. If we do not want to have this feature available we just need to leave this value as 0.
-
Optionaly we could create other properties in the OSF for our internal management of scripts or simply to add information.
-
-
We will check the OSF has been created correctly if we see it appears on the list view.
3.2.3. Creation of a disk image
The creation of the disk images that will be loaded by QVD can be performed in 3 ways:
-
By selecting an image among the ones available in the staging directory in the server.
-
By uploading an image from our computer.
-
By providing an image URL which will be downloaded and hosted on the server.
In this case, we choose uploading the image from our computer.
- The image creation can be performed from 2 sections
-
-
From the section Disk Image.
-
Access the Disk Image menu section from Platform section.
-
Click on New disk image.
-
-
From section OS Flavours
-
We access the menu OS Flavours section from Platform section.
-
Choose the OSF we want to associate with the new disk image and click on its name to access its detail view.
-
On the right part of the view, we find a box with all the associated disk images with the OS Flavour. We click on the button New Disk image placed in this box.
-
-
- Fill in the creation form
-
-
Select the disk image browsing our file system.
-
We can define an image version. If we leave this field blank an automatic version will be generated based on the creation date (E.g.: 2015-05-03-000).
-
We select the OSF we want to associate the image with.
-
We can define the image as default image of the OSF. If it is the first image created in an OSF, this field will be irrelevant, since if there is only one image in an OSF, this will be the default image.
-
Optionally, we can assign tags to the image to be able to identify it from the virtual machines manager. These tags are unique per OSF. If we assign a tag that already has another image in the same OSF, the tag will be moved to another image, avoiding duplicity.
-
Optionally, we could create other properties for the image for internal management of our scripts or simply to add information.
-
- We will check if the image has been correctly created
-
3.2.4. User creation
Every virtual machine will be linked to a user, therefore we will need to have, at least, one in the system.
To create a user we will follow the next steps:
-
We go to Platform section. This is the active section by default after logging in.
-
Access the Menu Users section
-
Click on the button New User.
-
Fill in the creation form.
-
Assign a name to the user. This name will be unique in the system.
-
We assign a password. The user will use this password to connect to his virtual machines.
-
Optionally we could create other properties for the OSF for internal management of our scripts or simply to add information.
-
-
We can check that the user has been correctly created if we see it appears on the list view.
3.2.5. Creation of a virtual machine
Having created at least one user and one disk image, it is possible to create a virtual machine.
The creation of virtual machines can be carried out from two screens:
- From the list view of virtual machines
-
*We go to Platform section. This is the active section by default after logging in.
-
Access the section Menu of Virtual Machines
-
Click on the button New Virtual Machine.
-
Fill in the creation form.
-
Assign a name to the virtual machine.
-
Choose the user we want to link to this virtual machine. This data can not be modified later on. **Choose the OSF we wish. This data can not be modified later on.
-
Choose the image tag we want to use on the virtual machine. In this control we can find the versions and tags of the images belonging to the selected OSF in the previous control of the form, as well as the special tags head and default that will be used to use the latest created image in the OSF and set as default image in the OSF respectively.
-
-
- From the user detail view
-
-
Go to Platform section. This is the active section by default after logging in.
-
Access the section Menu Users.
-
Choose the user we want to link to the new virtual machine and click on its name to access its detail view.
-
On the right part of the view, we find a box with associated virtual machines with the user. We click on the button New virtual machine placed in this box.
-
Fill in the creation form.
-
Assign a name to the virtual machine
-
Choose the OSF we wish. This data can not be modified later on.
-
Choose the image tag we want to use on the virtual machine. In this control we can find the versions and tags of the images belonging to the selected OSF in the previous control of the form, as well as the special tags head and default that will be used to use the latest created image in the OSF and set as default image in the OSF respectively.
-
Optionally we could create other properties in the Virtual machine for internal management of our scripts or simply to add information.
-
-
We can check the virtual machine has been correctly created if see it appears in the box of virtual machines associated to this user.
-
3.2.6. Start of a virtual machine
Once created the virtual machine, we need to start it, so that the user can connect to it.
A virtual machine can start from two screens:
- From the detail view of the virtual machine
-
The steps are:
-
Go to Platform section. This is the active section by default after logging in.
-
Access the section Menu virtual machines.
-
Choose the virtual machine we want to start and click on its name to access its detail view.
-
On the right part we locate the running state panel.
-
Click on the virtual machine starting button on the right of the running state panel.
We can see how the running state panel changes from Stopped to Starting.
This process may take some time to complete, specially if it is the first time we start a machine.
When the process is over, the running state panel will change showing the machine is runnning and the Node name where it is running. Moreover, the running parameters will be accessible. These values, like the IP address or the disk image in use, won’t change while the machine is executing even if said values are edited in the virtual machine.
-
- From the virtual machine list view
-
This way allows to start several virtual machines at the same time, although in this case we will use it as a comfortable way to start a single virtual machine.
The steps are:
-
Go to Platform section. This is the active section by default after logging in.
-
Access the section Menu virtual machines.
-
Select the virtual machine we want to start by checking the corresponding checkbox from the first column in the list.
-
Under the list of virtual machines, in the actions control over the checked elements, we choose start.
-
We click on the button Apply.
We can see how, in the information column of the checked element, the icon changes from stop to an animated icon that indicates us that the machine is in starting process. If the column with the node associated to the machine is visible, it will change in this moment showing the node where the machine is starting.
This process may take some time to complete, specially if it is the first time we start a machine.
When the process is over, the icon will change to a play icon, that will indicate that the virtual machine has started.
If instead of the play icon, the stop button appears again, it means there has been some problem with the machine starting and it was stopped. This may happen because of multiple reasons, and we will need to look into the QVD server what happened.
-
3.2.7. User connection
Once the virtual machine is started, the user will be able to connect to it.
In order to do so the user will use the QVD client and will connect using the server address and the user/password which were assigned from the WAT.
When the client is connected, this is shown in the list views and virtual machines detail.
3.3. Image update
We will see how to update an image used by a virtual machine.
The process consists of creating an image with the newest version we want to use and replace the assigned image to the virtual machine by the new one.
|
|
The sections used in this part are described in detail in the Platform section in the guide WAT step by step. |
3.3.1. Creation of a new disk image
We must create a new disk image in WAT with the image version we want to use to replace the current one.
3.3.2. New image assignment
There are several ways to manage the images associated to the virtual machines.
- Having assigned to the virtual machine the tag head
-
If the virtual machine has assigned the tag head it will always have associated the latest image created of the OSF, this means that just creating it will be enough.
If the virtual machine has the tag default assigned, it will have associated the image marked as default image in the OSF. We must mark the image we want as default image if we want this virtual machine to be associated to the new image.
- Having assigned to the virtual machine other tag
-
If in the virtual machine we have an identifying tag of the image being executed, we must change this tag to select the new image to replace the current one.
Change of tag in the virtual machine
To change the associated tag of a virtual machine we need to follow the next steps:
-
Go to Platform section. This is the active section by default after logging in.
-
Access to the section of Menu Virtual Machines.
-
Choose the virtual machine we want to edit and click on its name to access its detail view.
-
In the detail view, on the right of the virtual machine’s name, among the action buttons, click on the Edition button.
-
In the edition form we change the image tag and select the version of the new disk image created or any of its tags.
-
Click on Update.
To check the change has been made effective, we can see that in the attributes of the virtual machine appears the image tag we have selected and the correct disk image. It must come from the last one we have created.
If the machine is running, we can see the execution parameters in the executing state panel and check that the old image is still appearing, since the image change can not be done while the virtual machine is working, we will need to restart it.
Change of default image
An image can be set as default image in different screens.
- From the image detail view
-
-
Go to Platform section. This is the active section by default after logging in
-
Access to the section Menu disk images.
-
Choose the image we want to set as default image and click on the name to access its detail view.
-
In the detail view, on the right of the image name, among the action buttons, we click on the Edition button.
-
In the edition form we check the verification box by default.
-
Click on Update.
To check if the change has been made effective, we can check if among the image attributes appears the attribute “By default” letting us know this is the default image of its OSF.
If now we go to the virtual machine detail view, we see that, among its attributes, the disk image we just edited appears.
If the machine is running, as we previously saw, the execution parameters will still show the previous image until we restart it.
-
- From the OSF detail view
-
*Go to Platform section. This is the active section by default after logging in. * Access the section Menu OS Flavours. * Choose the OSF belonging to the image we want to set as default image and click on the name to access its detail view. * On the right of the OSF detail view there is a box with the associated images of the OSF. One of the columns on this list contains verification boxes to set an image as a default image. Click on the verification box of the image.
To check if the change has been made effective, we observe that in the information column of the disk image list has changed the image that contains the icon that indicates the default image.
If now we go to the virtual machine detail view, we see in its attributes that the disk image we just created is displayed.
If the machine is running, as we previously saw, the executing parameters will still show the previous image until we restart it.
3.3.3. Restarting virtual machine
To make the image change effective, we need to stop and restart the machine.
The stop of a virtual machine is performed the same way we do when we start it. We can see this process in detail in the section Start of a virtual machine in the manual.
3.4. Block situations
There are different situations in which because of a configuration or an oversight, we can miss some features. We will call this a block situation.
We will see some of the situations we may find, since there might be more, and how to solve them.
-
Deleting the only administrator since we could not manage the WAT because in order to create an administrator we need another administrator.
-
Modifying permissions such way that there are no administrators left to manage the permissions.
-
Forgetting the only administrator password that can manage permissions.
- Solution
-
To recover the missing features we can access the WAT in a special way. The use of this mode can be found in the Recovering mode Guide.
3.5. Recovering Mode
Due to some configuration or permissions change, or due to forgetting a password, we can find ourselves lacking some features.
This situation will appear when we have no administrator allowed to manage permissions, because otherwise, we could recover it.
To restore the missing features, the WAT has a special recovering administrator. Its credentials are:
User: batman
Password: (Consult the support team)
This administrator has the following characteristics:
-
It does not appear on the system administrators list.
-
It can not be shown or altered as the other administrators.
-
It has default permissions that can not be modified.
-
WAT management: Configuration, Administrators, Roles.
-
QVD management: Configuration.
-
This way, when we face a block situation, we can log in with the recovering administrator and solve it, for example, with the next actions.
-
Change a forgotten password
-
Set lost permissions to an administrator
-
Create an administrator we might have deleted
-
…
3.6. Managing Administrators and Permissions
The administrators and permissions management is framed in the WAT management general section.
The two useful sections for this management are:
-
Administrators: Creation/Deletion of administrators as well as the permissions they have.
-
Roles: Roles management.
QVD has by default some predetermined roles that can be useful if we do not need very specific permissions.
3.6.1. Administrators management
The action of creating an administrator will allow us to assign it a user name, a password, a description, the language in which the WAT will be shown to him and the roles which give to him permission to view and do different things. To give it access to the WAT it will be necessary to assign at least one role.
The process will be:
-
Create an administrator with the button “New administrator” from the list view of administrators. Choose a simple password so that it is easy for the administrator to log in, although we will warn them that they should change it later on for a personal password.
-
After creation, the administrator will appear on the list. On the information column of the just created administrator will appear an icon that will indicate us the assigned roles or a warning icon if it has no assigned role. Click on the name to access the detail view for a deeper configuration.
-
In the detail view we find a list with the assigned roles. We will have as support an ACLs tree that has assigned the administrator at any moment. This tree has two modes that we will analyse in the roles management.
Watching how appear/dissapear ACLs on the tree when we assign/unassign roles, we will see exactly what licenses we are giving to the administrator.
For our first administrators we can use the available default roles in the system.
- Root
-
Role with all the possible system ACLs. Or what is the same, total reading control, update, operation, creation and deletion on each of the elements. This role is associated to the “admin” user created by default in WAT.
- Operator L1
-
Role with all the disk images reading ACLs, OSFs, Users and Virtual machines.
- Operator L2
-
Role with the ACLs of the Operator L1 and in addition, the operation ACLs: Block/Unblock elements, Start/Stop virtual machines, Disconnect users…
- Operator L3
-
Role with Operator L2 ACLs and in addition the creation, update and deletion ACLs on the QVD elements, and Node administration ACLs
When we find the need to create administrators with more specific permissions, it will be necessary to go to Roles Management.
3.6.2. Roles management
In the search for administrators with customized permissions, we will create the roles we need. To make our work easier, a good strategy will be creating reusable roles, seeking they have the common ACLs we want for an administration group.
As with the administrators, when creating a role, we can assign it ACLs in the creation process or create it empty, in which case we will have to edit it to assign it ACLs.
The process will be:
-
Create the role with “New role” button from the roles list view. We will choose the name containing some relationship with the permissions it will have to make it easily understandable in the future.
For example: Basic users provider
-
After the creation, the role will appear on the list. In the ACLs report column and inherited roles from each role, a 0 will be displayed. We will click on the name to access the detail view.
-
On the detail view we have two available tools
-
ACLs inheritance: ACLs groups will be available to inherit.
To make the tedious work of assigning ACLs to a role easier, we can create inheritance links between the ACLs groups
There are two types of ACLs groups from which we can inherit:
-
Roles: They will be every WAT roles, set by default or that have been created afterwards.
They are the normal roles that are shown in the roles list and apart from being available to inherit from them, they can be assigned to administrators.
There is a protection against infinite inheritance loops with which a role A can not inherit from a role B if role B is already inheriting from role A.
-
Templates: The templates are ACLs groups whose only objective is to be inherited by the roles. Its use is recommended for maintenance purposes.
The templates are descriptive of the ACLs they contain, normally making reference to what elements affect and how they affect them.
For example: Users Creator, Images Operator, Vms Manager, Roles Eraser...
In future WAT updates new ACLs might appear. To avoid having to re-configure our administrators ACLs after an update, we recommend using the templates inheritance to configure our roles. These roles will be updated with the WAT containing the new ACLs in a coherent way with its use.
For example: if we add a new field in the users view, the ACL that allows its display will be added to the internal role Users Reader. The roles that inherit this internal role, will be updated and will automatically have said new access.
When we inherit a new role or template, we will see how the ACLs tree changes, activating the new ACLs, giving use guide about how close we are to the wished ACLs as we configure the role.
One advantage of the inheritance is that if in the future a role’s ACLs change, every role inheriting it will be changed along with it. That is why we must use this technique carefully.
To know the roles and templates that a QVD installation includes, see user guide: ACLs Reference Templates and Roles.
-
-
ACLs tree: The ACLs system will be displayed in the form of a tree with checkboxes.
We will check those ACLs we want the role to contain, and the same way we will uncheck the ones we want it not to contain, no matter if they were added manually or come from a role or template inheritance.
The branches also contain a checkbox to select/unselect whole branches with just one click
Along with each ACL coming from an inherited role or template, an icon will appear. When moving the mouse over it, we will see information about which role or template it comes from.
An ACL can come from different roles or templates if these have ACLs in common. This has no importance apart from that if we stop inheriting from a role or template that provides us these ACLs we will not be taking out the ACL, because it would still be inheriting from the others. However, this ACL, like the rest, could be deleted manually unchecking it from the ACLs tree no matter how many roles or templates it is coming from.
According to our preferences, we can represent the tree in two different sortings:
-
By sections: If we wish to group the ACLs depending on the WAT sections affecting to: users, virtual machines, nodes, administrators…
Useful if we want to create a role that gives permissions with much depth but little extent.
For example, total permissions in users and virtual machines.
-
By actions: If it is easier for us to group the ACLs depending on the action they enable: create, delete, access to the main display, filter…
Useful if we want to create a role that gives permissions with little depth and much extent.
For example, total permissions in users and virtual machines.
-
-
We must be carefull when managing administrators and permissions since if we perform an incorrect action, we could lose features and even the WAT access. See section Block situations in the manual.
- Update of the current administrator
-
The ACLs are obtained at the moment of the login, so, if we decide to change ACLs in the current administrator, specially the ones related to sections display, it will be necessary to refresh the browser or log in again to have the changes effective.
3.7. ACLs reference, Templates and Roles
In the following reference list the different system ACLs are described as well as the Templates and the Default Roles
3.7.1. ACLs reference
List of the ACLs sorted out by the different object they affect. Each category contains a table with a short description, the internal code and a description in detail for each of the ACLs.
3.7.2. Users' ACLs
| ACL | ACL code | Description |
|---|---|---|
Create users |
user.create. |
Creation of users including initial settings for name and password. |
Set properties on users in creation |
user.create.properties |
Setting of custom properties in the creation process of users. |
Delete users |
user.delete. |
Deletion of users. |
Access to user’s details view |
user.see-details. |
This ACL grants the access to the details view. The minimum data on it is name |
Access to user’s main section |
user.see-main. |
This ACL grants the access to the list. The minimum data on it is name |
See user’s blocking state |
user.see.block |
Blocking state (blocked/unblocked) of users |
See user’s creator |
user.see.created-by |
WAT administrator who created a user. |
See user’s creation date |
user.see.creation-date |
Datetime when a user was created |
See user’s description |
user.see.description |
The description of the users. |
See user’s ID |
user.see.id |
The database identiefier of the users. Useful to make calls from CLI. |
See user’s properties |
user.see.properties |
The custom properties of the users. |
See user’s virtual machines |
user.see.vm-list |
See the virtual machines of one user in his details view. This view will contain: name, state, block and expire information of each vm |
See user’s virtual machines' blocking state |
user.see.vm-list-block |
Blocking info of the virtual machines shown in user details view |
See user’s virtual machines' expiration |
user.see.vm-list-expiration |
Expiration info of the virtual machines shown in user details view |
See user’s virtual machines' running state |
user.see.vm-list-state |
State (stopped/started) of the virtual machines shown in user details view |
See user’s virtual machines' user state |
user.see.vm-list-user-state |
User state (connected/disconnected)) of the virtual machines shown in user details view |
See number of user’s virtual machines |
user.see.vms-info |
Total and connected virtual machines of this user |
See statistics of number of users |
user.stats.blocked |
Total of blocked users in current tenant or all system for superadministrators. |
See statistics of number of connected users |
user.stats.connected-users |
Total of users connected in at least one virtual machine. |
See statistics of number of blocked users |
user.stats.summary |
Total of users in current tenant or all system for superadministrators. |
Block-Unblock users |
user.update.block |
Update the blocking state (blocked/unblocked) of users. |
Update user’s description |
user.update.description |
Update the description of users. |
Update user’s password |
user.update.password |
Update the password of users. |
Update properties when update users |
user.update.properties |
Update properties in user’s update process. |
3.7.3. Virtual Machines' ACLs
| ACL | ACL code | Description |
|---|---|---|
Create virtual machines |
vm.create. |
Creation of virtual machines including initial setting for name, user and OS flavour. |
Set tag in virtual macine’s creation |
vm.create.di-tag |
Setting of disk image’s tag in the creation process of virtual machines. Without this ACL, the system will set default automatically. |
Set properties in virtual machine’s creation |
vm.create.properties |
Setting of custom properties in the creation process of virtual machines. |
Delete virtual machines |
vm.delete. |
Deletion of virtual machines. |
Access to virtual machine’s details view |
vm.see-details. |
This ACL grants the access to the details view. The minimum data on it is name |
Access to virtual machine’s main section |
vm.see-main. |
This ACL grants the access to the list. The minimum data on it is disk_image |
See virtual machine’s blocking status |
vm.see.block |
Blocking state (blocked/unblocked) of virtual machines |
See virtual machine’s creator |
vm.see.created-by |
WAT administrator who created a virtual machine. |
See virtual machine’s creation date |
vm.see.creation-date |
Datetime when a virtual machine was created |
See virtual machine’s description |
vm.see.description |
The description of virtual machines. |
See virtual machine’s disk image |
vm.see.di |
Disk images used by each virtual machine |
See virtual machine’s disk image’s tag |
vm.see.di-tag |
Disk image’s tag assigned in each virtual machine to define which disk image will be used. |
See virtual machine’s disk image’s version |
vm.see.di-version |
Disk image’s version used by each virtual machine |
See virtual machine’s Expiration |
vm.see.expiration |
Expiration info of the virtual machines. |
See virtual machine’s Node |
vm.see.host |
Host where each virtual machines are running |
See virtual machine’s ID |
vm.see.id |
The database identiefier of the virtual machines. Useful to make calls from CLI. |
See virtual machine’s IP address |
vm.see.ip |
Current IP addres of the virtual machines. |
See virtual machine’s MAC address |
vm.see.mac |
MAC address of the virtual machines. |
See virtual machine’s IP address for next boot |
vm.see.next-boot-ip |
IP address that will be assigned in the next boot of the virtual machines. |
See virtual machine’s OS Flavour |
vm.see.osf |
OS flavours assigned to each virtual machine. |
See virtual machine’s Serial port |
vm.see.port-serial |
Serial port assigned to a running virtual machine. |
See virtual machine’s SSH port |
vm.see.port-ssh |
SSH port assigned to a running virtual machine. |
See virtual machine’s VNC port |
vm.see.port-vnc |
VNC port assigned to a running virtual machine. |
See virtual machine’s properties |
vm.see.properties |
The custom properties of the virtual machines. |
See virtual machine’s state |
vm.see.state |
The status of the virtual machines (stopped/started) |
See virtual machine’s user |
vm.see.user |
The user owner of the virtual machines. |
See virtual machine’s user’s connection state |
vm.see.user-state |
The user state of a virtual machine (connected/disconnected) |
See statistics of number of blocked virtual machines |
vm.stats.blocked |
Total of blocked virtual machines in current tenant or all system for superadministrators. |
See statistics of virtual machines close to expire |
vm.stats.close-to-expire |
Info of the virutal machines that will be expire (hard expiration) in next 7 days. |
See statistics of running virtual machines |
vm.stats.running-vms |
Total of running virtual machines in current tenant or all system for superadministrators. |
See statistics of number of virtual machines |
vm.stats.summary |
Total of virtual machines in current tenant or all system for superadministrators. |
Block-Unblock virtual machines |
vm.update.block |
Update the blocking state (blocked/unblocked) of virtual machines. |
Update virtual machine’s description |
vm.update.description |
Update the description of virtual machines. |
Update virtual machine’s tag |
vm.update.di-tag |
Update the disk image’s tag setted on virtual machines. |
Disconnect user from virtual machine |
vm.update.disconnect-user |
Disconnect the user connected to virtual machines. |
Update virtual machine’s expiration |
vm.update.expiration |
Update the expiration date times of virtual machines. |
Update virtual machine’s name |
vm.update.name |
Update the name of virtual machines. |
Update properties when update virtual machines |
vm.update.properties |
Update properties in virtual machines’s update process. |
Start-Stop virtual machines |
vm.update.state |
Start/Stop virtual machines. |
3.7.4. Nodes' ACLs
| ACL | ACL code | Description |
|---|---|---|
Create nodes |
host.create. |
Creation of hosts including initial setting for name and address. |
Set properties on nodes in creation |
host.create.properties |
Setting of custom properties in the creation process of hosts. |
Delete nodes |
host.delete. |
Deletion of hosts. |
Access to node’s details view |
host.see-details. |
This ACL grants the access to the details view. The minimum data on it is name |
Access to node’s main section |
host.see-main. |
Access to hosts section (without it, it won’t appear in menu) |
See node’s IP address |
host.see.address |
IP address of the hosts. |
See node’s blocking state |
host.see.block |
Blocking state (blocked/unblocked) of hosts |
See node’s creator |
host.see.created-by |
WAT administrator who created a host. |
See node’s creation date |
host.see.creation-date |
Datetime when a host was created |
See node’s description |
host.see.description |
The description of the hosts. |
See node’s ID |
host.see.id |
The database identiefier of the hosts. Useful to make calls from CLI. |
See node’s properties |
host.see.properties |
The custom properties of the hosts. |
See node’s running state |
host.see.state |
State of the hosts (stopped/started) |
See node’s running virtual machines |
host.see.vm-list |
See the virtual machines running on one host in his details view. This view will contain: name, state, block and expire information of each vm |
See node’s running virtual machines' blocking state |
host.see.vm-list-block |
Blocking info of the virtual machines shown in host details view |
See node’s running virtual machines' expiration |
host.see.vm-list-expiration |
Expiration info of the virtual machines shown in host details view |
See node’s running virtual machines' running state |
host.see.vm-list-state |
State (stopped/started) of the virtual machines shown in host details view |
See node’s running virtual machines' user state |
host.see.vm-list-user-state |
User state (connected/disconnected) of the virtual machines shown in host details view |
See number of running vms running on nodes |
host.see.vms-info |
Virtual machines information such as how many virtual machines are running in each host |
See statistics of number of blocked nodes |
host.stats.blocked |
Total of blocked hosts in current tenant or all system for superadministrators. |
See statistics of running nodes |
host.stats.running-hosts |
Total of running hosts in current tenant or all system for superadministrators. |
See statistics of number of nodes |
host.stats.summary |
Total of hosts in current tenant or all system for superadministrators. |
See statistics of nodes with most running Vms |
host.stats.top-hosts-most-vms |
Top 5 of hosts with most running virtual machines. |
Update node’s address |
host.update.address |
Update the IP address of the hosts. |
Block-Unblock nodes |
host.update.block |
Update the blocking state (blocked/unblocked) of hosts. |
Update node’s description |
host.update.description |
Update the description of the hosts. |
Update node’s name |
host.update.name |
Update the name of the hosts. |
Update properties when update nodes |
host.update.properties |
Update properties in node’s update process. |
Stop all virtual machines of a node |
host.update.stop-vms |
Stop all the virtual machines of hosts. |
3.7.5. OSFs' ACLs
| ACL | ACL code | Description |
|---|---|---|
Create OS Flavours |
osf.create. |
Creation of OS flavours including initial setting for name. |
Set memory in OS Flavour’s creation |
osf.create.memory |
Setting of memory in the creation process of OS flavours. |
Set properties in OS Flavour’s creation |
osf.create.properties |
Setting of custom properties in the creation process of OS flavours. |
Set user storage in OS Flavour’s creation |
osf.create.user-storage |
Setting of user storage in the creation process of OS flavours. |
Delete OS Flavours |
osf.delete. |
Deletion of OS flavours. |
Access to OS Flavour’s details view |
osf.see-details. |
This ACL grants the access to the details view. The minimum data on it is name |
Access to OS Flavour’s main section |
osf.see-main. |
This ACL grants the access to the list. The minimum data on it is nname |
See OS Flavour’s creator |
osf.see.created-by |
WAT administrator who created an OS flavour. |
See OS Flavour’s creation date |
osf.see.creation-date |
Datetime when an OS flavour image was created |
See OS Flavour’s description |
osf.see.description |
The description of the OSFs. |
See OS Flavour’s disk images |
osf.see.di-list |
See the disk images of this osf in his details view. This view will contain: name, block, tags, default, head and the feature of change which is default one |
See OS Flavour’s disk blocking state |
osf.see.di-list-block |
Blocking info of the disk images shown in osf details view |
See OS Flavour’s disk images' default state |
osf.see.di-list-default |
What of the Dis is the default one in osf details view |
Change OS Flavour’s disk images' default info |
osf.see.di-list-default-update |
Controls to change the default disk image of an osf in osf details view |
See OS Flavour’s disk images' head info |
osf.see.di-list-head |
What of the Dis is the head (last created) in osf details view |
See OS Flavour’s disk images' tags |
osf.see.di-list-tags |
Tags of the disk images shown in osf details view |
See number of OS Flavour’s disk images |
osf.see.dis-info |
Number of disk images assigned to each OS flavours |
See OS Flavour’s ID |
osf.see.id |
The database identiefier of the OS flavours. Useful to make calls from CLI. |
See OS Flavour’s memory |
osf.see.memory |
Amount of memory in the OS flavours |
See OS Flavour’s overlay |
osf.see.overlay |
Overlay configuration of the OS flavours |
See OS Flavour’s properties |
osf.see.properties |
The custom properties of the OS flavours |
See OS Flavour’s user storage |
osf.see.user-storage |
User storage of the OS flavours |
See OS Flavour’s virtual machines |
osf.see.vm-list |
See the virtual machines using this osf in his details view. This view will contain: name, state, block, di tag and expire information of each vm |
See OS Flavour’s virtual machines' blocking state |
osf.see.vm-list-block |
Blocking info of the virtual machines shown in osf details view |
See OS Flavour’s virtual machines' expiration |
osf.see.vm-list-expiration |
Expiration info of the virtual machines shown in osf details view |
See OS Flavour’s virtual machines' running state |
osf.see.vm-list-state |
State (stopped/started) of the virtual machines shown in osf details view |
See OS Flavour’s virtual machines' user state |
osf.see.vm-list-user-state |
User state (connected/disconnected) of the virtual machines shown in osf details view |
See number of OS Flavour’s virtual machines |
osf.see.vms-info |
Number of virtual machines that are using a Disk image of each OS flavours |
See statistics of number of OS Flavours |
osf.stats.summary |
Total of OS flavours in current tenant or all system for superadministrators. |
Update OS Flavour’s description |
osf.update.description |
Update the description of OSF flavours. |
Update OS Flavour’s memory |
osf.update.memory |
Update the memory of OSF flavours. |
Update OS Flavour’s name |
osf.update.name |
Update the name of OSF flavour’s. |
Update properties when update OSFs |
osf.update.properties |
Update properties in OSF’s update process. |
Update OS Flavour’s user storage |
osf.update.user-storage |
Update the user storage of OSF flavours. |
3.7.6. Disk images' ACLs
| ACL | ACL code | Description |
|---|---|---|
Create disk images |
di.create. |
Creation of hosts including initial setting for disk image and OS flavour. |
Set disk images as default on disk images creation |
di.create.default |
Setting of disk image as default in the creation process of disk images. |
Set properties on disk images creation |
di.create.properties |
Setting of custom properties in the creation process of disk images. |
Set tags on disk images creation |
di.create.tags |
Setting of tags in the creation process of disk images. |
Set version on disk images creation |
di.create.version |
Setting of version in the creation process of disk images. Without this ACL, the system will set it automatically with a string based on the timestamp and an order digit. |
Delete disk images |
di.delete. |
Deletion of disk images. |
Access to disk image’s details view |
di.see-details. |
This ACL grants the access to the details view. The minimum data on it is disk image |
Access to disk image’s main section |
di.see-main. |
This ACL grants the access to the list. The minimum data on it is disk_image |
See disk image’s blocking state |
di.see.block |
Blocking state of disk images |
See disk image’s creator |
di.see.created-by |
Wat administrator who created a disk image |
See disk image’s creation date |
di.see.creation-date |
Datetime when a disk image was created |
See OSF’s default disk image |
di.see.default |
If a disk image is setted as default image within the OSF where it belongs |
See disk image’s description |
di.see.description |
The description of disk images. |
See OSF’s last created disk image |
di.see.head |
If a disk image is the last created image within the OSF where it belongs |
See disk image’s ID |
di.see.id |
The database identiefier of disk images. Useful to make calls from CLI. |
See disk image’s OS Flavour |
di.see.osf |
The OS Flavour associated to the disk images. |
See disk image’s properties |
di.see.properties |
The custom properties of the disk images. |
See disk image’s tags |
di.see.tags |
The disk images tags |
See disk image’s version |
di.see.version |
The disk images version |
See disk image’s list of virtual machines |
di.see.vm-list |
Virtual machines using this image in his details view. This view will contain: name and tag of each vm |
See blocking state of VM’s list of DI’s |
di.see.vm-list-block |
Blocking info of the virtual machines shown in DI details view |
See expiration of VM’s list of DI’s |
di.see.vm-list-expiration |
Expiration info of the virtual machines shown in DI details view |
See running state of VM’s list of DI’s |
di.see.vm-list-state |
State (stop/started) of the virtual machines shown in DI details view |
See user state of VM’s list of DI’s |
di.see.vm-list-user-state |
User state (connected/disconnected) of the virtual machines shown in DI details view |
See statistics of number of blocked disk images |
di.stats.blocked |
Total of blocked disk images in current tenant or all system for superadministrators. |
See statistics of number of disk images |
di.stats.summary |
Total of disk images in current tenant or all system for superadministrators. |
Block-Unblock disk images |
di.update.block |
Update the blocking state (blocked/unblocked) of disk images. |
Set disk images as default |
di.update.default |
Set as default a disk image in the OS flavour where it belongs. |
Update disk image’s description |
di.update.description |
Update the description of disk images. |
Update properties when update disk images |
di.update.properties |
Update properties in disk image’s update process. |
Update disk image’s tags |
di.update.tags |
Update the tags (create and delete) of disk images. |
3.7.7. Administrators' ACLs
| ACL | ACL code | Description |
|---|---|---|
Create administrators |
administrator.create. |
Create WAT Administrators. It includes name and password setting |
Set language on administrator creation |
administrator.create.language |
Setting of language in the creation process of administrators. |
Delete administrators |
administrator.delete-massive. |
Deletion of WAT administrators massively. |
Access to administrator’s details view |
administrator.see-details. |
Access to details view of WAT administrators. This view includes name |
Access to administrator’s main section |
administrator.see-main. |
Access to WAT Administrators section (without it, it won’t appear in menu). This list view includes name |
See administrator’s ACLs |
administrator.see.acl-list |
Effective ACL list for a WAT administrator calculated from the assigned roles |
Source roles of Administrator’s ACL |
administrator.see.acl-list-roles |
Which role is the origin of each effective acls in WAT administrator details view |
See disk administrator’s creator |
administrator.see.created-by |
Wat administrator who created an administrator |
See disk administrator’s creation date |
administrator.see.creation-date |
Datetime when an administrator was created |
See administrator’s description |
administrator.see.description |
The description of the WAT administrators. |
See administrator’s ID |
administrator.see.id |
The database identiefier of the WAT administrators. Useful to make calls from CLI. |
See administrator’s language |
administrator.see.language |
Language of the WAT administrators. |
See administrator’s Roles |
administrator.see.roles |
Assigned roles to the WAT administrator. |
Assign-Unassign administrator’s roles |
administrator.update.assign-role |
Assign roles to WAT administrators to give to them their ACLs. |
Update administrator’s description |
administrator.update.description |
Update the description of administrators. |
Update administrator’s language |
administrator.update.language |
Update the language of administrators. |
Change administrator’s password |
administrator.update.password |
Update WAT administrator password (it doesn’t include roles management) |
3.7.8. Roles' ACLs
| ACL | ACL code | Description |
|---|---|---|
Create roles |
role.create. |
Creation of roles including initial setting for name. |
Delete roles |
role.delete. |
Deletion of roles. |
Access to role’s details view |
role.see-details. |
Access to details view of Roles. This view includes name |
Access to role’s main section |
role.see-main. |
Access to the roles view. The minimum data on it is name |
See role’s acls |
role.see.acl-list |
Effective ACL list for a role calculated from the inherited roles |
See role’s acls' origin roles |
role.see.acl-list-roles |
Which role is the origin of each effective acls in role details view |
See role’s creator |
role.see.created-by |
Wat administrator who created a role |
See role’s creation date |
role.see.creation-date |
Datetime when a role was created |
See role’s description |
role.see.description |
The description of a role. |
See role’s ID |
role.see.id |
The database identiefier of the roles. Useful to make calls from CLI. |
See role’s inherited roles |
role.see.inherited-roles |
Inherited roles of a role. |
Assign-Unassign role’s ACLs |
role.update.assign-acl |
Add/Remove acl on role. |
Assign-Unassign role’s inherited roles |
role.update.assign-role |
Manage the inheritance of roles adding roles in others. |
Update role’s description |
role.update.description |
Update the description of roles. |
Update role’s name |
role.update.name |
Update the name of roles. |
3.7.9. Custom properties' ACLs
| ACL | ACL code | Description |
|---|---|---|
Access to properties’s main section |
property.see-main. |
Access to custom properties managment section |
Manage user’s custom properties |
property.manage.user |
Create, update and delete custom properties of users. |
Manage virtual machines’s custom properties |
property.manage.vm |
Create, update and delete custom properties of virtual machines. |
Manage node’s custom properties |
property.manage.host |
Create, update and delete custom properties of nodes. |
Manage OSF’s custom properties |
property.manage.osf |
Create, update and delete custom properties of OS Flavours. |
Manage disk image’s custom properties |
property.manage.di |
Create, update and delete custom properties of disk images. |
3.7.10. Views' ACLs
| ACL | ACL code | Description |
|---|---|---|
Access to default view’s main section |
views.see-main. |
Access to WAT Customize section (without it, it won’t appear in menu). |
Set default columns on list views |
views.update.columns |
Set what columns will be shown in list views by default by tenant |
Set default filters on list views for desktop |
views.update.filters-desktop |
Set what filters will be shown in list views by default for desktop version by tenant |
Set default filters on list views for mobile |
views.update.filters-mobile |
Set what filters will be shown in list views by default for mobile version by tenant |
3.7.11. Configuration ACLs
| ACL | ACL code | Description |
|---|---|---|
QVD’s configuration management |
config.qvd. |
Manage QVD configuration (add/update tokens). |
WAT’s configuration management |
config.wat. |
Manage WAT configuration (language…). |
3.7.12. Templates reference
Predefined template list in the system. The templates are sets of ACLs, but as well as it happens with the Roles, they use inheritance among them.
The predefined templates in the system are found in this guideline, including diagrams which contain the connection among them.
3.7.13. Original templates
Only ACLs are asigned.
- Notation
-
- List
-
-
Administrators
-
Administrators Creator
-
Administrators Eraser
-
Administrators Operator
-
Administrators Reader
-
Administrators Updater
-
-
Configuration
-
QVD Config Manager
-
WAT Config Manager
-
-
Images
-
Images Creator
-
Images Eraser
-
Images Operator
-
Images Reader
-
Images Updater
-
-
-
Nodes
-
Nodes Creator
-
Nodes Eraser
-
Nodes Operator
-
Nodes Reader
-
Nodes Updater
-
-
OSFs
-
OSFs Creator
-
OSFs Eraser
-
OSFs Operator
-
OSFs Reader
-
OSFs Updater
-
-
Roles
-
Roles Creator
-
Roles Eraser
-
Roles Operator
-
Roles Reader
-
Roles Updater
-
-
Users
-
Users Creator
-
Users Eraser
-
Users Operator
-
Users Reader
-
Users Updater
-
Users Operator
-
-
Views
-
Views Operator
-
Views Reader
-
-
VMs
-
VMs Creator
-
VMs Eraser
-
VMs Operator
-
VMs Reader
-
VMs Updater
-
3.7.14. Action templates
They inherit original Templates and comprise the ACLs sorted out by the type of action of every QVD element. For example "QVD Lector" gathers the permissions for reading about the Users, virtual Machines, OSFs and disc Images. *
- Notation
-
- List
-
-
QVD Creator
- Inherits from
-
Users Creator
-
VMs Creator
-
OSFs Creator
-
Images Creator
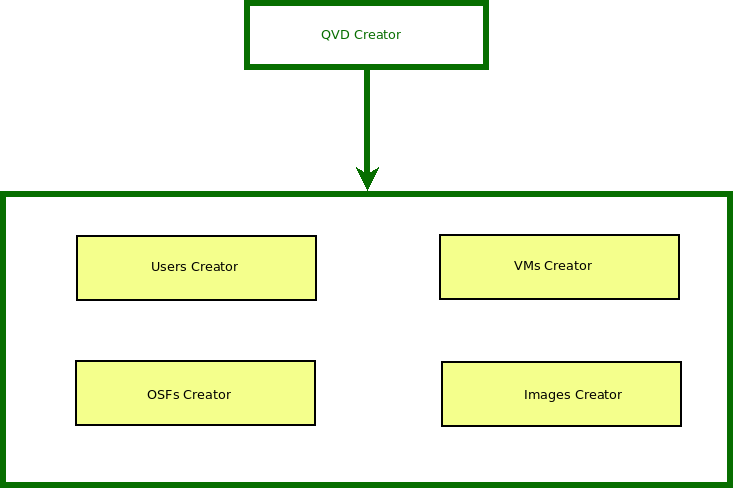
-
QVD Updater
- Inherits from
-
Users Updater
-
VMs Updater
-
OSFs Updater
-
Images Updater
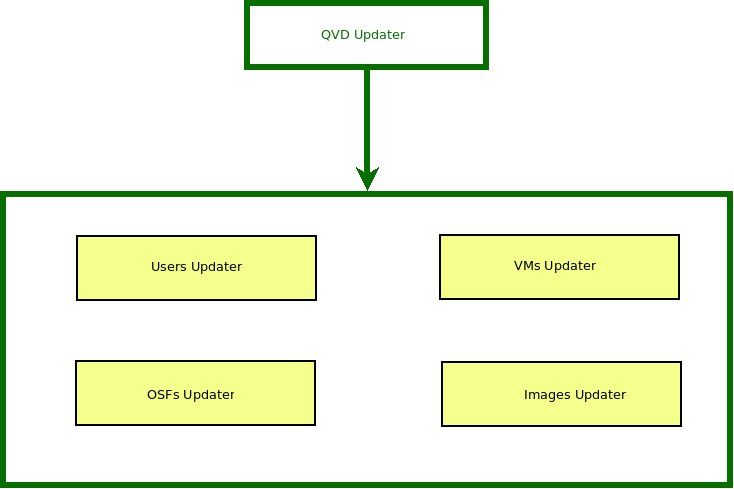
-
QVD Reader
- Inherits from
-
Users Reader
-
VMs Reader
-
OSFs Reader
-
Images Reader
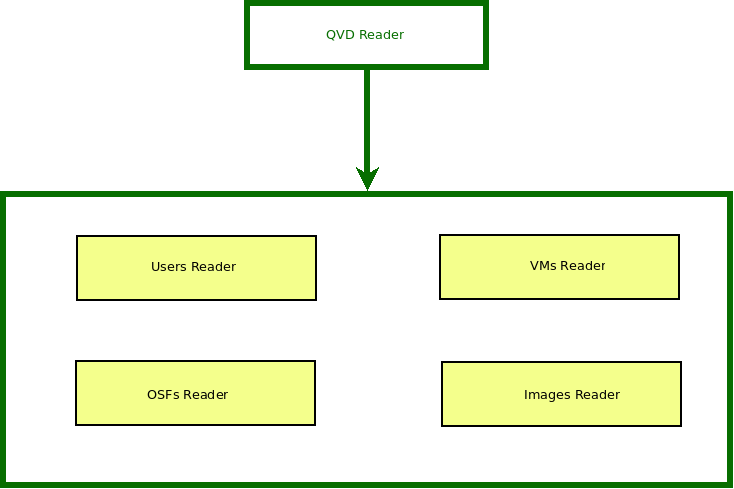
-
Operador de QVD
- Inherits from
-
Users Operator
-
VMs Operator
-
OSFs Operator
-
Images Operator
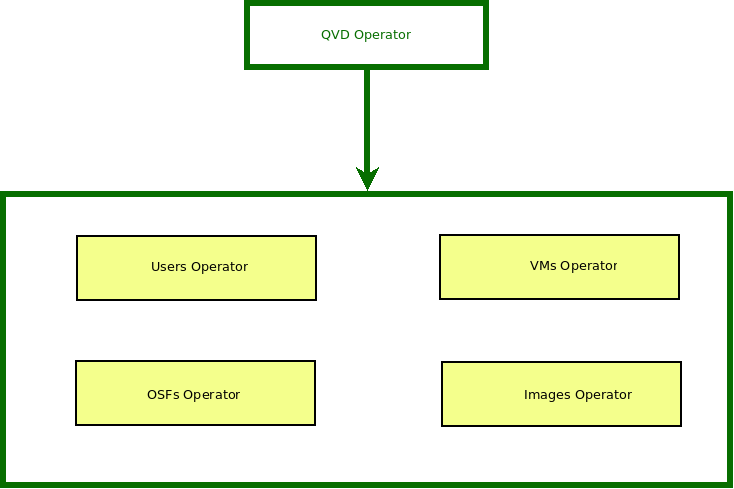
-
QVD Eraser
- Inherits from
-
Users Eraser
-
VMs Eraser
-
OSFs Eraser
-
Images Eraser
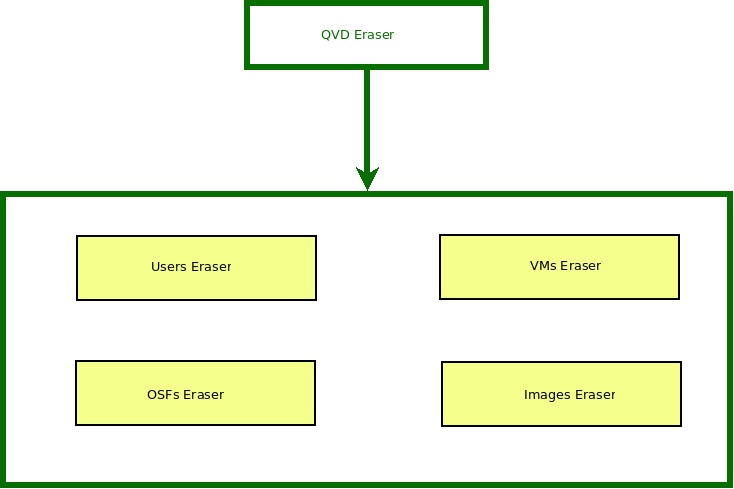
-
3.7.15. Management Templates
They inherit original Templates and gather the ACLs which are sorted out by the affected element, enabling every type of possible action on it. For examples, "Gestor de Usuarios" gathers the permissions to read, operate, update, create and eliminate on QVD Users.
- Notation
-

- List
-
-
Users Manager
- Inherits from
-
Users Reader
-
Users Creator
-
Users Updater
-
Users Operator
-
Users Eraser

-
VMs Manager
- Inherits from
-
VMs Reader
-
VMs Creator
-
VMs Updater
-
VMs Operator
-
VMs Eraser

-
OSFs Manager
- Inherits from
-
OSFs Reader
-
OSFs Creator
-
OSFs Updater
-
OSFs Operator
-
OSFs Eraser
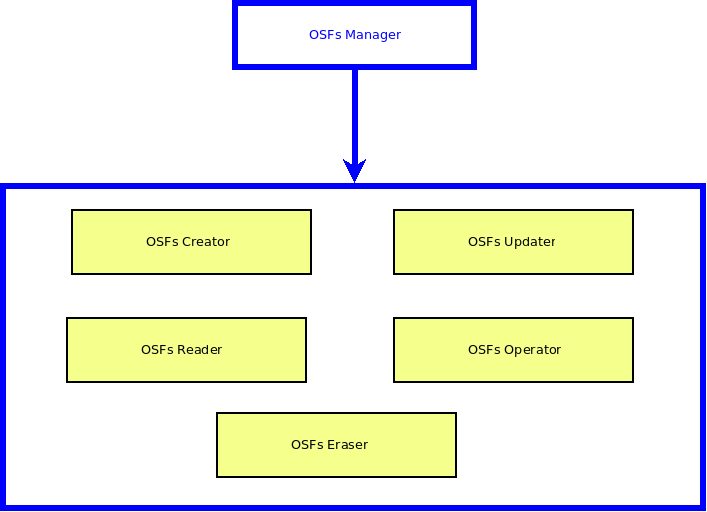
-
Images Manager
- Inherits from
-
Images Reader
-
Images Creator
-
Images Updater
-
Images Operator
-
Images Eraser
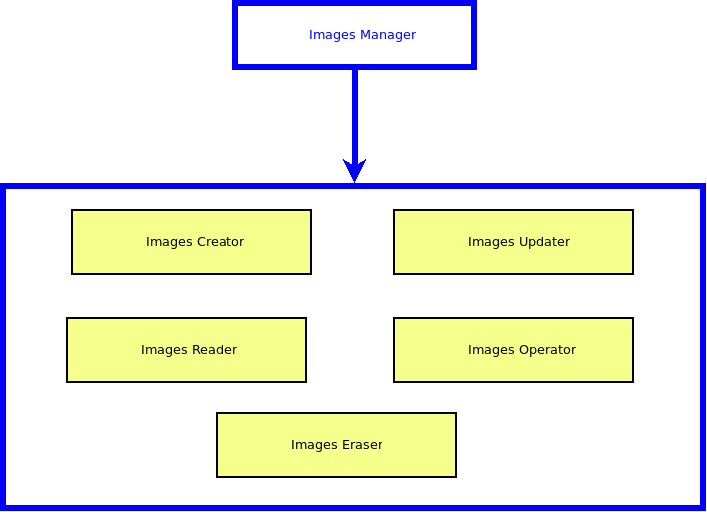
-
Administrators Manager
- Inherits from
-
Administrators Reader
-
Administrators Creator
-
Administrators Updater
-
Administrators Operator
-
Administrators Eraser
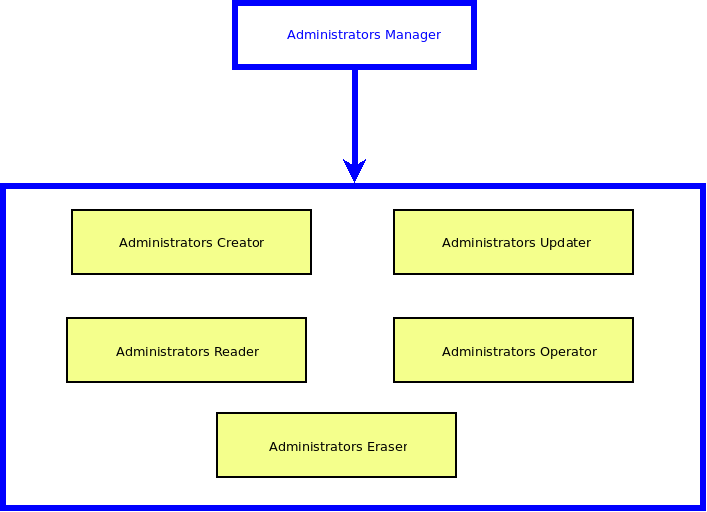
-
Roles Manager
- Inherits from
-
Roles Reader
-
Roles Creator
-
Roles Updater
-
Roles Operator
-
Roles Eraser

-
Views Manager
- Inherits from
-
Views Reader
-
Views Operator
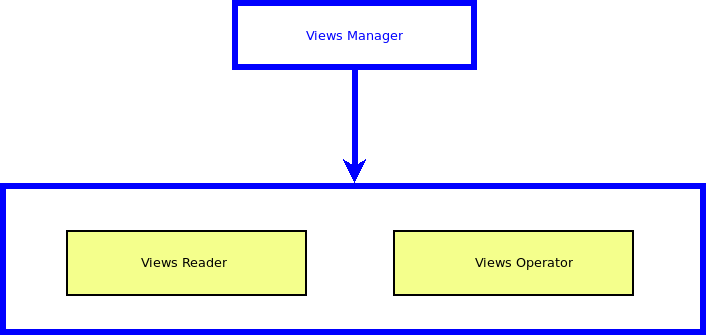
-
Nodes Manager
- Inherits from
-
Nodes Reader
-
Nodes Creator
-
Nodes Updater
-
Nodes Operator
-
Nodes Eraser
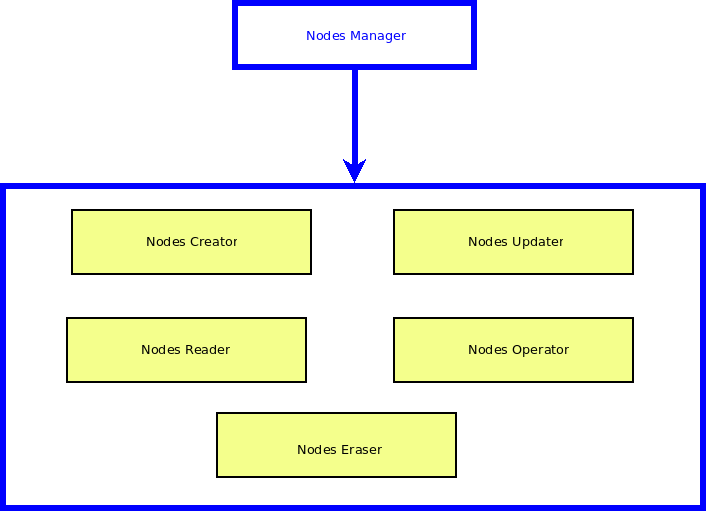
-
3.7.16. Global Management Templates (QVD/WAT)
They inherit from the Management Templates to create a template with the management ACLs of all QVD or all WAT.*
- Notation
-

- List
-
-
WAT Manager
- Inherits from
-
Views Manager
-
Roles Manager
-
Administrator Manager
-
WAT Config Manager
- Diagram
-
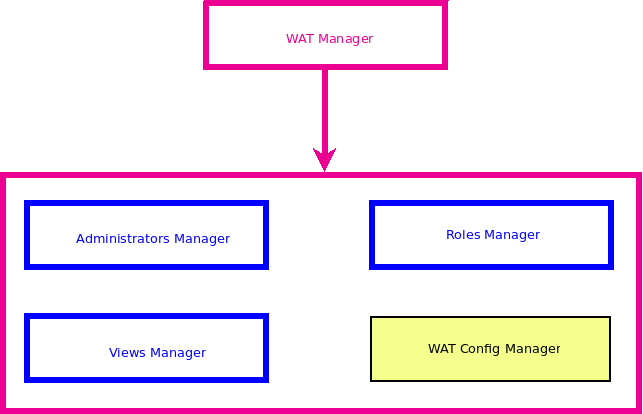
-
QVD Manager
- Inherits from
-
Users Manager
-
VMs Manager
-
OSFs Manager
-
Images Manager
-
QVD Config Manager
- Diagram
-
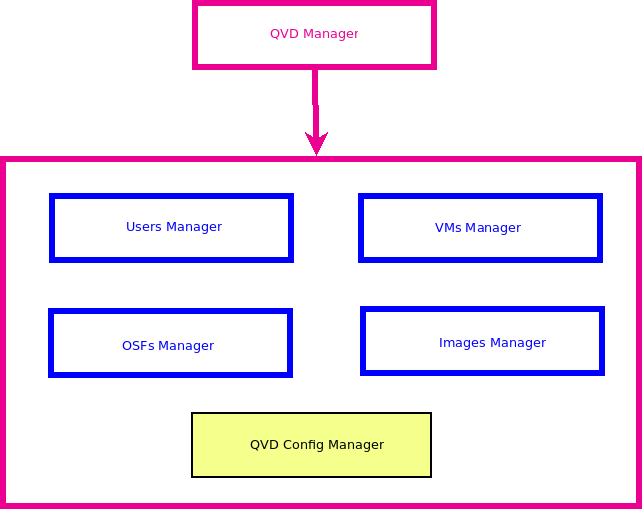
-
3.7.17. Master Template
They inherit from Global Management Templates creating a template with every ACLs. Two templates are found in this typology:
-
Master
Inherits from the QVD and WAT global management templates obtaining every possible ACLs except the ones from the Nodes.
- Notation
-

- Diagram
-
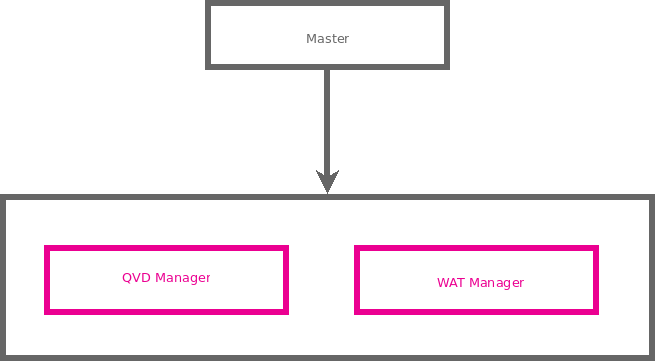
-
Total master
Inherits from the Master template as well as from the Nodes Management Template.*
- Notation
-

- Diagram
-
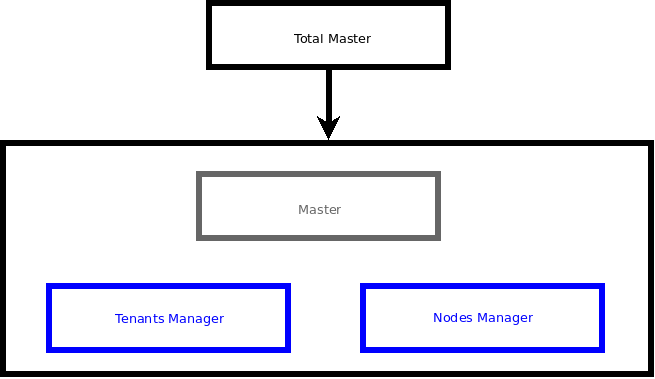
* Nodes stay out of the QVD classification in the templates because they are physical architectonic important elements. They will have their own ACLs templates.
3.7.18. Template’s Hierarchy
In just a quick look, one can see the complete template’s hierarchy in the following diagram.
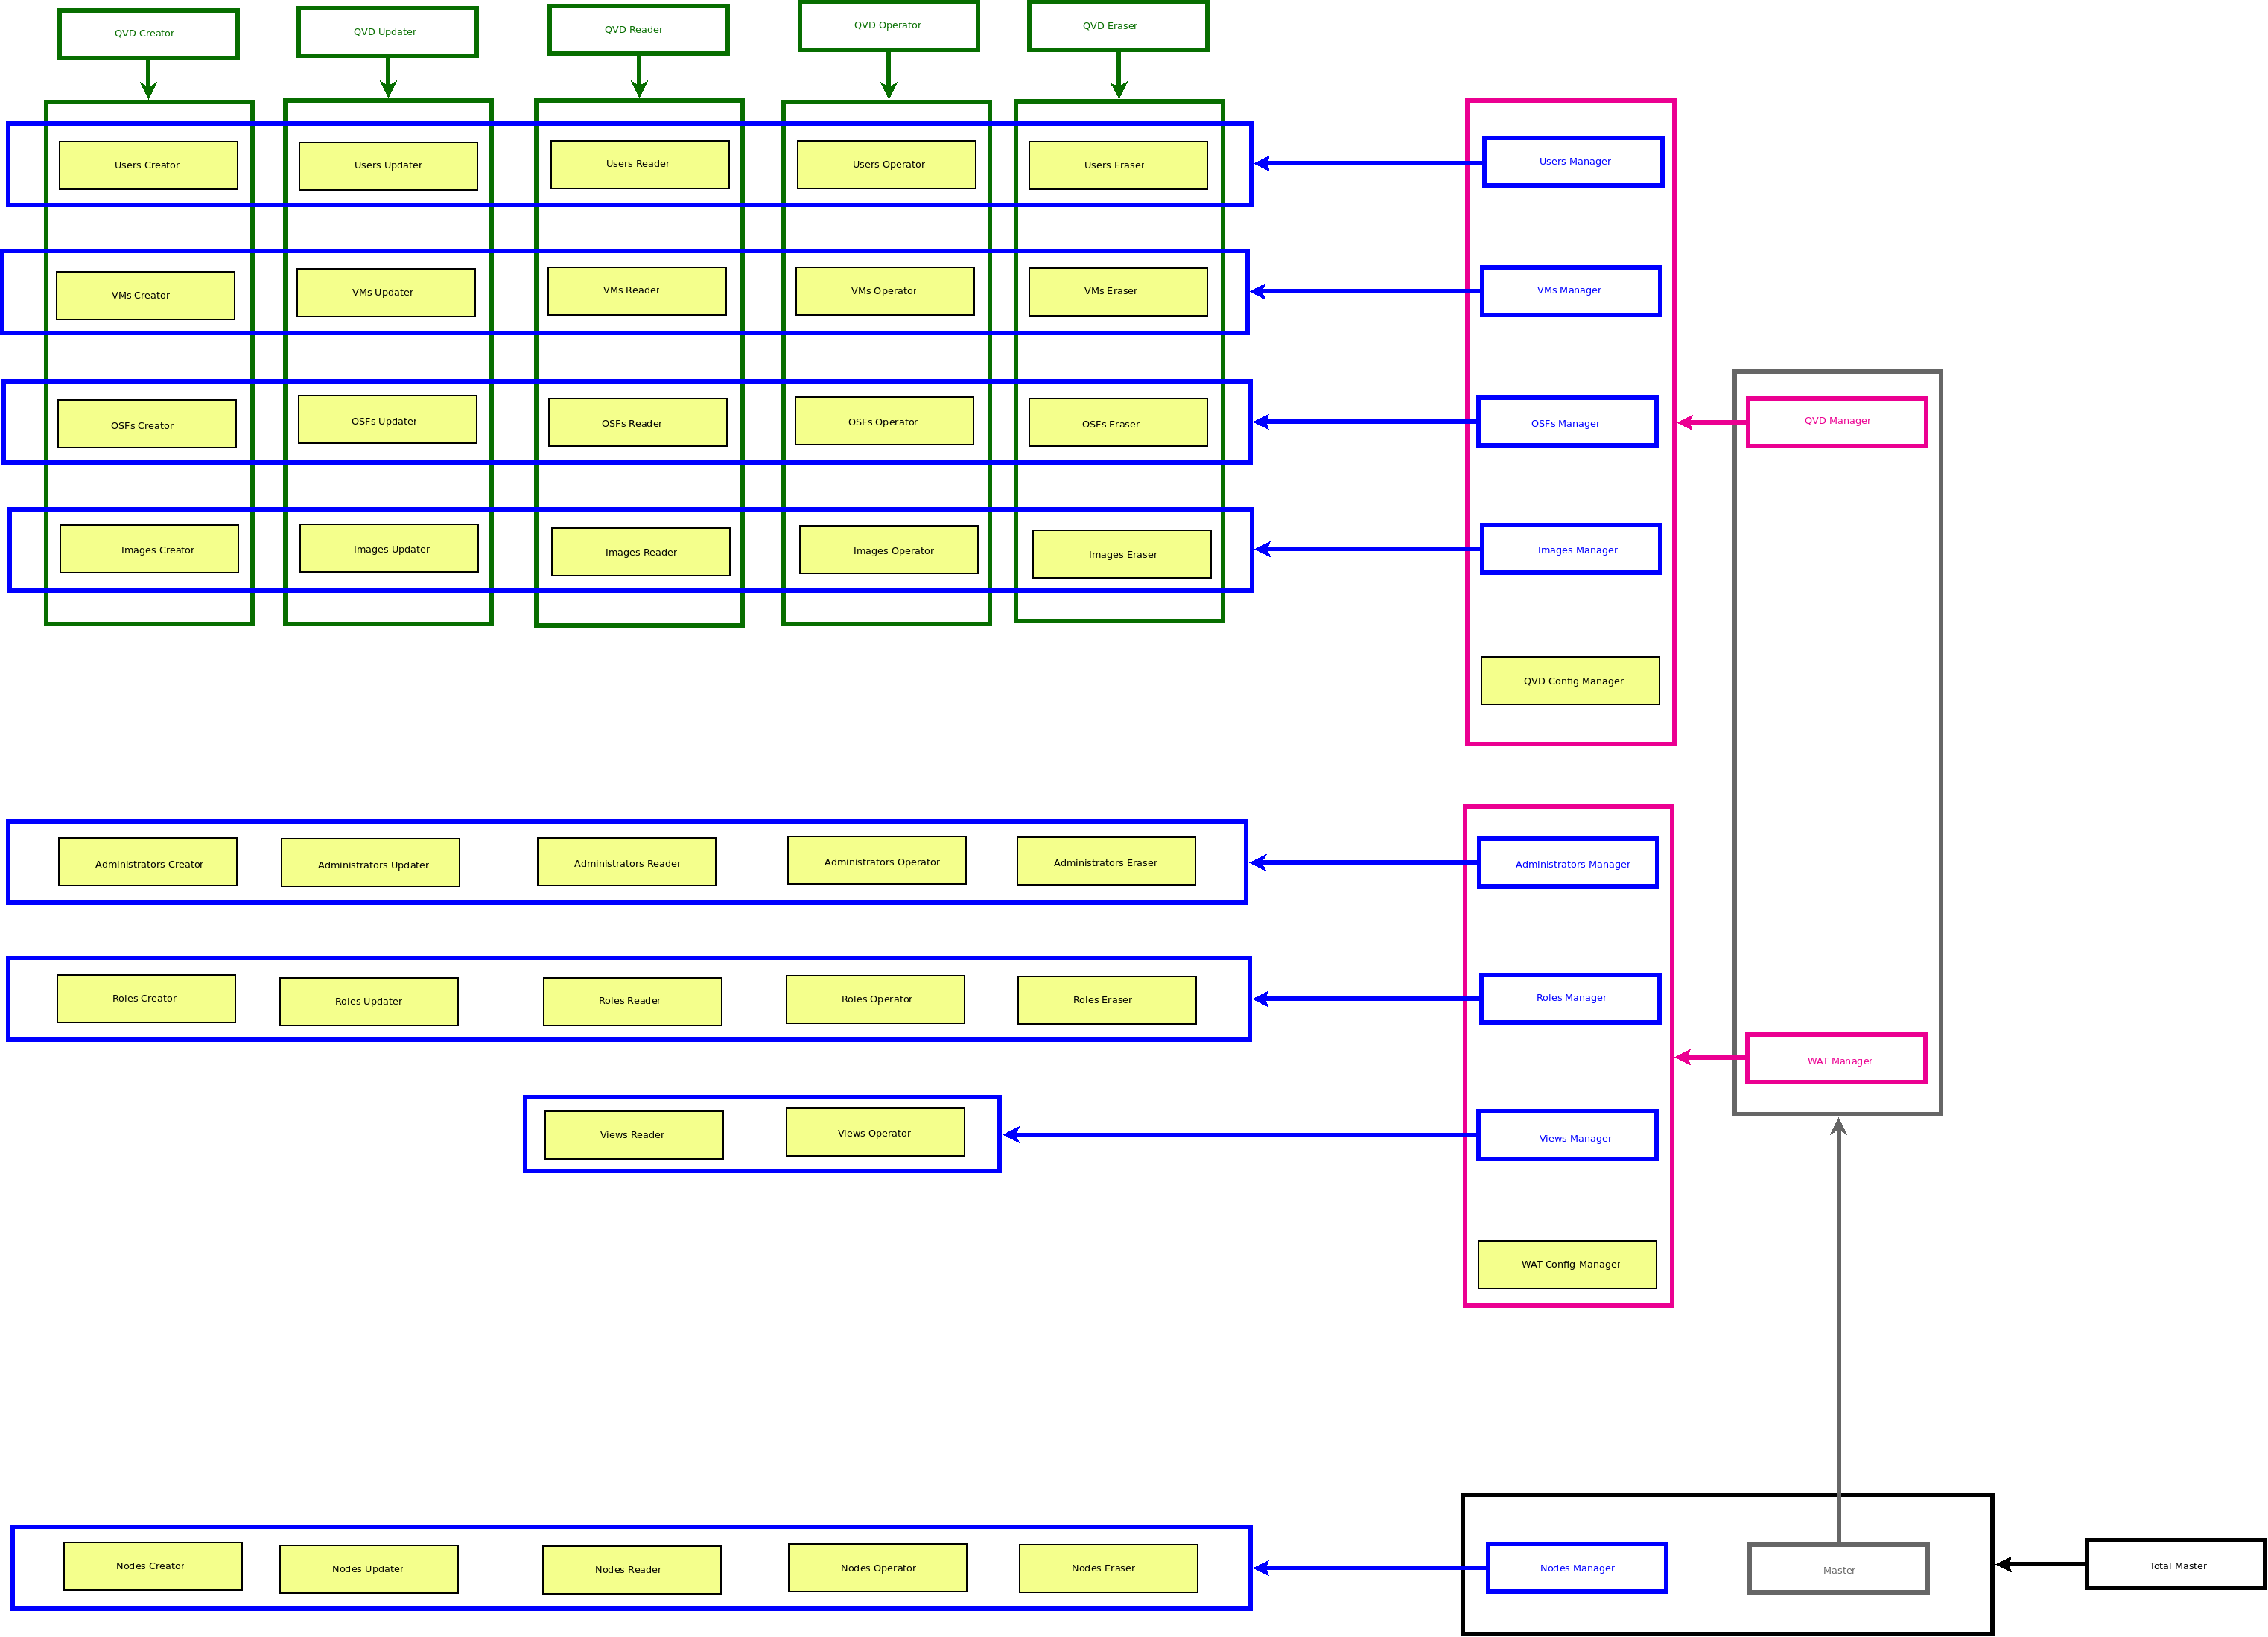
3.7.19. Roles reference
This is a reference to the default WAT Roles given in a clean QVD system.
These roles inherit most of the ACLS from templates.
In order to avoid an undesired and faulty functioning, the default roles are blocked and therefore can not be edited nor eliminated.
- List of default roles
-
-
Operator L1
This role guarantees the sufficient permissions to see the QVD elements although it is not possible to create, edit, eliminate or undertake any other operation on them. It is a read-only role aimed at detecting problems.
- Inherits from
-
Lector QVD
-
Operator L2
This role gives the Operator 1’s permissions (in fact, it inherits that role) and in addition it gives permissions to undertake certain operational actions such as start/stop virtual machines, disconnect other users or block elements.
- Inherits from
-
Operator L1
-
Operador QVD
-
Operator L3
This role gives full permissions for QVD elements. Creation, Update, Operation and Elimination. It provides access to Nodes too.
- Inherits from
-
Operator L2
-
Gestor de QVD
-
Gestor de Nodos
-
Root
This role gives total power over all the QVD elements and also over the WAT Administrators, roles, etc.
- Inherits from
-
*Master Total
-
3.8. Customized properties
The QVD elements have attributes like for example the name, its block state, its associated IP address (in the case of virtual machines or nodes) or the reference to other QVD objects to which they are associated with. For example the disk images have an OSF assigned or the virtual machines are always linked to a user.
Each of these attributes describe how the QVD objects are, they allow us to see distinguish them from the rest, they give us information about what dependencies they have and show us about their behaviour. This information is fixed, although their visibility through the ACLs can be configured, being possible to create administrator roles that only allow to see them partly.
Due to the varied needs that can be required in different QVD environments, there is a way to customize the information that is stored in each QVD object. This customization is possible thanks to the customized properties, that are special attributes of the QVD objects created by administrators to cope with their needs.
These properties will be extra attributes that could be configured as an extra column and enable them as a filter on the list view.
|
|
We can create a property in the users called Company, to store the company to which the different users belong to and later filter the list by this data. Other interesting use of these properties is to use them through external scripts through the CLI to perform bulk actions on the subset of filtered elements depending on our needs. |
These special attributes may be restricted through ACLs but as bulk. It means, we can permit or deny the display of all the free properties for each type of QVD object (Users, Virtual Machines, OSFs…), but we can not allow some properties and not others.
|
|
The elements with customized properties are: Users, Virtual Machines, Nodes, OSFs and Disk images. |
- Customized properties Management
-
To create, edit or delete customized properties we will go the the section “WAT Management”, described in the guide “Step by Step”
In this section we could manage the properties of each QVD element. Being able to easily assign the same property to one or more than one of them, rename it or add it a description that will appear along with it in the interface to guide the user.
3.9. Bulk actions
In some list views exist the possibility to perform bulk actions. When this happens we will notice that the first column of the list table is a checkbox column.
3.9.1. Elements selection
With the checkbox column we could check the elements to which we want to apply the same action. This check can be done one at a time or in a multiple way.
- One at a time selection
-
We can check the elements one at a time checking the checkboxes in the first column.
When there is more than one page of elements, we can navigate through all of them withouth losing the checked elements. This makes possible to select elements from different pages at the same time.
- Multiple selection
-
The Checkbox column has a special box at the heading of the table. With this box we could use a multiple selection. When checking this box, all the elements in the list will be checked automatically.
Two situations can happen:
-
There are no elements out of the list:
The number of elements in the list is higher or equal to the paging block, and therefore there is only one page and all the elements are being shown.
In this case, when the multiple selection box is checked all the elements will be checked immediately.
-
There are elements out of the list:
The number of elements on the list is higher than the paging block, and therefore a page of X total pages is displayed.
In this case, if we check the multiple selection box a dialogue will appear warning us that there are elements in different pages and giving us two options:
-
Checking only the elements we can see
-
Check every element on the list, including the ones in other pages.
-
-
|
|
On the left part, right under the list table we could see at any moment the number of elements that are checked. |
3.9.2. Bulk actions selector
If available, under the table of the list, there will be a bulk actions selection control. It will be enough to check the whished action and click on the Apply button to carry them out on the checked elements.
3.9.3. Types of bulk actions
The bulk actions can be of different nature:
-
Edition:
With the edition action we can edit the common attributes of the checked elements
-
Deletion:
With the deletion action we can delete elements in bulk.
-
Execution:
In this category the non-edition, non-deletion actions are encompassed. Start/Stop virtual machines, disconnecting users, block/unblock elements…
3.9.4. Bulk actions restriction
Through the ACLs control, we can allow or not perform the different bulk actions independently from the normal actions. This means, for example, the delete action of a virtual machine and the virtual machines deletion through bulk actions is regulated by different ACLs.
3.10. Tool for style customization
With this tool we could customize the WAT style, including logos and colours.
|
|
To make the changes done with this tool permanent, it will be necessary to have access to the server where the WAT is uploaded. |
The tool will be available for those administrators with WAT configuration permissions along with the ability to edit other parameters like the language or the paging block size.
This tool is not a section, but a feature present in every WAT section.
When the style customization tool is on, a tab will appear on the left part of the screen showing the text “Customizer”.
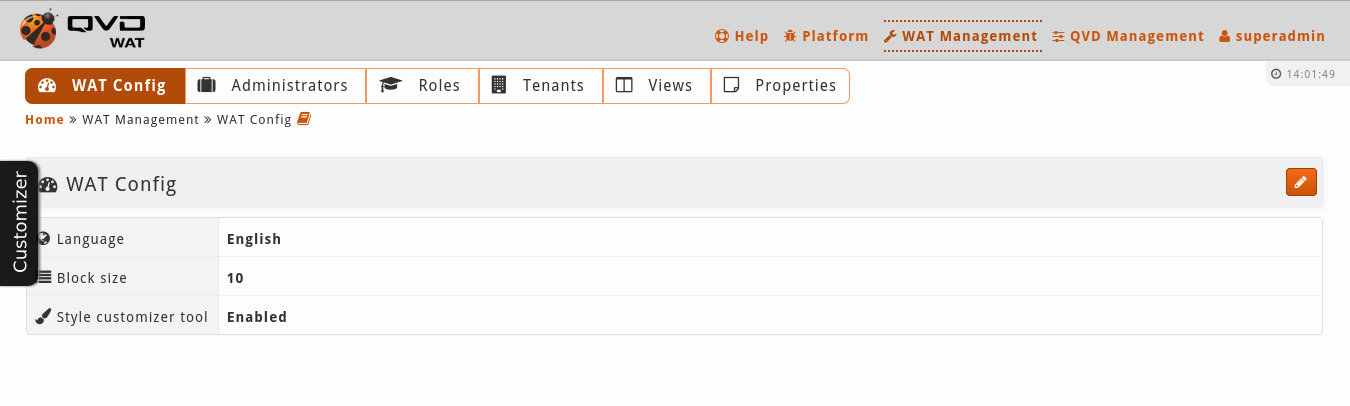
If we click on the tab a menu with a category selector will appear.
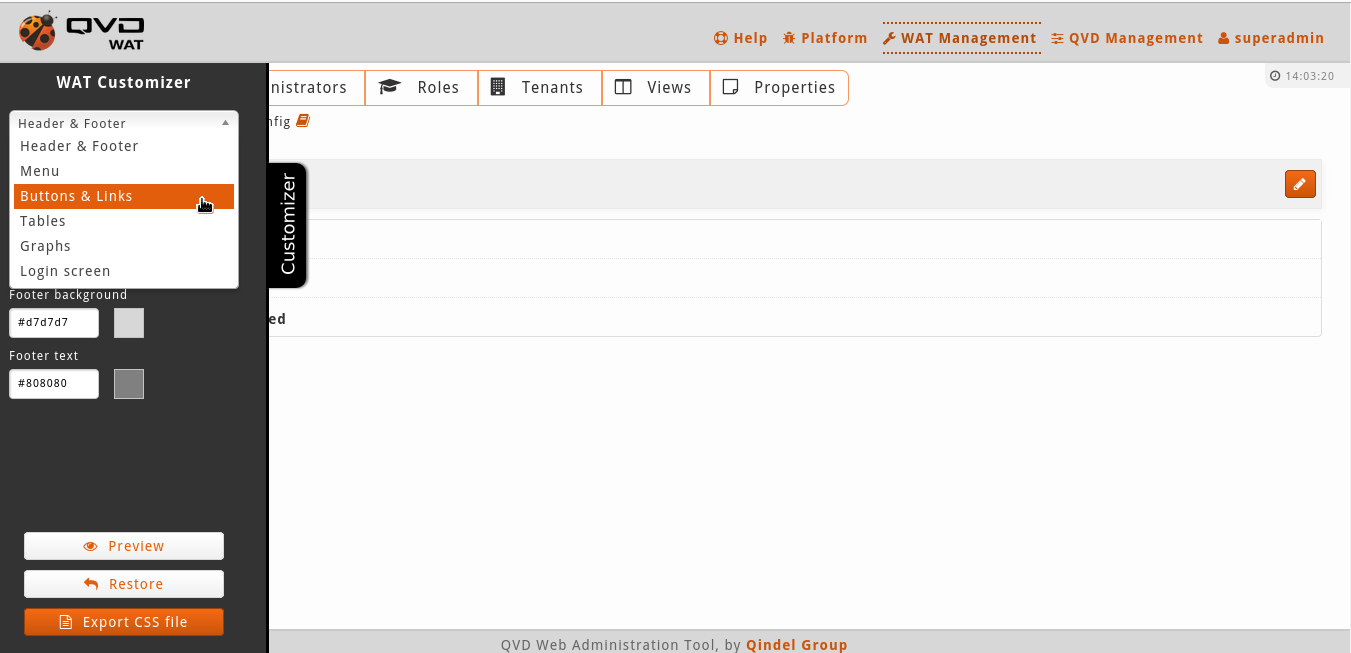
Each category will have certain configurable parameters, most of them colours.
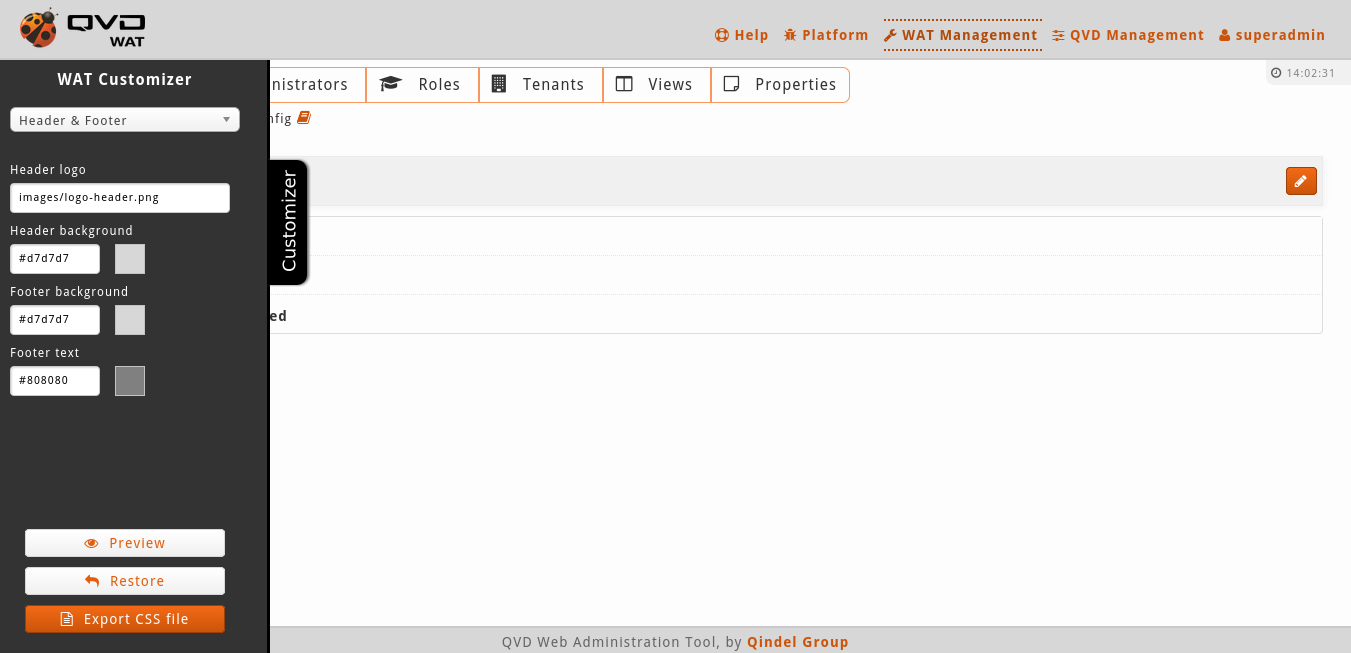
Styles customizing parameters divided by categories:
-
Heading and footer
-
Heading Logo (125px x 55px)
-
Background colour of the heading
-
Background colour of the footer
-
Text colour of the footer
-
-
Menu
-
Main menu background colour
-
Main menu text colour
-
Main menu border colour
-
Main menu background colour (moving the mouse over it)
-
Main menu text colour (moving the mouse over it)
-
Main menu background colour (selected)
-
Main menu text colour (selected)
-
Heading menu text colour
-
Heading menu text colour (selected)
-
Heading submenu background colour
-
Heading submenu text colour
-
Heading submenu border colour
-
Heading submenu background colour (moving the mouse over it)
-
Heading submenu text colour (moving the mouse over it)
-
-
Buttons and links
-
Button1 Background colour
-
Button1 Text colour
-
Button2 Background colour
-
Button2 Text colour
-
Text links
-
-
Tables
-
Tables heading background colour
-
Tables heading text colour
-
Tables heading background colour (organised column)
-
Tables heading text colour (organised column)
-
-
Graphics
-
Graphics Colour A
-
Graphics Colour B
-
-
Login Screen
-
Login Logo (150px x 227px)
-
Login Box background colour
-
Login Box text colour
-
The colour changes will be made with a palette that will be shown if we click on the box with the colour we want to use.
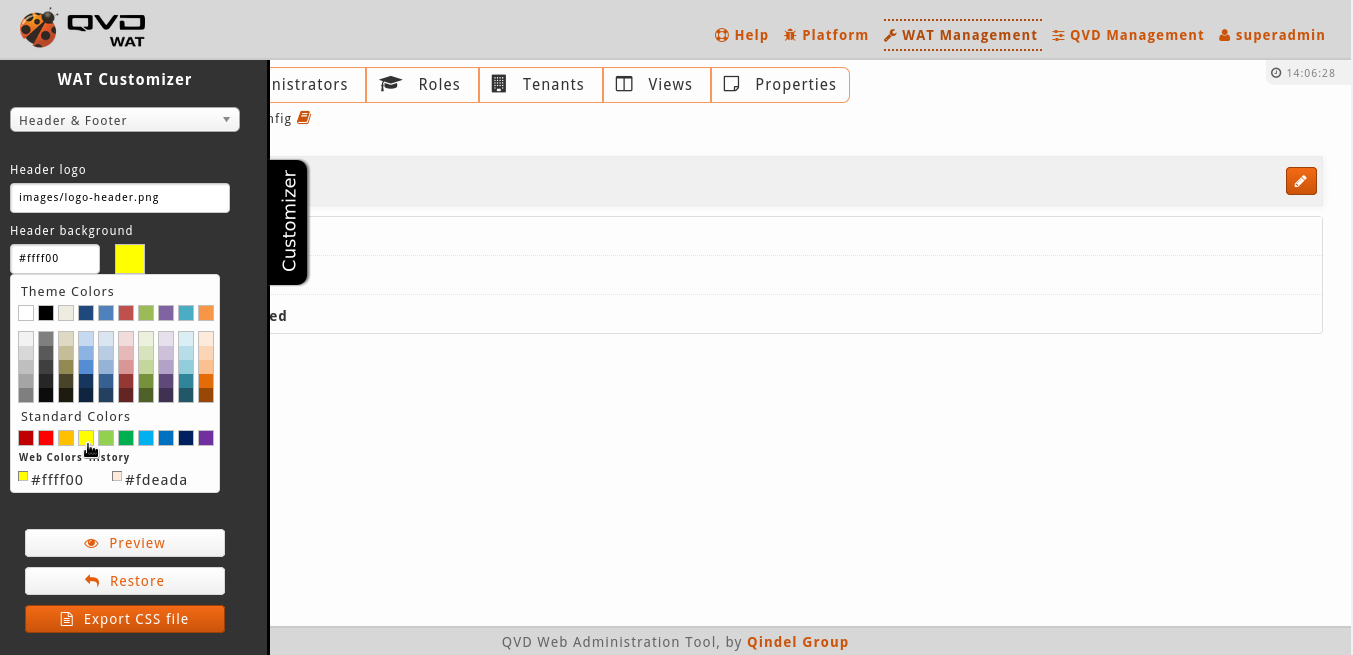
Although we can also set an RGB code in the text box of the parameter. For example.: #ff0494
3.10.1. Preview
If we click on the preview button the system will calculate the changes and generate a preview showing the new styles.
|
|
These changes will be temporary and only visible in the browser where the preview is performed. |
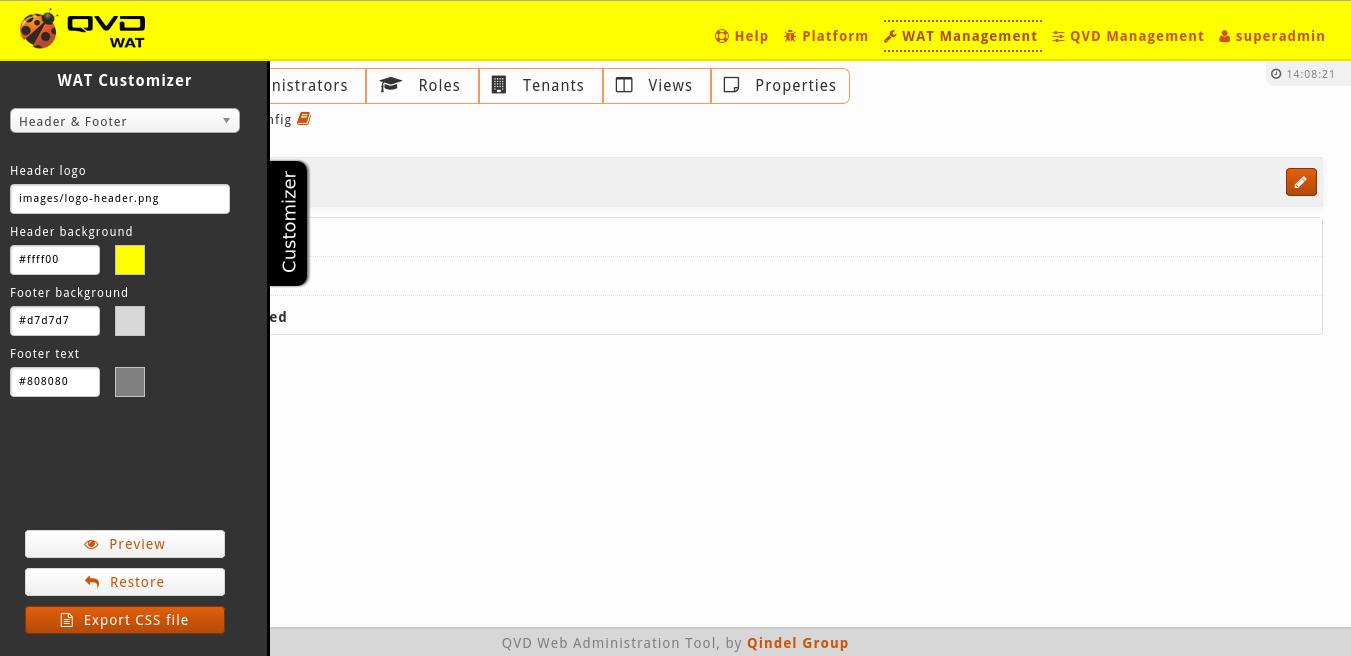
|
|
Choosing yellow as background colour is a dramatisation. Do not try at home. |
3.10.2. Restoring
With the restore button we will go to the initial configuration of the WAT styles. We can also go back to the initial configuration refreshing the screen.
3.10.3. Exporting CSS file
With this button we can download the custom_style.css style sheet with the current changes. We must access the server where the WAT is hosted and overwrite the file /styles/custom_style.css. This style sheet will overwrite the default one.
3.10.4. Change logos
From the customization tool we can only change the logos file name, but not the file itself. So, to make it visible in preview and to make it permanent, the new logos must be uploaded to /images/ in the server.
3.10.5. Changes example
Let’s imagine we want to change the WAT style to bluish colours more in the line with our organisation. Changing the initial colours to different tones of blue would display a result like the following:
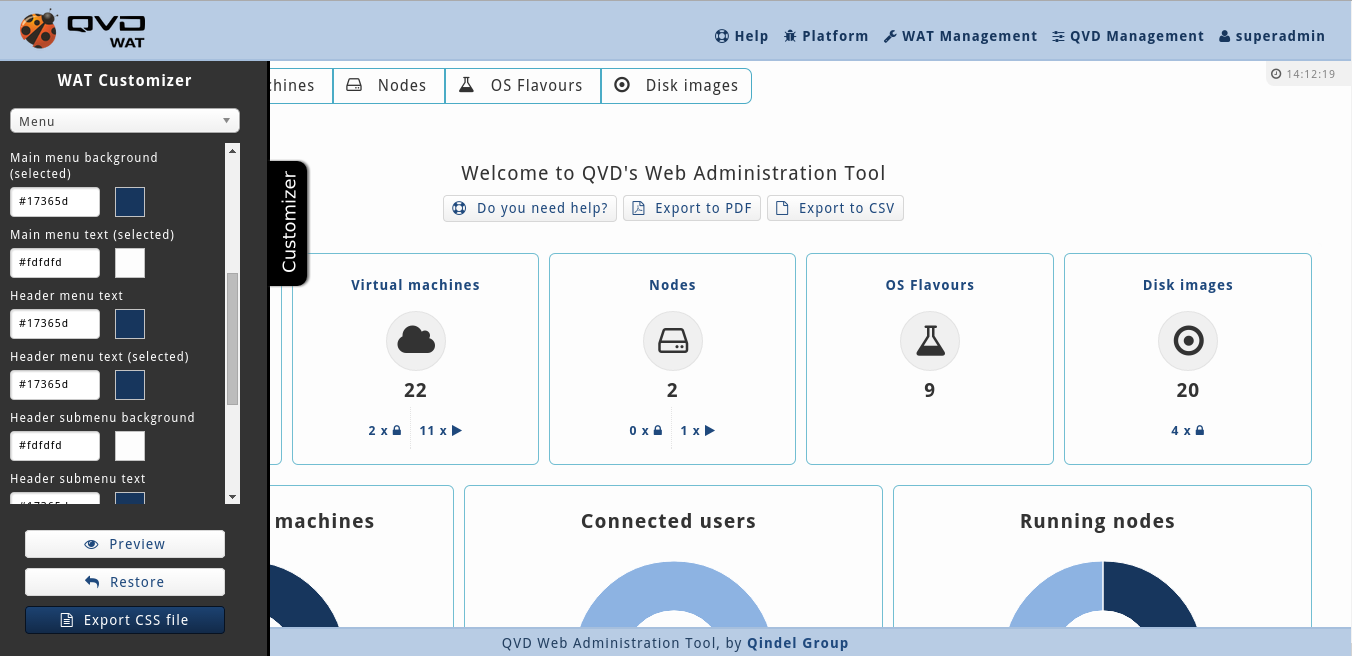
|
|
Qindel Group is not responsible for aesthetic disasters caused by daltonic administrators using this tool or by administrators suffering of any other visual dysfunction. |
3.11. Session spy
From the WAT, it is possible to spy on a user who is logged in and connected to a virtual machine. Thanks to the protocol of sharing desktops VNC, you can access in real time to the desktop where the user is connected, and even take control of it.
If the administrator of QVD has enough permissions, when the virtual machine is started, the option Spy will appear both in the detail view and in the massive options in the list view (in this case the option will only appear if an only element is selected).
When clicking on Spy, a new tab in the browser will open where the desktop with the current session will be loaded.
If the user is doing things, we will see in real time what he sees including his cursor.
- Settings
-
On the left side there is a settings tab that displays a lateral menu with a chart with information about the virtual machine and the user followed by the configuration options:
-
Resolution: it can be configured so the resolution of the desktop QVD in the browser is adapted to the size of the window or appears in the original resolution of the client. In the second case, if the resolution is higher than the window of the browser, scroll bars will appear.
-
Mode: Only see mode is established by default with which we could not interact with the remote desktop. With the interactive mode we could take control of the cursor only by passing over it apart from being able to write with our keyboard.
-
Log: To be able to detect dysfunctions in the VNC connection they can be shown with different levels of verbosity, the registers of the log in the connection. The log remains hidden by default, but everything can be shown (Debug level), only through the registers that have some relevance (Info), the ones that are considered important (Warning) or only the mistakes (Mistake).
-
Adapted resolution and log shown
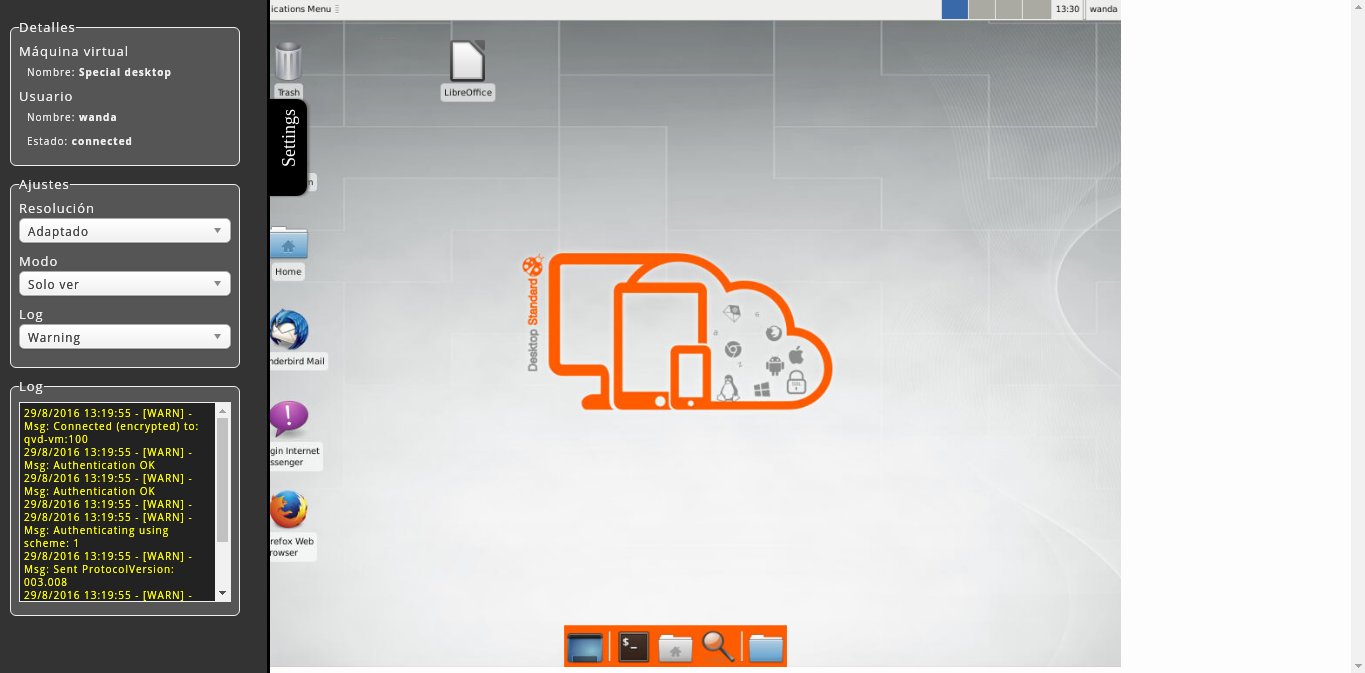
Original resolution and log hidden
4. Multitenant guide
This guide is a supplement to the user’s guide where the distinguishing WAT operation features will be revised in a special way: the multitenant mode, regarding the normal mode, or the also called monotenant mode.
With the multitenat guide, everything which someone may need to use this advanced mode is described both conceptually and operationally, considering the user’s guide as a basis. Both guides are not independent.
4.1. Operation modes per scope
WAT has two operating modes:
-
Monotenant: All the system administrators coexist in the same scope or tenant. This operating mode would be the same as the way WAT worked in previous versions before QVD 4.
A system is monotenant by default. It comes with a administrator user already created which provides total access and, with it, we will be able to create QVD elements and other system administrators with more or less limited permits to manage different parts in WAT .
These permits will mention the elements to see or manage (users, virtual machines, etc.) but it will not be possible to provide access to a subset of them.
For instance, if we give a system administrator read-only permits for disk images, he will be able to see all the system images, we cannot limit him to a subset of them.
This kind of disintegration will be carried out in multitenant mode.
-
Multitenant: There can be different scopes or tenants. Within them, it will be possible to create QVD independent elements from one another and system administrators to manage them. In this case every tenant will behave as a monotenant WAT installation, it may issue permits to the system administrators so that they can manage elements with more or less control.
For example, a system administrator may be assigned read-only permits for disk images, with which he will be able to see what is in his tenant, and a more advanced management level in virtual machines, with which apart from viewing, he can create and update the virtual machines he has access to (the ones from his tenant).
Tenant system administrators will be isolated in their tenant, without any knowledge of the existence of other tenants. They will only see the QVD elements which are in their tenant. The system administrator will not be aware if he is working in a monotenant WAT or in a tenant within a multitenant WAT.
In a multitenant WAT, there will be a higher tenant which we will name Supertenant or Tenant * and it will include all the rest. System administrators for this Supertenant are thought to deal with setting up and supervising tasks since they can manage QVD elements from any tenant being aware of the distribution, being able to filter elements by tenant, or choosing in which tenant to create a specific element.
When a Supertenant administrator creates elements, he can choose the tenant to do it. In the same way, he will have to take into account that he cannot link elements from different tenants within themselves. Thus, for example, if he wishes to create a virtual machine in Tenant A, there should be at least a OSF, a disk image linked to that OSF and a user in Tenant A. 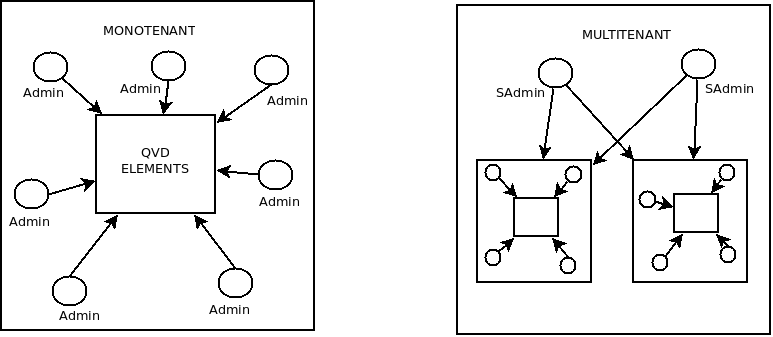
4.2. Mode change (monotenant ←→ multitenant)
- Reversible changes
-
WAT mode changes are reversible. It is possible to change from one mode to another as many times as someone wants to although, in order to preserve data coherence, it is recommended to make only the strictly necessary changes.
- How to change a mode
-
To change the mode between monotenant and multitenant, we have to go to the QDV Management section in the general menu. In that section, in the QVD set up part, we will either go to WAT or look for the multitenant browser.
There, we will find the wat.multitenant token. This token accepts two values: 0 for the monotenant mode and 1 for the multitenant mode. We can change it to the wanted value and implement the change. From this moment, our system will have change its operating system.
- Changes according to the type of system administrator
-
Depending on the change we make and the kind of system administrator we make it with, we can find ourselves in different situations:
-
Change from monotenant to multitenant: in this case, as we come from a monotenant system, the change will only be possible with a tenant administrator who has QVD set-up permits.
As we are all the time inside the tenant where the administrator who makes the change is, there will not seem to be immediate consequences after its implimentation. We have to log out and authenticate with a super administrator to access the supertenant and thus check that the WAT is working in multitenant mode. If it is the first time this mode is on, there will be a super administrator created by default. Everything is detailed in the Multitenant Set-up section in the manual.
-
Change from multitenant to monotenant: This change can be made in two types of system administrators: a tenant administrator or a super administrator. Both will need QVD set-up permits to do so.
-
When someone goes from multitenant to monotenant, super administrators who are in the system, will stay on. They will not be deleted in case we want to return to the multitenant mode at some point.
In this way we will have different performances depending on the type of system administrator we make the change with:
-
Tenant administrator: We will not notice apparent changes. What will happen is that if we log out and we try to authenticate with the super administrator, the system will not allow it.
-
Super-administrator: Due to the fact that when we change to monotenant mode super administrators change to inactive, if we make a change with the super administrator when it is given effect, it will log out automatically.
Changing multitenant to monotenant there is a risk of losing the multitenant mode. See Locking situations section in the manual.
4.3. Supertenant
By switching to multitenant mode (See Mode change section in the manual), we will be able to log on with the super administrator. This way, we will manage the supertenant mode * which is the scope of the super administrators, just like all the tenants in the system.
The supertenant * is like another tenant as far as WAT set-up is concerned. It is possible to create system administrators within it with more or less restricted permits. But in contrast with the tenants, it will not be possible for it to host QVD elements (virtual machines, users, disk images…).
The other main difference as it regards to the tenants is that supertenant administrators or super administrators have as scope, not only the supertenant, but also all the tenants in the system.
4.4. Multitenant interface
When we log on with a super administrator, the WAT interface is practically the same as the one of a normal tenant administrator apart from some differences:
-
In the elements which are contents in the tenants, it will appear an extra column pointing out the tenant they belong to. In the case of the administrators lists, as a particular case, the tenant it belongs to can also be the supertenant*.
-
In the elements list views classified by tenant, appear an extra filtering control to filter by tenant. As an exception we have the tenants, nodes and administrator lists.
-
When we create an element in QVD as well as a WAT administrator, there will be an extra field in the creating form to specify its tenant. In the same way we mentioned before, in the case of system administrators we will be able to choose, apart from the tenant, the supertenant*. This possibility is only included in the production of elements, and not in the edition. Once the element in the tenant has been created , it can be moved.
-
In the Views section included in the WAT management section, there is a new Tenant control. The views can be set up in the same way as those in a Monotenant but by each Tenant.
-
There are special permits such as the ones for tenants management. This way, it can show (if the super administrator has those permits) one more section: Tenants.
4.5. Multitenant WAT step by step
Step by step we will see the sections or parts which are added to WAT when the multitenant mode is on. These changes go from the log on screen to the small alterations in the generic views list or in elements production. It can also appear in some new section if we are in this mode.
These changes will only be seen by the super administrators who have the proper permits for that. Tenant administrators will not appreciate any difference with the monotenant mode, apart from a different log-on screen.
4.5.1. Log-on page (multitenant)
When we load WAT, it is set up in a multitenant mode, the log-on screen will have the tenant field besides the user and password. This is due to the fact that an administrator’s name can be repeated in different Tenants. In the super administrators case, * it will be added to the Tenant field.
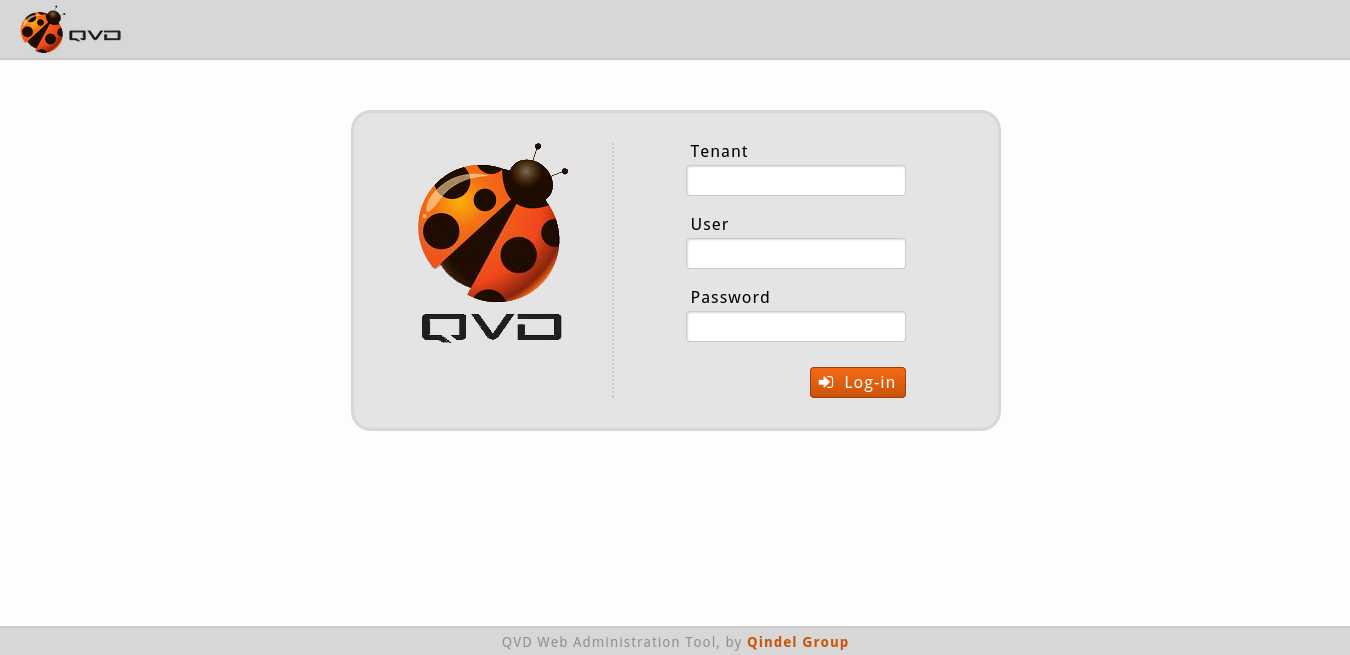
4.5.2. Tenants
In the section Manage WAT there is one more point: Tenants. In this section the WAT tenants are managed.
- List View
-
The main view is a list with WAT tenants.
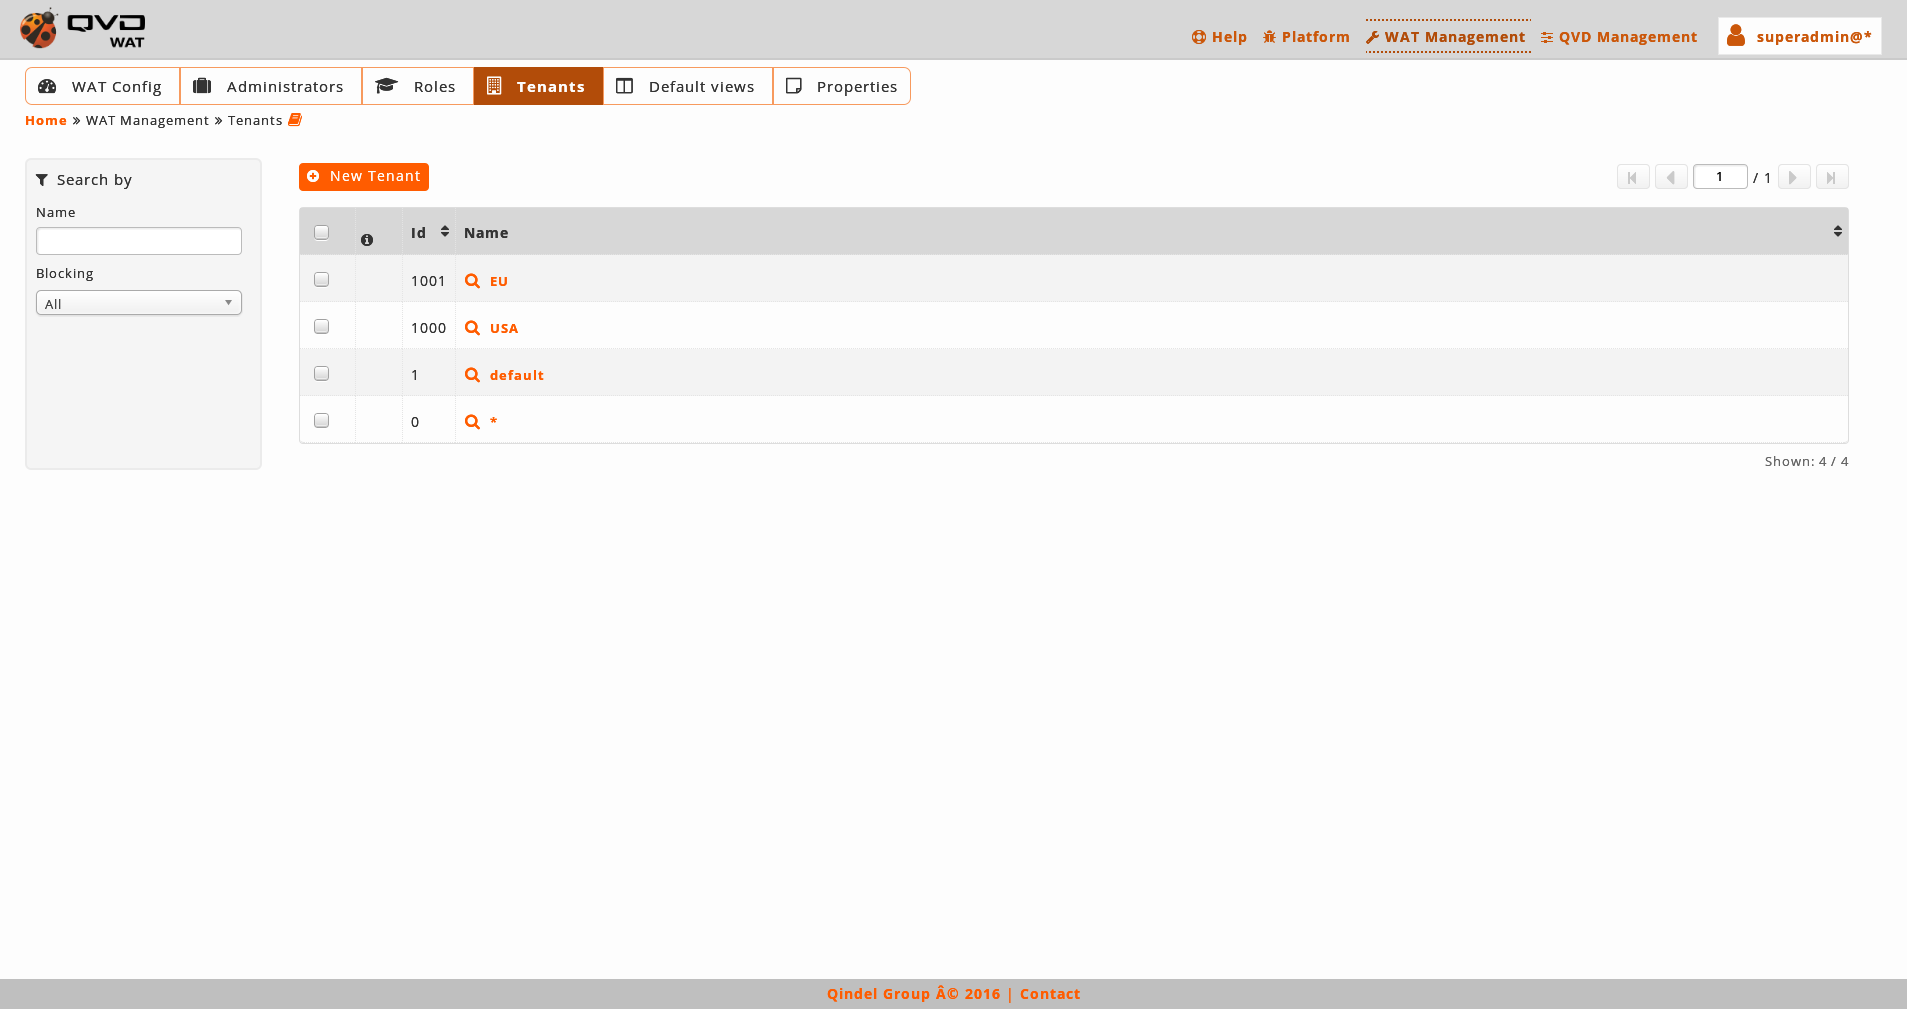
- Information column
-
Tenants list does not have any information column.
- Massive actions
-
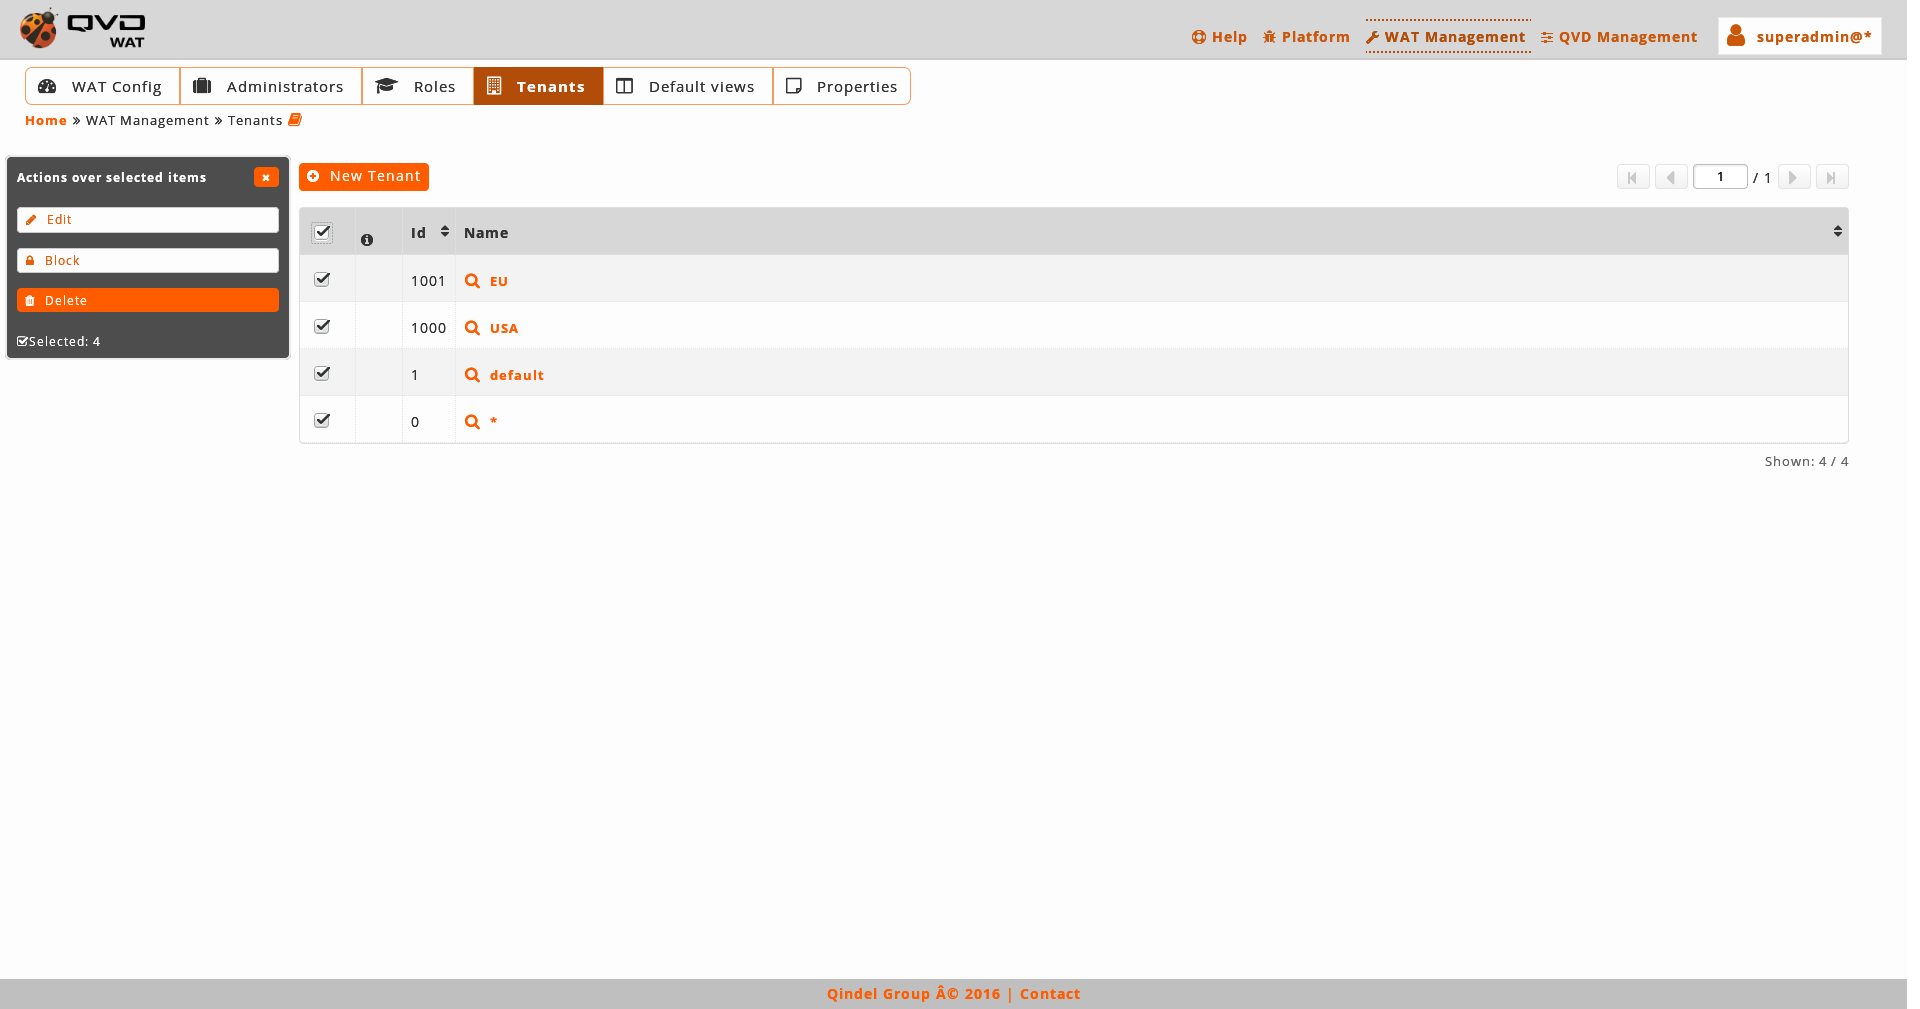
Massive actions will give us the following options to perform on the selected tenants:
-
Delete tenants
-
- Creation
-

When creating a tenant, we will set its name, language and block size. Likewise when we manage the WAT configuration, the values of configuration of a tenant will be the WAT configuration inside this tenant. The administrators of a tenant, are not conscious that other scopes exist, and they will have what for them is WAT configuration, corresponding to the configuration of its tenant if we see it from the high scope or supertenant
- Detail view
-
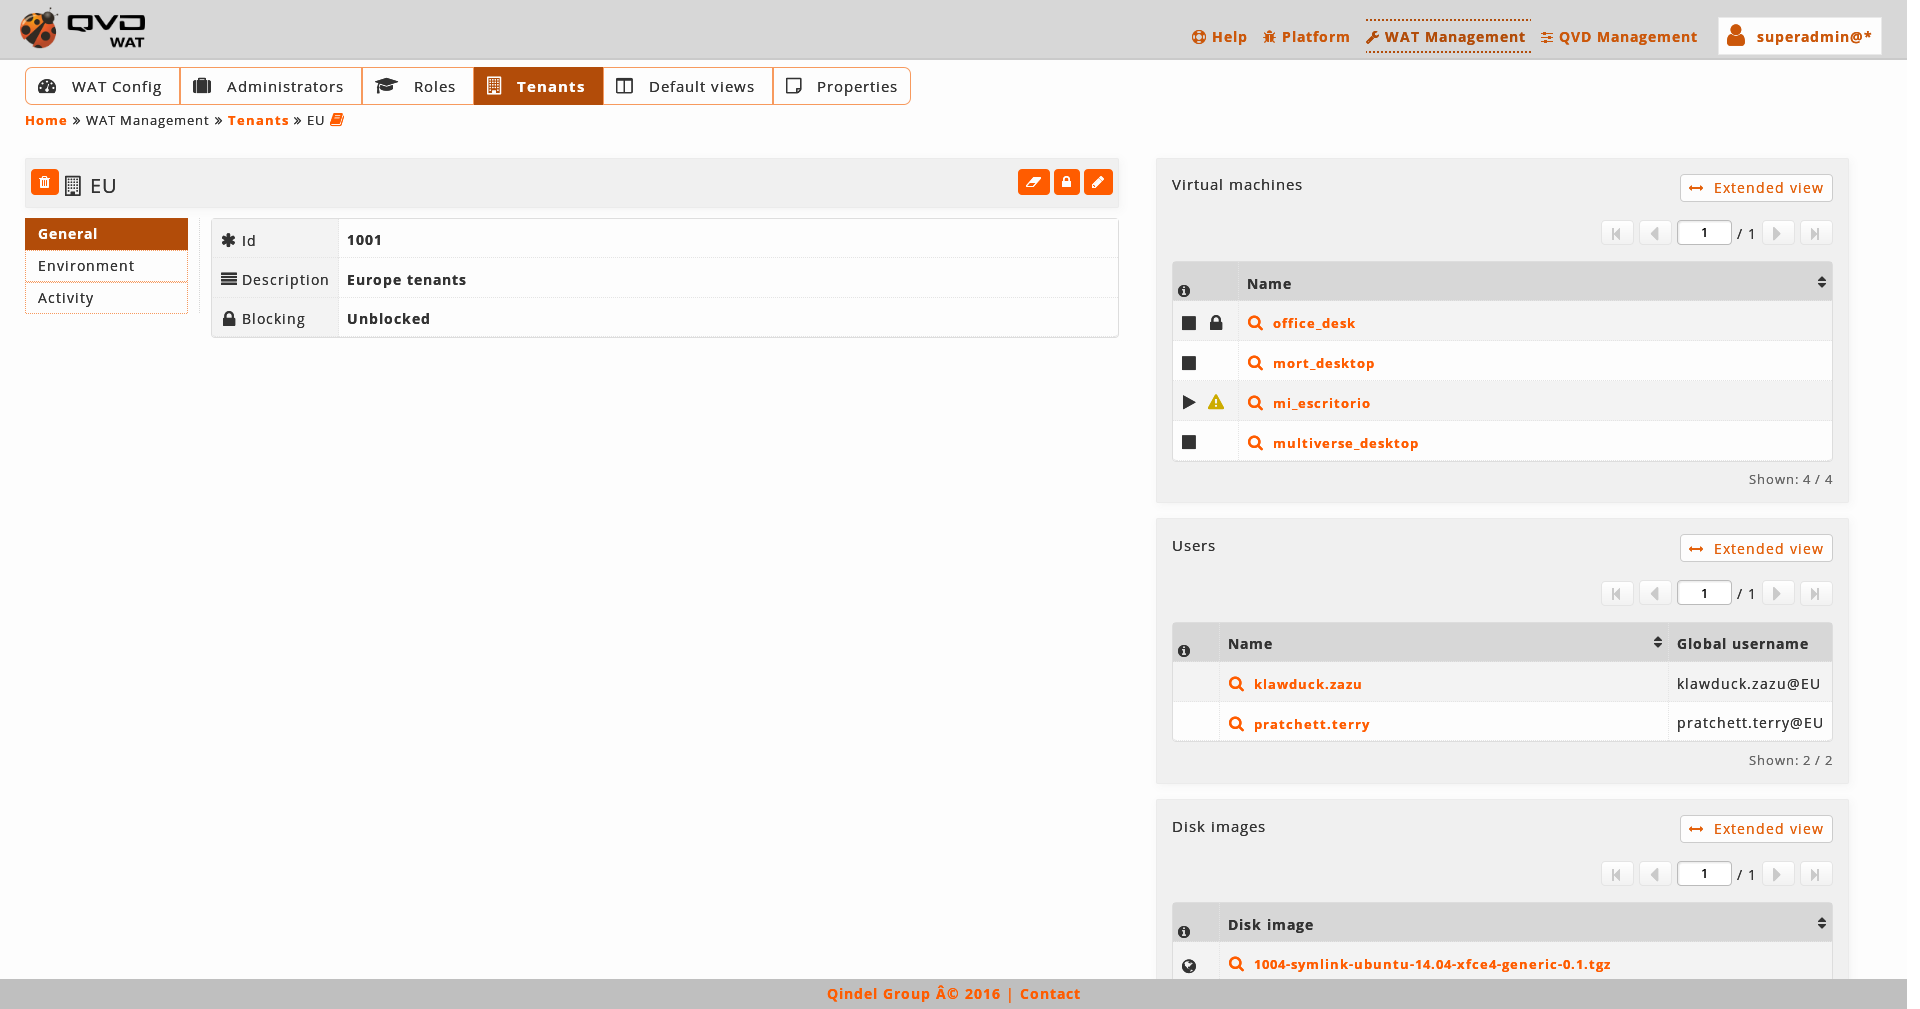
See a header next to tenant name where there are buttons to delete, edit, block or clean up it.
-
The elimination of tenants is like the one of other elements. In this case if a tenant has elements, it cannot be eliminated. You will need to empty it manually or with the cleaning tool.
-
The block of tenants restricts the administrators and the users to access the WAT and its virtual machines respectively.
-
In the edition you can change the name, the description, the language and the block size of the tenant by default. The block size and language will be effective for administrators of this tenant whose personal settings they have established by default.

It is important to know that the name of the tenant is used in the credentials of the administrators and users, so its change must be controlled and informed. -
The cleaning tool shows in one screen all the dependent elements of a Tenant offering various options of elimination. One by one, by categories (all the virtual machines, users, etc), or eliminate all that this tenant has.
Under this heading there is a table with the attributes of the tenant.
On the right part we find charts that contain the list of relevant elements of the Tenant: Virtual machines, Users and Disc images. All these come with paging controls and a button to go to the correspondent view filtered by the current tenant.
-
- Edition
-
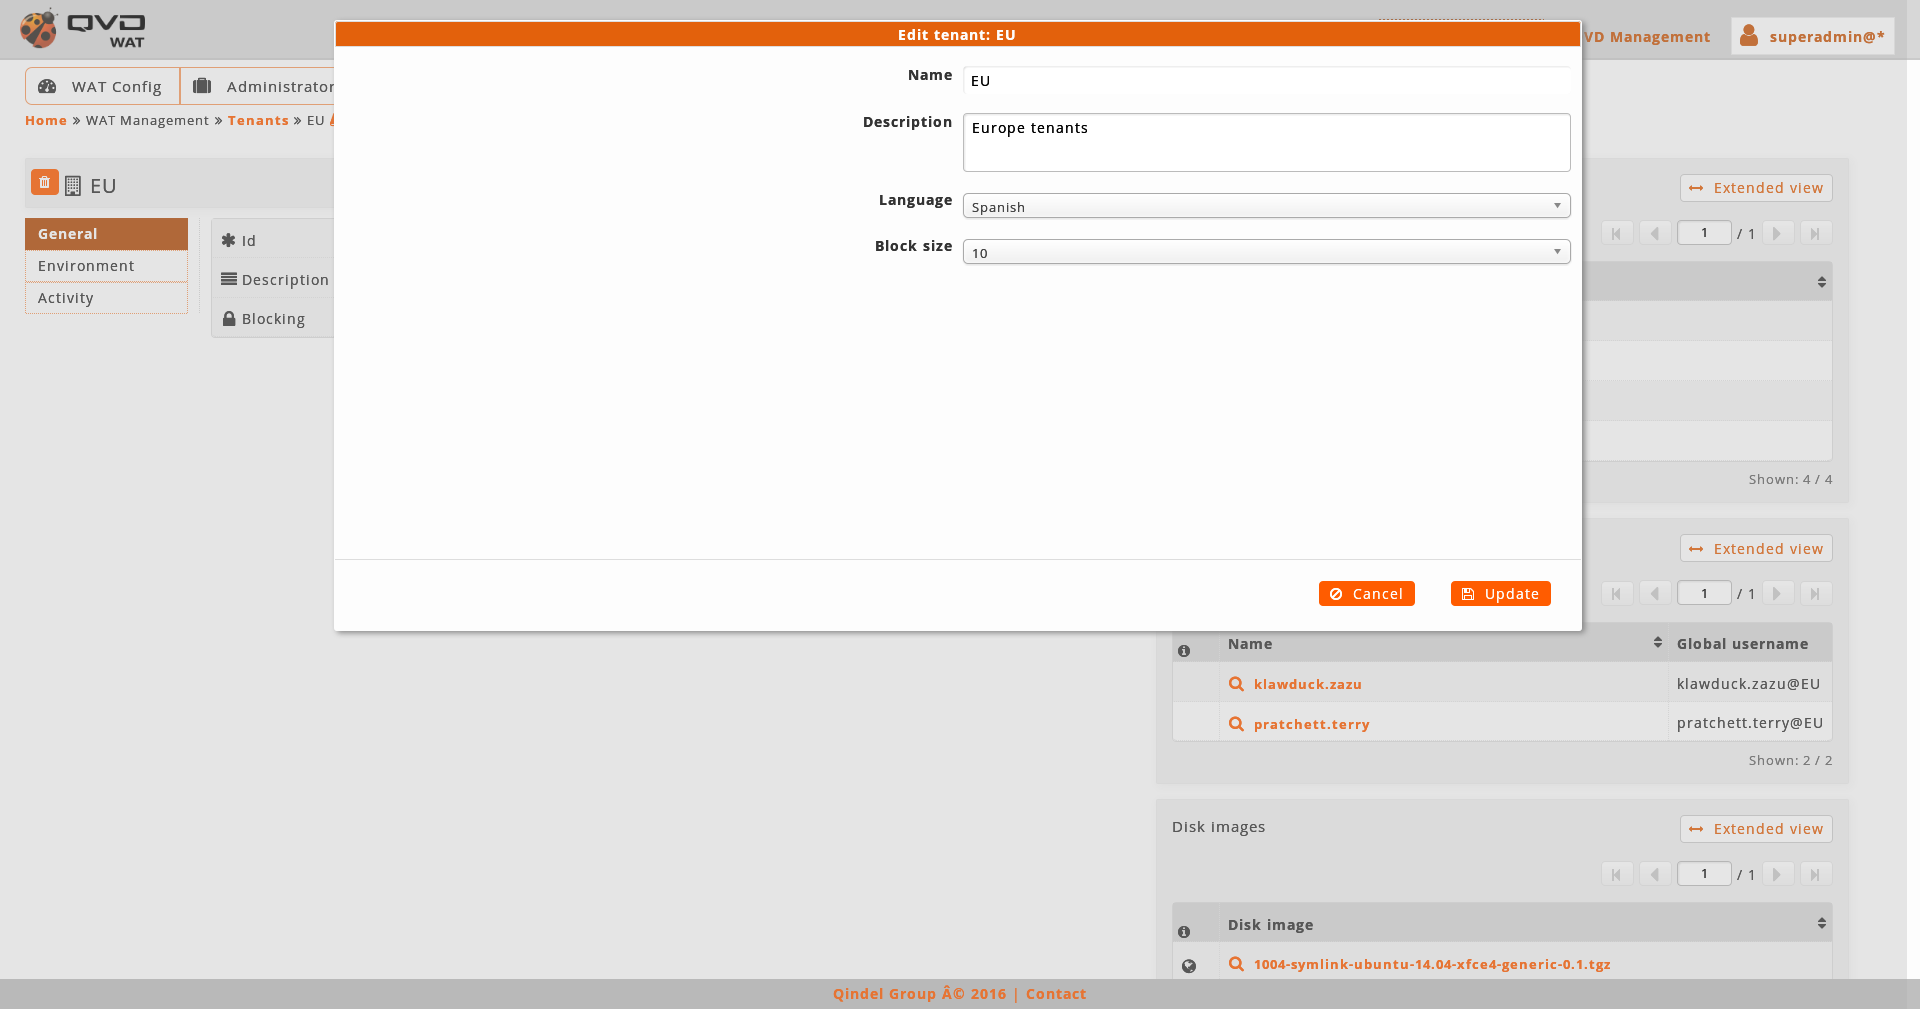
When editing a tenant we could change its name, language and block size, bearing in mind that the administrator of that tenant with QVD setting permissions can change these values except the name, which can only be changed by a superadministrator.
4.5.3. Default views (multitenant)
If we are in a multitenant mode and we are a super administrator, in Default views we will be able not only to set up these elements in the supertenant, but also to do it for each tenant in the system.
That is the reason why, besides having a selecting combo with the section we want to customize, it will appear another combo with the tenant that will be altered by this set-up.
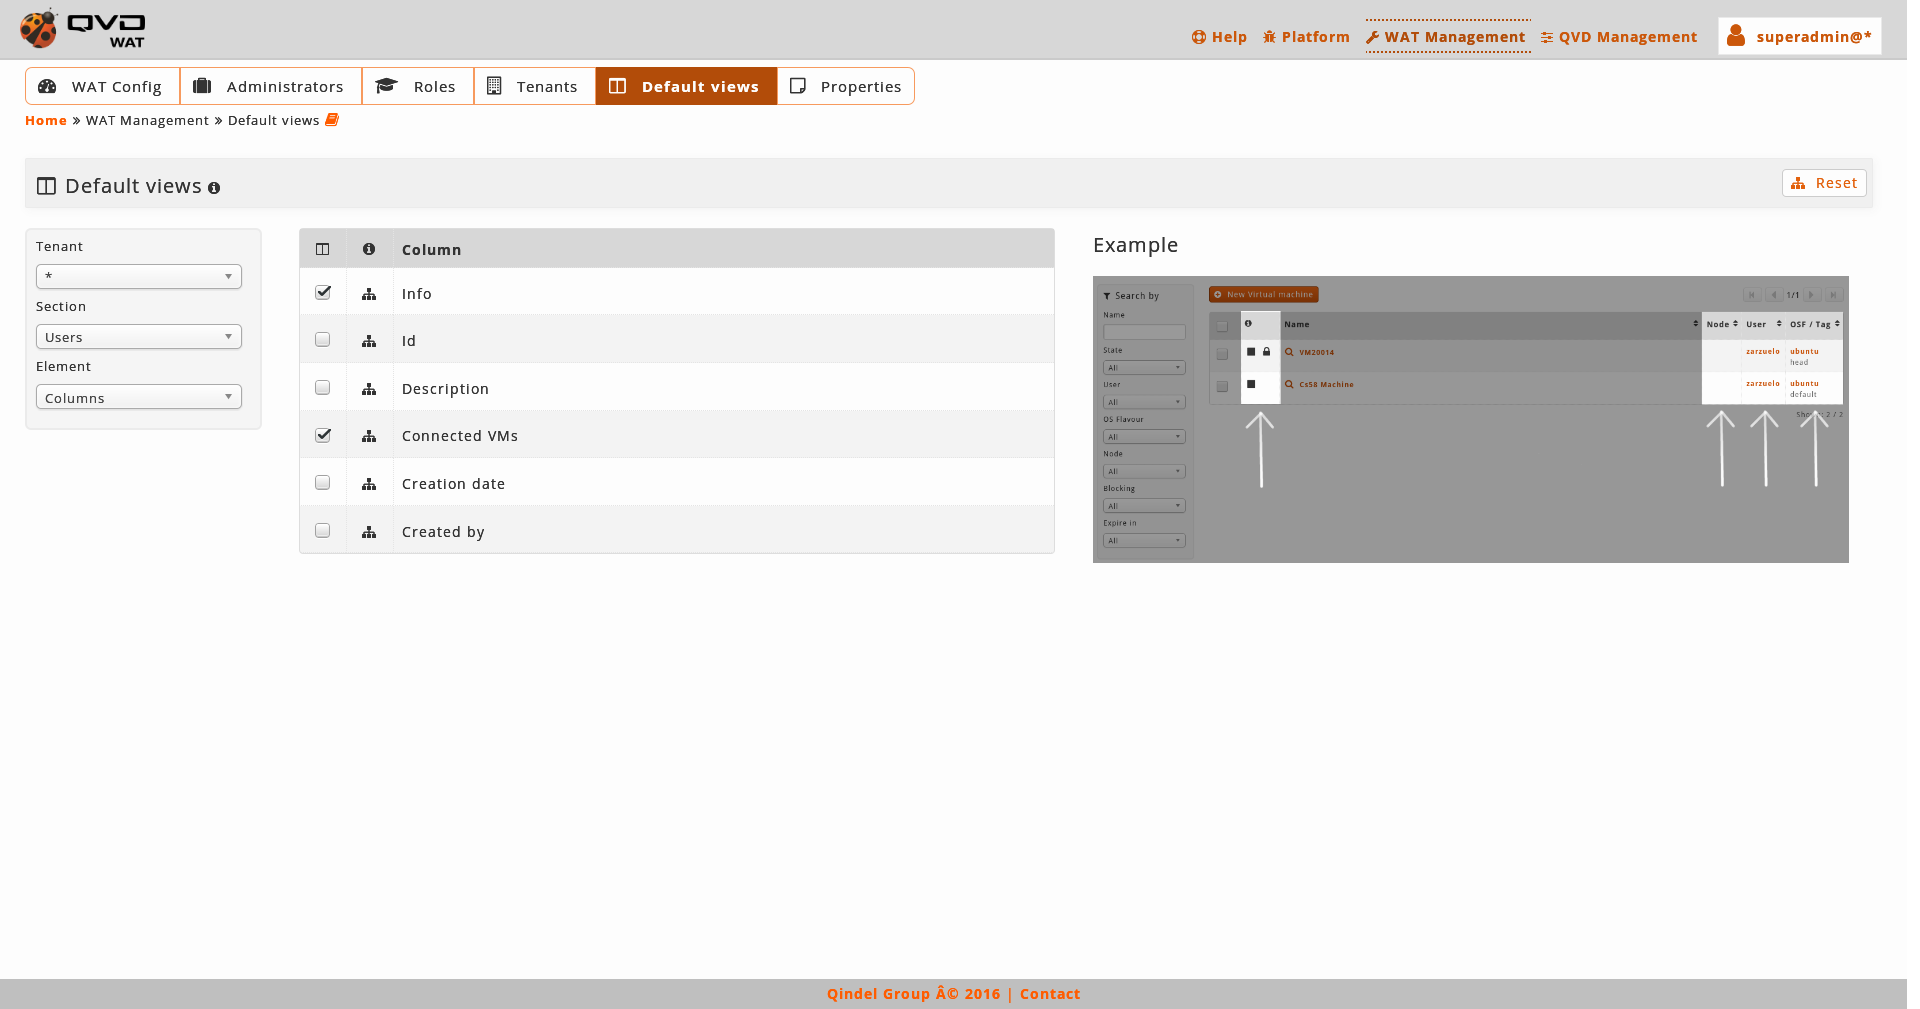
In order to reestablish the views by default, if we want, we can also choose to apply this action on the uploaded tenant at the moment in the section or on all the system tenants, including the supertenant*.
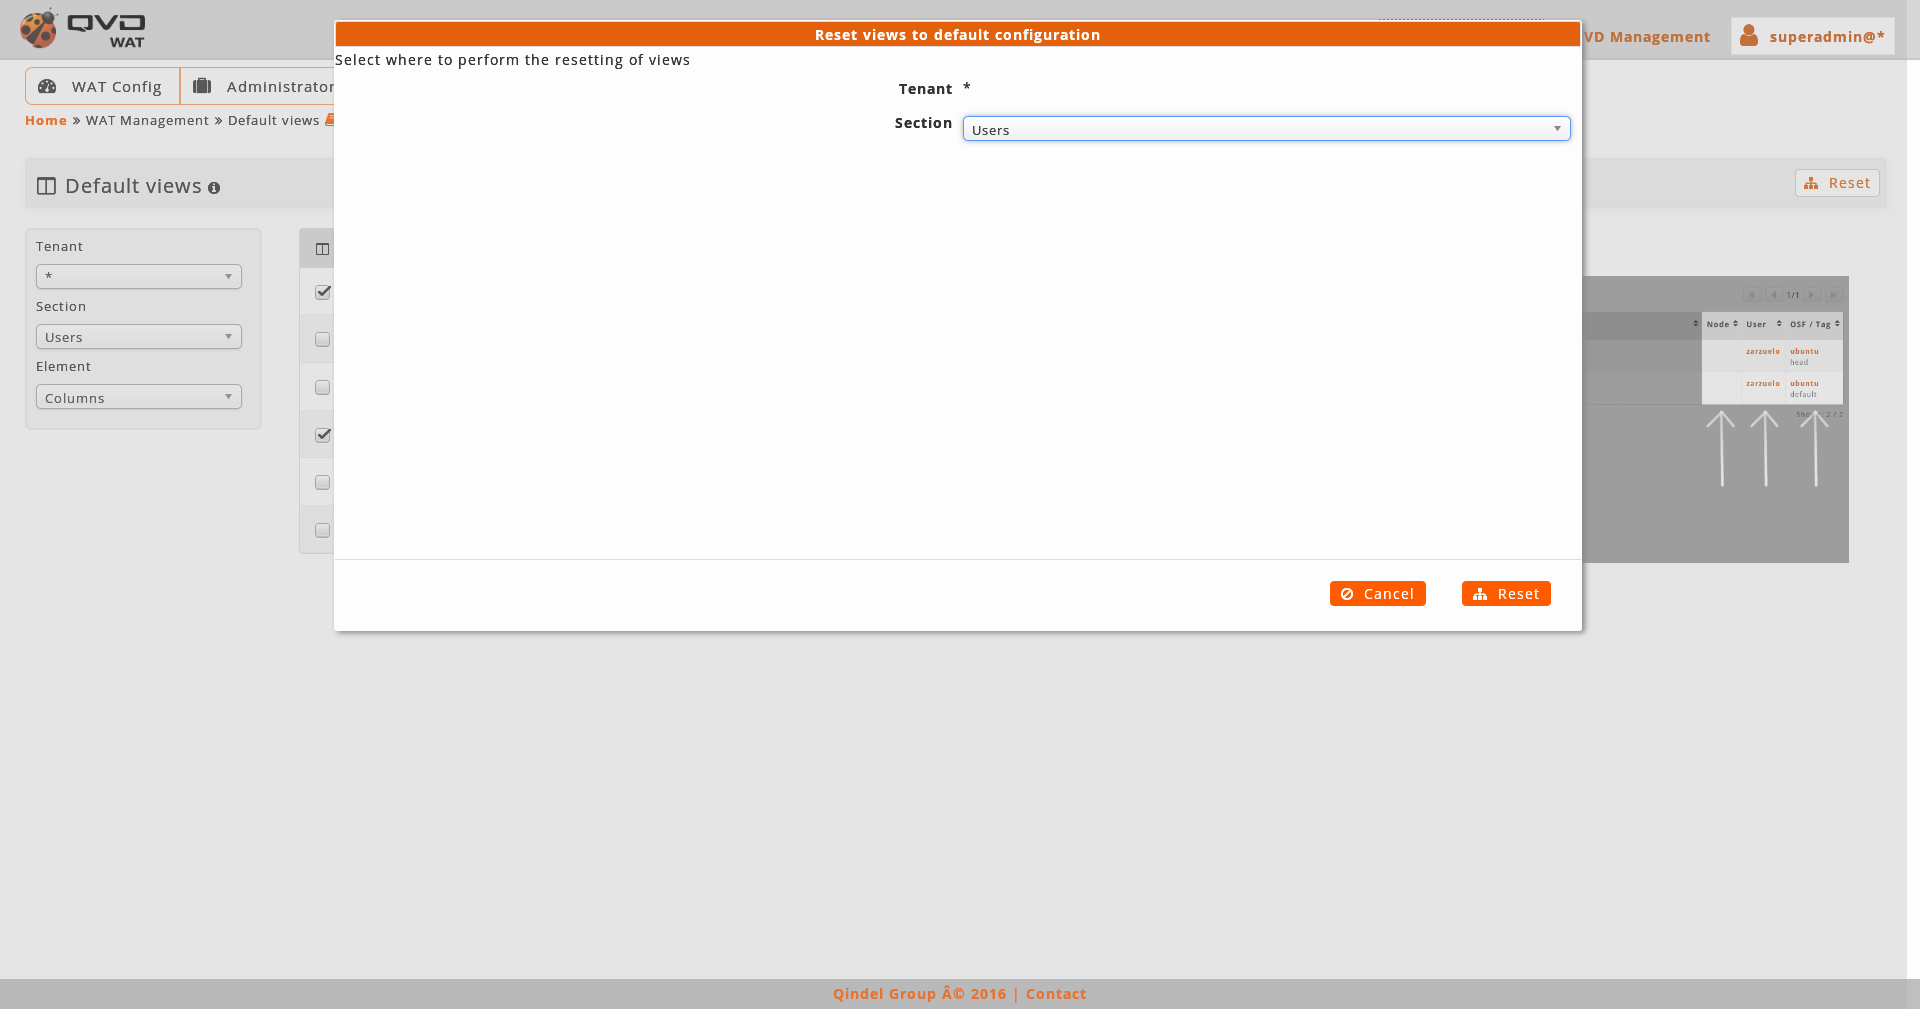
Combining this option with the control in which we choose if we apply the action on the current section or on all of them, we have different possibilities:
-
Reestablishing uploaded section and tenant lists at that moment
-
Reestablishing uploaded section views in all the system tenants
-
Reestablishing uploaded tenant lists for all the sections
-
Reestablishing every section list in all the system tenants
4.5.4. Documentation (multitenant)
If we are in the multitenant mode and we are the super administrator, in Documentation we will find one more guide:
-
The multitenant guide where we find on the one hand, a theoretical description of the multitenant system functioning and, on the other hand both functional and interface differences as far as the monotenant mode is concerned.
Besides, in the related document links under the different sections, it is possible to find additional links with access to the corresponding part from the multitenant point of view.
4.5.5. Properties (multitenant)
If we are in the multitenant mode and we are the super administrator, we will have access in Properties to the management of all the tenant’s properties. Thus, so as to classify them, there is one more available filter with the tenant which the display properties belong to. These tenants include the supertenant *, which can also have its own properties.
Since it is possible to have specific multitenant properties *, in the detail and list views of the elements, if we are super administrators, we may see the tenant properties apart from the supertenant. It is important to consider that the latter will not be visible for that tenant administrators, but only the super administrators will be able to see them.
In addition, in the multitenant mode the Nodes can have custom propierties too. The nodes, as they do not belong to any tenant, they only can have properties in the supertenant \*, accordingly the will be managed and visible by a super administrator.
4.5.6. QVD Configuration (multitenant)
If we are in the multitenant mode and we are the super administrator, we will have access in QVD Configuration to some additional actions.
- Parameters creation
-
It is possible to add new parameters.
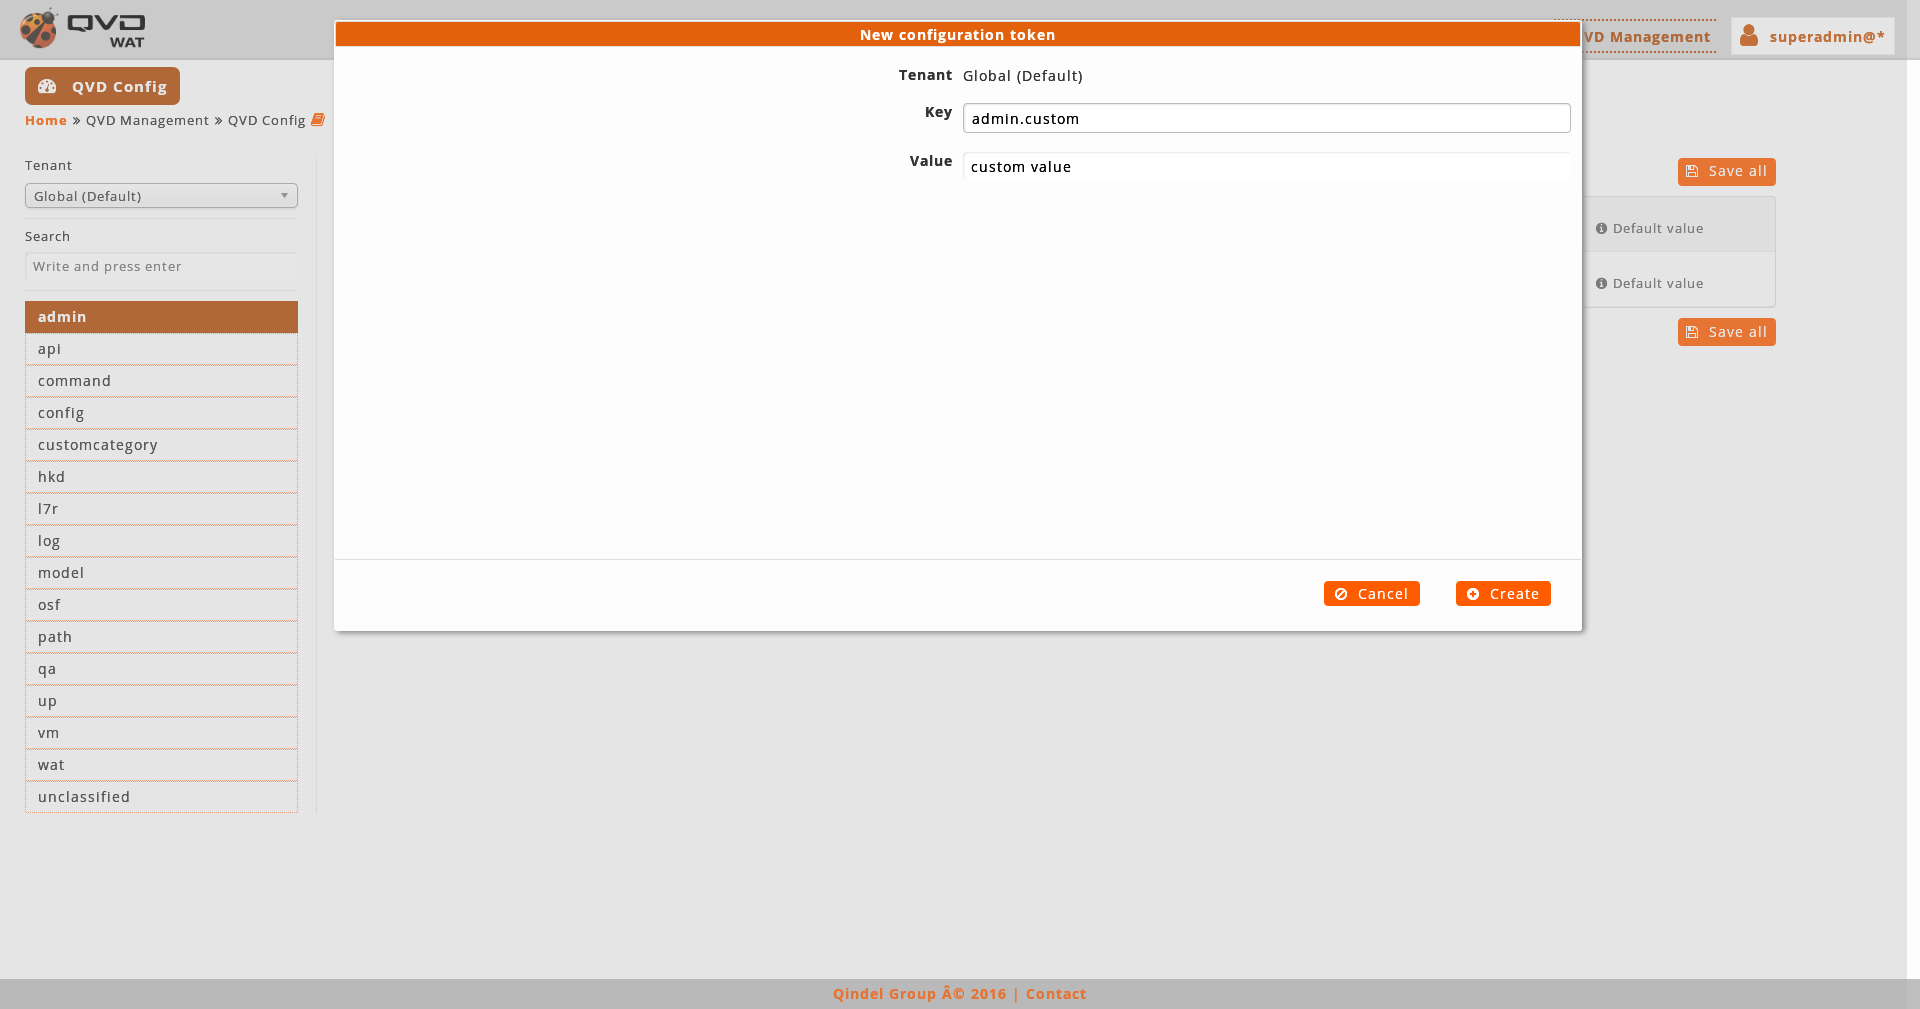
When a parameter is created, it will be situated in the category that corresponds depending on the beginning of its name.
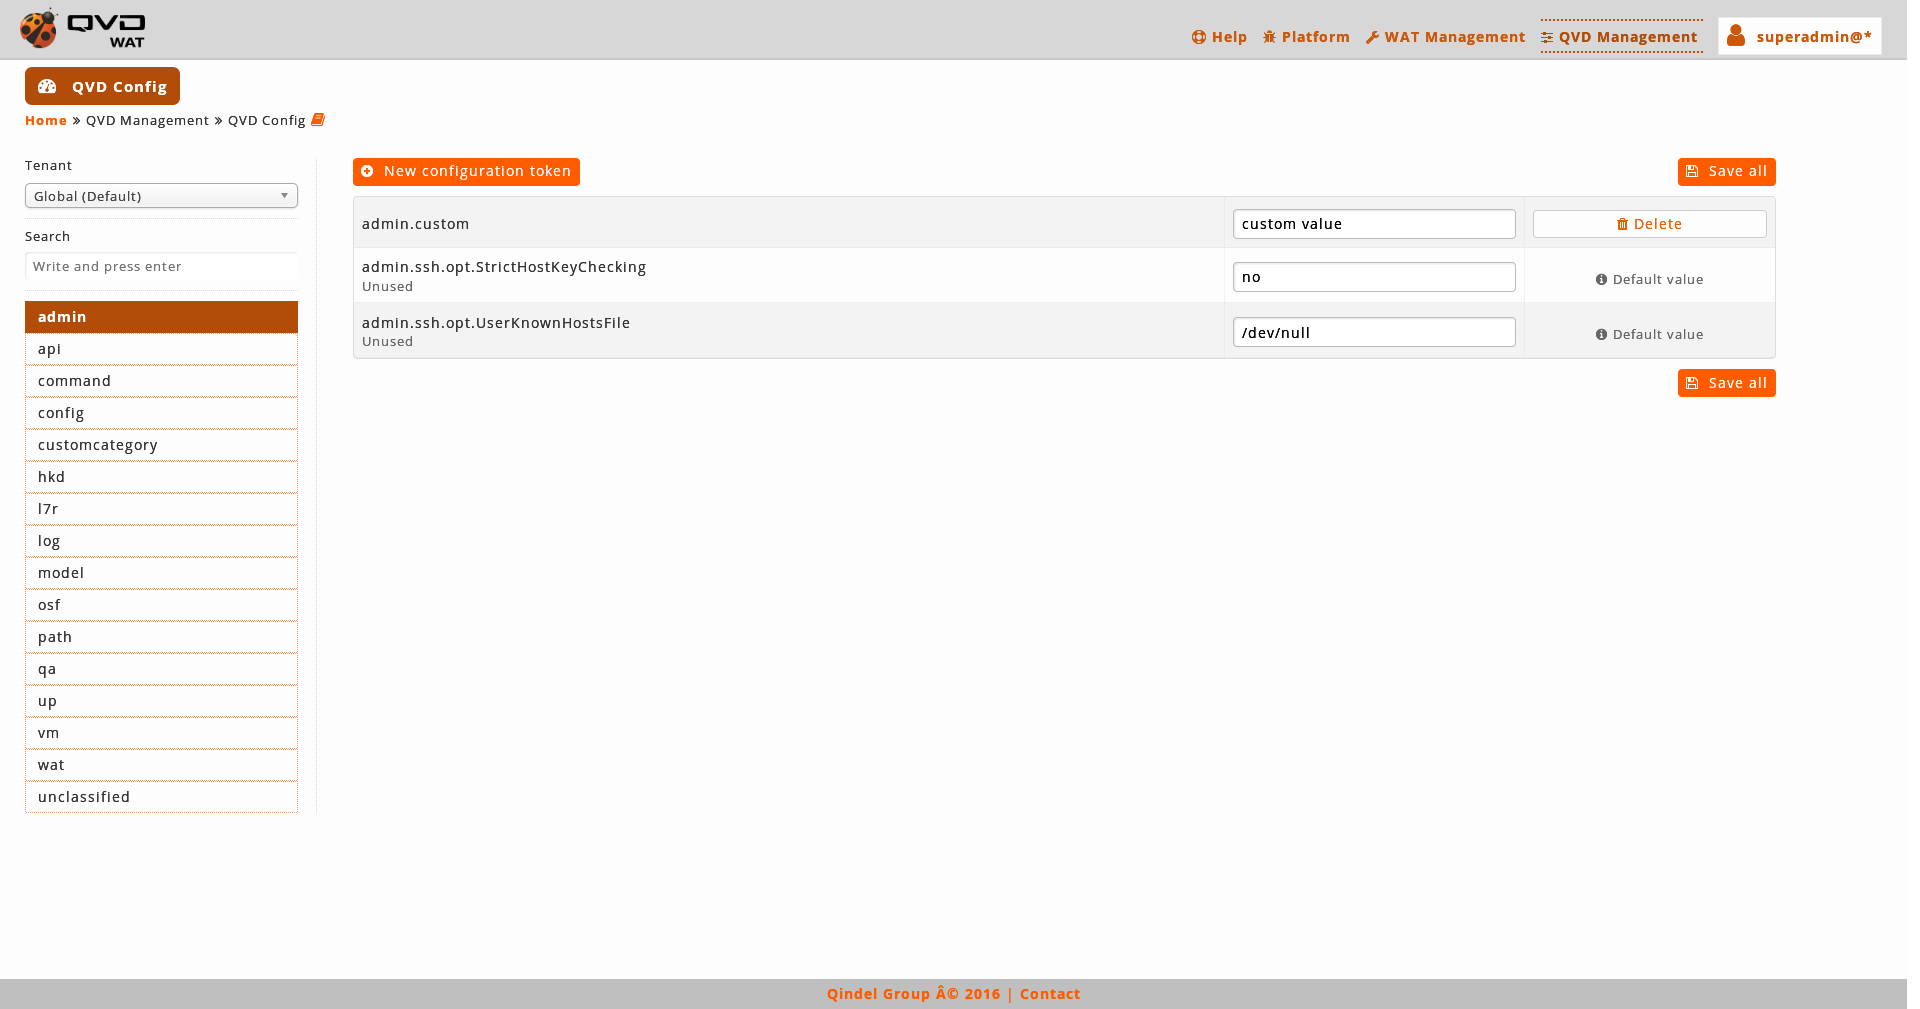
If the category does not exist, it will be created in the menu.

If the name of the parameter do not contain dots, it will take part of the special category unclassified.
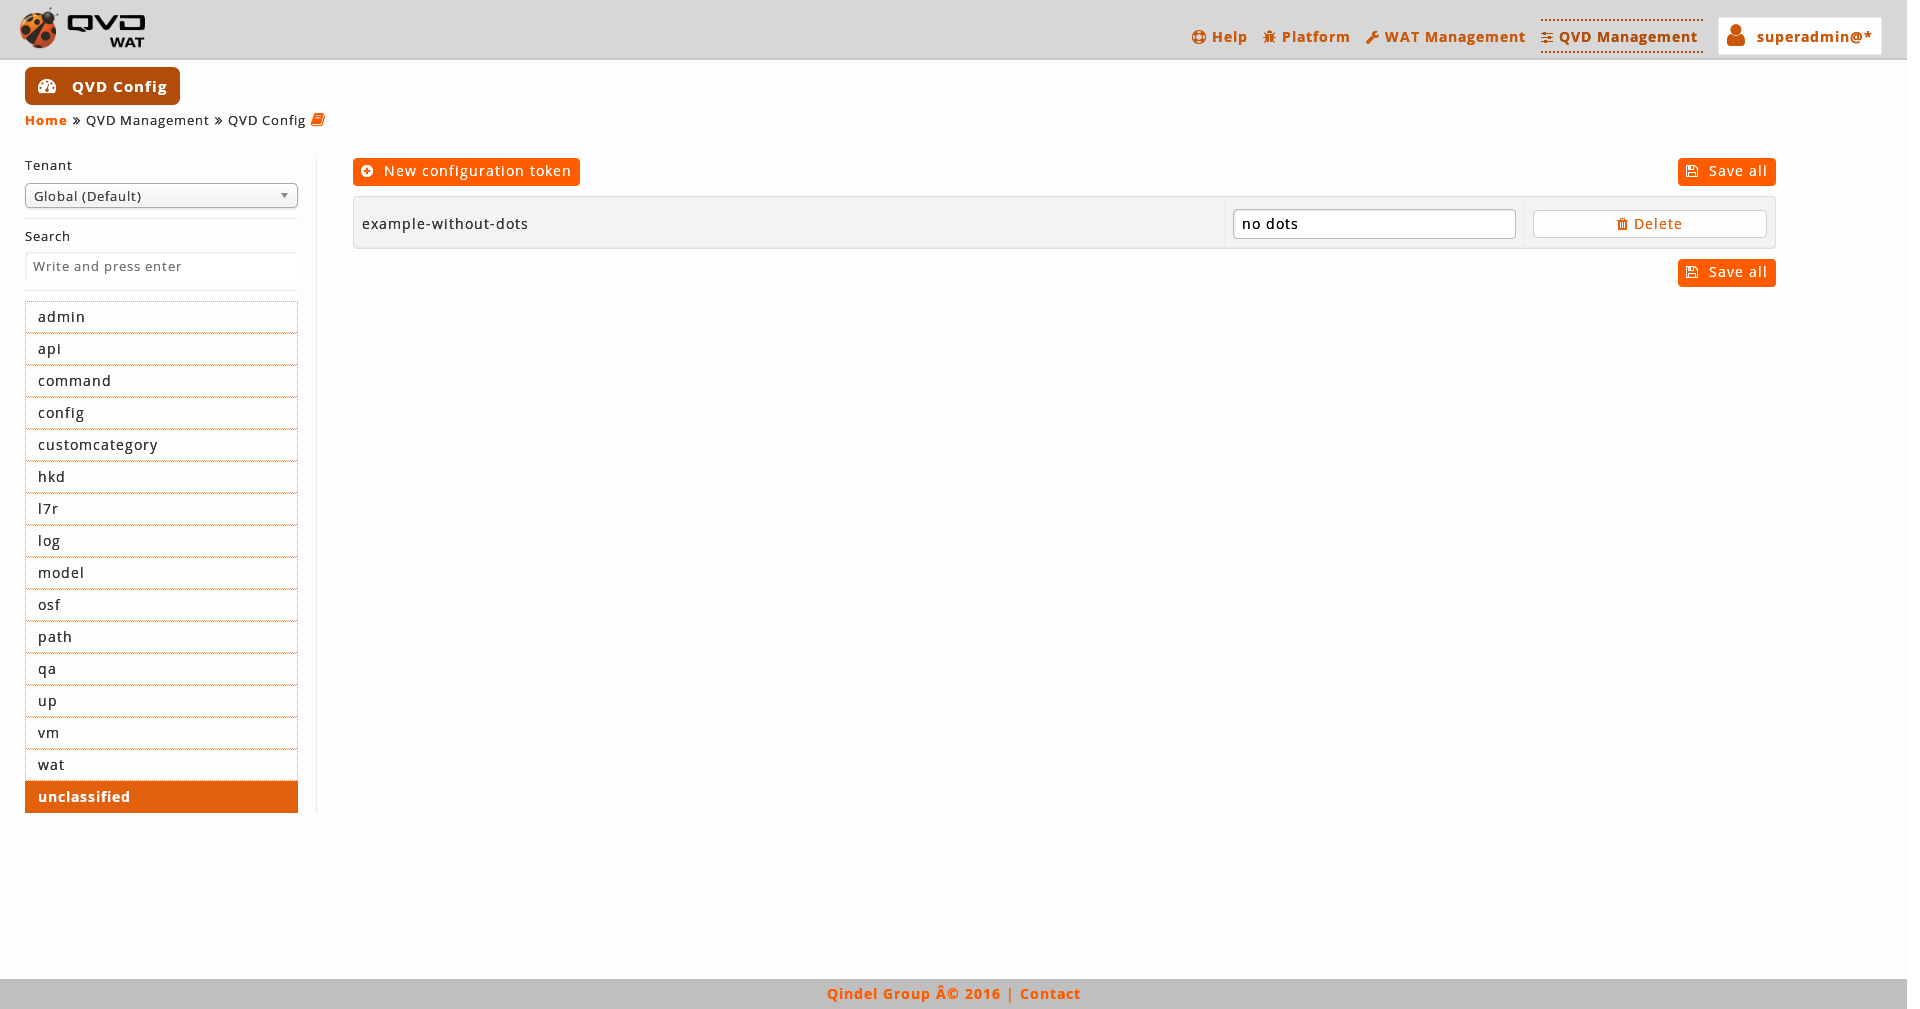
- Deleting parameters
-
The parameters added after the installation can be deleted. By clicking on the "Delete" button next to the text box, it will be marked as deleted. This action can be undone with the button that appears under the text box, or deleted permanently with the "Save all" button.
4.6. Multitenant first steps
If it is the first time we activate the multitenant mode, we can log on with the super administrator which comes by default with the system . Its credentials are:
User: superadmin@*
Password: superadmin
The first thing we will do is to change the password.
- Powers of superadmin
-
This administrator will have full power over the system. If we want to have less powerful super administrators, we can manage them with it or with any super administrator created in the system with enough permits, to know more see section Administrators set-up in the manual.
4.7. Manage Administrators and Permits (multitenant)
There are some things we must know as it regards to multitenant contexts when we manage administrators and their permits.
The differences in the interface and its management, which we will comment on next, will only be visible for the super administrators.
Although a context may be multitenant, for the tenant administrators, this condition is clear. For them, there will not be a difference with a monotenant context.
4.7.1. Administrators' distribution by tenants
In a multitenant contex, administrators will be hosted unequivocally in a tenant, either it may be a normal or a supertenant in the case of the super administrators.
On the basis of creating an administrator, we distinguish two cases depending on the scope.
-
A tenant administrator can be generated by an administrator from its own tenant or by a super administrator.
-
A super administrator can be generated by other super administrator.
When we produce an administrator, if we are in a multitenant context and we are super administrators, a field will appear to choose where we want to create it. The administrator cannot be moved to another tenant once it has been done.
In the administrators' list view in an extra column it appears the tenant which every administrator belongs to, moreover a new filtering control will help us to see only the administrators from the tenant we select to.
4.7.2. ACLs template independence
Templates are independent from the tenants, what means, they are common to all of them. As there is not a templates view further from the roles edition screen where we will inherit templates, there will not be significant changes on the interface level.
4.7.3. Tenants' role distribution
System roles
The roles the system has by default are fixed and common to all the tenants, that is, they can not be edited or deleted and they are at the disposal of any system administrator, independently from the tenant or the supertenant they belong to, in the same way it happens with the templates.
Customized roles
The roles created by an administrator will be hosted unequivocally in a tenant, either a normal or a supertenant.
Super administrators can create roles in any tenant and tenant administrators will do it in their own tenant.
A role can only inherit system roles or other roles from its own tenant.
When a role is created, if we are in the multitenant context and we are the super administrators, a field will appear to choose in which tenant we want to create it. The role cannot be moved from the tenant once created.
In the roles' list view, there will be in an extra column the tenant each role belongs to, and also a new filtering control which will help us to see only the roles of the tenant we select.
4.7.4. Tenants management
Tenants management is introduced in multitenant contexts.
We can create as many tenants as we want to, with no limit as far as the number of administrators for tenant is concerned.
When we create a tenant we will select its default name, language and the size of the WAT block for its administrators.
The process will be:
-
To create the tenant with the *New tenant button from the tenants' list view. We will establish its default name, language and the size of the WAT block for its administrators.
-
A tenant management does not go further than modifying those parameters or deleting a tenant as any other WAT element. If we delete a tenant, all its content will be deleted*, so it is quite a sensible and thus critical action.
4.7.5. ACLs reference (Multitenant)
Some ACLs are exclusive to multitenant contexts
This way, in roles management when we manage administrators in a multitenant context, ACLs trees will have certain extra ACLs apart from the ones that are in the monotenant.
This is the case of the ACLs responsible for Tenants management.
Tenants ACLs
| ACL | ACL code | Description |
|---|---|---|
Create tenants |
tenant.create. |
Creation of tenants including initial settings for name. |
Delete tenants |
tenant.delete. |
Deletion of tenants |
Access to tenant’s details view |
tenant.see-details. |
Access to details view of Tenants. This view includes name |
Access to tenant’s main section |
tenant.see-main. |
Access to the tenants list. This view includes name |
See tenant’s block size |
tenant.see.blocksize |
The block size in lists pagination of the tenants. |
See tenant’s blocking state |
tenant.see.block |
Blocking state (blocked/unblocked) of tenants. |
See tenant’s creator |
tenant.see.created-by |
Wat administrator who created a tenant |
See tenant’s creation date |
tenant.see.creation-date |
Datetime when a tenant was created |
See tenant’s description |
tenant.see.description |
The description of the tenants. |
See tenant’s disk images |
tenant.see.di-list |
See the disk images of this tenant in his details view. This view will contain: name, block, tags, default and head |
See tenant’s disk blocking state |
tenant.see.di-list-block |
Blocking info of the disk images shown in tenant details view |
See tenant’s disk images' tags |
tenant.see.di-list-tags |
Tags of the disk images shown in tenant details view |
See tenant’s ID |
tenant.see.id |
The database identiefier of the tenants. Useful to make calls from CLI. |
See tenant’s language |
tenant.see.language |
The language setted by default for any administrar that belong to a tenant |
See tenant’s users |
tenant.see.user-list |
See the users of one tenant in his details view. This view will contain: name and blocking information of each user |
See tenant’s user blocking state |
tenant.see.user-list-block |
Blocking info of the users shown in tenant details view |
See tenant’s virtual machines |
tenant.see.vm-list |
See the virtual machines of one tenant in his details view. This view will contain: name, state, block and expire information of each vm |
See tenant’s virtual machines blocking state |
tenant.see.vm-list-block |
Blocking info of the virtual machines shown in tenant details view |
See tenant’s virtual machines' expiration date |
tenant.see.vm-list-expiration |
Expiration info of the virtual machines shown in tenant details view |
See tenant’s virtual machines' running state |
tenant.see.vm-list-state |
State (stopped/started) of the virtual machines shown in tenant details view |
See tenant’s virtual machines' user state |
tenant.see.vm-list-user-state |
User state (connected/disconnected)) of the virtual machines shown in tenant details view |
Block-Unblock tenants |
tenant.update.block |
Update the blocking state (blocked/unblocked) of tenants. |
Update tenant’s block size |
tenant.update.blocksize |
Update the block size in lists pagination of tenants. |
Update tenant’s description |
tenant.update.description |
Update the description of tenants. |
Update tenant’s language |
tenant.update.language |
Update the language of tenants. |
Update tenant’s name |
tenant.update.name |
Update the name of tenants. |
4.7.6. Template reference (Multitenant)
There are also exclusive and additional ACLs Templates in the multitenant mode:
-
Tenants Manager
- It inherits from
-
Tenants Reader
-
Tenants Creator
-
Tenants Updater
-
Tenants Eraser
Tenants do not have an operating template as they are not operative apart from seeing, creating, updating and erasing. If in the future it was added, it would be inherited from this managing template.
Templates Organization (Multitenant)
When the system is in multitenant mode, Templates organization has additional Templates. It can be seen at a glance in the following organizational chart.
4.8. Block situations (multitenant)
In the multitnenant system, there are new ways to be in a blocked situation. Although the administrators are properly set-up in the tenants, it can be possible that in the supertenant we carelessly lose the control over the only super administrator who can manage permits, so we will lose its functionalities.
Another new blocked situation can happen when we change from multitenant to monotenant mode.
It will happen if we change from multitenant to monotenant mode in the case there is not any tenant administrator with the capacity of returning the system to multitenant or of giving those permits to other administrator (or to himself).
In this case we will be trapped in the monotenant mode, what we also consider a blocked situation.
4.9. Recovery mode (multitenant)
In the multitenant set-up there is also the recovery administrator with the same credential that the multitenant one:
User: batman@*
Password: (Consult the support team)
In this case, there will be small differences in comparison with the one there is in the monotenant mode.
Basically the difference will be, that in this mode, the recovery administrator will also have, apart from the ones the monotenant mode has, access to the Tenants management.
_